
But Not Where You'd Think.....
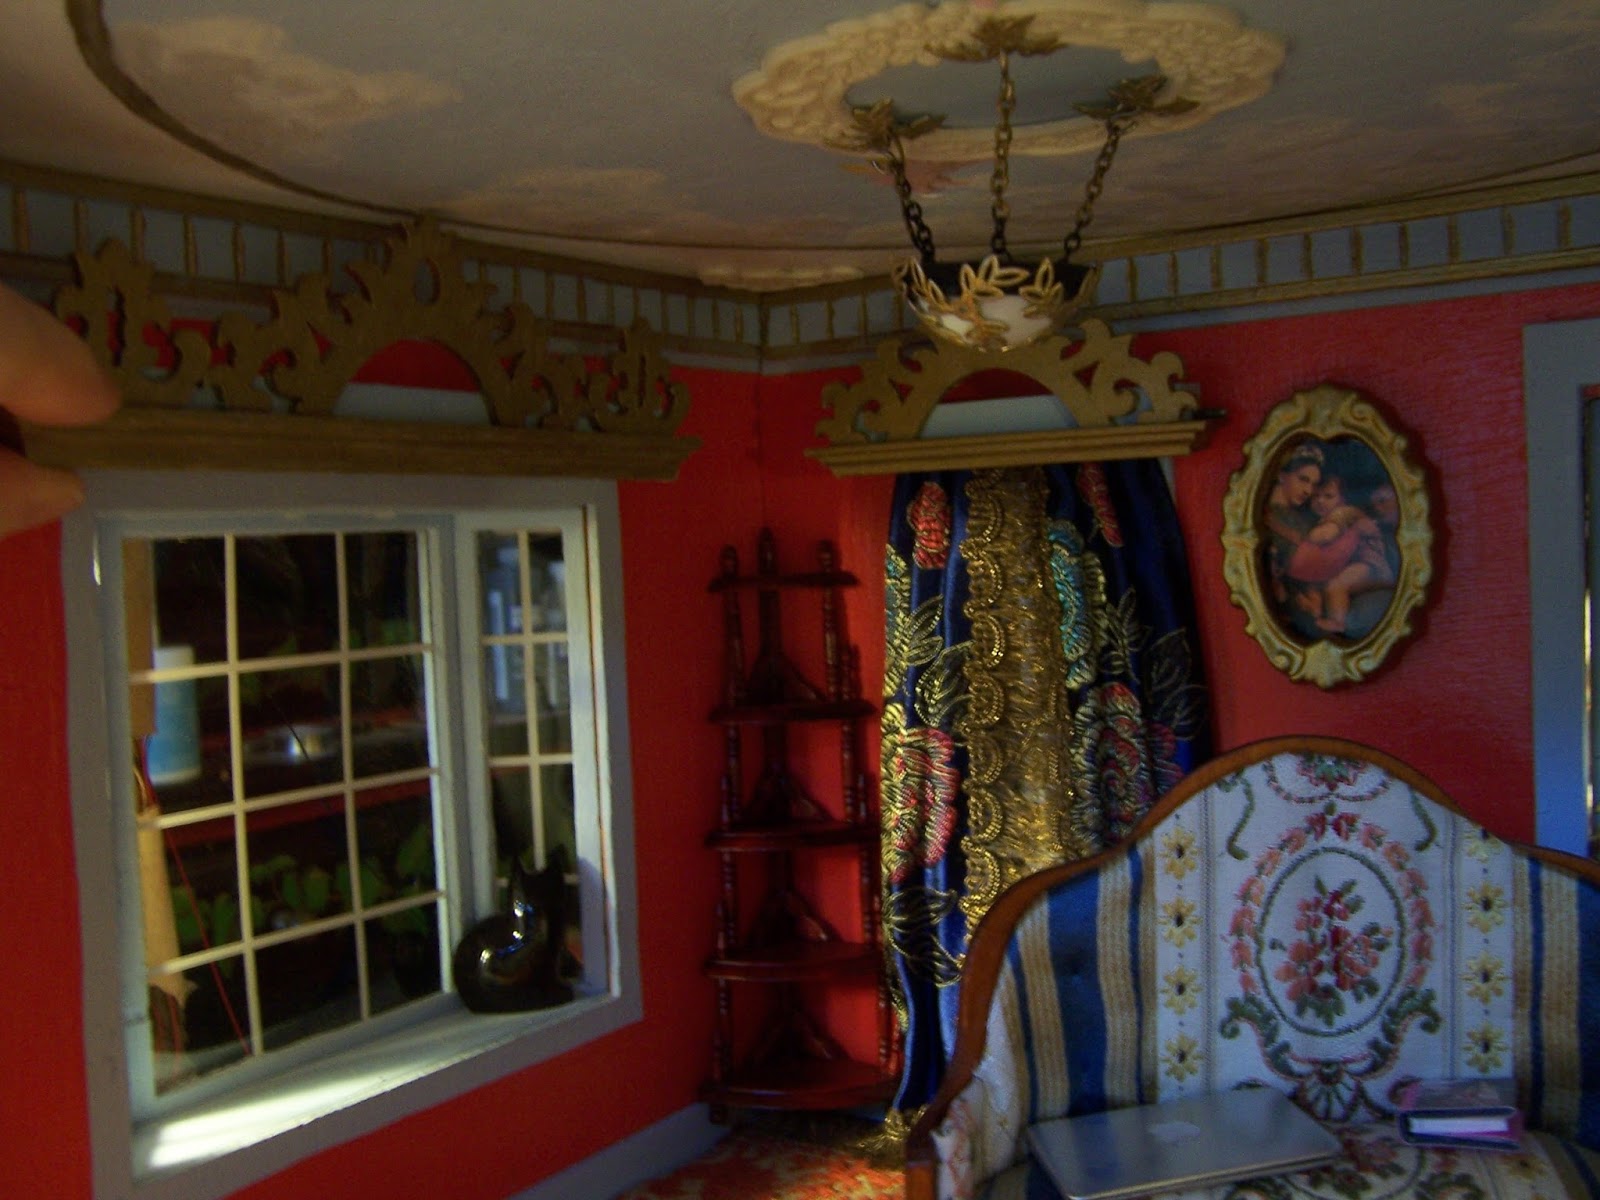
Well, Dear Readers, I have to confess, sometimes I have no idea where my projects will lead me next! I have so many of them in partly finished condition, all halted for one reason or another, and all waiting for my ideas to catch up with my abilities.... or my abilities to catch up with my ideas! Above you can see the Folly Living Room bathed in rare morning sunlight and clearly revealing the entirely irregular and unfinished window curtains. Or it would if Will were not standing in the way! Some of you might recall that The Folly was the first dollhouse project I started when I returned to making miniatures .... Ten years ago this month! I have sporadically added to and improved on it since then, but the Living Room has remained essentially the same for many years now... with incomplete curtains tacked up with thumb-tacks and the gold fringe pinned "temporarily" in place. In fact, the entire roll of gold braid has been draped across the floor and out of the room all this time as I had been unwilling to commit to cutting it at an incorrect length...! The problem lay in my not being sure what method to use to ensure that the curtains would "drape" realistically! The fabric I had chosen was a heavy ornate brocaded satin which I love because it is that beautiful royal blue and the flowers on it are lush and gilded and oriental and a brilliant carmine just like the walls in this room! Where would I ever find a better pattern to go with this overly ornate Regency style Living Room?

I had read on other blogs about using hairspray and pins, or soaking the fabric in a mixture of water and glue and shaping it before it dried..... but I was worried that such treatment would ruin the gloss of the satin and besides... I wanted my curtains to be able to open and close on real curtain rods! While I was busy making the tiny curtains for the Secret Christmas House last summer, I finally decided to test the fabric in the water and glue mixture..... the results are pinned to the small window behind Will. I was right, it ruined the gloss of the satin and completely altered the color of the blue. That method clearly would not do! But there was a less frequently mentioned method I had read about that involved stitching wires into the hems to make them "pose-able", and as you know from my recent post about the curtains for the Hardwick Hall Attic window nook, I found that method to be quite successful! So why shouldn't I try it on the curtains for The Folly Living Room too? Well, one reason was that being able to reach inside The Folly Living Room would require moving the house..... not a simple thing in my overcrowded and messy workroom! But bit by bit I packed and cleaned and rearranged all the accumulated partly done projects and detritus for same, and moved The Folly to where I can reach inside the rooms!

Here it is at the working end of my Worktable....

Here I have begun to remove the pieces in the way....
as well as those "test" curtains which had been there for a long time!
Another thing which I had made ages ago, Dear Readers,
was the "Pelmet" for the small window on the far wall...
Which you can see here in all it's ornate gilded glory!

This would cover the top of the curtain,
hiding the rods and rings... and adding to the Regency flair of this room.
And part of my problem was not knowing how
to make this design work on the much wider window on the side wall...
I had even made most of the pelmet for that window ages ago!
Just not the crowning pieces...
how to have the same shape but over a wider expanse...

Suddenly last weekend I figured out
that the Pelmet just needed "finials" at either end....
Which you can see being painted above.
And another problem was how to attach the curtain rod holders....
because the walls on this kit are very thin!
But once I had the room open
and was measuring where they would go,
I realized that the exterior window trims
were deep enough to take the screw eye....

The first one is installed above....

And the second one, with the curtain rod in place...
it is the same wire coat hanger that
I used for the Hardwick Hall curtains.

And then we have to test the Pelmet...
because it is a bit tricky to align ...
it slides onto the curtain rod too....
and we have to make sure this idea will work!
It does!
It was also crucial to be able to measure
the exact length of the curtains...
which couldn't be done until the rod was actually in place!

Here I am testing the first panel...
it has been hemmed with the wire on three sides
as with the Hardwick Hall curtains.

And with the gold braid fringe added....
(Yes, the daylight is fading....)
but we must try it with the Pelmet.....

Which you can hardly see!
But never mind,
I am quickly sewing the second curtain panel....

Which you can see here.... with the lights on.....
Oh, Dear Readers, I am liking this very much!
Except I didn't like the "puffy" un-pleated middle of the curtains....
which was something I had worried about with this method.....
and decided to try gently ironing the "pleats" into the drapes....

This is much better!

I think they look Wonderful in this room!
Oh, but let's try the Pelmet.....

And the furniture too...!
Now That is looking like I had hoped it would!

With the rest of the furnishings.....

With a glance to the ceiling above.....
(This was my very first painted ceiling!)
So, where do we go from here...?
Well, there is that other window.....
which still does not even have it's trim added!
But I have made the Pelmet......

And I know exactly how I will make the curtains!
It shouldn't take me very long!
So it seems we are making Progress, Dear Readers,
Just not where I expected I would!
I LOVE your new drapes Betsy although I never would have thought that that fabric and color would work with the other colors and patterns in the room; but I was wrong! They look very Posh and they add an additional layer of interest and warmth to the living room of your Folly; which by the way has ALWAYS been high on my TOP TEN list! :D
ReplyDeleteThe wire method is a very good one and the fact that the drapes can actually open and close makes them even MORE special-
Well done Madam! :D
p.s. Any leftover scraps of that beautiful fabric might make lovely throw cushions too!
DeleteHa Ha! I came to that conclusion too! Only a matter of Time.....!! :)
DeleteLe tissus des rideaux est superbe et c'est bien qu'ils puissent s'ouvrir et se refermer.bravo!
ReplyDeleteHi Jean-Claude! I have a difficult time with curtains... I always want them to be "real" and be able to open and close... not that I will close them... but I will be able to if I should ever need....! LOL!
Deletea charming room! the fabric of the curtains is beautiful
ReplyDeletehugs
Thank you Claude! I have been saving this fabric for a long time! Because it is "heavy" I was not sure it would work... but I am glad that it does!
DeleteHello Betsy,
ReplyDeleteHow beautiful. You did a great job on the drapes. they hang really well and the fabric is just beautiful. You really did a great job interpreting the regency style. I really love this room. everything works together so well. Bravo Betsy!
Big hug
Giac
Hi Giac! I have always loved the Regency style! They were not afraid of color and the balance between Classical and Rococo forms was still allowing for much variety! I have been wanting to make these curtains for Ages... and finally I have dared to try my ideas! I am glad you like it! :)
Deleteyay! Good for you! Not compromising is always best. They look gorgeous.
ReplyDeleteThank you Sheila! I am always amazed at how long it takes me to work up my "courage" to try something... and how easy it seems after! LOL! I am glad I finally sewed these curtains!
DeleteMaking progress is making progress! Well done you!
ReplyDeleteThank you Alexandra! It helps to have some time off from work too! :)
DeleteThe curtains are fabulous! I love the whole room actually, and the ceiling as well! Wonderful job!
ReplyDeleteThank you Millicent and Friends! I have wanted to make these curtains for a long time... I am now wondering why I waited so long! LOL! I am loving the look! :)
DeleteYou've created beautiful drapes, dear Betsy, and for me, being a true fan of the color blue, I too love the rich blue color and especially the lush flowers, very beautiful for a room like this!! This room looks so beautiful now, although it's not done yet....
ReplyDeleteWhile I was reading I came at the same idea as you and Elizabeth: some throw cushions would be such a wonderful addition ;).
And last but not the least: you really made a lot of progress for this room!
Hugs, Ilona
Hi Ilona! I do love bright blue! And I think it complements the brilliant red... making a better balance of color! I was thinking of making cushions too... but who knows how long it will take me now...! LOL! Thank you for your comments! :)
DeleteI think your projects have lead you to such a wonderful results!
ReplyDeleteHappy Valentine's Day!
Hugs, piikko
Thank you Piikko! And Happy Valentines Day to you too! :)
DeleteI think your projects have lead you to such a wonderful results!
ReplyDeleteHappy Valentine's Day!
Hugs, piikko
Hooray for progress! Great Betsy, a BIG step forward for completing the living room!
ReplyDeleteThank you Shannon! It is a Huge step forward and makes such a difference! Way more than I thought it would! LOL!
DeleteAbsolutely stunning room and brilliant solution with gorgeous results for the draperies! It is so funny how something eludes us for so long, then suddenly everything falls into place! A lesson in patience and persistence for us all!
ReplyDeleteHi Jodi! I am always amazed at how long it takes me to make (even to start making!) things I have been thinking and thinking about! I have been staring at the pinned up "temporary" curtain for years .... and not been sure what method to use... and just didn't get around to doing "test" versions until last summer! I know that when I am in doubt I should make a test sample.... but other things always seemed to have more "priority"! This is the story of me having too many projects going at once...!LOL! :)
DeleteIt's incredible how great this curtain fabric looks in your colorful room - what a good choice, as always I'm admiring your eye for detail and your ability to see the big pattern. Looks like you've found your way to create the most stunning and working curtains, what a wonderful job. While enjoying your pictures I spotted a detail I must admit had slipped out of my memory - the tiny roombox version of this room. What a pity that this roombox is so tiny that there will be no need to add the curtains - I would have liked to see you make them with working rods and perfect draping... *shows-a-devilish-grin* And before I leave for today I need to say that your first painted ceiling is simply beautiful. What a honored ceiling to be the first one in a row of outstanding painted ceilings and walls! ;O)
ReplyDeleteHugs
Birgit
Dear Birgit... I have to admit I enjoy your "devilish grin"! LOL! I have had those thoughts myself... about the tiny curtains... I would need to paint the fabric, of course... ! LOL! And I am always happy that when I began to work on "The Folly" I was still so much a beginner that I was willing to try all sorts of things... and I had never even seen any blogs at that time.... nobody would ever see my attempts! So I would not be afraid to try my painting on the ceilings... and it got me started! LOL! But I must say I was shocked to learn that you had forgotten about the tiny room-box!!! :):):)
DeleteBeautiful progress. The curtain looks perfect in this room.
ReplyDeleteThank you Fabiola! I love this fabric and I am so happy that they turned out well! I think they add so much to this room!
DeleteHello, Betsy - I'm so glad that you've returned to The Folly. The living room color scheme is gorgeous, and the beautiful brocade fabric is perfect for the drapes. The golden pelmets add just the right finishing touch, and you've done such a fine job constructing them. The fact that you made the drapes so that they open and close is amazing to me - I admire such painstaking detail and the planning and patience required to achieve the beautiful results. Now I can't wait to see your progress on the large window.
ReplyDeleteMarjorie
Hi Marjorie! I was determined not to stop half way through this project... so the other drapes have been completed now! I am loving the way they look! Even I am impressed with the "glamor" they add to this room! But it has always been my intent to make this small house a very ornate "hideaway"... hence the name "The Folly"! It is being a lot of fun to finally see it coming together! :):)
Delete(Note that I read the Feb. 21 entry first)
ReplyDeleteI was wondering what a pelmet was.
That marvelously ornate room reminds me of the living room of your great-grandparents Rogers, in Longwood Towers in Brookline. We used to visit them from time to time - it was stuffy, cluttered, hot - hated it at the time, but along with Memorial Hall at Harvard, which we also hated, I'm coming around in my old age. The living room in the Folly is delightfully authentic.
Love, Mom
Hi Mom! I would love to hear more details about the Brookline house! As you know I have always loved ornate decor! :):):)
Delete