Tuesday, July 28, 2020

Rocky Road.......


Castle Kitchen Upgrade....

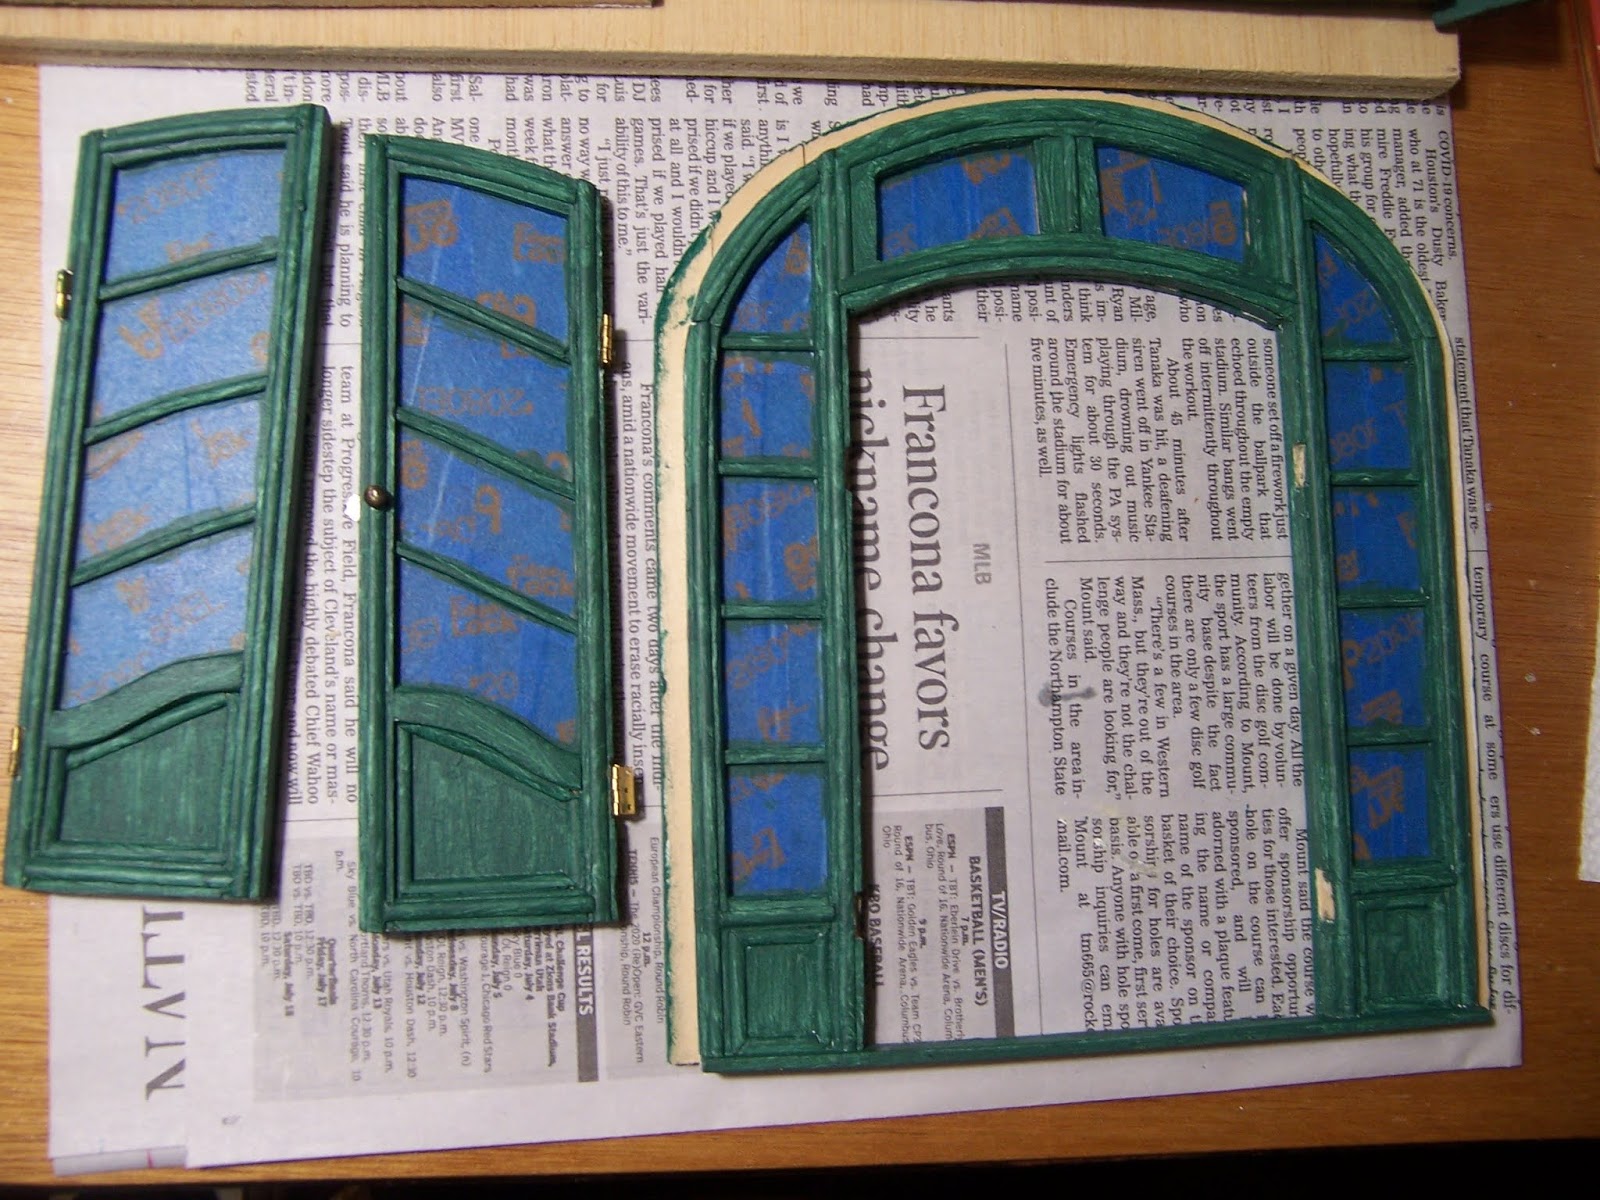
We have been suffering a Heat Wave, Dear Readers, with temperatures in the 90's F nearly every day, which means it is prudent to close the windows and blinds early in the day to keep the cool indoors for as long as possible. And that means my already dark workspace is darker still... and the Castle, dark to begin with is Gloomy as night. I apologize for the dark photos, but all I am doing is adding more of those Rocks you have seen before... surrounding the doors with a three dimensional framework. This is slow going so I did not take many pictures. The door above has all but the "keystone" attached. And the other kitchen door as well....

The kitchen has even more doors beyond these,
and they all need "Rocks" added to both sides of the frame....
Which means I will be "Rocking on" for a while!
And since I was upgrading the doors,
and had found such success with the arch supports
on the Guard Room Ceiling....
I decided to do the same here as well.

Can you even see back there in that corner
above that "modern" Bread Oven?
The vaulted ceiling support arch on the sides is just painted on...
But that is easily remedied!

Can you see I am adding the same "Rocks"
that I added to the Guard Room Ceiling?
I think I need to turn on the big spotlight....
To be able to make sure the Rocks are aligning properly...

There!
(I should have done that sooner....!)
(But you have no idea how challenging it is to get the spotlight down here...!)

Now you can see the Kitchen in all it's "Modern"
(for the Middle Ages at least) decor!
Shutters at the windows,
Modern Fireplace with a smoke removing chimney,
with room for more than one cauldron...
and a Roasting oven right to hand!
And the well is right beside the door on the other side of the wall!
And now the "stonework" will be sturdier too!

All I need to do is re-paint some of the grout lines
to match the new "Rocks"
And nobody will Ever Ever notice anything has changed at all!
But I am glad I did it... it does look so much better.

See? Can you tell anything was changed?

And lest you think I have lapsed on my Petit-point stitching jag....
I have started on a whole new era of stitching possibilities....
My first Carpet!

This is another Janet Granger kit which I had ordered
at the beginning of the Covid Era.
It is stitched on 18 point canvas with crewel yarn.
I had not used this scale since....
Well, I think this was the thread count I used with the stitching
for my little sofa I made in my teen years....
that resides in The Lovely Old Dollhouse Hallway....

And I hadn't used this weight cloth since!
But I had bought a frame for holding the cloth a number of years ago...
so I dug it out and started my first carpet stitching!

This will only be a 3inch by 5inch "scatter" rug when finished.
But I already like the pattern so  much I have ordered the larger version....
Sally May has been wanting a new carpet for her Living Room for Forever!

I have worked on it mostly while I would normally be commuting.
But I might be going in to Work more often in the near future...
So my rate of progress might slow a bit.

For now it is coming right along!

And I have only had to unstitch mistakes a half dozen times or so...!
I think I get careless because it feels so "easy" compared to the tiny works.

The "lattice" work is being relatively tricky...
trying to decide which part to stitch in what order
without missing any stitches....
It's really a sweet design!

And because I am still "Rocking Along"....
I will show you the Castle as it now stands....

(Yes, It is huge!)
It is a Long Way from finished
And the kitchen is in the middle at the bottom...

There are still some other "Rocky" trim pieces I want to add...
but I haven't figured out the details yet.
And the doors... all six on  both sides...
I will be traveling the "Rocky" Road for a while,
Dear Readers, on this Castle Kitchen upgrade!

(And I am not sure I like the New Blogger...
but I think I managed a Post!)


Tuesday, July 21, 2020

Finishing.....


A Few Little Things.....

It did Not take me long, Dear Readers, to complete the stitching of the Three Kings stocking! I enjoyed every minute of the stitching and am pleased to report that I didn't change anything about the design (I love it as it is...) and I didn't make any mistakes in the stitching! All it (and the other completed stockings) need now is to be stitched to their backing material. No, I did not finish doing that step. But I was in a "finishing" frame of mind and so I made sure to put the paint on the other side of the lovely arched door for the Dollmaker's Studio.

You might not be able to tell from the photo, 
but it is a different shade of green for the outside... 
it is more of a Forest green and the paint is flat with no gloss.
 It needed to look a little bit weather worn.

Here I am giving it a test in place....
 the lighting is too harsh, and it only has one coat of the paint....
 but I wanted to see how it would look....
I know... it is hard to tell!

A second coat of paint helps!

But while the paint is drying
 there are a couple of other little things I am finishing....

You might recall the little footstool with the Tree of Life stitching.....
(I apologize for the blurry picture... I didn't take many of this project!)
It required patient gluing to the backing and foam cushion....
Which I was Finally in the mood to tackle!

Ta Daaaa!!!! Finished!!!
(How long did this simple step take for me to do...?)
I will show you a better picture later.... 
because I am Finishing Things....!
 
Next up is the Little Tudor Stitching panel
 to go in the embroidery frame...
The Whaaaat??? I hear you say...
It has been a couple of years
 since I was working on this one.....
 
Here you can see the stitching is almost Finished....
But I needed to construct the little frame that it goes into... 
(which is part of the lovely Janet Granger kit....)
and when I pulled out the instructions.... 
it needed special wax finishing for the mahogany wood.
I hadn't ordered that.... 
and it wasn't until the Covid lockdown
 that I got around to ordering the Finishing kit. 
I am glad I did! 

It's a lovely Delicate turned wood mahogany frame!
And I have never Ever used real wax polish on anything.... 
so it was a real learning experience!
But it turned out beautifully!

I am sorry my pictures are so lousy...
I was so intent on the process I was forgetting to take pictures.... 
so this is what I have to show.

Meanwhile, the paint has dried on the door frames... 
and it is time to carefully cut around the edges 
and remove the painter's tape from the windows...

I think it looks just like I hoped it would!

I just need to re-attach the hinges... 
with a little judicious shimming
 and it will be finished!
But the exterior of the Dollmaker's Studio
 has a Looooong way to go before it is done.
(Egg-carton stones somewhere on the horizon...)

And the little piece of tapestry stitching
 had to be mounted carefully in the frame....

Again, I apologize for the poor focus! 
But I was in a hurry to put it  in the stand.....

And add the tiny needle to the thread....
Because it isn't quite "Finished" yet...!

See the tiny "needle" I made?
It is just a bit of very fine wire 
superglued to the thread...!

I just LOVE the way this turned out!
This kit is so well made and the results are beautiful!

And with the footstool.... 
(with the carved feet which you can barely see)
I am very pleased with the results of both of these kits!

And while I was Finishing things.... 
I also Finished the "stones"
 around the little window in the Castle Dungeon....

And I added the shutter too... but forgot to take any pictures...
 and it still needs the sculpey "hinge flanges" 
because I need to make some more.
This completes the "upgrade" on all the windows
 that had already been "finished". 
There are still many windows in the Castle
 that have not been worked on at all.

And because Elizabeth wanted to see the
 ceiling of the Guard Room in a better light....
I will Finish this post with a picture... 
This ceiling was painted so long ago I forget it is here...

Here you can see it with full illumination....!
The scattered stars are reflective, 
but because the ceiling is vaulted,
 they never all reflect the light at the same time....
So only some of them appear to be shining.
And the harsh light really brings out the raw paint strokes...
This is mostly copied from a Medieval Illumination
 series showing the zodiac figures.

So that's what I've been doing lately, Dear Readers,
 a whole lot of Finishing!
But as I am sure you can Imagine, 
I am a long way from finished with the "finishing"!


Tuesday, July 14, 2020

Fast Days.... Slow Progress....


Vacation..... Time.....

I had a Vacation Week, Dear Readers, and in my Imagination I was going to make Great Progress on all sorts of parts of my too many projects. I can tell you now, that I did make great progress on a few little things! The Three Kings stocking being one of them. It was so lovely to be able to sit and stitch every morning beside the open windows with the birds singing and soft breezes blowing. That is one of my favorite parts of Summer! I also made some good progress on adding "stones" to the many windows of the opening sides of the Castle. But those pictures are a little boring.... and the process is very time consuming. I didn't want it to be the only thing I accomplished on my week off! And the Dollmaker's Studio was calling to me.... and had been for months! In case you have forgotten, this was started as a "Quick Little Project" Dreamed up while I was in the endless weeks of only making Lilac blossoms..... but the minute I started it last summer there were suddenly a whole bunch of reasons to make it into an entire house... three stories tall... and using up many "stray" parts that had no homes. It got Complicated!


Here you can see the basic structure with the fronts open. 
I will confess, Nothing about this has been "quick" or "little"!
 And once I had built all the lovely paneling in the bottom room.... 
I could not bring myself to paint it!

But after debating with myself for Months and Months, 
I decided I really needed to go forward with
 my original inspiration and paint the paneling.
Here I have added the "stones" around the door and window frames.
And taped off the edges of the wood paneling.
It was going to take courage to slather on the primer... 
but I knew that the orange of the paneling
 would never look "right" to me..... 

Meanwhile, the three kings were progressing just beautifully!

Following that Amazing Star!

I had to close my eyes and just start painting.....!

And at first it just looks awful.... 
one coat of primer is not enough.....
(I know it is dark.... the shades are closed against the heat of the sun....)

And I had to knuckle down and tackle the windowpanes of the arched door.....
because I was going to need to paint the framework.....
 and every pane had to be carefully taped off!
It took hours!
On Both sides of the door!

After three coats of the primer.... 

 on the opening panels too...
I thought it was good enough to start on the color...
 (You must Promise not to panic when you see the next picture....!)

(Sorry... the picture is dark.... and I did not take many at this point!)

And on the doors too.... 
Clearly it was going to take several coats of paint!
(But this did not surprise me....)
And in the humid weather I had to wait
 for the paint to dry thoroughly before painting another coat.

Here in the bright light you can see the difference
 between the first and second coats of paint.
(I am finally feeling encouraged...!)

And with the Three Kings, 
the desert is done
 and the Night Sky is started....
 bringing the stars into focus!

Are three coats of green enough?

I think it is!
I have removed the painters tape....

And painted the "stones" around the windows....!
Funny how much these look like the castle Windows......

Where the stones and shutters have been added 
to the opening Wall of the Kitchen...!


And in the bright light of the morning....
I am feeling very glad I followed my Dreams
 and painted the paneling!

And the Kings are still following their Star....
 hoping for the Sky to fill in the gaps
 and bring the Stars into focus!

So That was my Vacation, Dear Readers,
The Days went quickly....
The Progress is Slow......
But sometimes it is better that way... 
We have more Journey to Enjoy in Time!