Monday, July 30, 2012

The Doors and More Doors


And More Hinges!

Sometimes, Dear Readers, if I am Not Sure of where I am going with a Design, I find it helps to start with the parts I AM sure about and see where it leads me. With each choice I make the field of options is narrowed and the vision becomes clearer. This is proving true with the next room in the Tree House. I have known the Purpose of this room since the Beginning.... but have been much less clear about the Specific aspects of the Design. And the more I mull it over in my mind.. the more I get LOST in the Possibilities! So I decided to jump right in and make the Outer Door for the Room. This would be relatively easy as I was following the basic design of the other two doors already made. It would be thick and sturdy and hinge on the Post already built. And it would have a Window in it.... as the other rooms have. This time I decided to give the window a pointed Gothic Arch. AAAH.... I Do LOVE the Gothic Windows! And of Course, it had to have shutters with more of those Tiny Hinges!

And then, Because this room is going to be a Library of sorts... 
I am thinking of it as the "Scholar's Room"... 
I needed to build shelves flanking the Window... and a seat in the embrasure. 
Here, I think you can see the seat a little better in this shot.....


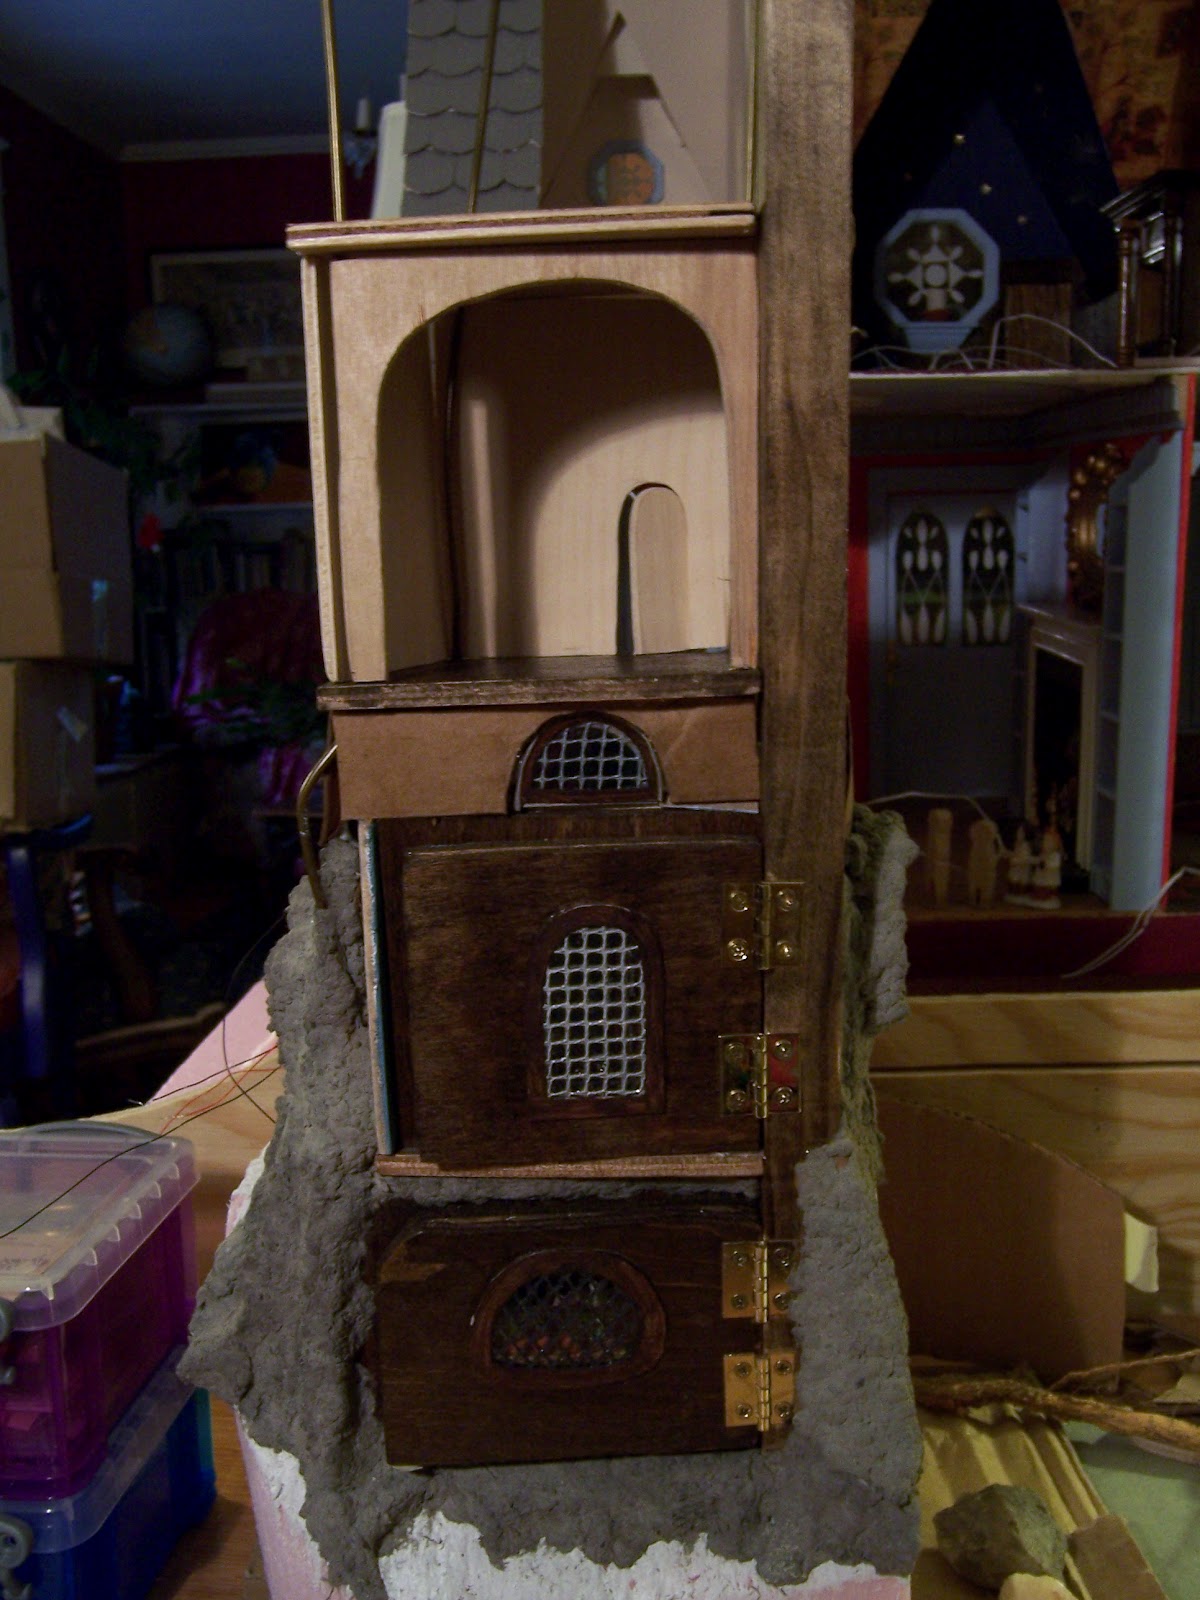
I added my usual mesh window treatment.... diamond panes this time.
And I stained it all a Lovely Dark Walnut color!


But I was not content to leave it there, Dear Readers, 
I had to make it Much More Complicated!
You see, I wanted to make the shelves into Cabinets with Doors.....
Doors that Open and Close....
So I started by making the Doors according to the method  I use for the Windows.
The Frame is cardboard cut with an exacto knife. 
The top frame is glued to the plastic "window pane" with the mesh fitted into the opening.


"But what about Hinges?" you ask! For those I used an idea that is quite common in miniatures... 
the metal pin hinge.... but I had to be inventive for such a small scale!
I was afraid the pin would not stay in place just glued between the layers of cardboard. So I added a strip of cotton cloth, bias cut, along the outer edge of the door frame where the pin "hinge" was to be glued and wrapped it around the outside of the pin.... creating a stronger attachment to the frame.
Here below you can see the cotton with the pin in place prior to wrapping.....


And here you can see it with the pin wrapped and the inner layer of the door frame added.
I also added a layer of cardboard between the outer and inner layer to make up for the thickness of the pin... so the frame is three layers of cardboard and one layer of plastic.

And here you can see me testing the Doors in place....

OOOOH.... don't they just Give you the Shivers????
The part you Can't see is that I under-estimated the amount of "shrinkage" the motion of the doors would create.... so the doors themselves are too wide for the openings! And I tried to be clever and make the doors for the double section in one piece and cut them apart once they were done..... 
and it Sort of worked....
But the cardboard layers got messed up in the cutting...  
so one of the doors really was not useable as you can see below.


Which was okay since I really had to make a new narrower door anyway if I want the doors to be able to close all the way... which I do!!!
So here I am making the new narrower door...
 and as with many things it was easier the second time around when I knew what I was doing!


And here I am testing the new doors for fit.....

Oh, I Do LOVE how these are turning out!!!


See, they open.......!

All the way...!!!

And Such a Gothic Cabinet needs a bit of Mythical Adornment..... 
A little Dragon come to visit...!

Here you can see the door in place on the Tree House.....


But when you look inside....

 
You can see I have a LOOONG way to go with this room!
 
 
I probably will be making Doors and More Doors for a Quite a while!


Monday, July 23, 2012

So Little To Show


Moving Up, Ready Or Not!

I have had to Wrench Myself away from this Tiny Room this week, Dear Readers, in part because there were things needing doing in my RL house...(Imagine That!).... and in part because while I really would like to stay in there Forever, admiring the Shadows on the Ceiling, and listening to the tiny Harp...., there ARE only a few more details to add before I must proclaim it Done! One of these Details is proving Very Challenging.... the Statue for the Niche just doesn't show up Anywhere... and I've been Searching! I may have to admit defeat and Sculpt one myself.... we shall see...... I find that a daunting prospect! Another one of the Tiny details I Have managed to build....... it is a Tiny Oval Table to match the Demi-lune Table I had already built. Here below you can see the Table all done.....


 I was so happy with the sparkly "Feet" on the Demi-lune Table 
that I copied them on purpose for the Oval Table!


And then I had one of those Really Nutty Ideas for what to put ON the table....
I wanted to show some Tarot Cards......


So I Made some REALLY TINY cards...........!

First I took a picture of the Cover of a book about Tarot that had lovely cards printed on the cover....
From standing on top of my step-stool....... 
so they would look as Small as possible...


But when I printed the picture out the cards were still too large for the scale.....
So I took a picture of the picture.......
Like this....
(Yeah, I need to learn how to manipulate them in the digital world....)
 
I know... pretty silly.... you can barely SEE them!
But when you cut them out.......
And glue them onto the Oval Table....


They are ALMOST recognizable......


If you zoom in Really close.....
Or maybe it's just one of those things you have to Pretend.......
When you glance into the Salon....


That you caught someone in the Middle of a Reading....
But they hurried away when they heard you coming....!


Meanwhile, the painted Domed Ceiling has been firmly glued in place.
I decided not to change anything on the painting....... 
So Hera is Forever Fleeing an Ardent Zeus....

(If you get down low enough to look up and see them...! )

I'm having Such a Hard time dragging myself away...!


But Like it or NOT I have moved on to work on the Next Level of the Tree House!
And have so far accomplished very little.
The floor of the Next Level is the top layer of the Salon Ceiling....
which you can see here from the outside.
I have filled in with cardboard around the Lunette Window...
which eventually will have a layer of paper mache over it.
 

And I have scored "Floorboards" onto the floor surface and stained them.....

I am drilling holes in the corners of each floor from here on up 
and sliding them onto the vertical wires for an added layer of structural support.
It makes it very easy to raise or lower the ceiling 
while you are testing the fit of the parts of the room!
So I have also positioned the Ceiling for this next room..... Temporarily....
Along with the walls... which makes it so much easier to Visualize the space....

And there is already a little Door in the back wall where the stairs come up....
just waiting for the Tiny hinges....

And from the outside you can see the extra layers of cardboard 
glued onto the exterior of the Salon in preparation for the next layer of paper mache.
And I have also labeled the wires for each of the lights 
so I know which wires go to which fixture.... 
because as I add the paper mache the wires get buried.... 
and I want to be sure to keep them properly identified!

So here is the Beginning or the Third Room.....

Not much to show... 
but Definitely Moving Up!

Monday, July 16, 2012

It's The Little Things That Count

Refinements, Or More Is More!

Where to Start, Dear Readers, is my challenge this week, because there have been so many Tiny Changes in the Salon! Well, to begin with, I completed the Little Love Seat for the Arbor Alcove, even though you cannot see it in the picture above! So I will show it to you on its own....
Along with the Fabric that I have used.... 
so you can see the tiny piece of the pattern that shows....

And then, just for comparison I will show you the other pieces too... 
so you can see the entire Suite....

Aren't they sweet? 
(This is the first time in my life I have ever used a Matching set of furniture!)
As you can see the Love seat is smaller than the Settee and tapered to fit the Alcove... 
and the back is lower so it won't obscure the painted Roses on the Arbor....
which is difficult to see unless you are looking down from above....  
Like this....


Another small refinement I made was for the little window in the stairs...

I wanted a little flowering plant to sit on the window sill....
Even though it really is not possible to see it clearly when the wall is in place...
But I can Imagine climbing those stairs and wishing the window sill was not empty....
And speaking of things that just shouldn't remain Empty....
Have you Ever known a Table that didn't collect things.....?
So I have added some tiny "Decanters" to the Demilune Table ...
In case anybody was thirsty....

But the most Dramatic Refinements, Dear Readers, 
have been worked upon the Ceiling of the Salon! 
I was just NOT Happy with the way the Domed ceiling was hardly visible from outside the Tiny Room..... 
I felt there should be a way to see it better..... 
And what better way than by Adding a Lunette Window in the Dome itself???
I started by Boldly cutting into my Painted Dome and removing a piece in the front half of the ceiling....
Like This.....


And adding in the arched section to go over the Lunette Window....

Which looks like this......

Before you turn it over....


And test it in place......

And, of course, that was just the Beginning.....
I added a "Plaster Rosette" to the center where the chandelier will hang....
(made from a scrap book paste-on decoration)


And added window panes...... using my favorite painted mesh...
And Tested the view......
(this is looking more Down than across at the ceiling....)


And then I HAD to make the ceiling worth Looking AT.....
And I got a Little bit carried Away....
It is a scene from The Courtship of Hera......
For Surely, before they drove each other Mad with Jealousy.... 
they Drove each other Mad with Passion.....

Although I think Zeus in his Pursuit looks a Lot more Eager than Hera....
And the Cherubs are her devoted Attendants....
(If you poke the pictures to enlarge them...
you will see that this is just the beginning of the painting....
still a lot of Refining the painting to be done.... !)

The entire Ceiling fits in the Palm of my hand!

And try to imagine how it will look....
And test it in place.......


And Try to look through the Lunette window.....
Before we attach the Chandelier....
Which Might get in the way of the  painting....


But That is not all, Dear Readers.....
I have also constructed a Beautiful Golden Harp....
Here you can see me gluing the wires in place.... 
three different thicknesses of wire!

And here you can see the completed harp... 
please ignore the bad job of painting it...


And here you can see it in place in the Salon....
With sunlight pouring through the Marble Window into the Arbor Alcove...
Just waiting for someone to make music fit for the Gods above....
And since the ceiling is not yet firmly in place.... 
we can still see the view as Hera does from above...
a view that will not be possible when the room is finished....
And another view...
Here you can see that the stairs have been extended..... 
so they reach the next floor with the newer ceiling height....


And I have even added more paper mache to the outside of the Tree... 
extending the shape higher.....
At the moment it looks rather ugly....
with the wires all sticking out and the surfaces just partly covered....
but it's a start!

But if you are at All like ME, 
you will be wanting to see the ceiling WITH the Chandelier installed.... 
and we are almost there.....

Like That?
Or Closer... can we still see Hera?
(If you poke THIS picture you can see Hera Much more complete than before....!)

Or Through the window....?
Oh, SO Hard to Photograph.....


Or like this...?

Oh, but Wait... the Fire isn't lit......

There, that's better!

And while the ceiling is still not firmly attached...
(so I can STILL make some Refinements to the painting....!)
and there are one or two more details to add to this room... 
I am almost ready to start the Next floor....
But for sure, it is all the little things that count!