Showing posts with label Petit-point Stitching. Show all posts

Tuesday, January 6, 2026

Stitching Updates....


 Cushions  And "Our Lady"....

It Has been a While, Dear Readers, since I showed you any of my stitching projects, and that is in great part because it has been a while since I have been stitching them! With the completion of the stitching on the tiny Tapestry Cushions last summer, I felt the need to start another tiny scale (thread count wise) project right away because I enjoy it so much! It was full summer, the days were hot and long and the nights were short so daylight was abundant and the tiny thread count projects require good lighting! I dug around in my stash and found the above kit waiting for me. I had purchased it quite a while ago at one of the Miniatures Fairs.... it is another kit by Phyllis Stafford (now deceased) who also made the Baktiari Carpet kit and the Chinese Dragon Carpet kit (although I added the dragons to that one), so I felt ready to tackle this one. Believe me, it has been a challenging one!

To begin with, it is another 40 count mesh design, like both the Chinese Dragon Carpet and the Baktiari Carpet, but it has a much larger variety of threads! There are twelve colors of cotton threads, five colors of metallic threads, of two different types, and 5 colors of silk thread of a type I had not stitched with before! The end product will be about 2.5 x 3.75 inches so it is not large, but it has a great amount of detail.

 Add to that the chart is the old fashioned symbols only kind.... although I think it would be very hard to chart the different thread types if you were only using a color chart! But that is a large number of different symbols/numbers to keep track of! I will confess that the first time I opened this kit I took one look at the chart and decided I was not ready to work on this yet! 

But last July, I was eager to get started! I had been stitching those 50 count cushions with gold metallic thread mixed into the designs and had gained confidence! But where to start?! There are very few large blocks of one color in this project. And the counting needed for every single part required relentless accuracy.... no room for jumping around or re-designing parts with this kit! And because the metallic threads were such an integral part of the design, and used Abundantly.... yes, very very challenging! I decided to start with the eyes as they were easily identifiable on the chart, and I could approximate the positioning in the overall cloth.... no going back! 


The story behind this kit is that near where I live is a Polish immigrant community of long standing who brought their "church" with them from Poland along with an icon of the Black Madonna of Czestochowa. Occasionally when my sister visits with me we go to church services at this Church where the icon lives. Phyllis Stafford, the kit designer was familiar with this church and made the kit of their icon in miniature. When I saw the kit in the offerings at the Miniatures Fair, I recognized the icon and thought it would be fun to stitch! The deep black lines on The Madonna's face are where the original icon was damaged by thieves who attempted to steal it, and no amount of "mending" has made the gash disappear!

The process of stitching requires constant thread-changes....you can only count so far when the stitches are random gold pieces of a complex design... but you have to make sure they are in place first for the more complex designs.... it is complicated! I did the reverse for the metallic thread "gems" in the white band of the headcloth... I left the "gaps" for the metallic threads to be stitched later. I did this in part because they are random single stitches in a place far from other bits of that color.... easier to start and end the thread with the surrounding parts already stitched! But I made a counting mistake at the bottom end of the design...! No way to fix it later when I discovered my mistake. And the metallic threads are profuse in the clothes and in the Haloes of Mary and Jesus.


The picture on the kit package is fairly small, 
it actually is printed to "finished size" which is very handy,
 but it makes stitch details in the picture difficult to see.
 I was at first quite puzzled about the "white ribbon bows"
 that she "wore" on her headdress.... 
only to realize as I was stitching them that they are tiny angels....
 one at each ear for both Mary and Jesus! 


Of course, the original angels in the painted icon
 might be easier to recognize...
 I was quite enchanted when I realized what they were!
 In this picture the angels for Jesus are still incomplete.
And the ones for Mary still need the two blue and one red
 metallic stitches for the eyes and mouth!

 
And then there is the challenge that there are both
 gold and silver metallic threads used lavishly in the Halos.... 
and the clothing... and keeping track of where you are
 on the chart and where you already stitched....
 constant counting and double-checking!
 Did I say I wanted a challenge?

 
And trying to make the clothes for Jesus.... and the halo...

 
And Jesus' hands...

 
Their clothes are stitched with the silk threads... 
"Ping Ling" silk which you have to separate 
the threads and use two to stitch with. 
They are quite "bouncy" and twist abominably 
so you need to be very careful how you 
pull the threads through... 
and start with a short length!

 
I made some boo-boos in the metallic pattern in Jesus' sleeves, 
but honestly, it is hard to tell!

 
I spent many peaceful summer mornings
 outside on my porch stitching 
while the birds sang and the crickets hummed!
 
 
Here I have been filling in the background of the halos
 with the gold cotton threads.... in three different shades!
 Keeping track of which row you are on... 
and adding the gold or silver metallics
 when I discover a missed stitch.... 
there were a few where Jesus' halo
 and Mary's headscarf join together.
And then the weather changed... 
Autumn was coming the light was fading...
 this project went on the back burner!
 
 But Oh, yes, those little Tapestry cushions..... ! 
They "just" needed to be stitched to a backing, stuffed etc....

 
At the last minute before cutting these 
little squares apart, Dear Readers, 
I had realized I should stitch an extra row 
of plain background around each one to give more
 "seam allowance" for stitching these into pillows.
 Then I separated them.... 
and I have already shown the finished 
Astrological Cushions on the blog last Fall.
 For the Tapestry ones I had several possible 
backing options in my stash as you can see above with the Deer cushion. 
In the end I decided not to use only one color for all six cushions!

 
And I even had options for the cording that goes around the seams....! 

 
In this case a varicolored Perle cotton that could be used selectively 
since the length needed was short for each cushion. 
And I decided that since the back of the cushion and the front
 are never seen at the same time.... and that the cushions 
would not be all in one location... (that would be too much!)
 I could mix and match to my heart's content! 
It was really random and spur of the moment
 as each cushion was being stitched!

 
The cat was the first completed... 
I know... the corners are not done very well.... 
they are hard to turn inside out!
 But it really is not very noticeable in the end.
They are all stuffed with small beads so
 they have some weight and can be shaped a little. 

 
The bunnies came next.... 
don't they look wonderful together?

 
Here you can see the slow over-stitching 
that attaches the cording around the seams. 
It covers the little bits of silk mesh that show 
when the cushions are turned right side out.

 
There! The squirrels are finished too! 
These were done over many weeks last Fall.

 
And the hounds too! they do look happy together!
 I am so glad I decided to add the second hound!

 
And yes, the Deer cushion and the Unicorn cushion
 have also been completed.... 
but I didn't get good pictures of them in the dollhouses yet.


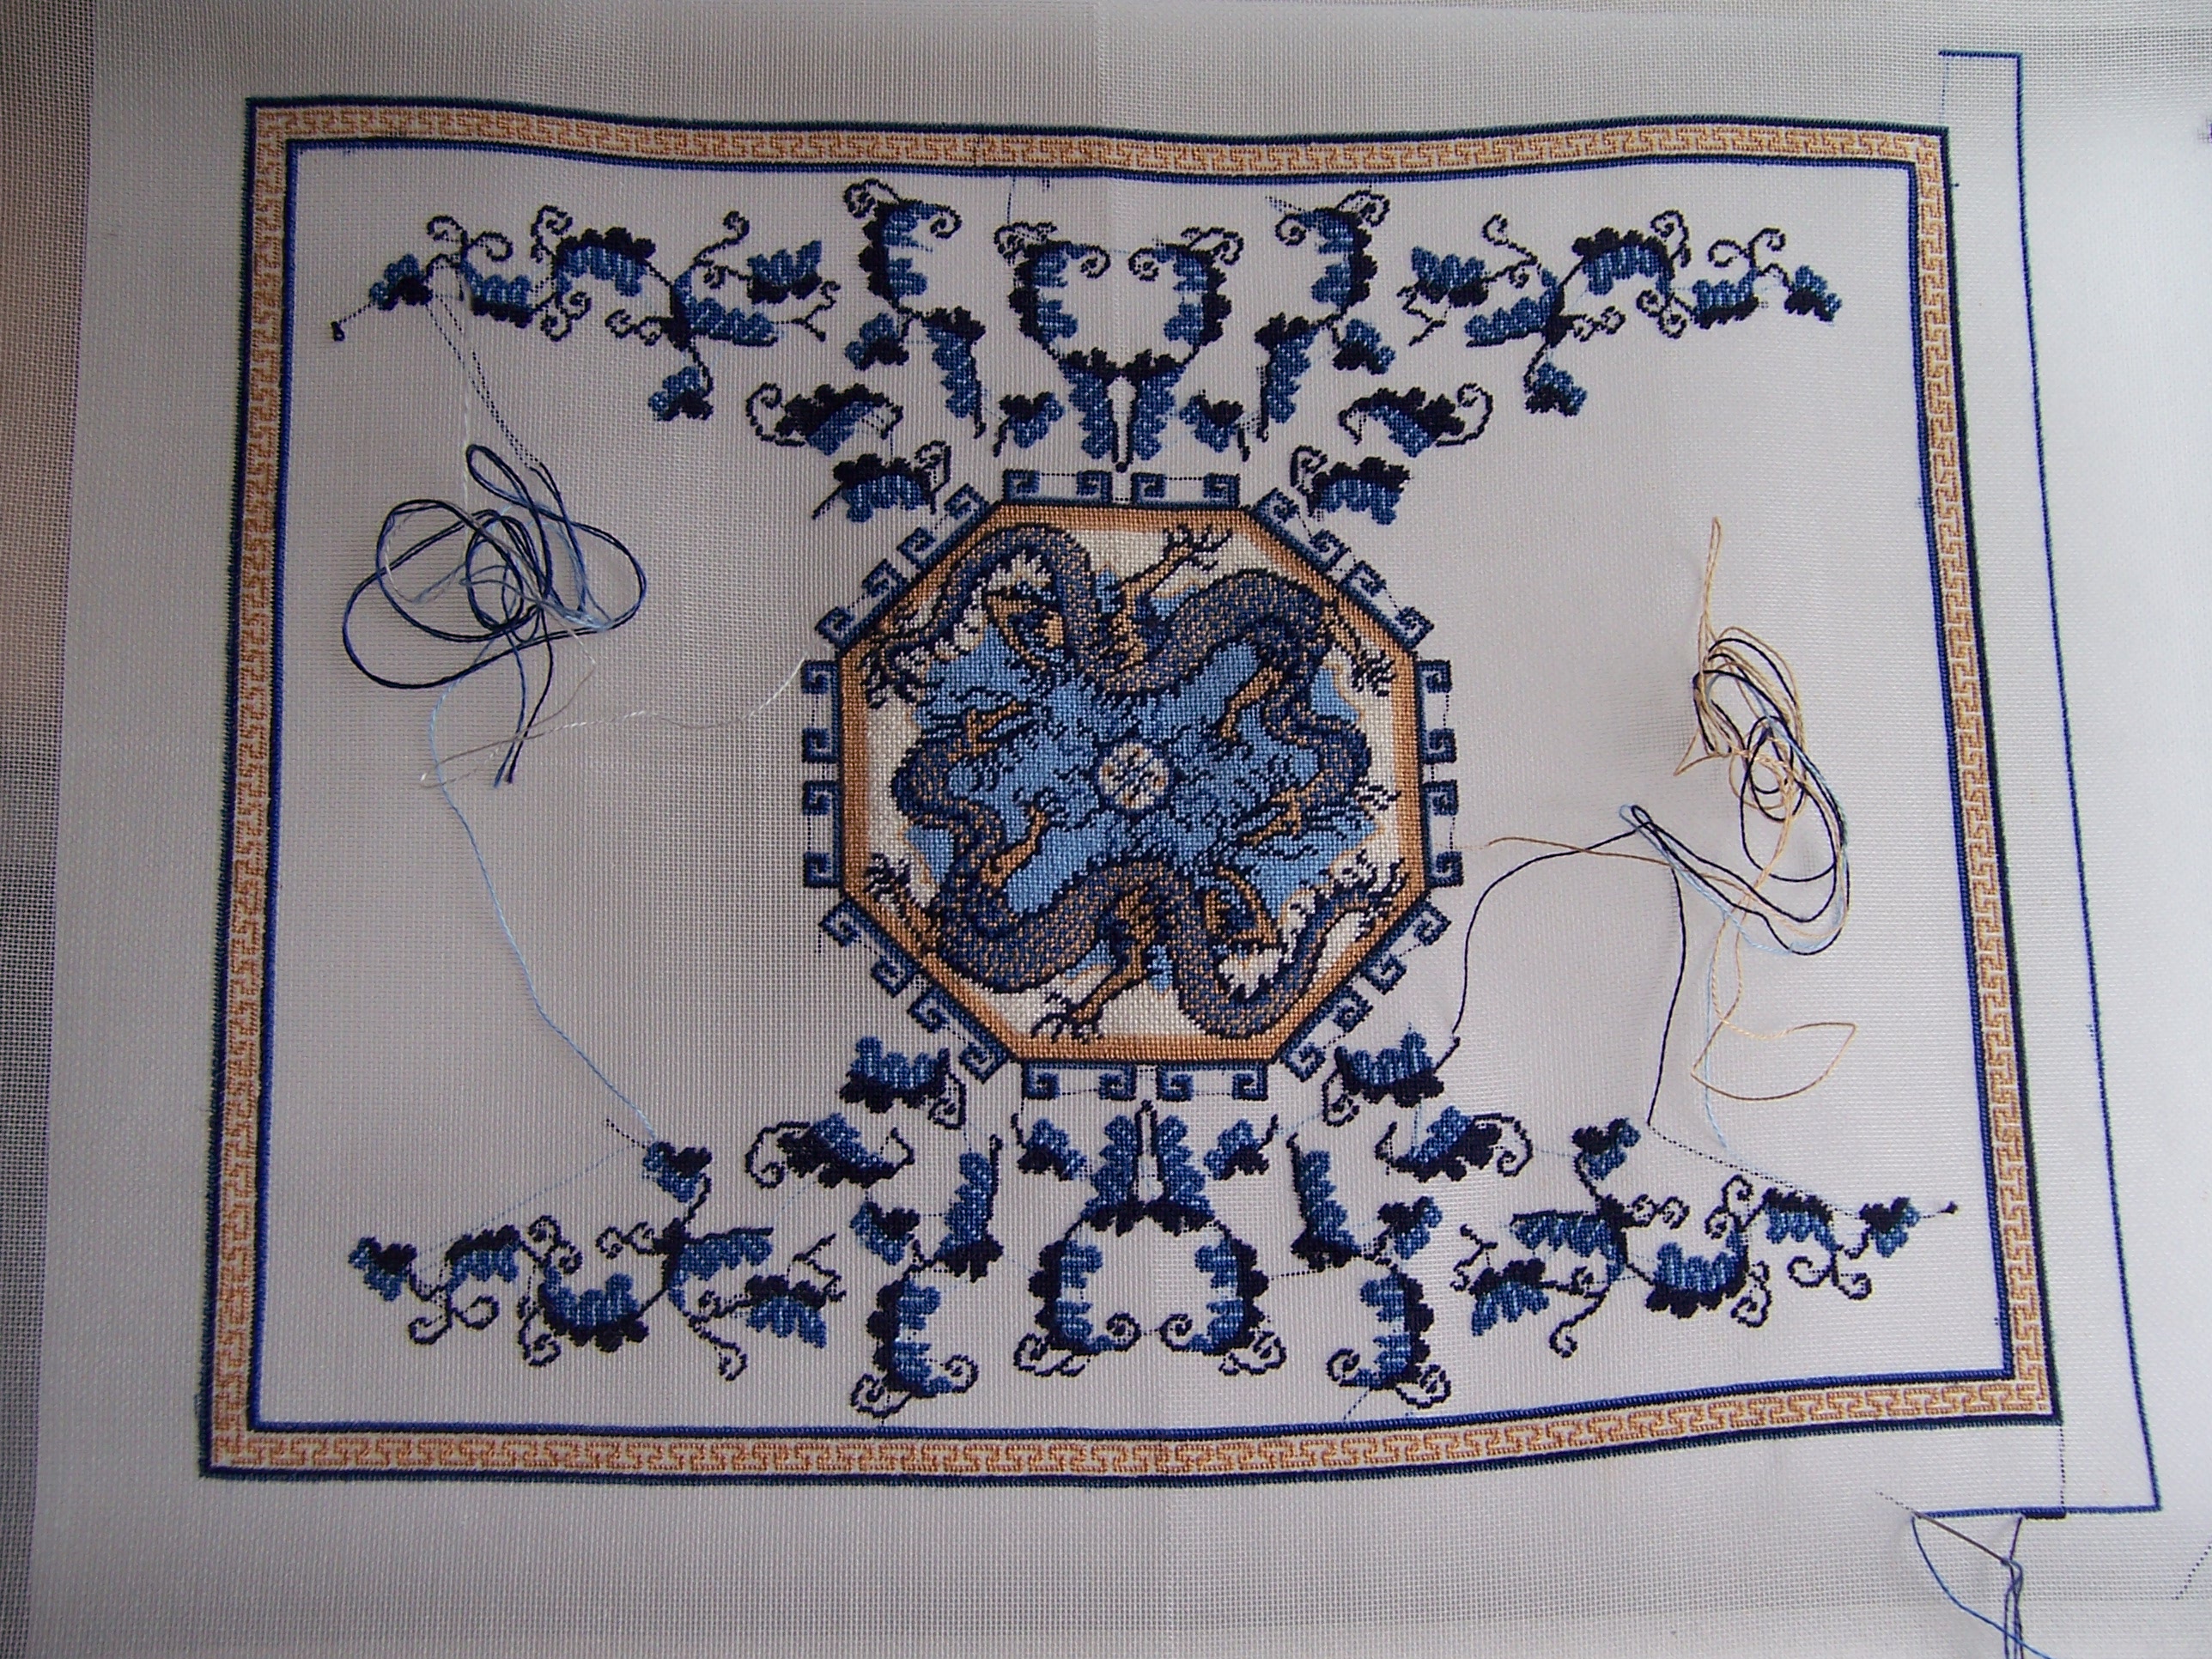
And lastly, the Dragon carpet has had the 
"little gold leafy" details added to the main area. 
This design has always had a few parts that mystified me!
 The gold "accents" are scattered very widely
 through the design and add a bit of "sparkle" to the pattern, 
which is why, I suspect, they are there.
 Because I moved parts of the pattern around 
to accommodate the dragons, the gold bits got re-arranged,
 and I deliberately skipped some of them altogether, 
and added some where I thought they could balance the design.

 
And because I didn't like the "gold bits" 
that were in the original design's corners... 
I changed them completely!
 I decided instead to take the tiny original central circle design
 and bring it out to the corners too!
 And that's as far as I have gotten on this project. 
We are back to the dark time of year 
and it is too easy to make mistakes
 when stitching in poor light! 
 
So none of this is recent work, Dear Readers,
(Because, yes, I am still working on the Christmas Card....) 
 but all of it worthy of showing here...
Just a little overdue Stitching Up-date
on the Tapestry cushions and "Our Lady of Czestochowa"! 


Monday, July 7, 2025

Green.....


Grow the Leaves... Oh!

Can You remember, Dear Readers, about a year ago when I first posted the "Summer Green" Rhododendron shrub at the Folly Garden and wondered if it really had enough leaves to qualify as "finished"? Well, as some of you might realize, I decided it needed quite a few more leaves to really look right as THE evergreen shrub beside the Folly Porch. It is Evergreen, after all, so only steps aside briefly for the Blossoming version which takes a week or so, and for the Snowy winter version which comes and goes quickly only in Winter, so it had better be really worthy of all the rest of those months of viewing! Above you can see the "revised" version, newly "completed".... even though there are probably a few more leafy stems I will add, in particular in the corner by the Tree House. If you can't remember exactly how it looked before.... I have added a photo from Last Year....

 
And I know the lighting is different, 
which makes it really hard to judge.... 
but I also know that the newer version has nearly 400 leaves
 more than last year's version!

 
Here you can see it again... this years (version #3-2) 
from the side of the Garden near the Tree House. 
It definitely looks "denser" to me.... which was the whole point!

 
 The "trick" was to add the "understory leaves" which are
 the previous year's growth still attached to the shrub. 
And believe me, this was tricky to do! 
And very time consuming. 
And as some of you know, last years "green" shrub
 got a coating of "snow" during the Winter 
and is now the "Snowy Winter" version (#2-2)!
 So nothing was wasted after all!

 
And yes, Mr. Gnome is hoping that some of the disruptions
 to his usually quiet neighborhood will be finished for a while.

 
And maybe I can get working on some of my many other
 unfinished projects.... the list is Looooooong!
 
And Speaking of Green, Dear Readers,
 some of the threads I had ordered arrived
 and among them was a blue-green shade
 that I could use in my Astrological Cushions! 

 
The Leo Astrological cushion design
 was asking for four shades of green and one of gold
 for the ground below the Lion.
 The darkest green had arrived a while ago,
 and finally the blue-green arrived.
 Until it did, I did not want to start stitching
 until I could be sure it would work with the rest of the greens.
 As you can see, it does! So I got stitching right away!

 
Here you can see the Leo Cushion before starting the greens...
 but with the night sky completed. 
These kits are designed for larger scale, 
so the details are quite intricate for this tiny scale.
 I was not sure the two blue colors would be needed... 
but I have decided they work out okay....
 Just the darkest blue would have been
 too much like the black border squares.
 And once the ground is stitched... it makes beautiful contrast...

 
This is just the first two greens...

 
Here you can see the stitching beside the chart... 
it is sometimes difficult to tell which color the printed square is...
 they are very similar shades.
I start with the colors that are clearest to follow....
 the darkest and the lightest,
 and gradually fill in the more confusing ones.

 
Here I have added the golden wheat color....

 
And here the Leo Cushion stitching is finished!


And because I had also been waiting for
 that blue-green for the Wyvern Cushion... 
I got busy right away with the Green ground. 
This chart only needed the four green shades... 
no golden color is needed.

 
More of the Greens have been added...
 only the last one is still not stitched.

 
And of course, I have started the border for
 the last little Cushion for this piece of mesh....!
 
But I will Leave you here, Dear Readers... 
Wondering what the final cushion will be.... 
because I do have just a few more Leaves to grow
 on the Evergreen Rhododendron Shrub! 


Wednesday, June 18, 2025

A Question of Color....


 Blue... Gold.... Green...

As You might be aware, Dear Readers, I have been wrestling a lot recently with Color choices for my many various stitching projects. This is in great part due to my tendency to change the designs that were the original kit specifications, but also due to the change of thread type being used due to the changed scale of the project. The threads specified for the Wyvern (and the future Lion) cushion, are all intended for DMC cotton pearl thread and the projects were scaled for RL products. When I noticed that the number of stitches for the Wyvern design was exactly the same as that for the Milles Fleures Kits I had been stitching, I assumed I could just use the same Milles Fleures kit silk threads for the Wyvern. And I could for the most part, but there were not enough colors in the Milles Fleures selection to match all the colors in the Wyvern design. So I set about ordering the missing thread colors... but this is very challenging when you don't have a chart to compare the colors across different manufacturers. And the availability of the silk threads here in the USA is hindered by the fact that they are imported so not all stores carry all or any of them. And trusting to the pictures of on-line ordering is also risky... they even don't recommend using the colors shown as a guide! You need to know the number of the color you want... which I have no clue about! So I have been ordering anyway... a kind of thread roulette... I assume I will eventually use the silk even if not right away on this project. For the Wyvern, I got lucky and could use two of the darker blues I ordered for the sky. You can see I have finished stitching that part in the above photo. I am still waiting for a blue-green thread, a purple thread, and could not use the only orange-ish color I ordered as it was too dark for the highlights on the Wyvern's scales. So meanwhile, I have started stitching the frame for the Lion cushion...

 
This is another of Candace Bahouth's designs.... 
one of a series of astrological-inspired motifs. 
And one of the things I love about these designs is that
 she actually designed them with glittery
 metallic gold thread for the stars and the Wyvern's fire! 
I didn't have to change that at all!

 
And yet again, I don't have enough colors of gold
 to complete the design as is....
 so I have ordered some more.
 We will see if they will work!
But the real color challenge I wanted to talk about was
 the still undecided background color for the
 Chinese Dragon Carpet golden border motif!

And I am not entirely to blame for this challenge, even though I did drastically change the kit design by adding the dragons as a central motif. The design had specified two colors of gold for the border that were so close to each other in hue that you could not tell there was a pattern at all! When I added the central motif I used the picture on the kit, showing a lovely gold band, as inspiration for the gold octagon surrounding the dragons. Only to discover once I started stitching that gold band that it was supposed to be a beautiful golden Greek key pattern,not a solid gold band. And in order to decide what color would work best for the background of that key pattern, I started stitching small "samples" along the side of the silk mesh.

I had shown sample of the options I tried so far... a paler gold background.... (bottom) the kit threads as specified (next above) the cream background (third from bottom) the dark blue (fourth up) and the navy blue (top option). And by then I had realized I really needed to include the dark blue outlines for this band in order to get the real effect. I had not intended to try the pale sky blue that is the background of sky with the dragons in the center.....(a piece of the design added by me) because I was pretty sure it would not work at all. But when a Dear Reader suggested I could try it, I thought that this would be a great example to use to show how some colors just do not play nicely with each other! Rather than just try to describe why... they are too similar to each other in intensity (or tone, both being mid-range) and too dissimilar in hue (they just cancel each other out!)..... I should show why by stitching a sample.... 

 
Can you even see the stitched sample above the navy blue one.....?
 It was extremely difficult to get it to show up in photos!


Here you can see I am adding the blue edges to all the samples...

 
Here is a closer view of the samples.... 
trying to get them in enough light... 
but I swear, the gold and the sky blue just swallow each other up! 

 
Here it is even closer... 
and you can see that the design and the background are too similar in intensity,
 neither one dominates, so they just cancel each other.
 And viewed from a distance, they combine to make a slightly green hue....!
So you can see my dilemma, Dear Readers,
 in needing to choose an alternate color than the kit specifies, 
without changing the original design color balance.... 
I am still undecided. So I am stitching the parts I do know first! 

 
Maybe by the time I am done with the outer borders, Dear Readers,
 I will have answered the question of which Color to use...