Showing posts with label Snowy Lilac Bush. Show all posts

Tuesday, January 9, 2024

Snow....!


Just A Touch of Winter....

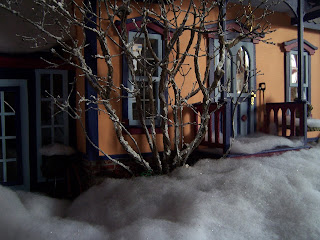
I Hope you will Understand, Dear Readers, that it has to happen at least once a year, or all the effort would have been wasted! I refer here, to pulling out the "Snowy Lilac Bush" and creating a Winter Wonderland in the yard of The Folly dollhouse! As you can see above, it snowed quite a lot! As some of you remember, this lilac shrub was part of the Epic series of Lilac Shrubs that I created, one for each season of the year (sort of... there is no "Autumn Lilac" because they just drop their leaves overnight at the beginning of Winter), but four Lilac bushes were created and the "Snowy Lilac" was actually the first to be completed, being the easiest one to complete having no leaves or blossoms. I put it ahead of the "Bare Winter Lilac Bush" because I was so eager to see if the snow would look okay on the stems. And if you have ever spent time in the North with Lilac bushes, you will know they spend many months with bare stems, and only a few magical days "dusted" with snow! 

 
Of course, it is Winter, and gloomy so you will have to
 excuse the dark and poorly focused pictures...
 
As you can see, nobody has come out.... 
Nobody is going anywhere in this weather!

Oh, beg your pardon, Mr. Gnome, 
I didn't see you under all that snow!
"Hmmph...!" declared Mr. Gnome, grumpily. 
"Don't know where else I'd be. It's not as if 
anybody was building me a Home or anything... 
Not that I'm complaining mind you," he muttered.


"Ah, yes," I replied.... "about that home thing... 
I still have a few tasks ahead of that in the list...!
 The Tree House isn't quite done and there is a Rhododendron
 or three in the process...you might have to be
 patient a little longer..." I added apologetically.
"Hmmph" replied Mr. Gnome.
 

"I'm sure you could hide in "The Glass House".... 
I added hastily, "I'm sure nobody would mind!"
But he was no longer talking to me, Dear Readers, 
and I have other things to see to....
So I hope you don't mind if I rush off now.... 
the Christmas Card is not quite finished...
But I thought you would like to see just a touch of Winter...
Snow!


And yes, we had a touch of Winter in RL too!
This fell on Sunday, although it is going to pour rain all night tonight.
A Brief touch of Winter!


Tuesday, March 15, 2022

Spring Snow....


Comes And Goes....

I suppose, Dear Readers, some of you might have Wondered whether there would be any snow falling on The Folly this year! After all, what was the point of spending all that time making Seasonal Lilac shrubs if one never puts them to use in Seasonal display? This winter has been rather inconsistent in this neck of the woods, with extremely warm weather in December, quite cold in January with almost no snow, some of Everything in February, and now a rapid series of storms that have both very warm rainy parts and very cold very windy snowy parts! Last week we got six inches of a heavy wet snow which was all melted two days later in time for rain and freezing rain.... suffice it to say we are ready for Spring! But all that snow reminded me that the Folly Lilac shrub had been neglected...

And Finally, it has snowed in mini blogland!
At this time of year it is challenging to get a well lit picture of the Folly.
It is still too dark in the morning as I head to work.
I had to wait for the weekend and hope for a sunny morning.
(And then remember to grab the camera at the right moments!)


Early morning.... before there are any footprints in the snow...
Before the shoveling commences...


As the light grows steadily stronger...


We can take a moment to admire that magnificent Lilac bush....


With every branch outlined in a Fresh Spring Snowfall!
Isn't that why I made the Seasonal Lilacs in the first place?


And here's the fresh snowfall on my RL garden....
 that reminded me I had neglected The Folly!
Spring snow, Dear Readers,
Comes and goes quickly!


Thursday, February 4, 2021

Snow....


Days....

It Snowed the other Night in my RL world, Dear Readers, piling up almost nine inches of fresh snow on top of five inches we had earlier in the week, which reminded me that you have not seen the Snowy Lilac bush in quite a while! And if I was going to take so much time and trouble to make the lilac all covered in snow.... I'd better be sure to trot it out at least once every year! So here you can see it just as the dawn is arriving....(this corner is a bit dark...) and it is still a gloomy day.

The snow has drifted quite deep in the corner by the Glass House
And no one has  been out yet to put tracks in the pristine snow.

Well, I know you probably don't remember
all the steps it took to complete even one lilac bush....
And my reason for having one bush for each season...
was Just so I could come here 
and Play in the snow in the Winter!


So I really hope you don't mind me indulging in a
Snow Day!
(Even though I am supposed to be 
at my desk working at home....
 I can take my lunchtime to play!)

Oh look!
 It seems I'm not the only one who wanted to play!
 
 
Mr. Greene has decided to try some "sledding..."
Mrs. Red is not so sure this is a good idea!
 

 And look who else is here!
It's "Cloude-with-an-e"!
And he is chatting with Ms. Blue....
I don't think they know about the sledding....!
 
Mr Greene is ready.....
 

Wheeeeee......!!!!
 

"Oooops....."
 

At least the snow is soft!
 

But getting the sled back up the hill.....
That might take some doing!
 

Maybe "Cloude-with-an-e" could help carry it!
 
Well, Dear Readers, I hope you
 enjoyed Playing in the Snow with me!
Even if it was just a short break from Work...
These days, even Snow Days aren't the same!
I Hope you all are staying safe... 
and maybe playing just a little with your Minis!
 
(And if you missed my Christmas Card...
 I posted a picture at the bottom of the Jan. 18th blog post.)


Monday, December 2, 2019

Decisions, Decisions.....


Kit Bashing Continued....

You Might recall, Dear Readers, that I was hesitating to add the stones to the exterior of the Dollmaker's Studio ground floor while I had not decided how to fix the warped floor. After much thought and second guessing my original plan, I decided that I did not want to raise the floor level by adding any thickness to it in the hopes that thickness would defeat the warp. I think that eventually I will be firmly attaching the building to a base and that will have to be the "warp reversing" moment. Until then I have too many other parts that still need to be wrangled, and I am choosing to ignore the floor. It is supposed to be an "Old" building, after all! With that non-decision made, I continued to add the "stones" around the opening for that lovely door. At least I was certain that I could do this without getting too far ahead of any of the other "corrections" I needed to make to the structure.

I added the keystones next so I could be sure
 they were mostly centered above the door...

I needed to pad the opening at the left shoulder.... 
my cutting for the opening was a little off...
and the stones need to be snug against the door frame.

I was trying to keep the stones roughly even in size...

I think they ended up okay.
And now the door looks like it was made for this opening
 instead of the other way around!
And because I had last week off from work, Dear Readers,
 I was able to take the time to fiddle 
with the frame work of this structure.

I apologize for the dark pictures... 
I was just testing ideas and not taking good pictures.
I wanted to see the "whole" structure
 so I added the kit roof panels.
You can see that the side walls of the upper floor are not straight...
 since the kit has been "expanded" the floor
 no longer holds the shape of the walls properly.
I was going to need to add a "framework"
 to tie the walls together sturdily.

Then I thought maybe I could reverse the end wall
 so the little porch balcony was on the opening wall side
 instead of on the back wall.... 
this would allow more solid wall space in the interior...
So I gave it a try....

It would also make the extension created by the "Vignette" kit
 look less cluttered and more like an old Tudor building...

This really is a small kit.... 
the ground floor with the warp ignored....

Upstairs room with the door closed in 
where the balcony would have been... 
now there can be a wall for shelves of some sort...
And the large window on the end wall 
temporarily placed using the kit pieces...

And the attic.... 
still in the very undesigned stage.....

The frame I will be using for the end wall window....
just propped in place for testing...

I might still keep the little dormer 
on this side and add a tiny window....
We shall see!
But meanwhile it became Obvious that
 I needed to extend the sturdy framework
 of the front opening wall....

Because the upper storeys would also need to have hinging doors to close...

There was only the small upper section of 
the plywood wall to attach the posts to.....
So I used extra screws.

And once the front posts were in place, 
I could properly measure for the crossbeam 
needed to join them at the ceiling height.

And I could see that I would also need to add
 another support post at the back corner where the 
Tower stairs would join the building...
 which also required correcting the 
warped corner of the plywood 
with More Screws!

Here you can see the two posts where the Tower will attach.
 The left hand door is the entrance to the tower stairs...

And the crossbeam that will brace the upper floor 
and the frame for the opening side doors...
Firmly screwed in place!
And after all that jostling and bumping....
I decided I better glue those stones onto the floor...

Before I lost track of how they fit...

See... I am ignoring the warped floor for now!

But here you can see the upper walls propped in place
 with the new sturdy posts... I just have to trim off all those tabs...
And I really wanted to get the rest of the front opening wall doors cut...
 I just forgot to take any pictures.

Here it is being tested for fit 
before drilling and screwing it in place...

Here the rough panels are attached. 
The little balcony will attach on the opening panel
 and the door will open inward....

Here the door has been added... 
the size of the balcony will need to be carefully fit
 within the opening part of the front wall.

That is as far as I got on the Dollmaker's Studio, Dear Readers...
Every step required three times of taking everything apart and thinking again...
but such is the Nature of Kit Bashing!
You get to take everything apart....
 and throw out the instructions....
But you need to be prepared
 to make lots and Lots of Decisions!

And in case you wanted to know... 
the day before Thanksgiving...
 all the leaves had fallen from the Lilac at The Folly...

And the low winter sun reached way into the room...
and then Last night it Snowed!

I could not resist having a little Snow Day....
But Alas... there was no sun to shine in....
I will be sure to let you know when it does...!