Showing posts with label Gypsy Wagon Doors. Show all posts

Thursday, July 20, 2023

Little Progress....


Trims, Blossoms & Borders....

Well, Dear Readers, I really have not got a lot to show you this week, but I have been chipping away at the usual myriad projects. The Gypsy Wagon bed chamber doors, for instance, needed the trims for the door on the side facing the main compartment. I dug around and found the piece of trim I had already stained quite a while ago (years!) just waiting to be cut, fitted and glued in place! You can see above, that the side pieces need to have their undersides cut away where they fit over the hinges (oh, look at all those glorious hinges!) so they can glue securely to the wall surface. It does not matter that this covers the screws on one side... if the doors ever need to be removed (why would that ever happen?) they can be unscrewed from the other side instead.

It did not take very long to carve away the undersides for the hinges. 
It took only slightly longer to fit the sections for the arched top.


I know my sections are not even or "properly" mitered....
It is easier for me to just measure cut and trim....
(and who but me is going to notice this uneven spacing?)
 

The doors still need their "air holes" drilled... 
but I left that for another day while the glue was drying.

As for the Rhododendron Blossom assembly line...
I am still not getting it very organized!
I have made quite a few "clusters", 
and even more blossoms...
 

I am making the blossoms in batches of ten. 
It seems an ideal amount for a cluster
 (I counted when the bush was blooming!)
And I have made seventeen "batches" so far.... 
and started the eighteenth!
 

Here the stamen clusters are glued and the blossoms cut and shaped.
Next they get painted and assembled.
 

But I have only glued together ten batches into "clusters".
And I am way, way behind on making the leaves. 
I really think I need to make a batch of leaves for every cluster.
This is totally different from the process of making the lilacs!
I need to get the leaf making and attaching figured out!
But still, seventeen blossom clusters is not too bad
 for a couple of months occasional work! 

And I know it has been ages, Dear Readers,
 since I showed you any progress on the petit-point carpet...
 

Here you can see I have made quite a bit of progress stitching the outer borders. 
(I think you have to look back to February to see the last update!)
 

It is very slow going!
But you can see, Dear Readers,
 there is a Little Progress
 in some of my many projects!

Wednesday, July 12, 2023

Gypsy Wagon Details....


And More Rhododendron Blossoms...

I don't Know about you, Dear Readers, but Time has been playing tricks on me lately! It seems like only yesterday that I had painted the inside of the Gypsy Wagon Barn addition and got side-tracked with the sleeping nook with the rabbits and roses. I had several unfinished parts of the Barn that needed to be completed once the paint was dry, and I worked on them the very next day. That was almost two weeks ago! But before I show you those details, I wanted to remind you of who lives in this little traveling barn; the goats of course! They are still waiting for me to add the straw bedding and some hay to munch on. The nanny's name is "Jingles", and her kid is "Jester". (Thank you, Birgit for sending him many (but who's counting....) years ago!) The parts of the Barn that I worked on were the chicken coop doors, and the "pannier" cages. 

The chicken coop boxes needed to have a mesh screen added to the openings.
I dug in my supplies and found some already "prepared" scraps
 from way back when I was working on the Tree House windows!
They were already painted and the rectangular scraps
 were exactly the right size once cut in half!
 

 All I had to do was apply glue and let it dry!


Here they have all been glued. 
Once they were dry I decided it needed
 an extra "frame" on the inside for strength.


I decided cardboard would do the trick and cut the openings.
I painted them before cutting them all the way apart.


And glued them to the inside of the windows.

As for the "pannier" cages....
 I forgot to take any progress pictures of the attachment process! 
(It was difficult and fidgety!)


These "cages" had been constructed ages ago...
 and they have been  falling off every time the wagon is moved... 
it is a miracle that they are intact!
The "problem" that slowed my completion 
 was that the holes for the bars at the bottom
 needed to be made larger.
 And the drill doesn't fit in close enough to reach all the holes!
The ones at the edge by the walls couldn't be enlarged.
And I had to align one bar at a time into it's hole....
they kept popping back out!
 Tweezers helped me to push them in... 
their alignment was not exact in the first place
 so they needed to be bent a little....
Bit by bit I got them in the holes... 
but then I needed to get glue in there too!
If you look carefully at the first picture
 you can see a line of glue along the base...
applied with a toothpick!
Whew!
And there were two of them to do!
It took a lot of patience and persistence!


But I got them attached!
And the little "doors" still work perfectly!
And yes, somewhere, the bunnies who will live in them are hiding...

And as for the Rhododendron blossoms, Dear Readers,
 I have been working on them "intermittently".
I have not been able to make a good "sequence rhythm"
 to the construction process,
 in part because I am not happy with
 my methods of joining the florets to the stem!


I am trying to get the minimum length
 of the floret stem needed to attach it,
 and not add too much bulk to the cluster
 where it joins the stem.


Here you can see how they get very "thick" as a bunch.
The problem is exacerbated by the addition of the leaves... 
which need to spiral out right below the blossom cluster.


Here are the first three clusters grouped together
 the way they will be on the shrub...
 they will be densely packed together.
But in this picture you can't really see the ugly mess
 that is the stems attachment below the blossoms.

And at the moment I am Way behind on making the leaves....
 which need at least 8- 10 leaves per blossom cluster.


Here are some of the still not assembled blossoms....
And I am not sure whether I should use
 regular paper rather than card stock for the leaves....
Decisions... decisions...!


The one thing I am sure about, Dear Readers,
 is that I think the blossoms look wonderful in the cluster!
So even though Time is getting away from me, 
You can see I got a tiny bit done on the Gypsy Wagon
 and the Rhododendron blossoms!


Monday, May 21, 2018

And A Little Bit More....


How Long......

I tell Myself All the time, Dear Readers, that I will finish this Lilac Shrub project Someday.... and I will! I Promise you! But the longer I work at it the Crazier I think this Idea is! I know, creativity and insanity are sometimes not very far apart! But I tell myself that I will persevere! I will just make the next blossom and then the next and then the next..... and eventually I will have enough to decorate the shrub. And then I will worry about the Leaves.... which are needed for two of the shrubs.... when I get there! Meanwhile, I fret about all my Other Projects.... which surely need some of my attention... and certainly I could maybe devote just a little bit of time to them each week... so as to accomplish something on anything that is not just another lilac blossom..... *Sigh* ...... And then I remind myself that there are Three other shrubs also needing my attention.... and I decide to devote my Wandering attention to them for now! Above you can see that I have placed the second "branched" shrub in place beside the porch so I can test the fit of all the branches. They have very little room to fit under the eaves of the porch and really must bend just so in order to be able to fit in and out of the garden spot!

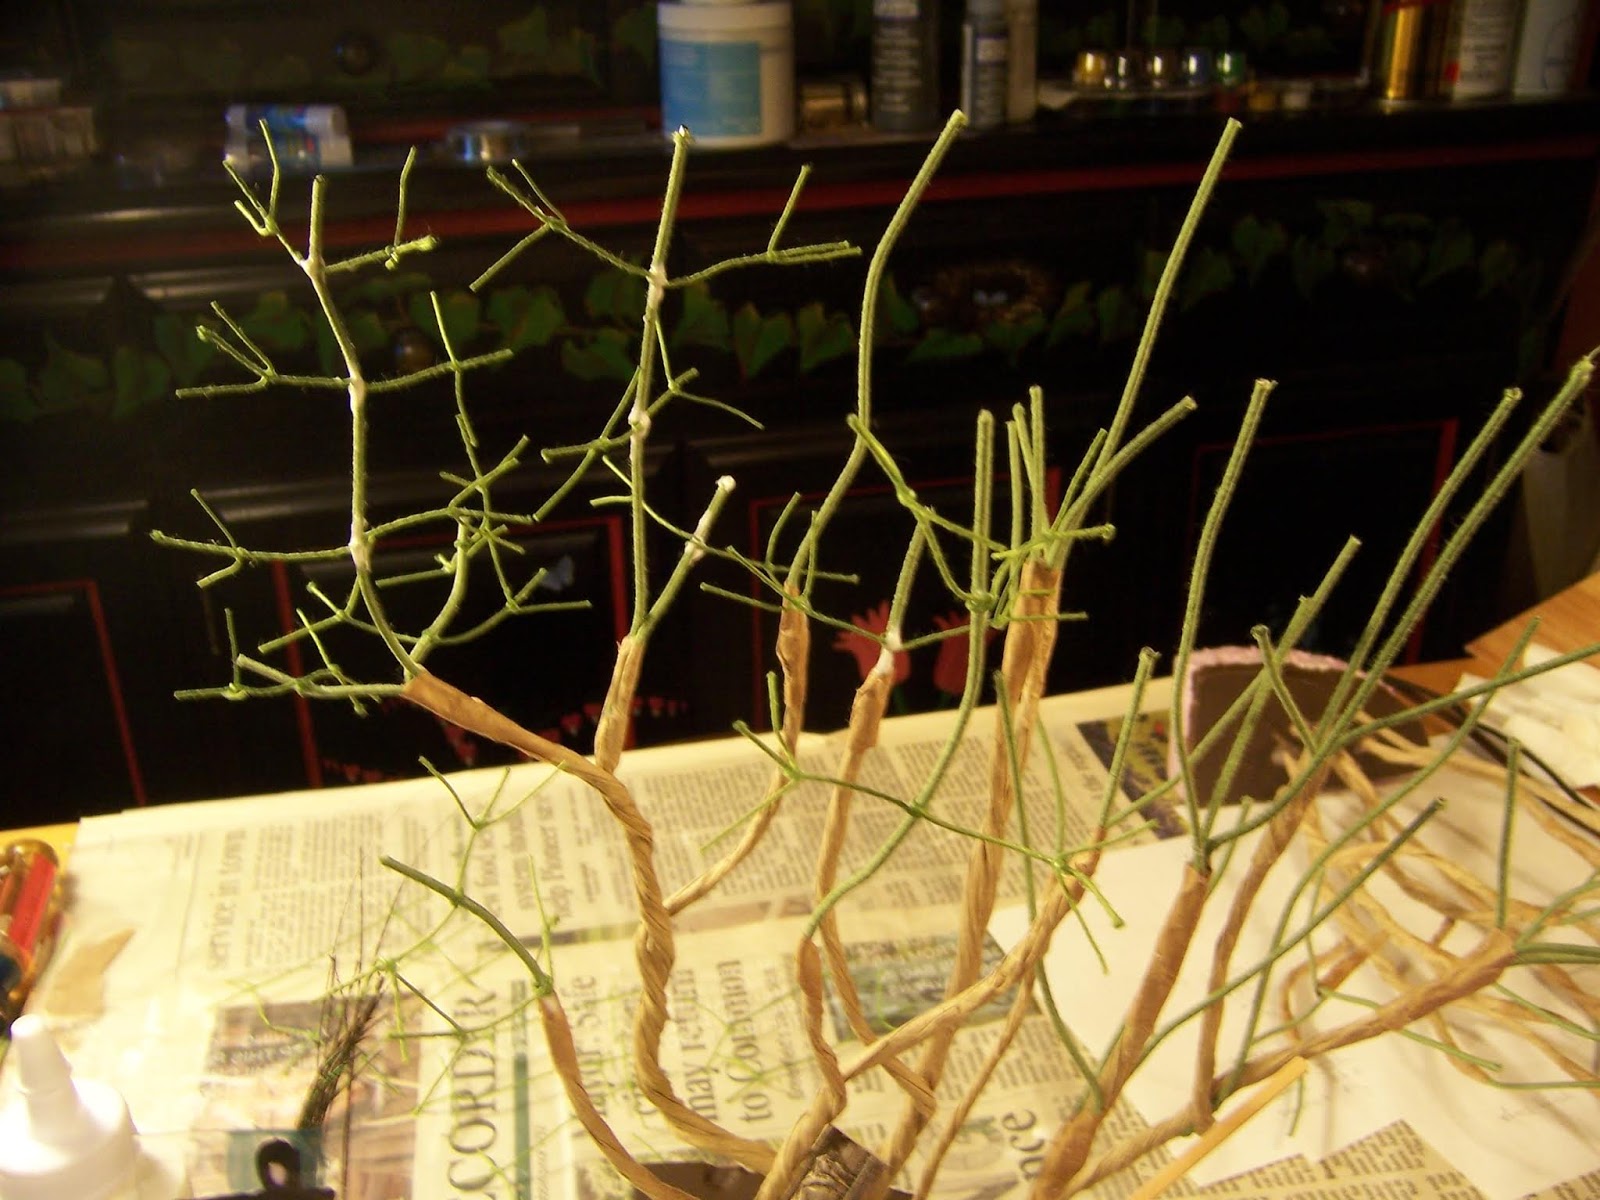
And here you can see I have begun to add the branches to the third shrub!
And just so I can keep from getting them confused
they are numbered on the under-side of each pod!
And as I progress with this third shrub, 
I have decided that I simply Must get
 all four of the shrub "skeletons" finished
 before I lose track of the steps needed to finish each one!
That means I need to finish branching and
 painting and "texturing" each shrub....!
Yes, I have a Loooong way to go!

But look....! 


This week I have managed to complete Two more lilac blossoms!
The pieces for number eight are being assembled to the right.... 
and hot on their heels are the florets
 for number nine in the box at the left...!

Here are eight completed......

And number nine too....!

And here are all nine in the box!
(Only How many more to go....?)
I will not count because
 I do not know exactly how many I will need...!
But I am making progress!
 And I have only been making them for seven weeks!
(I think I can do this!)

And because You are so good and Patient 
with this project, Dear Readers,
 I have traveled back through my archives
and found another project that you have not been shown....
and I will share it with you now even though it is not yet done....
It has to do with the Second Gypsy Wagon,
 the one that belongs to The Fortune Teller.
 
 
And I must confess, that when
 I began to build the Gypsy Wagons
 a couple of Summers ago, 
I was embarrassed to show you both wagons...
 because it seemed like it was too much.... 
but I knew there had to be two wagons
 because the Gypsies would travel in a group...
so I only showed you the first wagon....
 but for every step on that wagon
 I was doing the same with the other wagon too! 
(I know, it sounds familiar, doesn't it?)
 
 
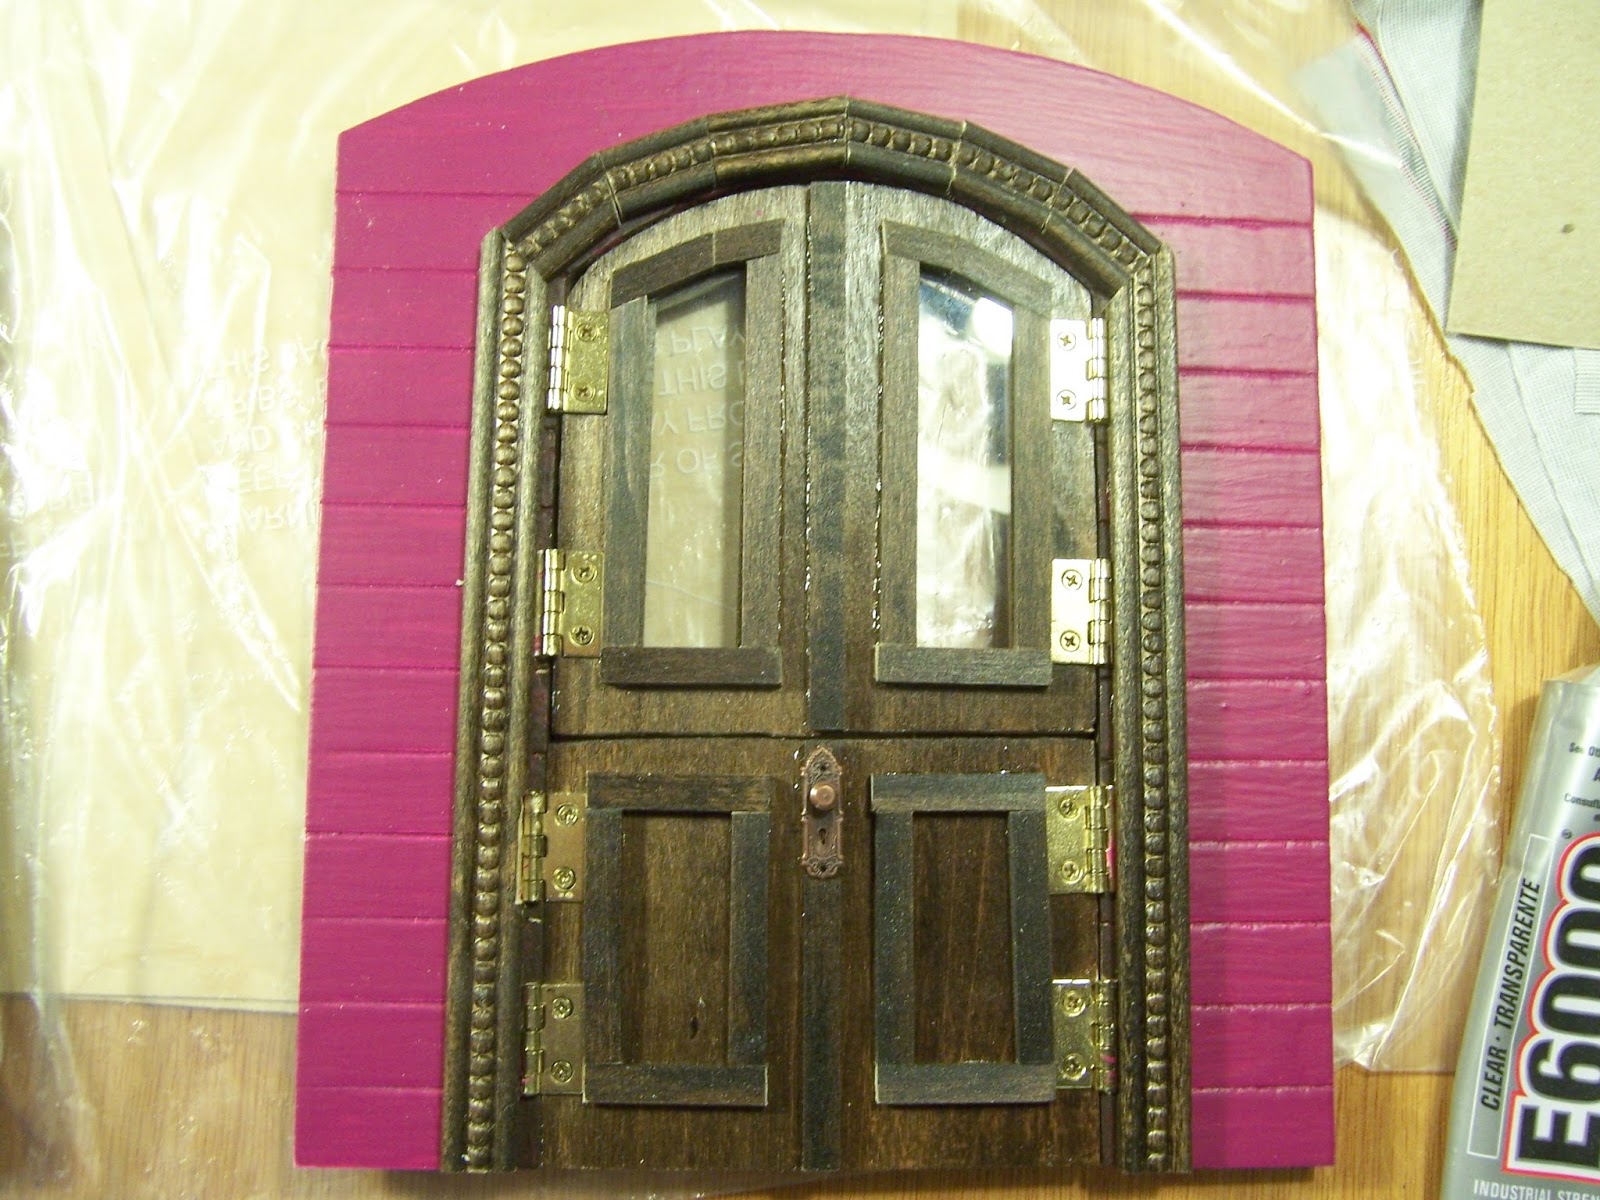
And the only differences were in small things,
 like the style of the carved trims around the doors...
 or the color of the wagons.

But then I decided that one of the wagons
 would have an extra window in the back wall
 of the sleeping compartment... high up.....
I could just see it with a deep window sill...
 with flowering plants on the sill...
So I cut the opening for the window!
And then, many months later, 
when I was thinking about how I was going to Build this window....
 because all the kit came with was 
the lovely frames for the windows... 
(I added all the glass panes...)

It occurred to me that in order to have 
a deep window sill to hold flower pots.... 
it needed to hang off the back of the wagon....
 and if it was hanging off the back of the wagon...
 then maybe there should be a "chest" or "box" as well... 
something to store things... 
that would explain the extra depth of the window sill.

So I started to build a framework 
that would attach to the back of the wagon.... 
with shelves maybe... 
or compartments......
 Or nesting boxes for chickens!....
 for surely the Gypsy Grandmother 
would want to have her chickens!
 
And it could attach like this...

And have nesting boxes like this.....
and doors, of course......


 with lots and lots of hinges!!!
 
Because all the compartments needed
 to be able to access separately....
 one chicken at a time.... 
and the bottom area for bigger creatures...
 maybe a goat or two?

And all those doors need extra interior trim
 to cover those sharp screws......
(And I have not yet decided how they latch!)

And since we have just added a Barn
 to the back of the wagon....
 perhaps there is still room for shelves in the corners... 
to hold a plant or two.... 
herbs, for example....
 and perhaps a cage or two...
(might as well maximize the real-estate while we are at it!)

Which could hold chickens or rabbits too!
(Just Think of the possibilities!)

One on either side..... 
with a hinging door.....
(Hinge still not added)
And the garden shelf above....
(still not added...)

So you can see, Dear Readers,
 what happens when you deviate
 even a little bit from the plan.....
But did I get my deep window sill?
 
Well, it's a start!
(It still needs all the trim....)
 

And with a temporary roof.....

And perhaps the suggestion of bedding.... 
oh, we have such a looooong way to go!

But I assure you, Dear Readers,
There will Always be A little bit more....
More to do and More that is done!
And I hope it will continue so for a Long Long time!


Tuesday, November 7, 2017

Where Was I.....?


Hmmmmm..........

It was weeks and Weeks ago, Dear Readers, that I last accomplished any building on any of my many projects! I hope you will be able to remember that I was building the attic "knee walls" for the Lovely Old Dollhouse sometime back in September, before I got swept up in the recent story-telling binge. This was a project I had been contemplating for nearly fifty years!!! I had even made a version of these knee-walls back in my teen-aged years when I was first trying to "up-grade" the decor of the dollhouse, but my construction methods were not sturdy and did not last. This time I am being a little more thorough and not relying on glue alone to attach the parts. At the moment they are all still removable while I decide how detailed the walls and doors need to be. But I did manage to add a coat of primer to the basic parts! It makes an amazing difference in the feel of the rooms to have the walls painted!

Of course, the lighting is not very good in my photos... 
and you can hardly see the wall behind all the furniture..... 
but that is sort of the point! It now feels just like a wall!

And the same is true of the bedroom....

I am still not sure if I will be trying to make 
the walls appear to be "bead-board" paneling....
since that is a later style of decor than the supposed era of this house. 
But I probably will... 
because "up-grades" would have been done over time, 
like with the kitchen walls.
 
And these were not the only walls I was painting, Dear Readers, 
as you may have spotted in that first photo!
I was also working on painting the 
sleeping compartment of the second Gypsy Wagon!
 
Here I have started to paint the dark blue base coat.
 
(Yes, I know, I have not shown you this second Gypsy Wagon!
But you might have spotted it in the Meadow with Beatrice!)
It is becoming quite different from the first, 
starting with an extra rear window in the sleeping compartment.
And I wanted the mood to be more "mystical"....
beginning with deep blue walls and silver-gray forest...

Here you can see how the walls fit together... 
only the gray under-painting has been done so far on the trees.

Here I have started to add the black details...
but decided that I really needed to add the silver color first...

You can see on the tree to the far right that I have added the silver .....

And now I am adding the black over the silver. 
I wanted a reflective effect because the compartment will be quite dark,
 and this way the trees will stand apart from the blue background.

Slightly closer shot.....

Most of the black texture added.....
There are still many details to be added... 
I have not decided how much foliage to add... 
but there will be more added!

Here the walls are assembled temporarily.....

And a hint of the decor... 
viewed through the compartment doors......

And closer..... 
Yes, it will feel much more Mystical than the other wagon!

And speaking of doors....

The exterior doors needed trim added....

And the doors needed the draft strip added to the center 
where the doors don't quite meet when closed.

And a lovely old tarnished bronze door knob too!

I love the way it looks in the morning light!

Well, Dear Readers..... 
I seem to have discovered where I was 
All those weeks ago!
Where I am going is another matter altogether....
Hmmmmm.... we shall have to wait and see!