Monday, April 29, 2019

And Still More Leaves....


So Little To Show.... But The Promise of Spring...

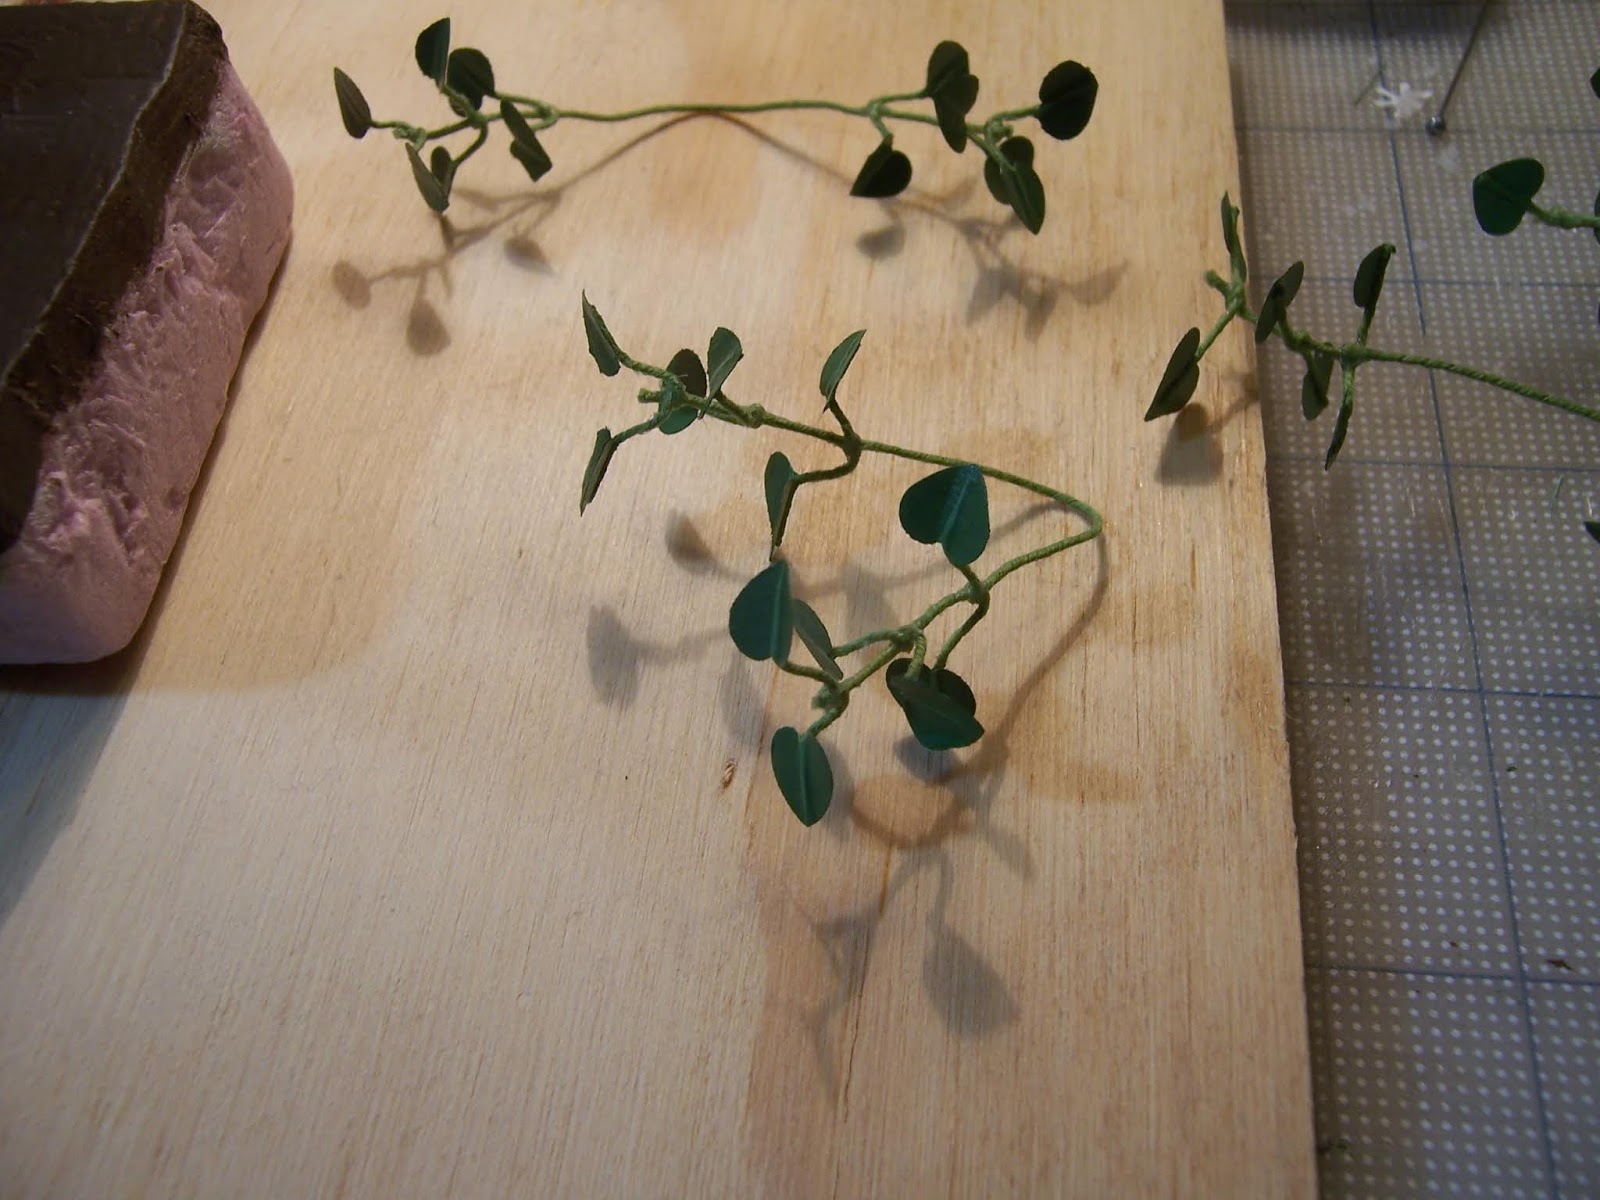
I am Sure you will be screaming in frustration, Dear Readers, when I tell you that the Lilac Shrub is still not covered in blossoms. I know, it is taking forever to assemble all the parts of this soon to be Glorious blooming Lilac bush! And I will reassure you that I am Not screaming in frustration, but am jumpy with excitement that we are Almost there! But I cannot bring myself to show you even a glimpse of the shrub in progress.... I just don't want to spoil the "reveal" of the completed bush. But I can show you another little detail that I realized was necessary to add in order to complete the blooming shrub. Above you can see the beginnings of leaves which need to be added to the stems of the single blossoms. They need to be glued and painted before attaching them to the already finished blossom stems. That way there is less risk of damage to the blossoms. I have only made this sample bunch because I don't know just how many I will need in the end!

I painted them the same way I painted the rest of the leaves...
first a stripe of pale green down the middle of the top side
and then the undersides are painted in the same green.

Then the top sides get the darker green painted up to the middle,
 leaving just a thin stripe of the paler green showing for the center rib of the leaf.

Then the leaves are twisted around the blossom stem and glued securely.
(This means waiting while the glue dries!)

And when it is dry, you can shape the leaves
 as I showed you in the last post....

So the stems are pointed upwards and the leaves fold downward.
Now this blossom is ready to attach to the shrub!

And lest you think I have been doing nothing, Dear Readers,
 I will tell you that the ninety leafy stems I had completed last week
 have all been glued to the shrub!
And I have made ten more leafy stems this week,
 bringing my total to 100 leafy stems!

Here are the last ten ready to be attached to the shrub!
But I am realizing that my original estimate
 of needing 120 leafy stems was probably accurate.
So I will be doing my best to make 20 leafy stems this week.
Because I Promise you Dear Readers,
 that Next week this lilac will be in Bloom!
 
And just so you know,
 Mother Nature is still not ready either!

Here you can see my RL lilac shrub
 with its tiny blossom just barely started from the bud.
The lilacs rarely bloom before May in this part of the world,
 and we are having a slow start to Spring.

Yes, there are Still more leaves to make, Dear Readers,
 and the blossoms to attach as well,
 But I just can't tell you how Excited I am
 about the Promise of Spring!

Monday, April 22, 2019

Leaves At Last....


Slowly Growing....

My collection of Leafy Stems has been steadily growing, Dear Readers, and even though I have a goal of approximately 120 leafy stems for this shrub and I have only completed approximately 90 leafy stems, it has reached the point when I must begin to attach them to the shrub itself! This is because I realized that the stems need to be attached before the blossoms, to protect the delicate blossoms from being handled too much, and also because the stems have to be attached in order from the lowest or closest to the ground, to the highest in order to be able to fit them around the branches of the shrub. It is a very crowded shrub from the point of view of the leaves! Even with that in mind, the leaves are only growing on the uppermost parts of the branches, because they would not get enough light in the lowest parts of the shrub. If you have ever climbed into a large tree or shrub you will notice that the leaves are only on the very outer edges or ends of the branches, leaving the inner area open and yet sheltered at the same time. And because the "removable garden pods" that hold each of these Lilac shrubs are all unbalanced when not in the Garden, I needed to construct a "stand" to hold the shrub while under construction so that it would not tip over as I was working on it.

I simply pounded a nail through a spare piece of plywood... 
large enough to add stability but not too large for the work space...

The "pod" fits over the nail and is easily removable
 for any quick maneuvering of branches or glue or paint.

And then it was time to begin to attach all those leafy stems.... 
but not before they were carefully "shaped" 
the way they would be on a real bush.

When the lilac leaves grow, they are reaching for the sun,
 so their stems all point upwards,
 and the leaves themselves have a fold along the center,
 and open out like little parasols to catch the most sun.

Here you can see a stem with all the leaves folded.
 
 
And here the stems are pointed upwards...

And then you open out the folded leaves, 
with the stem still pointing up but the leaf pointing down...

Like this!
And you must do this for every stem!
And then wrap the stem around one of the branches and add glue.

And you need to let the glue dry on each attached leafy stem
 before you add another one... to prevent dislodging the first one. 
You can shape the leaves on the next stem while the first one is gluing....
Yes, this will take a while!

And before you have added too many stems, Dear Readers, 
you must remember to paint over the wire
 where it wraps around the branch... 
with the gray of the lilac bark
so it looks like the branch, 
not the new leafy green stem!

Here you can see I have attached about a dozen leafy stems....
I have tried to begin with the branches in the center of the shrub
 that would be the most difficult to reach... 
and to work outward from there...
So far I have added two leafy stems each
 to many of the shorter branches.
The longer branches will need more leafy stems each.

And we have to test it in place in The Folly Garden... 
to be sure we are leaving enough clearance under the roof eaves......

Those leafy branches do get crowded under there!
(I am sure you can see the nest!)
There will be more leafy branches added on the taller stems... 
and of course, the blossoms too....

And the branches in the front of the shrub will get filled in too.....

It might be slow going Dear Readers,
 but the Spring Lilac Shrub
 is getting it's Leaves at Last!


Monday, April 15, 2019

Fifty-two Weeks....!


And a Few Little Details....

It has been Fifty-two Weeks, Dear Readers, give or take a few days, since I embarked on my Blossom-a-week project for the Lilac bush! And I am ever so Happy to be able to say I did it! I made one (or two) a week for Fifty-two weeks! And now I have a box full of lilac blossoms which will soon cover the Spring blooming lilac shrub for The Folly Garden!

See? Here is the box with almost all the blossoms 
(remember that I had attached four of them to the shrub
 before I realized I had better complete other details first!)


And here also are this week's batch of ten leafy stems..... 
which makes the tally somewhere around eighty leafy stems..... 
only forty or so to go!
And since I am now on the brink of launching the stem attaching program.... 
I thought I had better take care of a few of those other Tiny details first...

Such as finally adding the fungus
 (which is very delicate and so it should be added last...)

to the bare stemmed Winter shrub.

Here you can see it closer... 
the fungus are on the dead stump at the back.
And I also added a few of the "sucker" stems.....

Which you can see in this overall view.
At this point I am just trying to make this shrub match
 the one that has the snow on the branches.
I am fairly certain that once the blooming lilac is completed 
I will be adding a whole bunch more suckers to the front of the bush.
But I want to complete the blooming one first!

And Another Tiny detail that needed to be done first Dear Readers, 
was preparing the nest for the Spring Blossoming Shrub!

I made a few Robin's eggs from sculpey
 and painted them Robin's egg blue!
I think they are a tiny bit too large....
 but they will be mostly hidden in the foliage...
so I am going to use them anyway.

And then the nest needed to be attached to the shrub.....

This always requires a surprising amount of delicate twigs and glue
 to fill the space between the branches...
(I really don't know how the birds do it!)

Now the nest is ready and waiting.... 
the birds cannot be far away...!
But I promise you I will not be showing them any time soon... 
because I will be busy working on the branches!

And even though I have reached my goal 
of blossoms for the shrub, Dear Readers,
 I will still be making blossoms for a while... 
because there need to be a few for bouquets!
And yes, there might even still be
 a Detail or Two added to the Winter shrub....
After all, it is still a few weeks until the Lilacs will bloom!


Tuesday, April 9, 2019

Snowdrops....


The First Arrivals.....

Some of you, Dear Readers, may have seen your Snowdrops come and go weeks and weeks before now, but here in the North we are finally seeing them poke their heads out of the frozen earth! They are nearly always the first flowers to emerge in the Spring... their tiny white blossoms sometimes nearly hidden by the still snowy ground.... barely visible unless you know where to look and are watching for them. I have long intended that there be a clump of them under the lilac shrub, and have to admit I was running out of Time to get them made! Last weekend was the first real opportunity to clear last year's leaves from my RL garden, and so I suddenly found myself behind on my production schedule. But rest assured, I finished the lilac blossom number Fifty-one!

And here it is in the nearly full box!

I can't tell you how excited this makes me!


And another boring batch of ten leafy branches done!
But would there be time to make a bunch of snowdrops?
And could I even find the right sized punches in my tool box?

I had to try, even though I knew I needed to be out in my RL Garden too.
Above you can see the beginnings... 
painting a crescent of green on the inner petal tips,
 and dipping the green thread into yellow paint for the stamens.
The last time I had made snowdrops, (several years ago)
 I thought they had ended up a tiny bit too large for true 1/12 scale,
 so this time I started with a smaller punch.

Here I am slowly gluing the inner petals to the threads.

Here the three inner petals are all added.

I used a ball stylus to cup the outer petals
 before separating them and attaching them to the flower stem.

Adding the petals one at a time.... 
it is a slow process because you need to wait
 for the glue to dry between each petal.

Here you can see all the petals have been attached.
But then, Dear Readers, I truly had to go out to my RL garden.... 
and when I was done out there I was Exhausted!

So the beads for the tops of the blossoms were added later.
And I really wasn't sure I could finish the snowdrops this week.
But I tried anyway... painting a tiny bit of paper
 for the "hoods" at the tops of the stems...

They have stripes painted on the outer side, 
and tonal shading on the inner side...
not that anybody will be able to see the inner side when it is attached..... 
(but I will know it is there!)

The hoods get folded around the top of the stem
 where the blossom joins the thicker stem
 (already glued together here).

Here all the stems have their hoods attached.
 The blossom emerges from this hood as the flower blooms.

And adding a pair of strappy leaves to each stem.
In RL, these leaves are a bit thick...
 and I have not been able to make them appear that way in mini.
And I was rushing to try and get these done... 
to see how they would look in the Folly Garden...
 tucked under the Lilac shrub...

I only got four completed before it was late and I was tired.

But here they are!

Nodding their little heads...
(it just reminds me how many details are still needed here...
 those bricks need dirt and aging....
 there needs to be some moss....
 the lilac suckers are still not done.....)
But the snowdrops don't care! 
They have arrived, and that means
 it is truly Spring in the North! 

It sure is challenging to get good pictures of these little guys!
And tonight, Dear Readers, 
I added a couple more blossoms... 
because that clump was too sparse.

And there are still one or two more buds to add....
But I am running a little behind schedule here.....
Spring has arrived.... the Snowdrops are in bloom!