Monday, November 27, 2017

Teeny Tiny Upholstered Chairs....


Embellished....

Some of you, Dear Readers, might Not be surprised to learn that I love color in my decor! And some of you might remember that when I was first working on the furniture for the Secret Christmas House Sitting Room, in particular the two Wing-back Armchairs, I was having trouble deciding on the color to paint them. This problem was further exacerbated by not having the drapes in place, and therefore not being clear about the color scheme for this room. The drapes provided by the kit (only printed paper) were a fancy shape but a color that exactly matched the wallpaper. And the instructions for the chairs said to paint them a "lovely soft green that harmonizes with the room colors". So I tried. The above chair is my attempt to harmonize with the room color. I think it is very close, but I also think it is too bland. The chair disappears in the room! and especially once I had made the drapes in a darker green, I knew I was going to want to change the "upholstery" on the chairs! And since this room is just the "Sitting Room" and therefore less formal than the Parlor or the Dining Room, I thought I could get away with a less "matchy" look! And I hope you will not be too surprised when I show you the "fabric" I chose for one of the chairs!

Here you can see I am testing the pattern in the room.....
It is almost the right colors....
I wanted it to have one of those densely patterned Tapestry-like fabrics...

Here you can see it beside the cast iron stove.... 
I will darken the colors a bit more...

And here you can see both the Wing chairs.... 
I decided to not upholster them in the same fabric!
And yes, the green is not blue enough... 
I will darken it more too.

And while I am painting these chairs,
 Finally able to decide the colors because the Drapes are in place, 
I have also decided that I must start to glue the furnishings in place!
(Because Christmas is coming and I want to have this project done in time!)
So I started with the girl's bedroom, 
because the furniture was all completed.... 
or so I thought!

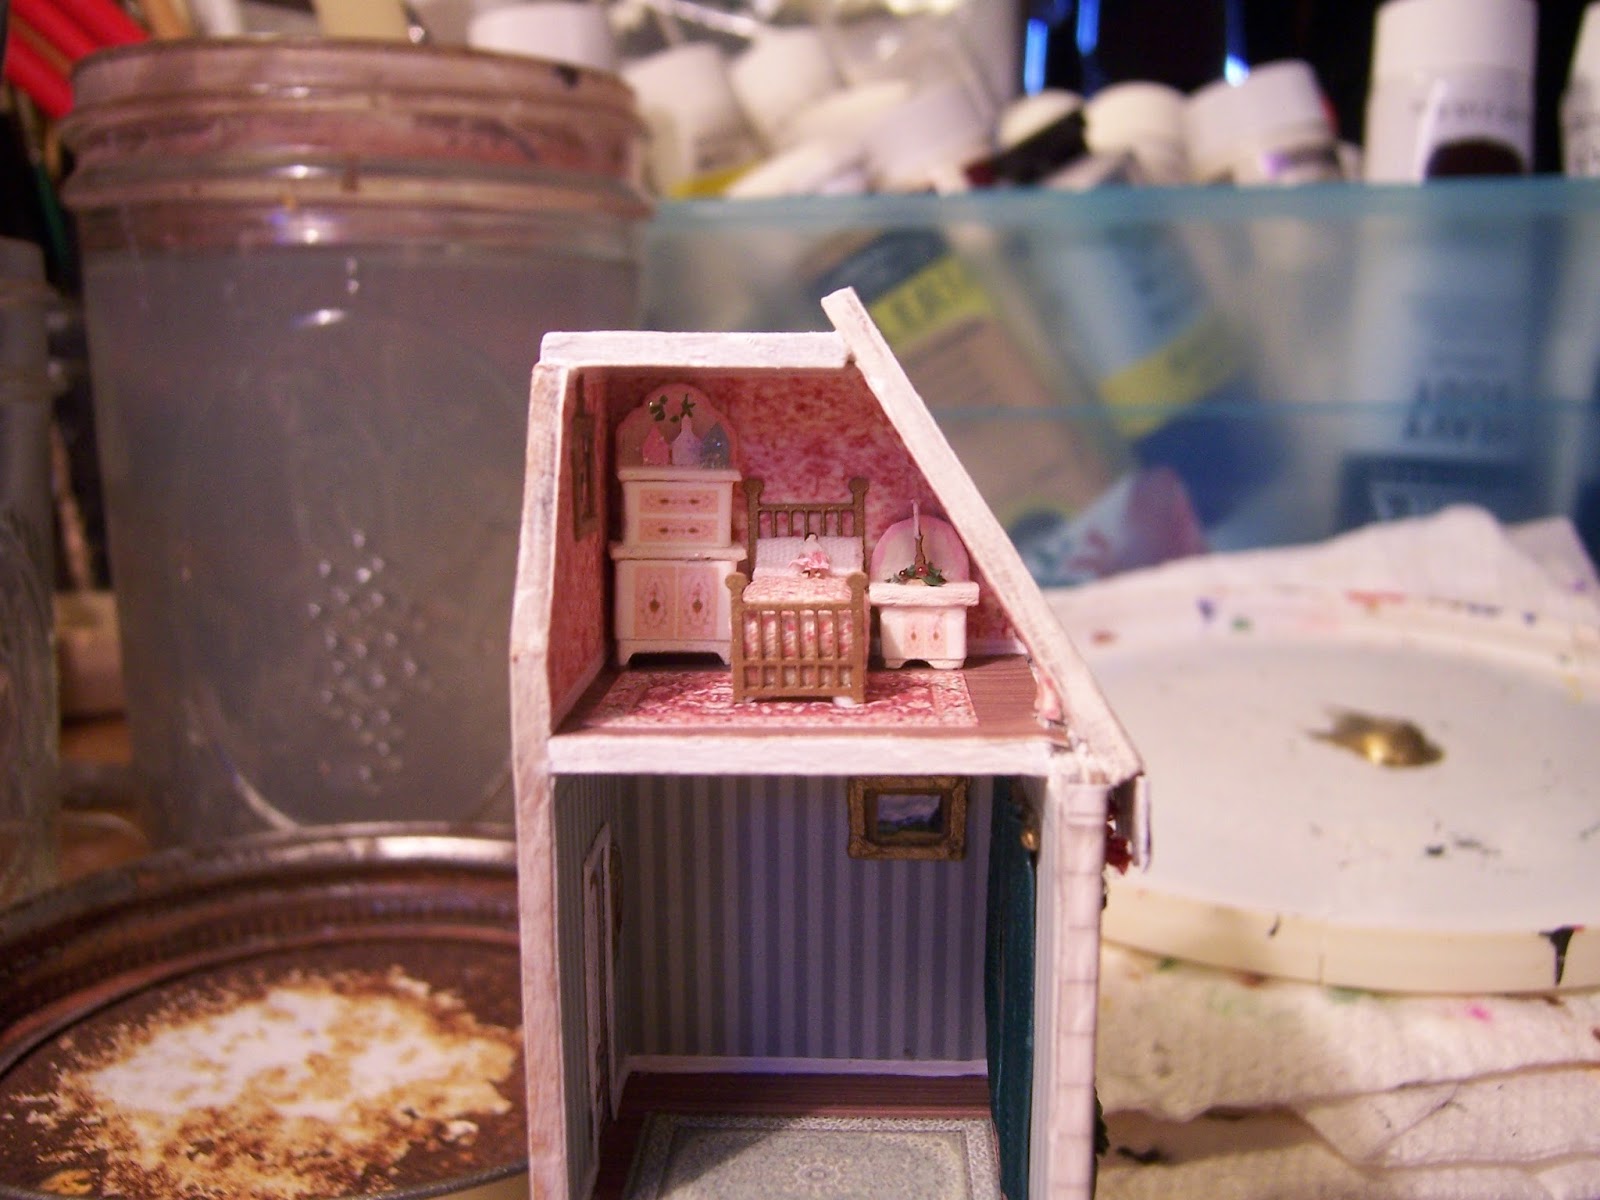
The Dresser, the bed and the side table 
tuck neatly into the back of the room... 
here finally glued down!

But when it came to the other side table
 which sits at the front of the room.... 
there seemed to be something lacking!
There was a little glitter tree in the middle 
and a wrapped gift on one side... 
and the other side was bare!
(And I forgot to take a picture of it just so!)
But I thought of something I could add....

A Teeny Tiny Snowman! 
(Made from tiny beads glued together and painted....)
Then I attached him to the side table....

See how well he fits?

And then I glued the table in place!
I think he looks perfect!
And then I decided to glue the furniture
 into the Mother's bedroom too... 
because it was mostly finished as well.

Starting with the bed and dresser and side tables...

Then adding the bedroom slippers by the dresser... 
and the shopping bag by the bed.....
(These are not part of the kit but my own inventions.)
 Here, can you see them better....?
Aren't those slippers cute?
And then I remembered that the Wing-back Armchair for this room 
also was in need of some "re-upholstering"!
The instructions wanted it painted white or cream.
I had thought that was a bit "ho-hum".......
So I painted it in a delicate rose floral pattern to match the wall-paper....
(even though I claim to not be a Matchy" type!) 

Can you see the pattern .... sort of?

And how it goes with the wall-paper?
And I had also made a tiny foot-stool....

Can you see it? 
(It is really hard to get these tiny items in focus!)
Maybe this angle is a little better...?
Well, never mind, 
it is also "upholstered" in the rose print "fabric"!

Meanwhile, Dear Readers, 
I have darkened the colors of 
the Sitting Room chairs by a good bit.
Now the dark green is a closer match to the drapes, 
and the "tapestry" fabric is a little toned down. 
I think I will continue to work on it... 
too much gold is still showing.
And then I started to make 
one of the "Embellishments"
 I have been dreaming of.......

I wanted there to be some "knitting" on one of the chairs... 
because my Mom knits... 
and that makes it feel like "home" to me!
You can sort of see my attempt to make knitting in the above picture...
 I know it is a little bit large.... someone is knitting a blanket!

Here it is draped on the chair... 
the ball of yarn is getting away... 
it will be positioned correctly 
once the chair is in place in the room!

Here you can see all three chairs with their "embellishments"!
The bedroom chair has a lacy "throw"... 
and the other sitting room chair has an open book 
(saved from the Library collection!) 
left on it's seat.

Here is the chair in Mother's Room... 
along with the footstool. 
They have not been glued in because 
there is supposed to be a pile of wrapped gifts 
behind the chair.... 
I have not finished them yet!

And here I am testing both the chairs in the Sitting Room.... 
the colors are pretty much the way I want them.
 (The ball of yarn will be positioned later...!)

Here's a closer view of the knitting chair....

Trying to get good lighting and a view of the drapes too....

And with the Tea Table in place.... 
can we still see the chairs?

Here.... a little closer....?
Yes, It is really difficult to get a good photo Dear Readers!
But I think the Teeny Tiny Upholstered Chairs 
are Embellished to Perfection!

Wednesday, November 22, 2017

Talking Turkey.....


Gobble Gobble Gobble.........

I Suppose I am allowed to feel a bit surprised, Dear Readers, that we are Already celebrating Thanksgiving, because it is falling earlier in the year than it has the past few years. This is because it is always the fourth Thursday of November whichever week that falls in! And as many of you know, this is when families on this side of the Pond are expected to gather together and "Give Thanks" primarily by eating an enormous Feast! And the centerpiece of this Feast is almost always roasted Turkey with "all the fixings"! Sally May loves to cook and was eager to host the Family Dinner again, and all the rest of the Family were more than willing to let her have her way. She spent all day in the kitchen preparing the traditional dishes.

Meanwhile, over at the Lovely Old Dollhouse, 
Victor and Joanna are wondering if it is time 
to head over to the Shabby Sister House 
where Sally May and Chip live. 
(It is a bit shabby because Chip is a builder 
and it is a fixer-upper that he promises will be fixed up someday!)
Will has been invited to join them 
because he has no family on this side of "the Pond".

Helen and Charles agree that it is time to head over.
They did not want to be too early 
as that would make Sally May feel rushed....
Sally May had said dinner would be at six.


There is not a great deal of room in Sally May and Chip's house.....
So it is very cozy once they have all arrived.
Chip's parents Ernest and Blanche
 have been there since the middle of the afternoon.
They live up the River and drove down for the Feast.

Joanna and Pollyanna head straight to the kitchen 
to see how they can help Sally May.
(She never likes too many helpers in her kitchen....
 the cooking area is quite small! )
But she has everything almost ready!
 
 The enormous turkey has come out of the oven
 and is just "resting"
 while she makes the gravy and cooks the peas....
 
Pollyanna carries the dishes to the Dining Room.... 
they will be eating "buffet style" 
as there are too many guests to fit around the table.

Joanna says "let me take the turkey.... 
that will give you more room in here...."

Annabelle says "I want to help....!"
 "You can help me sort the silverware...." replies Pollyanna.

Joanna set the turkey at the head of the table, 
then decided to count the napkins....

Sally May says " I think that's everything..."
"Shall I call everybody in..." asks Joanna?

Goodness! It is a crowded room!

Chip's Father always leads the song of Blessing....
everybody joins in, 
the familiar words echoing in the room ....
"Praise Him from whom all blessings flow......"

Chip loves the moment when he can begin to carve the turkey.... 
it makes him feel so useful!
Well, Dear Readers, we will leave them here,
 about to fill their plates and their bellies.
I believe they are ready to Gobble up the food 
they have waited so long to enjoy!

And as we stand back, 
I want to say to ALL of you, Dear Readers, 
how Thankful I am that you are Here!
I feel it is such a Gift that there are so many miniaturists 
all around the World who visit and share this mini World with me!
Thank you for your visits!
Thank you for your Wonderful comments!
Thank you sharing your knowledge and love of miniatures!
 
Oh, and don't forget to stick around for the Pie!

Yes! That Pie!
I hope you All can gather with Loved ones
 and enjoy the Feast!
Yes, it's Thanksgiving once Again
and we're Talking Turkey!
(Gobble gobble gobble.......!)

Monday, November 13, 2017

Teeny Tiny Curtains....!


Pursuing A Dream....

Some of you May recall, Dear Readers, my mentioning that I was not satisfied with the paper curtains that are provided with the Secret Christmas House kits. To begin with, they are very "fussy" and are just not my style. But more importantly in my opinion, they are Flat! As you may have noticed, I have been trying to add a third dimension to many of the pieces that come in these kits...(thickness to books, roundness to teapots and candlesticks, depth to picture frames and door frames to name a few!), so it should come as no surprise that I would want my curtains to appear more realistic and have at least a little bit of dimension to them! How to achieve this and with what materials has been the pursuit of many hours both waking and asleep. There was no way to finish decorating the Secret Christmas House without adding curtains.... and they needed to be added before the furnishings could be put in place. And in case you had not noticed... the Christmas Season is fast approaching! Would I give up on completing this project this year? Or would I try yet again to make suitable curtains....
The above picture will show you some of my attempts. They are a bit embarrassing.... made from coffee filter paper smushed into a curtain-ish shape and painted a color approximating the ones in the kit. Even with lovely gold trim, they just looked horrid when tested in place...

No, this just would Not work!
I decided I was going to need to be very precise with the "folds" of the material... 
and I also decided I would prefer to use cloth if possible!
From there I tried many methods of making the material fold like pleated drapes.... 
I even tried winding the wet cloth through the teeth of a comb while it dried!
But none succeeded in giving me a small enough pleat.
Finally, last weekend I decide to try making a wire "jig" 
to hold the material in place as it dried.

I thought that perhaps if I made a frame of wires in a curtain-drape shape,
 and placed the wet cloth over the wires....
Using a method described by Elizabeth of Studio E Blog...
 (The material is dipped in a watered down glue.... 
thank you for the tutorial Elizabeth!)

And then laid more wires over the wet cloth....
 pressed into the valleys between the first wires.... 
to hold the wet cloth down while it dried....
Then maybe it would dry with small enough pleats!
I also tested the method of just using pins
 to hold the fabric in pleated folds.... 
(which you can see above to the right.)
This method left large pin holes in the cloth 
and not enough consistency to the pleats.
But the wires method seemed to work fairly well...!

You can sort of see the test curtains here.... 
I know they are very pale and you can hardly see the pleats....
 but it shows promise!

I tested more versions with coffee filter paper.... 
but did not like the results.
Paper is out... cloth is in.
I quickly made more with the cloth...

Well, not quickly... it takes a couple of hours for the cloth to dry!
Here I am using an antique silk charmeuse scrap...
it has a very fine weave and a soft and malleable hand.... 
and is also a cream color that could be painted if necessary....

Here I am testing one of the dried panels in the parlor..... 
I think I am getting somewhere!

How about two panels together....?
I think these could work!
Now, Dear Readers, I am getting Excited!!!

Here I am testing the pale silk in the Sitting Room again... 
but I am not happy with the color for this room... 
it is too pale. The curtain just disappears.
And I am not really happy with the way it looks painted... 
that will serve as a last resort... 
but first I want to try other fabrics.

Starting with a green silk....
 the very same green silk I used for the bed curtains 
for the Tree House bed!

Here you can see several of the different versions 
together with the original printed paper kit versions.
The green silk is too "yellow" for the Sitting Room... 
so I try them in the Dining Room....

Oh my...!!! 
What a perfect color match!!!
And the fringe even looks okay!!!
So now I need to make the curtain rods.....

Like so...!

And testing the Parlor curtains......
I have decided to go with the cream color in this room... 
it tones down the pink a bit and won't compete with the Tree....!

And now I have Glued them in place!

The Sitting Room curtains wanted to be a darker green....

Here you can see it drying in the wire "jig"....

And in place in the Sitting Room.
It is hard to get the colors to look the way they are in RL... 
this appears a bit too blue in this light.
But the "green" in this room is a very blue-toned green!

But I must say, Dear Readers,
 I just want to Crow about these curtains!!!
Even though they will practically "disappear" 
when the room is all furnished...
 I think they look Perfect!

See what I mean? 
You hardly notice the curtains!

Here, come a little closer.....

I just Love the way the Light shines through them!
Well, Dear Readers, 
I just can't tell you how Excited I am
 by these tiny bits of cloth...
Catching that Dream....
Teeny Tiny Curtains!