Wednesday, July 27, 2022

More Stitching....


Great Progress...!

It was Dreadfully Hot all last week, Dear Readers, making it impossible to even Think about working on anything at all, no matter how little! The temperature was in the nineties farenheit nearly every day. A few thundershowers passed by every other day, but most of them missed us and we remain much too dry in this part of the Valley. Where I work, only 35 miles to the North of here, they have had twice as much rain as we have had all month! It cooled off on Monday night and has been quite comfortable, even chilly in the 50's in the morning! Needless to say, I got very little done last week. But I actually surprised myself by finishing the stitching on the brocade gown.... just a few stitches at a time! In the above picture you can see where I had gotten by Saturday morning. My chief problem at this point was figuring out the folds for the cloth as it "pools" on the ground. My first sketch was very inadequate!

Here you can see the chart before I had
 refined any of the details at the bottom.


And while I didn't get the design all figured out before stitching more... 
This picture shows the final chart. 
I had to really try to see where the folds would fall
 and where the highlights would be the most pale
 and where they would fall in the Lady's own shadow.


I started by completing the highlighted side of the gown
 because the folds there were the simplest.
I worked the blue trim at the hem first,
 and then brought the folds down to meet the hem.
It stayed pretty much the same as the original chart.
The tricky part was the front center folds...
 the cloth needed to angle differently than the tapestry Lady's gown,
 so I needed to really think about placement of the folds.
And as always, at a certain point,
 I needed to just start stitching to see if it would look okay...
 and after a while it is too late to make changes!


And it was so hot... I was taking a lot of breaks
 and forgetting to take any pictures!
So here the front fold is completed.
And I think it works pretty well!
This cloth has to feel heavy... not light and flighty!


And then starting to work the "shadowed" side of the gown.
Notice I stuck one of the spring meadow blossoms in
 to overlap the hem a little bit...
(it is hard to spot!)


And then I needed to make the hindmost folds
 look natural and fit in the space...
The Lady in Waiting is Not treading on her Mistress's Gown!


And I did the last shadowed fold after I had done the farthest back one,
 the better to judge how they related to each other.
It needed to be shadowed, but highlighted enough to look like a fold.....
Yes, I was overthinking all these parts!
And now the gowns are finished!
But the "Tapestry" is far from done, Dear Readers!
I have plans for the remaining space...
 as well as all the lovely "meadow flowers" to add.

But here you can see the "tapestry" sections together....
And I am aware that there is all sorts of extra canvas above the Ladies....
The only limitation is the space it needs to hang in!
So all in all, Dear Readers,
 while it seemed like only a little more stitching...
 I actually made Great Progress!


Tuesday, July 19, 2022

A Tiny Visit With My Sister....


 We Had Sew Much Fun....!

I had a week of Vacation, Dear Readers, and by Far the best part was the overnight visit I had with my sister who was visiting her grandchildren not too far away. I brought her to my house so we could have an overnight and get caught up on the Minis. Of course, she also visited my overgrown garden, and I snagged a good picture! We spent the evening of the first day looking at all the Big Mini projects I have underway.... not a small undertaking! Fortunately she is a Happy participant in the process. And the next morning, after the garden tour, she was poking around in some of my boxes of parts and pieces of in-progress builds... in this case, The Sugarplum Studio, aka The Dollmaker's Studio parts and pieces, and discovered a couple of little doll kits I had forgotten I had! They are also by Sandra Morris of Tower House Dolls, purchased at the same time I purchased the petite "Atelier de la Poupee" Vignette Kit which has become the "Dollmaker's Studio" project. We took one look at each other and agreed instantly that we were going to make them right away! The kits were to assemble a little Victorian Porcelain doll with all the bits: shoes, stockings hat wig and gown! They were alike but not identical. It took us less that five minutes to get started!

The kits are wonderfully well made!
The instructions are detailed and full of closeup pictures.
All the parts and pieces are ready to use...
 

Here we go! Undies under way!


And with the bunka trims added...
But look... who do we see over there...?


Is she cute or what?


And stockings too.... 
but I think I didn't make them cover enough of the foot...


And the fashion show begins.....


Starting the shoes...


This made us laugh hysterically....


But all in a good cause....
Next they got some "soles"....


At about this point, Dear Readers, 
we realized that the project would take
 a little longer than we had assumed...
 but we were enjoying ourselves so So much, 
we abandoned all our previous schedules...
The day was ours! 
Nothing was going to stop us!


And the kits were not identical, 
so here the instructions diverged...
My petticoat was simple and traditional...
And by now she has acquired the name "Petunia"...


And her pleated skirt over the petticoat.
 
 
And the beginnings of stitching the seams for the jacket...
Yikes!
 

 My sister's doll, Valerie, has the petticoat lace
 as an over-layer on the skirt...
And her Jacket is edged with a picot braid!
 

 Here is Valerie in her jacket.... 
before the sleeves are added!
Isn't she something???


Meanwhile Petunia's Jacket is getting sleeves....
You have no idea how difficult it is
 to gauge the proper length for the hems,
 and to turn them inside out!!!


Then the lace collar....


And Valerie is as done as we have time for....
It is time for me to return my Sister to her grandchildren...
My sister, who is a cancer survivor,
 loves Valerie's bald look and might even keep her that way.
 
I had enough time to add Petunia's
 buttons and picot trim before we drove off.


But didn't get a picture until much later 
when I was home again and it was dark.

And the following day, 
I completed her hair and hat...


A Much quieter, contemplative, process!


All those curls!


You almost hate to add the hat!


Until you see her with the hat, of course!

Ah, Dear Readers, the time went by Much to fast... 
and was years overdue....
But look what I have to remember it by....
Welcome Petunia!
I had a Tiny visit with my sister
 and We had So Much Fun!

Wednesday, July 13, 2022

Stitch By Stitch....


Slow But Steady Progress... 

I Left You last week, Dear Readers, with the beginning of the Brocaded gown being stitched on the Medieval Lady I am adding to the Tapestry kit from Janet Granger. It is very slow going! At first I just needed to see whether the shading of the brocaded cloth would look authentic enough in this scale of stitching, and whether the colors worked well together. It does, and they do, so I had no excuse but to get stitching! The problems I encountered first had to do with my inadequate sketching of the shaded areas of the gown. I was somewhat ambivalent in many spots about exactly where the "shadowed folds" started and ended.  And my initial sketch had allowed for too many subtle shadows... in this scale I was going to need to "consolidate" multiple cloth folds into single definite shaded areas. This is particularly necessary on the sleeves and bodice part of the gown. Those very parts that I had not even attempted to ink in the brocade "pattern"! That had to be done before I could make any progress.

Once that was done, I still didn't have the courage to start on the bodice...
But perhaps I could make some progress on the shadowed side of the skirt...
learn how the folds look once they are stitched...


The stitching requires that I work with all the colors simultaneously,
 because I am not confident enough of my chart!
So I stitch a small amount of the "pattern" color,
 keeping within a certain area of either the shadow,
the  highlight or the true color.
Then I add the "background" color for that particular area,
 and make sure I like the result before I get too far along.
The number of times I unstitched an area can't be counted!
But eventually I decided  I had to make a start on the bodice area.


I start with the darker shadows because they define the shapes.
The bodice area is small.... not many stitches of each color!
And adding to my uncertainty about the shadows was the little dog!
The darker shadow color was too close to his fur color...!
 It would confuse the eye!
I had to shift my shadows a little
 and make sure the brighter "pattern" colors
 landed in the few tiny spots next to the dog!
This is the sort of design dilemma that I will remember
 for next time I am charting a project!


But I forged ahead... stitch by stitch....
And unstitch and restitch.....
And of course, while you are stitching it
 you think it really is not going to work....
Too much detail in too small an area.
I probably should have "simplified" my "pattern"
 on the small sleeve and bodice area.
But I kept on... trying to make the 
shadows and highlights fall naturally.


And once the entire sleeve is finished.... 
it doesn't look as bad as I thought it would!
The missing shadows are not really missed!


And then the right sleeve... 
which has even smaller surface area 
and much more of the pale "highlight" colors.
I would stitch two stitches and then change my thread color!
But it really does make the gown begin to look as it should!


Another really difficult area
 is the shadows under the arm and sleeve on the right... 
where she is reaching over to pat the dog.
Again, it needed to stand apart from the dog color
 and needed to have some fold to the cloth
 which then extends down the length of the skirt.
I am fairly certain that none of this is "detectable" to the casual observer...
but I am confident that the subtle changes do make a difference in the long run.


And the long run is really only evident as the skirt grows in length...
Subtly shifting to the highlighted colors on this side of the gown.
And still preserving the shadow of the fold in the cloth... 
only one or two stitches wide!
Believe me, stitching this is not easy!


But progress is being made!
And I am loving how it looks!
I have yet to design the "pattern" for the folds of the gown at the feet... 
yards and yards of draped folded brocade!
 Yikes!
Slow and Steady, 
Stitch by Stitch...
I am really enjoying this project!

Tuesday, July 5, 2022

Charting....


And Stitching....!

I left you Last week Dear Readers, with the stated goal of charting the stitching pattern for the gown of the Medieval Lady I am adding into my Mini Tapestry Kit designed by Janet Granger. It is a complicated task! And I hope you will not be too bored as I explain my process. To begin with, I had already drawn the rough outline of the Lady, based loosely on the Lady in the Devonshire Hunting Tapestry. Above you can see the original that is my guide, as well as my graph paper sketch. I decided that I at least needed to Try to make the gown a brocade like the one in the original tapestry. Really, I just had to try! Brocade, for those who do not know, is a patterned cloth, mostly of silk, whose pattern is created by the threads in the weave, not by using different colored thread. It is all the same thread, but the way the light is reflected by the difference in the woven pattern, creates the two toned "pattern" that your eyes see. And this pattern and the colors it "appears to be" shift in different light. This is why the Devonshire Lady's gown has the "pattern" shift colors in the shadowed areas. Yes, I wanted to try to do this in my Lady's gown. But the first step would need to be to "develop" a pattern that would fit the scale of the gown.

I wanted it to look a little bit like the ones in the original gown,
and it needed to repeat easily and in a small enough area.
The above design is what I came up with. 
The original sketch in ink,
 then converted to colored blocks on the graph,
 and repeated to see how they relate.
Then I needed to test this on scrap cloth...
 

This is a larger count mesh (18 count)
 and the Tapestry is on 22 count cloth,
 but I like the pattern so far.
But I need to test it with the "background colors".
But wait, didn't you say the thread is all the same color? I hear you ask.
Yes, in the real cloth it is, but to render what the eyes see, 
we need to use more than one color.
The "Pattern" color, and the "ground" color
 are two different shades of the same"color", in this case, red.
(Have I lost you yet? We are just getting started!)


I wasn't sure whether I wanted the "pattern" to appear
 as the darker or lighter shade,
 so I made a second version with the same two colors.
The top version has the pattern in the lighter shade. 
This is more like the Devonshire Lady's gown so I am going with this.


But I needed to see how the different colors would look
 in the different combinations that would be needed.
Which meant I really needed to narrow down my colors
 to the ones that I was going to use.


I dug out all my red toned threads... 
accumulated over years and years! 
(Some of these threads are antiques!)
I needed to keep the colors close to the ones already in the kit...


And I needed two colors for each of 
three different "shadings of the cloth....
A pattern and a ground for the true color,
 and two for the highlighted part of the cloth,
 and two more for the shadowed part of the cloth.
Remember, it takes three tones to reveal a
 three dimensional shape on a two dimensional surface.
So we need six different colors.....


Here I have grouped the threads according to light and pattern.


And here we can see the comparison of the new colors
 with the ones that come in the kit and are
 the colors of all the Maiden's gowns.
By Jove, I think I am close enough!
So back to the Charting part!


My motto is to begin with what you are sure about... 
in this case, the placement of the shadows.
I could easily get a rough idea of where they go.
Once that was done, it meant I know where the cloth "folded"
which would make the pattern change...
But I could start to chart the pattern where the cloth was not folded...
the central front panel was the focus.
 

Starting just with pencil, marking an "x" in the boxes for stitching the pattern.
And trying to learn how to adjust the pattern
 where the cloth would "fold"
 and part of the pattern would not show....
 (not easy!)
 

 And not even trying where I was unsure how to make it look right....!
(the arms and the folded bottom of the gown...!)


But where I was pretty sure it would look okay,
 I inked the "x's" so they would not erase 
if I wanted to move the highlights a little to one side or the other.
I don't have enough of the right color pencils
 to actually draw every change of color needed.
But if I know where the "pattern" is
 and I can see if it is in shadow or highlight.... 
I can chose the right color thread for those stitches.... Right?


I gently sketched in the base color (red)
 leaving the highlighted areas with no color!
Now there are three clearly separated tones to follow....
But will it work?

I just had to try!


I am stitching the pattern first....
 beginning with the central "true" colors, 
(neither highlighted nor shadowed).
But almost right away I needed to see
 if the shift to the highlighted colors would look okay....
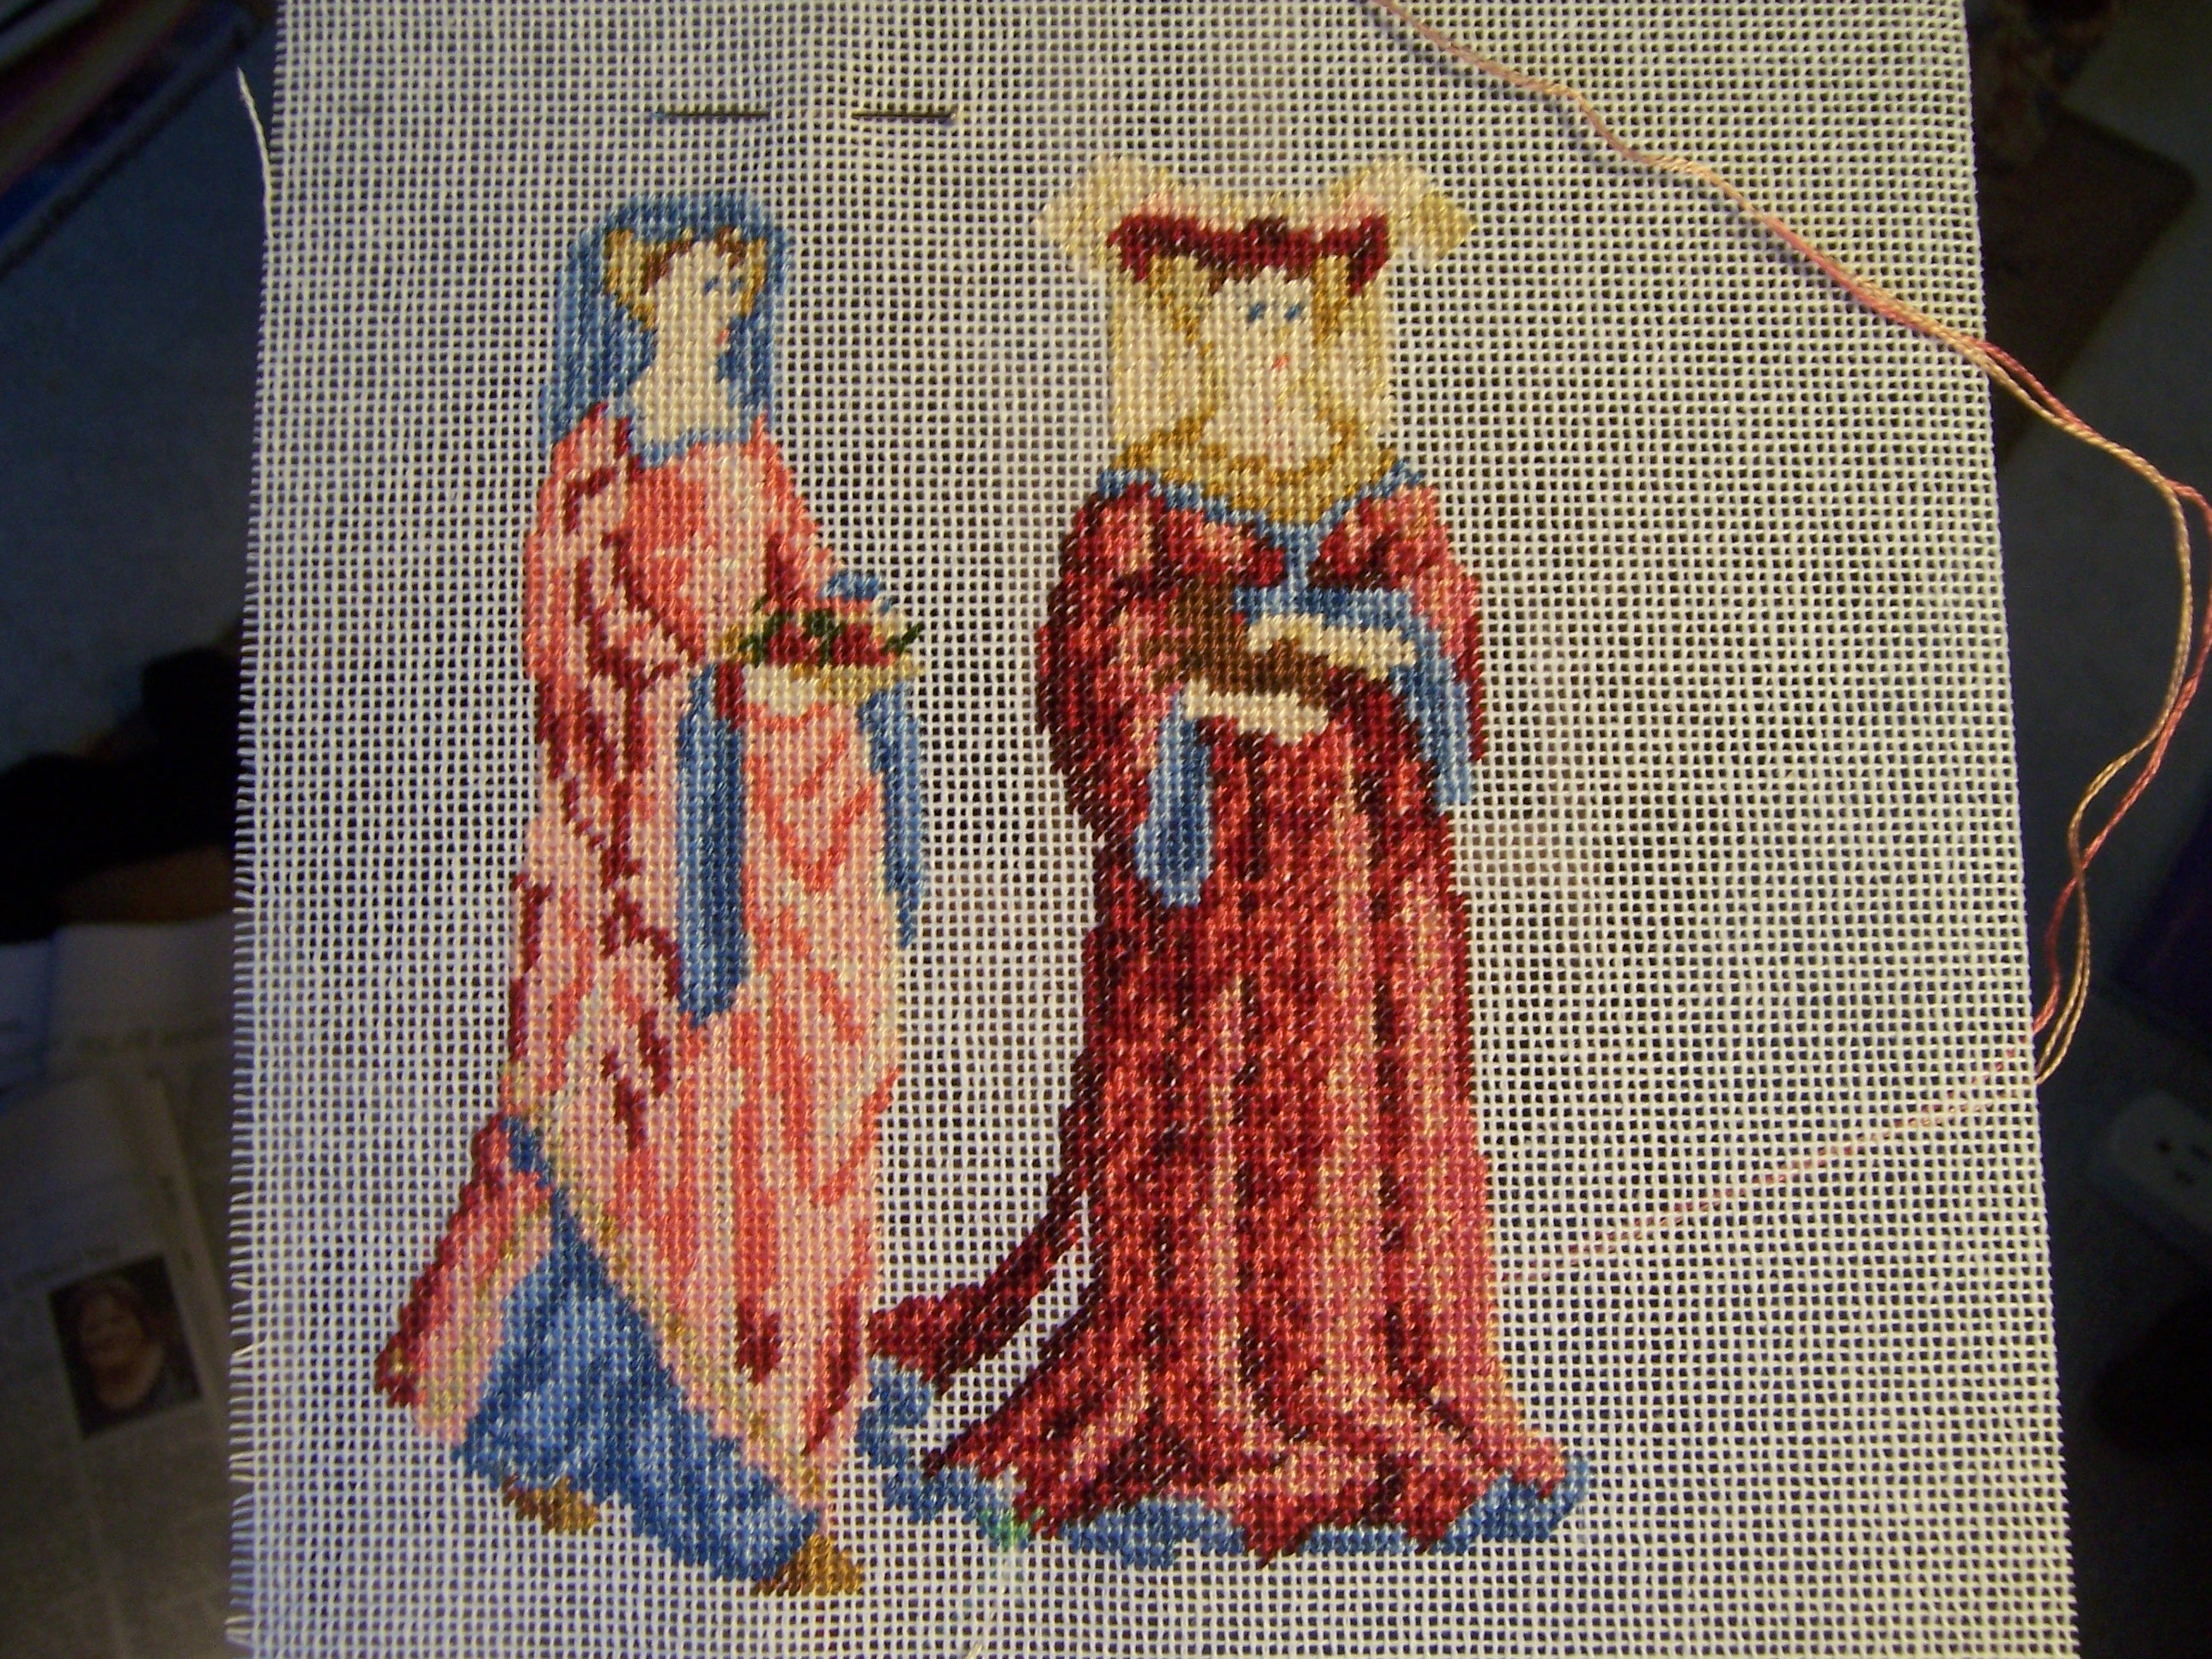
So in the above picture you can see the two colors being worked....


And then needed to see if the shift to the
 shadowed "red" would look okay...
above you can see the "pattern" in all three shades,
 with none of the background added.
As you can imagine... it is really easy to get lost in the chart... 
(There was a lot of unstitching.... and restitching.... 
and wondering if the highlight should shift....)


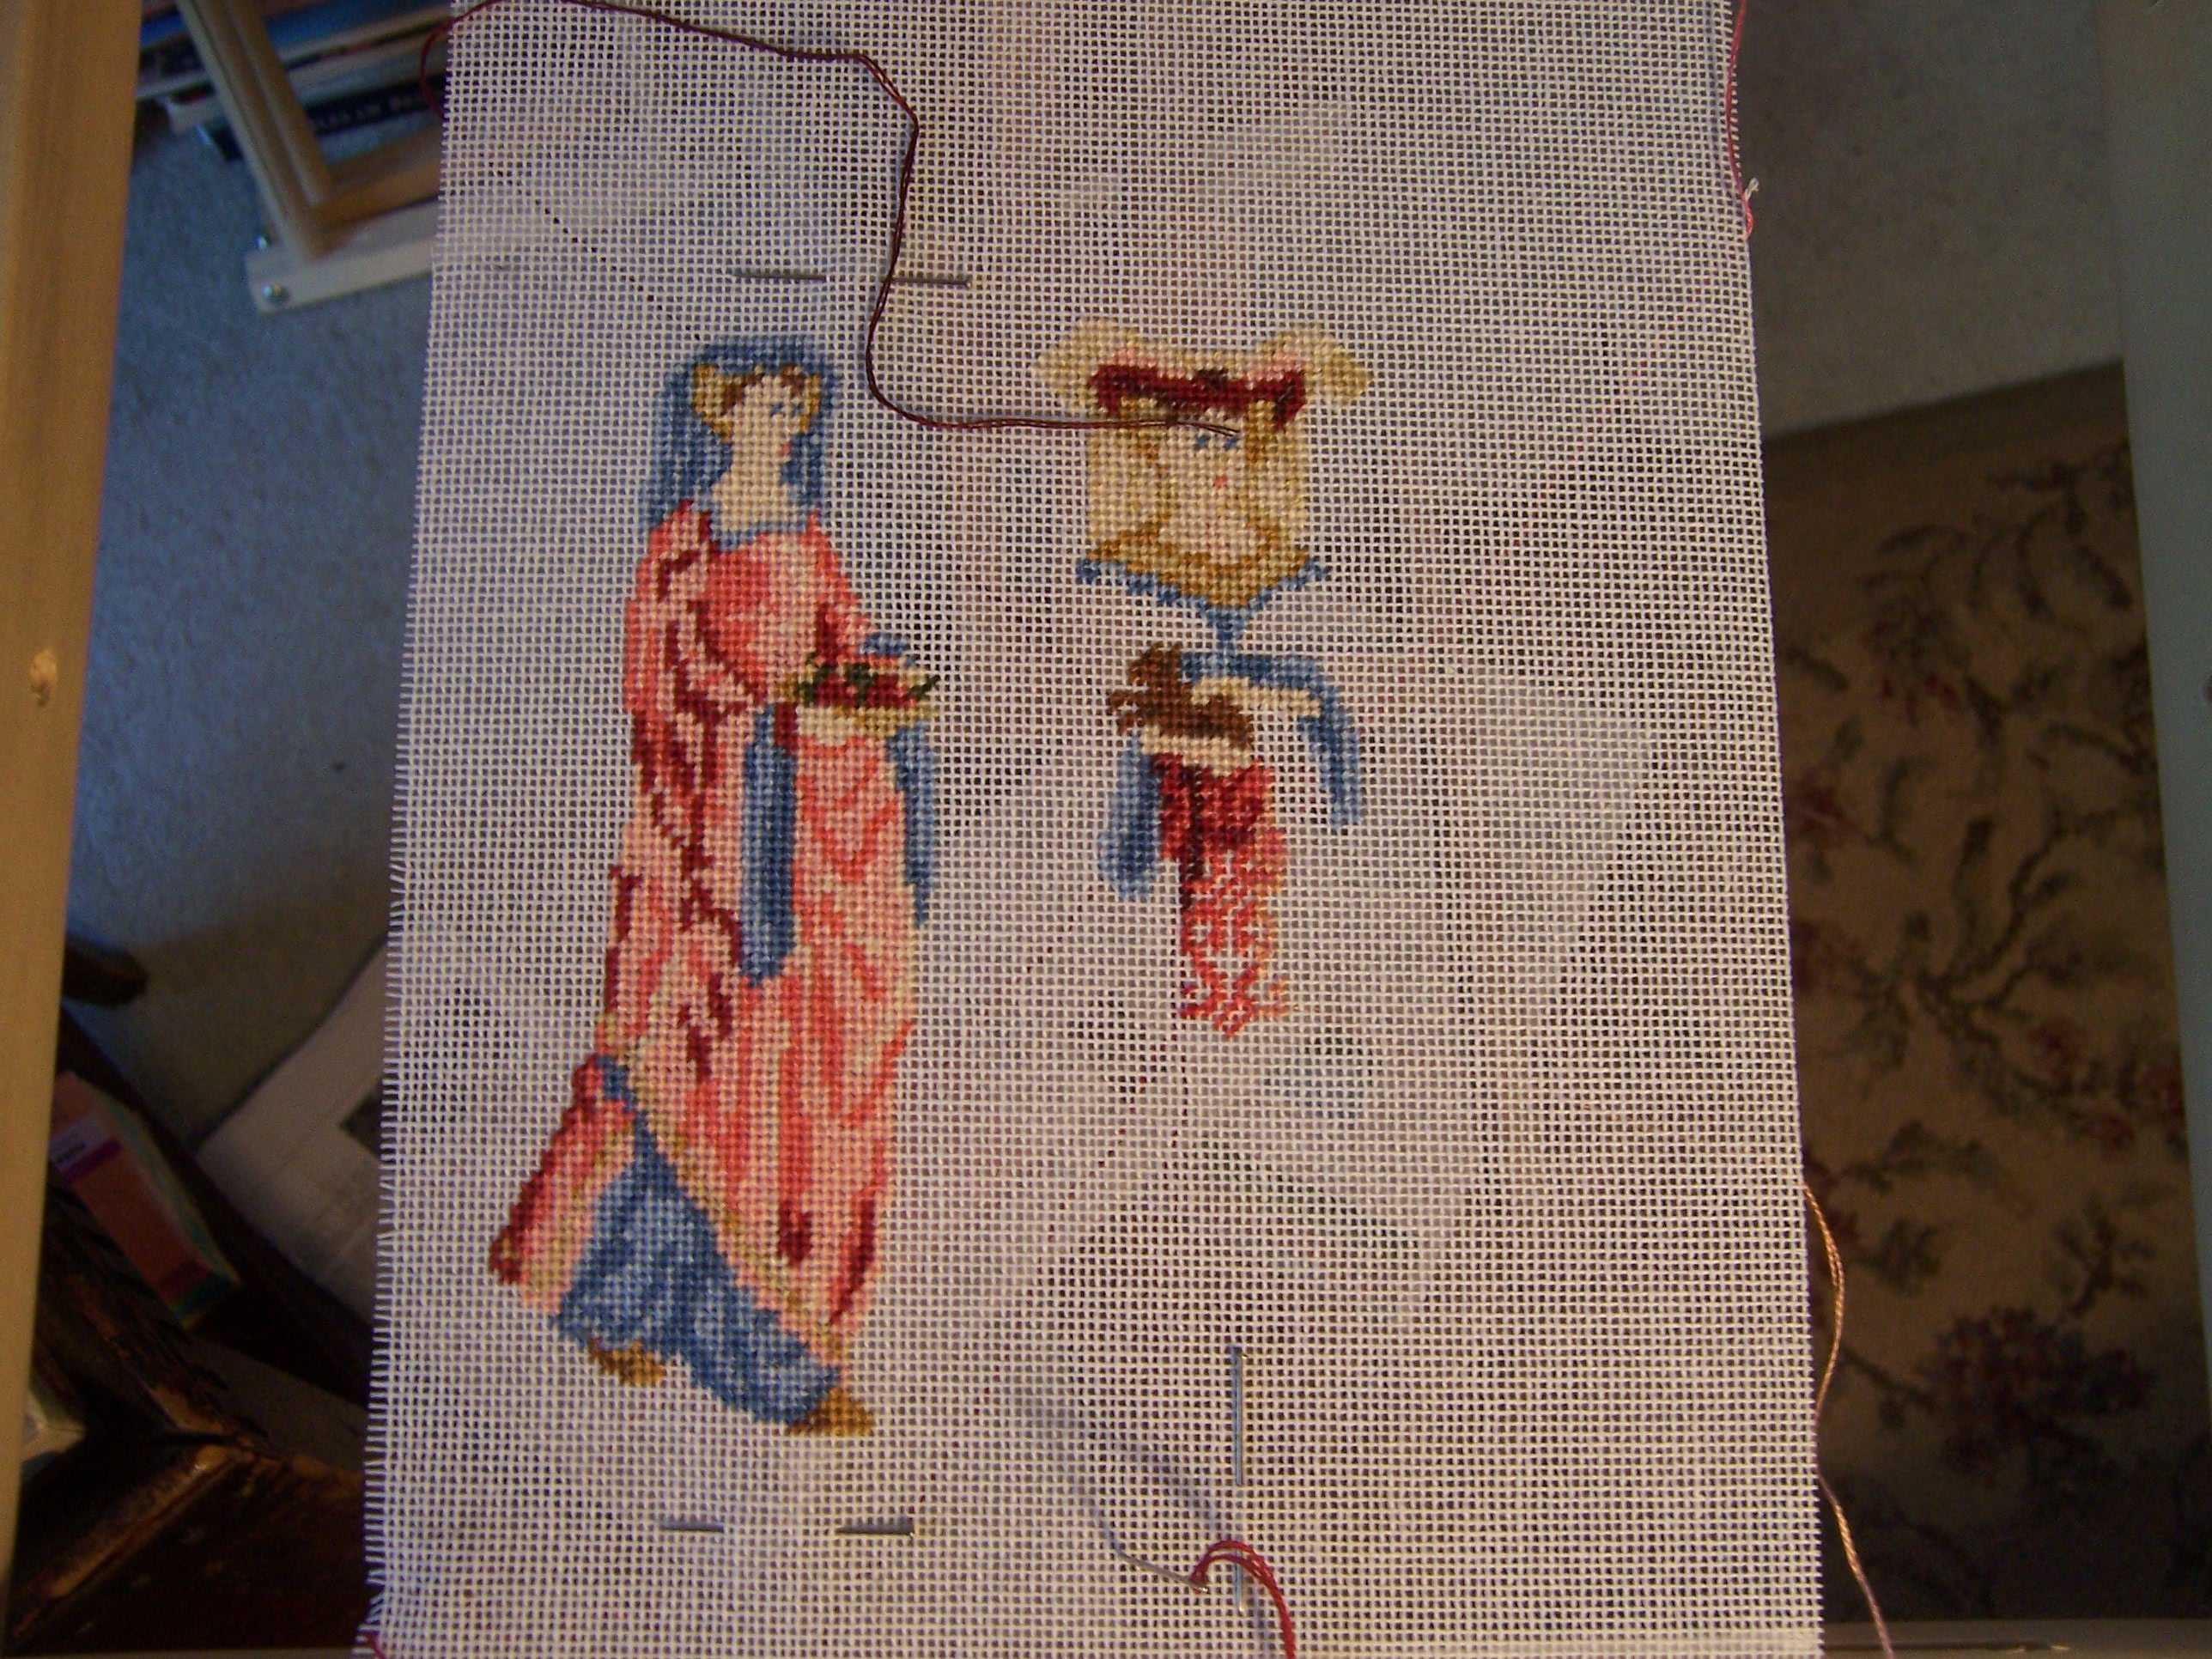
And then I just Had to see if it would look okay
 with the background colors.....
starting with the shadows...
Again.... wondering if I should shift a little.....
Trying to trust the original (sometimes vague) sketch!


Here you can see all three of the
 background colors have been added... 
sometimes just a stitch or two!
This is Not easy to stitch!
 
But I think, Dear Readers, 
it is going to be absolutely stunning
 when it is done!
I just have a lot of very careful Stitching to do...
 trying to follow my incomplete chart.... 
Making it up as I go!