Wednesday, July 31, 2019

Three Little Things.....


Depending On How You Count....

As With most kits, Dear Readers, this alcove is made up of many layered pieces that must be punched out and glued together to achieve the desired results. Above you can see the front wall of the Alcove being glued to the main section. I am trying to not get too far ahead of myself with attaching all the pieces only to discover that I should have attached the wall paper or at least added primer to all the wood before I glued it together. And I also need to make a decision about how much of the floor I will be able to incorporate into the Sugarplum design... and then make the appropriate cuts. Along with that decision is the need to re-design the little shelf brackets that are supposed to flank the opening of the Alcove, but might not work where I am putting it in the Sugarplum kit. But at least the front opening arch, which is supposed to resemble a Stone archway, will be used as designed for the kit. I did manage to punch out the little support pieces and the stone arch itself and glued them together.


Here you can see the pieces for the arch attached.
The alcove is supposed to have little angled "wings" 
off the sides where the little shelves attach. 
I am not using the "wings" so I may have to redesign
 the little shelves to fit against a straight wall.
And because my weekend was busy with Family visits
 I did not get anything else accomplished on the Dollmaker's Studio!

But the second little thing I wanted to show you, Dear Readers,
 is another Tiny project I am trying to complete, 
which I started way last Fall!

This is going to be a Christmas Stocking done in Petit-point stitching.
 It is a kit by Janet Granger and will be a little village
 of houses under a starry night when it is done!

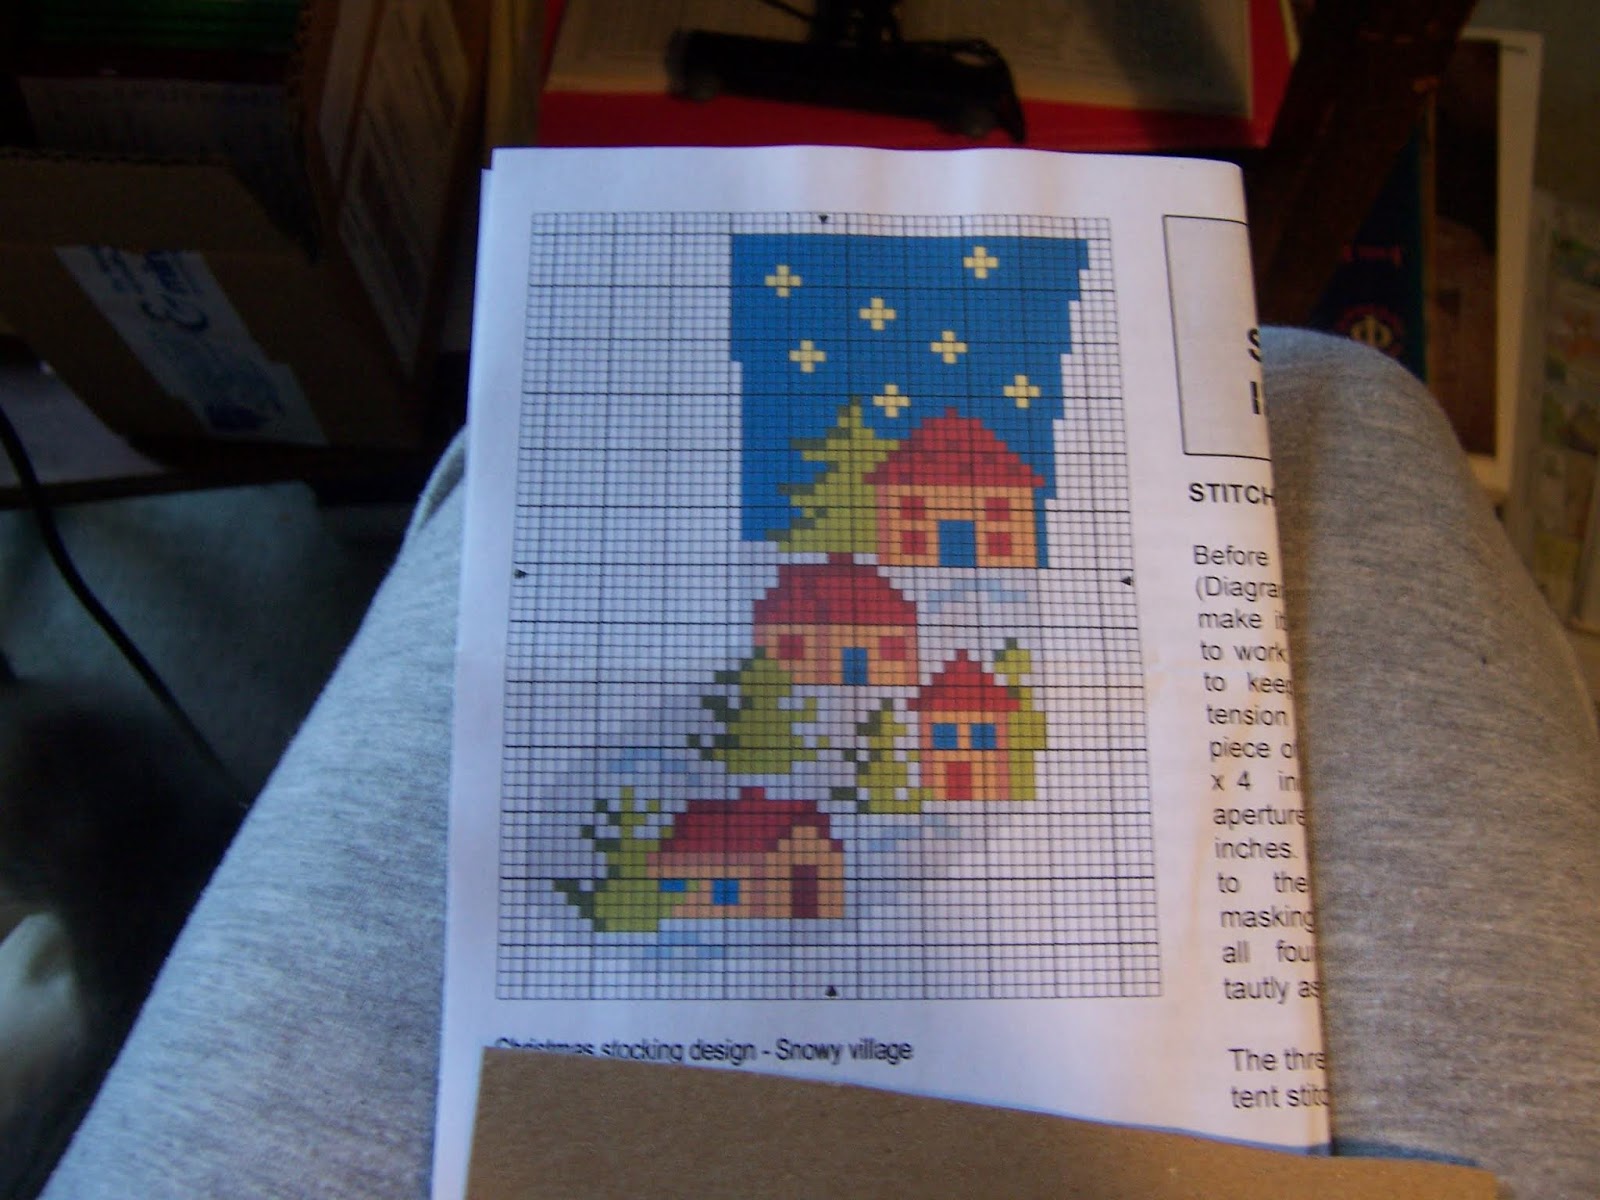
Here is what the pattern looks like.
I have only made one serious mistake so far...
 and it was not one I could undo, 
but it was not desperately bad either.
 I will leave you to see if you can spot it!

Here you can see I have added more of the trees....

And then the darker green shadow color.
And that is as far as I got
 before the Family visit demanded my attention.

And the Third little thing is
 the weekly Ten Leafy Stems that I completed!
I have decided that I need to attach them as I go from now on,
 so I can better estimate how many I will actually need to make.

So there you have it, Dear Readers, 
Three Little Things I managed to do on a busy Weekend! 
(Depending on how you are counting, that is!)


Monday, July 22, 2019

A Little More Progress....


Sugarplum Structure Changes.....

You Might recall, Dear Readers, that I am raising the height of the ceiling in the second floor of The Sugarplum Dollmaker's Studio by lowering the floor level, causing the bottom one and one half inches of the walls to be formed by the plywood structure I built from scratch. In order for the door openings and the alcove openings to begin at the new floor level, I had to cut away the openings in the plywood to correspond with the openings formed by the kit. Above you can see that I have done that, making the openings for (from the left hand wall) the fireplace, the Tower stairs door, the Alcove, and the door to the Balcony at the right side. We won't consider that this would have been easier to cut if I had made the cuts before I glued the base together...! At least this way I could perch the Sugarplum kit on top of the new base and make sure the openings were in the right place!


You can see here that I still have to cut away the bottom sections 
of the Sugarplum kit where the openings are....
 as well as add the door to the stair Tower 
at the second and third floor level.

 
Here I have cut away the lower portions of the kit....
 and added the floor so you can see how they go together.
The Balcony porch will be one small step up from the floor level.
And I have placed the Alcove in its opening
 as well as cut the Tower stairs door.
(The more I cut away the Sugarplum kit pieces,
 the harder it is to keep it standing up!)

Here I have added the second floor ceiling
 to get a better sense of the dimensions of the room.

 
Here you can sort of see both floors....
I know my photos are too dark.... 
It was a blisteringly Hot weekend here, Dear Readers,
 with temps in the high 90's both days, 
so I was staying indoors with my shades closed
 trying to keep cool!

 
This is a view of the structural support I am adding 
where the Stair Tower will connect to the main part of the house.....

Glued and screwed to the base wall...
It will make the connection much more durable
 and will stabilize the second floor kit where it sits on the base.

Oh, and you can see where I decided
 there just Had to be a small window in the back wall.
(Again, this would have been So much easier to cut
 before the walls were assembled!)

Here you can see I have patched the top of the door
 to the Balcony where it was too tall once the floor was lowered.

 
And I started to build the Fireplace for the Ground floor room.

As usual, it doesn't seem like much was accomplished,
 but quite a few little steps got done.

 
And yes, I Did complete my Weekly ten leafy stems
 for the Summer Lilac shrub!

Between those stems and
 the Sugarplum Structure changes, Dear Readers,
I think I made a Good bit of Progress!

Monday, July 15, 2019

Little Progress.....


Remember The Leaves.....?

I Have to Admit, Dear Readers, that I slacked off last week from the Weekly Leaf Making Challenge. There were just so many exciting other things to play with over my Vacation, and then the first week back to work is a little exhausting! So at the end of the day when I should be starting on those ten leafy stems.... I let other things take my attention, which just meant that on the Week-end, when I might have had time to make progress on the Sugarplum kit, I had to play catch-up with the leaves instead. At least I have now reached the stage of this Summer Lilac where the leaves are attached to the stems Before the stems are attached to the bush! But I still have to make all those stems.... above you see ten stems with the leaf twigs attached.  I was about to start adding the leaves when I remembered that I need to take an extra step with these stems Before I add the leaves! They need to be painted gray-brown like the rest of the "older" stems on the bush. It only takes a few weeks after the stems grow for them to begin to turn the gray-brown color!

Here you can see I have started to paint the stems....
And that I need to be careful to leave the twigs green.... 
because they are the same color as the leaf!

Here you can see a close-up of the color of the finished "aged" stem...
 the stem is the gray-brown, and the leaf stem is green like the leaves.

Here you can see the stems painted.... ready to add the leaves!

Here the leaves have been attached to the stems....

And beginning the painting of the leaves.
 
Of course, there were times while the glue dried, 
or the paint was drying that allowed me
 to fiddle with the Sugarplum kit just a little bit.

I had to remove the doors from their Hinges
 in order to carve the Faux board paneling and add
 the cross pieces which accommodate those huge screws!

And then I stained them a dark walnut color...
(They are supposed to be old oak doors!)

Then I had to test them in the room to see how they looked.... 
the stain did not take evenly on the plywood grain....
 I am not sure I can do anything about it!

Then I decided that if I was going to Kit-bash the Sugarplum,
 I might as well get on with making the necessary cuts....
 starting with removing the floor.
The floor in this kit pretty much holds the house together.
But one of the changes I am making is to increase 
the height of the ceiling in this (upper floor) room.
The kit has this ceiling at only 6 and 1/2 inches high!
I was planning to add 1 and 1/2 inches for a total of 8 inches high,
 but I measured wrong, forgetting that there is
 the 1/2 inch foundation area below the floor level...
 so when I move the floor down I now have
 two extra inches of height making it 8 and 1/2 inches high.  
I think I can live with that!


In order to make the floor fit into the new lower level walls, 
I needed to cut all the tabs and the front porch floor off of the floor panel.
It only makes me aware of the warping of the plywood!

This gives the lower level a nine inch ceiling height.

And with the attic floor positioned.... 
you can see how low the ceiling would be
 without the additional wall height!
I will need to cut the front wall openings for the alcove,
 and I will need to extend the porch door lower too.
And there will need to be a door in the side wall
 for the Tower Stairs to access the second floor.

The alcove will stick out over the front... along with the porch... 
with supporting brackets underneath.

And there will need to be some elaborate structural joining 
where the kit walls meet the new plywood lower walls....
Still a whole lot of kit bashing to do!

But meanwhile, Dear Readers,
 I have finished painting the leaves 
on the Ten leafy Stems...

And I have taken a careful look at the
 Summer Lilac Shrub as it stands.....

As you can see, it has nowhere near enough leaves!
This is about fifty four branches attached to the stems.
There needs to be at least twice as many....
I estimate between 120 and 135 leafy branches in all.
That leaves me 70 or 80 still to make....
At ten leafy stems per week.....
I think I can finish it before we officially reach Autumn!
But only if there is no more Slacking off!

So I hope you can bear with me, Dear Readers,
If  there is little Other progress
 while I Work on those Summer Lilac leaves!
I just Have to remember those Leaves!


Monday, July 8, 2019

The New Project.....


Gets Complicated......

I have to confess, Dear Readers, that I Should know by now that my projects are never simple little projects... even when they start out with that intention! You can see above a picture of the little kit I fell in love with back in the middle of the Winter when I was slaving over lilac blossoms and dreaming of Other Things. It is made by Sandra Morris of Tower House Dolls, a UK Dollmaker whose work I have admired and collected for a while. Sandra has been "downsizing" and threatening to retire and when she posted this kit as a possible final home workshop kit.... I didn't hesitate but hit the "buy" button right away! I was lucky to get one of the ten kits which you can see above. The set-up is so charming and includes the parts for making everything you see in the picture, resulting in a little free-standing vignette of a dollmaker's workspace. I just couldn't Wait to get started.... but alas, I had set myself a Goal of a Spring Lilac Shrub in full bloom.... so the kit was put on stand-by while I finished the lilac blossoms and attached them to the shrub. And while Daydreaming of this kit, I realized that it would be sort of Dangerous to leave it an open vignette in my little house... things would fall off and get lost...( I don't like to glue parts in place....) so I started thinking of incorporating it into a closed "room-box".... which would allow me to expand a little bit and add more to the Dollmaker's Work shop! I could include many of the tiny dolls I have been collecting! So, should I make the project a simple room-box, or a store-front type of place.... or perhaps I could start with a small house kit and incorporate the vignette into the house....?... and you can tell what happened next.... I woke up one morning having Dreamt  of the Dollmaker's kit being added to The Sugarplum kit that I already owned... the vignette window would insert right where the Sugarplum kit has a big picture window... and I would add stairs to the attic, climbing up a tower of oatmeal boxes, of course!

Here is the basic Sugarplum kit with the Oatmeal Tower for the stairs......

And starting to put together the pieces for the Dollmaker's Kit.... 
to see how they would fit together....

I love the shape of this window with the shelf....

Here you can see how the two kits will fit together....
 
 
I will need to enlarge the opening in the Sugarplum wall....
It will make a lovely alcove in the room.....
 
 
And the front porch will become more enclosed
 with the roof extended out over the little porch benches.
As you can see, I think it will work!

But that is not the end of my Great Ideas, Dear Readers,
 because if you know anything about these kits,
 you will know that the Sugarplum is really quite small.
 The main room is 9' x 14".
 And there is only the main room and the attic.
And if you know anything about My House, 
you will know it is small and already quite filled with Dollhouses.... 
and if I were to justify adding another House... 
it might be best to optimize the floor space 
by making it Tall... within a small area!
(This is how I get myself into Trouble!)

So, Of Course, I added a ground floor
 to the base of the Sugarplum kit....

(I've got the pieces propped together here...)

And the Base Room would need doors to the tower stairs.... 
and a bathroom addition off the side next to the Tower...

And a sunny window on the other side.... 
beneath the side window of the Sugarplum kit
 which sticks out  from the side in a bay window.

And then I realized that the opening I had cut was just the size
 of a unique door I had bought from an artisan
 at the Sturbridge Fair a number of years ago.... 
and maybe this was where I could finally use that door?

Here it is propped against the wall.... 
only small adjustments are needed for it
 to fit the opening I have already cut....

The width is right....
 I just need to round the arch at the top 
and extend the opening to the floor!

And then I remembered another window I already had in my stash... 
and wondered if it would serve to upgrade
 the window embrasure on the upper floor.....

Like So....!

So I cut the wider opening for the door....
(I'll take a better picture, I promise!)

And added Hinges to the Tower door and the back door...
(This is easier to do when the walls are still separate!)
 
And that is as far as I got, Dear Readers,
 Chasing my Dreams down the Vacation week...
 Ever Deeper into a "Simple Little Project"....
Which somehow got quite Complicated!


Monday, July 1, 2019

Lilac Blossoms....


Done At Last.....!

You May not believe it, Dear Readers, but I am Celebrating the completion of the Lilac Blossom Marathon that has been dominating my mini life for more than a Year! "What....?" I hear some of you crying out..."Before the milk jug bouquet is full....?" Well, I managed a Grand Finale of sorts.... above you can see the first of the Weekly Blossoms I completed this week....

Followed immediately by the second Weekly Blossom....
(For the fourth week running...)
All lined up in the blossom box and already painted...
But wait.... what are those other white florets....?
Yes, the Third Weekly Blossom was following quickly on the 
tails of the second one....!

Here are the first two finished already...
Because I had decided that enough is Enough!!!
This was to be the LAST of the lilac blossoms!

Here you can See the Final Floret.....!!!
Floret number 3,264 to be exact!!!

And here is the Final Blossom.... 
I decided to make it one of the Doubles.....

And here you can see I have attached them to a stem....
 
And added leaves to the single one....

Ta Dah! Ta Done!!!
The Grand Finale Trio!!!

Oh, but You want to see them in the Milk Jug?

Here is with just the first added to last week's blossom.

And then with the Double blossom added...!

A Slightly different angle.....

And way close up.....! 
Because I just want to Crow with Delight!

Here it is in the Folly Parlor....

And to prove that I did not just borrow blossoms
 from the Other bouquets, you can see them too!

And believe it or not, Dear Readers, 
I was also making about Fifty more of those little leaflets...

And then painting them.....

And more painting.....

And attaching them one by one
 to the already attached stems on the shrub...

Until each branch had it's second set of leaves.
They will each need a third set of leaves... 
still to be made and attached.
And then I will resume making the leafy branches
 before attaching them to the shrub...
 which will go a lot faster.
 
Oh, but you wanted to see the Milk Jug Bouquet
 at The Lovely Old Dollhouse?

I can't say I blame you... 
 
 
 They do look just Perfect there in the Kitchen...
 
*Sigh... *
I really do believe all that work was worth it!

And Yes, I have other things to do....
Not the least of which is the next batch of leaflets...

Fifty-two pairs ready for painting...!

Well, Dear Readers,
I hope you don't mind if I leave you here...
I am off to Celebrate!
My Reward for such Endurance is A new Kit....


Because, Heavens... I surely don't have enough to do
 Now that I am Done with the Lilac Blossoms!!!