Showing posts with label Embroidered Curtains. Show all posts

Monday, February 22, 2016

Birds, Blossoms, Walls and Wires....!


Hardwick Hall Progress... And More!

Believe it or Not, Dear Readers, I added a few more birds to the murals on the Bedroom Wall in Hardwick Hall! And whether or not they can all co-exist in Harmony in the Real World, here on my Mini Paradise Walls, I wanted to include as many of my favorites as I could! So I added a pair of Tufted Tit-Mice, which you can see on the branches to the left, and I also added a pair of Common Yellow-throat Warblers to the tree on the right. Because I was home on vacation, I spent a snowy/icy/ windy/freezing day flitting from bird to bird in my own little Springtime! And because I had so much Time to pursue all those little Details on my List, I also began to run all the wires from the Bedroom and the Parlor through the kitchen and into the basement.

These are the wires for the two bedroom sconces, the bedroom fire, the front porch light, the downstairs hall light, the two parlor sconces and the parlor fire. They all needed to be lengthened in order to reach the plug unit which will be at the back of the house along the foundation. I carefully spliced longer wires, using shrink tubing at the joins. (I neglected to take pictures, of course!)

I used ordinary masking tape to "flatten" them against the wall, and to keep them separated from one another so they would not rub and cause short circuits. Because they will be covered by the Hearth wall, I am not concerned about the tape failing to hold over time. They will be held in place by the wall itself. (At least this is the theory!)

And here is the view of the underside of the house, 
where the wires come through the floor 
and pass out from the foundation at the back
(which is at the top in this picture!).
I tested every light before and during and after 
the procedure of splicing...
 just to be sure they still worked!

Parlor sconces and hearth fire and downstairs hallway.... check!

Front porch.... check!

Bedroom sconces and hearth fire.... check!
So far we are good to go!
And of course, there were still a few more Birds that got added.... 

There are a pair of Downy Woodpeckers, one on each tree (the female has no red spot on her head) and also a pair of Rufous Sided Towhees, scratching in the flowers on the ground. The female is more brown and is on the left, the male is black backed and is way at the right in the corner formed by the back wall extensions. I also added another flowering Quince shrub to that corner (still not finished in this picture!) My goal was to get this wall finished so it could be glued in place!


Then I remembered that there were two more lights 
that would need to be run down the kitchen wall...
One was the kitchen light itself.....
Here you can see that I have added a chain 
to support the light so the light is not hanging by the wire alone. 
I have snaked the wires through the links 
and added a jewelry finding as a ceiling plate.

The other light which will need to run down this wall is the upstairs hall ceiling fixture... which is attached to the underside of the third floor... so I have to get that floor glued in place before I can run the wires down... and before I can glue the third floor, I have to glue the outer side walls!
And the front hall upstairs will be forever viewed only through the adjacent doorways...

Here is the view looking down from the top before the third floor is attached....
The Moon Maidens are marching up the stairs from the front hall to the attic,
 each one representing a different phase of the moon.
There are thirteen of them in all.

And since I was finally done adding birds.... 
well, I could go on adding, but enough was enough!...
I had Finally reached that important step, Dear Readers, 
the one where I take my courage in my hands 
and GLUE the wall in place!!!

It was a tricky manoeuvre, Dear Readers, because the walls were a bit warped, and I still was not supposed to glue the top front sides together because the third floor needed to be tabbed into slots on all three sides before gluing could be done! Of course, I didn't take any pictures because it was late and dark.... but the next morning the light could shine into the bedroom with all the walls in place! (Although you can see from the gaps in this picture that I had not yet glued the third floor in place!)
I wanted to attach an outlet into the baseboard that runs along the outside wall before I put the ceiling on! The wire would run through the groove in the baseboard and out the back corner where it could run down the outside to the plug strip. This would be covered eventually by the corner trim boards.


Here the kitchen light is glued to the ceiling, 
but it's wires have not yet been spliced.

And then, because nothing else could be done 
until the third floor was attached....

You can see my inventive method of "clamping" the walls together while the glue dries...
Because I have no clamps big enough... and ALL the walls were quite warped and unwilling to just sit nicely in place until the glue dried! I used a toothpick to insert some glue into the cracks of the upper half of the front corners, added tape and braced the stick against a nearby doorjamb!
Then I went to bed! (It was late!)

And in the morning I went to see if all was well.....
So far so good!!!

But I still needed to attach the wires to the lights from the hall and kitchen....
and run them down through the basement....

Kitchen light.... check!

Upstairs Hall light.... (viewed through the bathroom door)... check!
And you can even see a few of the stars glowing!

Progress, Dear Readers, 
This is Progress!!!
 
But I promised you blossoms too, 
and so far they have been missing...
 Here you can see I found time to sew 
the backing on the needlepoint pillow 
and stuffed it with seed beads...

I am in love with these needlepoint kits!!!

I think it looks so comfortable on this settee!

And that is not all! 
Do any of you even Remember 
the embroidered curtains 
for the Thee House Pagoda Bed?


Well, I couldn't remember when I had last stitched on them,
 and couldn't find a good picture, 
and forgot to take one of the "before" 
when I started stitching again....
Only about half of the blossoms on the left hand curtain had been done.


They are each about two and a half inches long, 
the basting stitches outline the curtains edges.
They are getting very close to finished!
 
So There you can see, Dear Readers, 
between the birds and Blossoms and wires and walls,
I made Great Progress on Hardwick Hall!
And Beyond!


Monday, May 11, 2015

'Twas Early In The Month of May...


Projects Old And New.....

I hope you will not be Too Surprised, Dear Readers, to see that I have picked up my needle and Magnifier and continued the embroidery of the Tiny curtains for the Pagoda Bed in the Tree House Chinoiserie Bedroom! The first of the two curtains has been mostly done for ages now, and the second curtain had only just been started. The curtain panels each are only 2 and 1/2 inches tall! They fit together inside a 6 inch embroidery hoop with room to spare. So what has been holding up the progress, you ask? Well, I needed to decide whether the second curtain would be a copy of the first one, or whether it could vary from the design. I have decided that it will be basically a copy, in that the flowers will be of similar color and design.... but it is very difficult to copy exactly! It seemed pointless to make an entirely new design, when one of the curtains faces the wall and will rarely, if ever, be seen! So they will be a matching pair! And I embroidered most of one blossom and part of another on Sunday morning as the beautiful May breezes wafted in my window!

There is still a Loooong way to go, but I made progress!

And another project that still has a Loooong way to go 
is the adding egg-carton stones to the Guard Tower of the Cloud Palace.

I had a Dream one night that all the Beary Guys 
were standing around Playing Cards in the Guard Tower,
and I realized they would need some seats to sit on!
I decided to make some built-in Stone benches....
And Hamish Harry came by to see if they were the right size!

Yup! He says they will do nicely!
So I got to work adding the "stones"....
Starting with the window openings.....

I found a piece that would bend over the opening and
stretch to the sides on both the inside and the outside!

They needed to look like a single piece of "stone"
forming the base of each window.

And then the remaining structural pieces for the window 
could wrap around the open edge....

And the same was needed for the bottom steps...
It needed to appear as though it was a single thick piece of "stone".

I started on the edges for the open doorways too...
And the "stone" bench....
There is a Looong way to go on this project!
And because there was such a Looong way to go, Dear Readers, 
did I work at it diligently?
No, I am afraid I got distracted by the Beautiful May Morning....
And remembered Another project....

Painting the walls of the Willowcrest Bedroom....
trying to capture that Perfect Moment on a May morning....
when the apple Trees are burst into bloom....

And the lilacs too......
(I know the colors don't look right here.... 
it is the dark purple variety of lilac!)

And before you can even catch your breath, 
the Quince are blooming too!
(Just starting to add the color in the above picture)

Yes, believe it or not, Dear Readers, there is still a Looong way to go 
with painting these walls, trying to capture that Perfect moment....

Here you can sort of see how they look in place in the Willowcrest....

These are modeled on the murals I have been painting 
on the walls of my RL bedroom...
Trying to hold onto that perfect moment...
early on a May morning....

As if that were possible Dear Readers!
But Twas Early In the month of May....
And as you can see, Even though there is a Loong way to go
I made progress on Old Projects and new!

Monday, April 29, 2013

Gilding The Lily....


Or Rather The Vine.....

Garden Season is upon us, Dear Readers, so once again, much of my Time over the weekend was consumed by my RL Garden. Hard work digging more beds and uprooting a thousand tiny baby Tree Seedlings... but so worth it in the end! And thus my mind is preoccupied by Flowers and plants and Growing Things... so is it any wonder that it overflows into my Mini World? To begin with, I added another flower to the Tiny stitching on the bed curtains.....

It is very difficult to get a close-enough shot of this.... 
I put the thimble in for size reference...
(You can poke the pictures to enlarge them...)
I dug out my lighted magnifier to stitch with and it helped speed the process!
But there is still a long way to go....
 
And you may recall that I said the Domed ceiling for the Bedroom was not yet done...
Well, I was not at all satisfied with the central panel decoration.... 
So I started over.... 
(only the central panel!)
 
 Even though it is inverted from the other panels (they are sunken and it protrudes)...
I felt they needed to look more similar... 
so I cut an octagonal frame section and painted it gold 
and outlined it with the golden "roping"...
 
And added a single inverted flower "Bosse" in the center.
That looks Much more like what I wanted!
But we are not done, Dear Readers... 
At this point I had to make another one of those Difficult Decisions....
To stop here and always wonder if my idea would have been a good one....
or to go one step further and just trust it would be what I imagined....
I had to give it a try... 
 
I am not a big fan of Straight lines...
I LOVE the sinuous shapes of vines, and I Love my gardens a little over-gown and wild....
and had imagined the sections of the coffered ceiling as if they were carved with vines...
I had to glue them in place to even see how they would look....
(Because they kept falling off when I tried using tape...!)
And we had to test it in place....
 
 
It gives a sense of the effect... and since I have started.... 
I must glue them All in place... 
Oh, My! NOW we are getting there!!!
 
And can we see it in place now?

This is NOT easy to photograph!!!
But you can get a sense of the Vines growing overhead....
As if they were continued from the walls.....
Only Gilded instead of painted.....

 
Maybe a little closer...?


That is Much more like I was Imagining!


The ceiling is Nearly Done now....!
And while Some of you might think it is Definitely Over Done.... 
I think I made the Right decision this time....
Gilding the Lily...or rather the Vine!


Monday, April 8, 2013

Curtains!


The Well Dressed Bed....

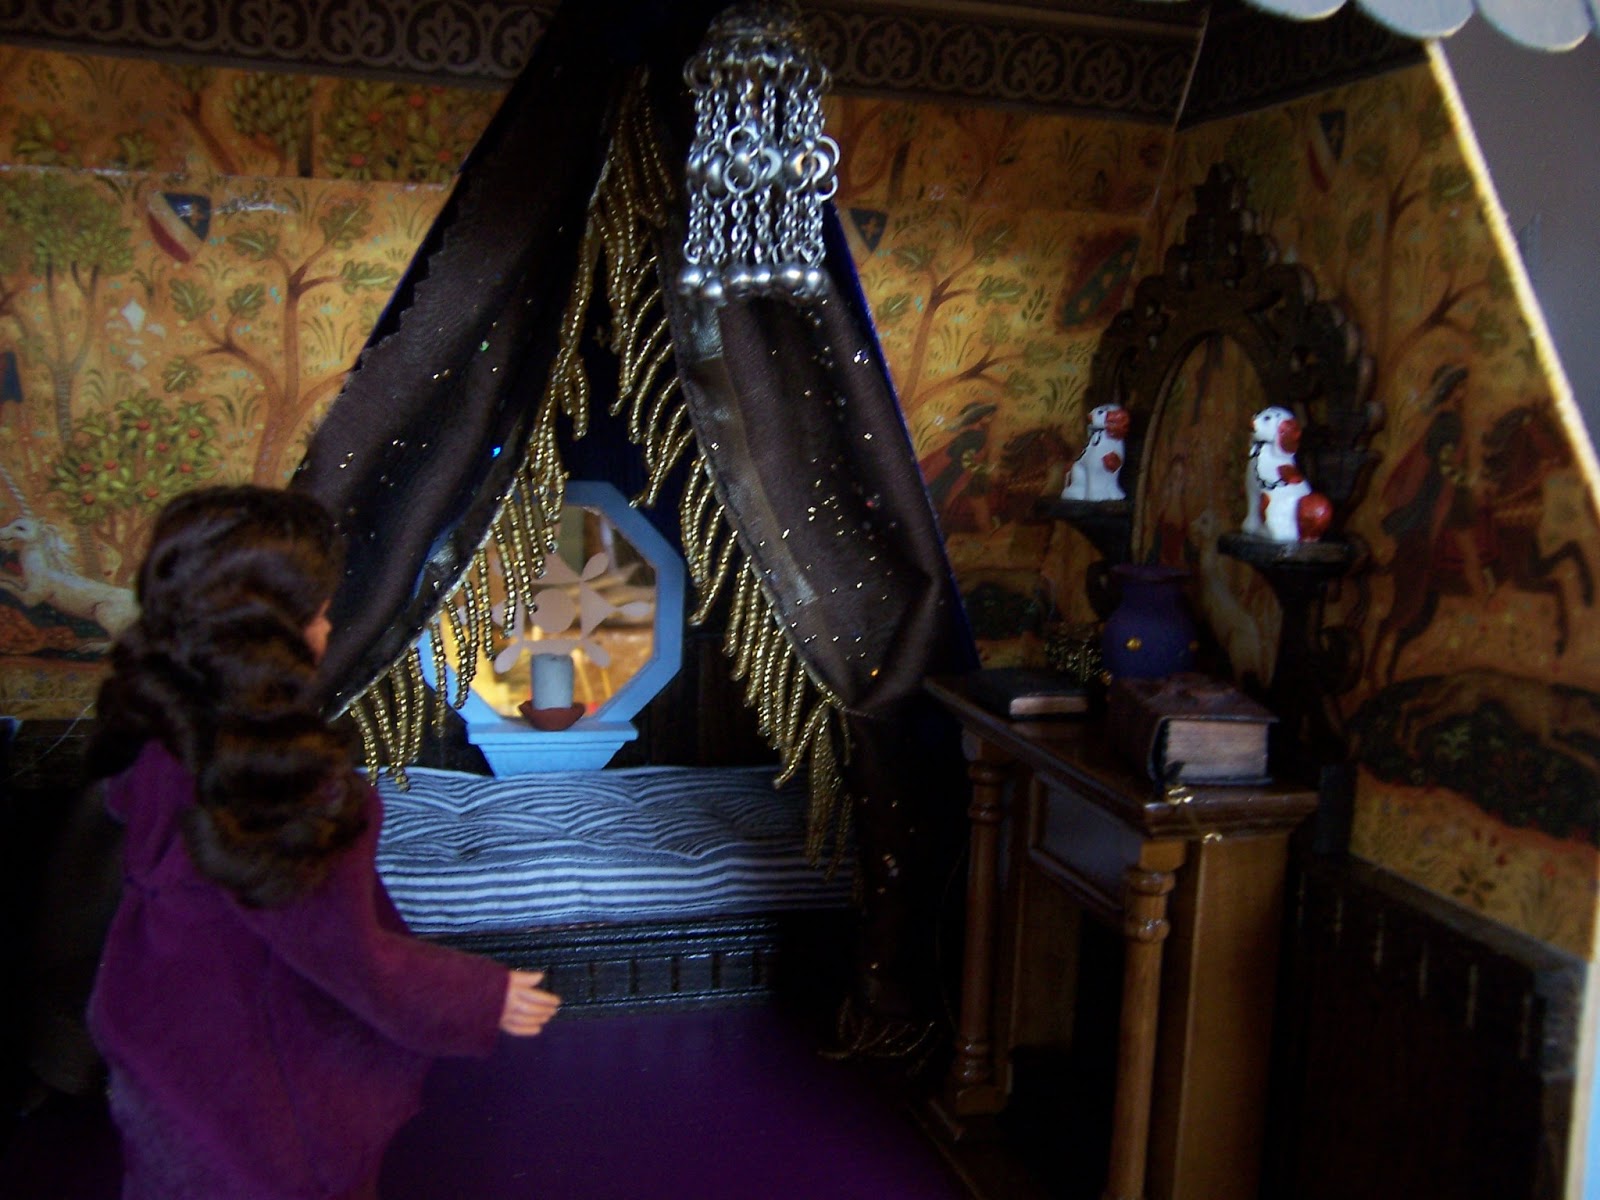
I was Procrastinating, Dear Readers, so what I have to show you this week is not at all what I had Intended to be working on! But since the results of my Procrastination were SO pleasing to me...... I couldn't wait to share them with you! Some of you may have noticed that I have not mastered the art of making Curtains for my dollhouses.... and this is in part because I love the way windows look with no curtains... and so my attempts are mostly just lace scraps pinned over the windows! And while I like my windows to have no curtains.... I think all beds should have them! I can blame it on my Medieval Tendencies.... because when you think about it, Historically they put curtains on the beds Long before they started putting curtains at the windows!So it is that I have from the very beginning envisioned the bed in The Folly tucked into that nook and draped with sumptuous curtains! I even knew exactly which Fabric I wanted to use.... and I was pretty sure that somewhere in all my "supplies" I had a beaded fringe that might be perfect for the trim!
And because I was procrastinating, I thought I needed to find that beaded fringe.... 
just to see what it would look like with the fabric... 
It took a while, but I DID find it!

 
 Here I am "Testing" the fit of the fringe 
on the quickly thrown together "Test" sample of the fabric,
and because I was just testing things, I didn't take many pictures of the process.... 
It was just slow and careful stitching of slippery fabric to wiggly beaded fringe, 
after all... just "Test" stitching... 
to see if it would work the way I hoped... 
The stitching was very slow and took much of the afternoon....
(This is that glitter strewn gauze that I use so often for my "Smoke effects" in my fireplaces...
 and the glitter pieces for candle flames....)
You can imagine my surprise when the beaded fringe turned out to be EXACTLY the right length!!

So then I had to do a "Test" of how it fitted in the opening for the Bed Nook......
Just thumb-tacked in place temporarily....  
And, of course I just Had to see how it would look pulled back to either side....


So I quickly wrapped a fine piece of gold thread around the curtains 
and attached it to the thumb tacks...
And then I thought we should see it with the lights on... 
even though it is the middle of the afternoon.....

Aaah..... that is Really looking Just the way I had Imagined it would!!!

Even though it is just Temporarily pinned in place...... 
because the bed still isn't even made up....
Can you imagine sleeping there?

And I had to take more pictures the next morning.... 
because the sun was shining into the room.....
Would you close the curtains when you slept...?

And let me bore you with some more pictures.....
I was procrastinating.... so I had to play for a while.....
and added some trinkets to the mantle...
(the books are some of Dark Squirrel Victoria's Divine creations...!)

And then Joanna heard there was work being done on The Folly.....
So she had to come and have a look....


She noticed the decorations right away.....

I has been such a long time since she visited at The Folly....

She really couldn't remember whether the curtains had been there before.....

But she was fairly certain she would have remembered such a Gorgeous Fringe...!

And the mattress.... as old as it looked... 
she was sure it hadn't been there when she last stopped by...
It was surprisingly soft for such an old mattress!

But after so MUCH Procrastination, Dear Readers, 
I Did finally get started on the project I had been intending to work on! 
And what was that, you ask?
Curtains, of course! 
Tiny Bed curtains for the Pagoda bed in the Tree House! 
But it already has curtains, I hear you say.....! 
Alas, those are just the lace Under-curtains.....
I really wanted it to have embroidered silk curtains... 
And I wanted to use that green silk.... 
in particular I wanted to have the gold fringe edging of the silk be the edging for the curtains!
Which meant carefully figuring out How I was going to embroider the silk!

Here you can see I have basted the green silk to a piece of muslin.... 
so the whole piece can go into an embroidery hoop.....

And if you look very carefully you can see that I have added some stitched guide lines.... 
so I know the area I am to embroider within....
And then I dug out my Treasure worth almost more than Gold itself.....
I inherited some of my Grandmother's sewing things....
These are Antique Wooden spools of Silk Sewing Thread!!!


In a lovely assortment of Rainbow colors.....

And because I have not Embroidered anything in Quite a few years....
I am just Testing....
(Which really means making it up as I go...)
Starting with a vine in green silk... using a simple back stitch....
 
I started with the curtain that will face the back wall.... 
so I have room to make mistakes...

And I added the flower "branches".....

And started on the flower blossoms.... 
in red, mauve and coral.....
Using a simple satin stitch....

It is supposed to end up looking like "Crewel" Embroidery... 
a style often worked in wool and having varied and exotic flower and plant forms...
So I am just making the shapes up as I go.....

One flower after another.....

Although I did make myself a rough sketch as guide....
To keep the stitching at the right scale.....
Each curtain will be two and a quarter inches long....
But because I Procrastinated so long in starting... 
It is a long way from done!
But I am really NOT sorry that I was procrastinating.... 
especially when at the end of the afternoon as the sun was setting, 
It reached all the way across my house and shone into The Folly.....

A slice of sunlight just hitting the Window Perfectly.....

Casting the beaded Fringe Aglow....
Oh, I LOVE that magical light!!
And even though they are not Finished....
Neither the Tiny Embroidered ones, nor the Sparkly Beaded ones....
Yes, I  do think Every well Dressed bed should have Curtains!