Saturday, July 31, 2010

Wainscoting For the Kitchen

You may remember, Dear Readers, that when I painted the kitchen of the Lovely Old Dollhouse a very bright yellow, I also mentioned that there was no need to worry about the brightness being too much as I was planning on adding wainscoting which would mellow the effect of the bright yellow. Now, the wainscoting as I was envisioning it was another of these projects that was giving me plenty of reasons to procrastinate! You see, all the wainscoting I had made so far for the house was of the "Panel" type commonly built in the Colonial style homes. But the wainscoting I was envisioning for the kitchen was going to be the more modern Victorian Era type known as "matchstick" or "beadboard" paneling. It was made of narrow strips of wood with a vertical beaded edge, creating a very striped appearance. Typically it was taller than the older Colonial style of paneling which went only to chair rail height, or about 30 to 36 inches from the floor. The matchstick paneling was more commonly as tall as 4 feet from the floor. The idea was that the kitchen of the Lovely Old Dollhouse would, naturally, have been "modernized" in the Victorian Era! They would have added a wood burning or coal burning cast iron stove in place of the open hearth cooking still in use during the Colonial times. And they would have added the paneling and cupboards that were coming into fashion at that time. So I was going to have to figure out how to MAKE this beadboard paneling! And what to make it out of! And how precisely detailed it would be! And even before I could make it, I would need to finish the trim around the window and doors....... so you can see that there was LOTS of room for procrastinating! And then, just to distract myself from the wainscoting, I went and started building the Castle Dollhouse! But I did not forget the wainscoting, and as is often the case for me, the project was "brewing" in the back of my mind the whole time I was doing other things. So when I finally did start the project this spring, it went together much more smoothly than I had ever imagined it would!


Here you can see the kitchen with the freshly painted YELLOW walls!


And here you can see the window trim and the completed REAL window in place!
And the sink which was just like the one in my first apartment!

Here I am test fitting the cabinet which will be over the sink.......


Now, I know you will agree that the wainscoting needed to have that same not-quite precise look of the rest of the woodwork in the Lovely Old Dollhouse. (Quite frankly, I think that is one of the things that adds that undefinable charm to this house - the home-made not quite exactly to scale woodwork!) I debated in my mind for a long time about the type of wood to use - should I go with very thin plywood and cut the ribbing in it... or should I use more of the wood my brother had made for my "dollhouse lumber" that had been so perfect for the rest of the wainscoting...... or should I try some other type of method altogether....... ! I was worried that the dollhouse lumber stock would not be enough to do the whole job as there were only a couple of pieces left. And I was not sure how well it would go together as the pieces needed to have the grain of the wood running vertically rather than horizontally as they were for the rest of the wainscoting in the house. That meant the paneling would be made up of sections 2.5 inches wide and nearly 4 inches tall. At long last, I decided that the only way to tell if there was enough of the lumber was to make an exact plan of what would be needed! (Some people would save themselves a lot of trouble if they would learn to do this BEFORE they waste a lot of time fretting....!) So I measured the spaces and figured out how many sections I could get out of the lumber that remained......... and was I ever AMAZED when the amount of lumber was EXACTLY enough to do the job!!! So I cut the sections to the right length - about 3.75 inches - allowing for a narrow "cap rail" at the top. I carved narrow grooves in the panels to approximate the look of the old beading - don't look too closely as my "carving" is a bit irregular! Then I stained the pieces the same "Old Pine" color as the rest of the kitchen woodwork. (Of course, I did not remember to take any pictures of all these steps!)


Here you can see the panels roughly set in place before the top rail was added.


I still have not added the bottom mop board to the paneling....... but here it is with the top rail and the cabinet in place...


I sure LOVE the way the morning sun streams in that window! And even though the mop boards are not done, someone has the mop out ready to go!


I could not be happier with the way the kitchen wainscoting turned out!

It is EXACTLY what I was envisioning!

Friday, July 23, 2010

Windows

If Eyes Are The Windows of the Soul, Are Windows the Eyes of the House........


Lest anyone think I have forgotten the Lovely Old Dollhouse in my Castle Building Frenzy, I will reassure you that nothing could be farther from the truth! While my recent posts have been all about the Castle, the Lovely Old Dollhouse has seen a number of VERY important improvements during this time. The most important one, and the one of which I am the MOST proud is the windows! You may recall me mentioning in an earlier post that long list of improvements needed in order to repair the Lovely Old Dollhouse and to make it the house I had always dreamed of. Well, the tasks I have already undertaken that were on my original list, have each seemed to grow and change and blossom into something unexpectedly MORE than the original idea once I started them. The chimney with it's original fireplace became two chimneys with four hearths! The trim and wainscoting became MORE elaborate and decorative. The front door, while replacing the original in the same framework, became MUCH more detailed and elegant. And NONE of these outcomes were the least bit expected by me as I set out to do the project! So you may forgive me for developing a sort of anxiety about starting on the windows! WHAT would I be getting myself in for?

To begin with, I must explain that, as with the wainscoting, I had set the pattern for the windows all those years ago in my teens. You see, from the earliest years I had wished my dollhouse had "real" windows. There was always something so empty and unfinished about those holes in the walls called "windows"! I can't describe exactly why it is, but those empty window holes just feel so unprotected, so bare, so vulnerable, as though the soul of the house was just ......blind or missing altogether! So right from the very beginning I have intended to make real windows and I actually completed one entire window frame with real panes of glass when I was working on the house in my teen years! I had carefully carved and notched the wooden pieces for the frame, made from some of the "lumber" my brother had brought from his woodworking classes, and cut and inset panes of glass, complete with glazing putty to hold them in place! You must remember that this was AGES before I had any idea of window kits or ready made stock lumber. And because the whole frame was never glued into the dollhouse, it was removable and was carefully stored away with all the other dollhouse furniture in that box marked "Betsy's Dollhouse Furniture". So, THERE IT WAS when I finally opened that box last year and started to work on the re-building of the Lovely Old Dollhouse! It was the simplest thing to slip it into place in the window opening of the parlor - the room it had been made for - as you can see in the picture below!

And while nobody had washed it in the thirty plus years it was packed away, it was unbroken and fit as though it had never been removed. You can sort of see the outside of the framework in the picture below. There has always been, for me at least, a heartwarming sense of cosiness in looking into lit rooms from outside in the dark of night, it makes me think of winter when the dark comes early and everyone is heading home to warmly lit houses.......


The frame had never been painted and was just the tiniest bit lop-sided and uneven...... but I had been quite young when I made it and I think it came out pretty well! It certainly fits with the rather rough look of the rest of the woodwork in the house. So, while I considered VERY BRIEFLY starting over with entirely new windows and just not using that original one...... I was just too fond of it to NOT use it! So that meant all the other windows were going to HAVE to be made the very same way.......... slowly....piece by piece....


As you can see from this picture of the master bedroom with the beautiful hunting scenes wallpaper, the empty window is just not acceptable!


And the same is true of the bathroom........without a window with glass........ it looks so unfinished and somehow so vulnerable........


And even the cheerful second best bedroom, which is slowly being painted with a sort of Chinoiserie mural, it looks DESPERATE for a real window with GLASS panes!


So after a great deal of dithering and considering and planning I pulled out my box of lumber that I had saved for all those years and started to carefully measure and cut each window frame to fit into the opening of each room. I needed to make five more windows in all. I hoped that the lumber I had would be enough to make all the windows as it was more or less the same dimensions as the wood of the original window I was copying. I am sorry that I did not take more pictures of each step of the process, but I was not yet thinking about blogging or tutorials.


Here you can see three more of the frames fitted to their windows.


Here you can see the frame inset into the window before the glass panes were added........


And the frame for the bathroom window............(as well as the rest of the tiles on the walls)


And the frame for the window in the Master Bedroom too......... you can see that the frame already makes the window feel more "present" and somehow protective.....


So, dear readers, it was about this point in my life that I had started my blog!.....and was now thinking of taking more carefully detailed pictures....at least when I remembered to! So I have some shots you might like of the windows getting their glass panes cut and fitted......


Here we have several frames already primed and stained or painted the correct color......as well as the glass cutting tool and the metal straight edge I use. And you can see I have cut paper patterns from the graph paper to test fit in each opening of the frame before I cut the glass. My openings were not exactly consistent because they were all hand cut and fitted...... but the variance was within one eighth of an inch. But glass is fairly unforgiving and needs to fit closely. If I had a piece that was just a tiny bit too large, I sometimes shaved the frame off a tiny bit instead of cutting new glass......


And a closer picture of the frames with partly completed glass....


And an even closer shot of the framework....... click on the pictures to enlarge them if you REALLY want to see details of my rough building...........


GOSH , Another shot! With Glass! I AM so proud of these windows!


And ANOTHER view of the framework


And now, since you have been SO patient with me and put up with too many shots of the same thing......here is a view of the Lovely Old Dollhouse with the windows in place, showing the putty that holds the glass in place just like real old fashioned windows!


I don't know about you, but I just LOVE how they look!


And can you imagine how amazed I was when the amount of lumber I had kept for all those years was just the right amount with a little bit to spare? There are no words to describe how satisfying THAT was! And even after all my worrying and fretting, the cutting and fitting of the glass panes went together SO smoothly - I did them ALL in ONE evening! With NO bad breaks and misfit pieces! I'm sure it was because I made such good patterns first.......

So, It is with GREAT RELIEF I can now report that the LONG anticipated making of the windows for the Lovely Old Dollhouse yielded NO unforseen problems or unimagined outcomes! They are JUST EXACTLY what I was wanting them to be!


And I don't know if I am just imagining it, but.... I think the house looks.....well.....HAPPIER than it ever has before...as though with the windows in place IT can SEE the world!


Windows ARE the Eyes of the House

Monday, July 19, 2010

Congratulations! And Moving Upward

First I want to say Congratulations to the winner of my 50 Followers Giveaway! The winner is The Old Maid! She was one of my first followers and I am very happy to be sending the tiny seashell mirror and the little catalog her way! They will be setting out on their journey overseas shortly and I hope they get there quickly.


Meanwhile, back at the Castle, time has not been standing still. Now, I want to warn you right at the beginning that I do not consider myself to be a fast worker when it comes to my creative projects. (I can hear my family members chuckleing as they think of all the projects I have been working on for twenty years or more!) In fact, I rather LIKE to take my time and savor the process. Or at least that is the excuse I give for being indecisive and needing to stop and think through each new step. And even more than that, I am one of those annoying types who will get a gift and NOT open it right away because I want to keep it and open it at just the right moment, when I'm ready, with my tea by my elbow and the time free to enjoy the opening. I like my dessert AFTER dinner. I like to save the best for LAST. So, in a strange way, this business of working from the bottom up on the building of my Castle Dollhouse fits right in with my natural tendencies to want to save the best for last. At least if you think that with each rise in floor level, you are moving further up in the level of richness that would have been present in the decor of a real castle. The basement level being the roughest and dingiest, the Lord's and Lady's chambers being the richest. And beyond that, I certainly will have had enough practice runs by the time I reach the top levels, to be able to make them the best! So it is easy to feel that as I am just moving up to the next level and starting to work on the Guard Room at the entrance to the Castle Dollhouse, that it will be just another of those rooms I need to get "done" in order to move on to the "fun" ones. I mean, it's A GUARD ROOM, for heavens sake!


But before I get going on that topic, I first want to quickly show you more of the kitchen level that was not included in the last post. At the entrance to the kitchen I have built a well with a fountain-head which channels water from the roof-top to the well. Now this is a feature that was normally found outside the castle in the courtyard area where the entire community would have access. But seing that this Castle has no courtyard, and that water was one of the MOST essential features of a successful stronghold, I have taken the liberty of including it under the roof of the main building, next to the kitchen where it would be most needed! I tell myself that the story goes like this..... Originally the oldest tower of the castle was the chapel of an Abbey which itself was built on an ancient sacred site. This well was the sacred spring and has long been thought to confer special powers on those who drink from it! When the Abbey fell into disuse and was taken over and added on to, becoming a fortified Castle, the sacred spring became the castle well, and continued to confer special powers......or so the legend says! You can believe it or not!


In the picture below you can see the lion's head fountain I built onto the wall, and the "stone" arch to hold the pulley for raising the bucket easily. The bucket will arrive later along with a few other details.

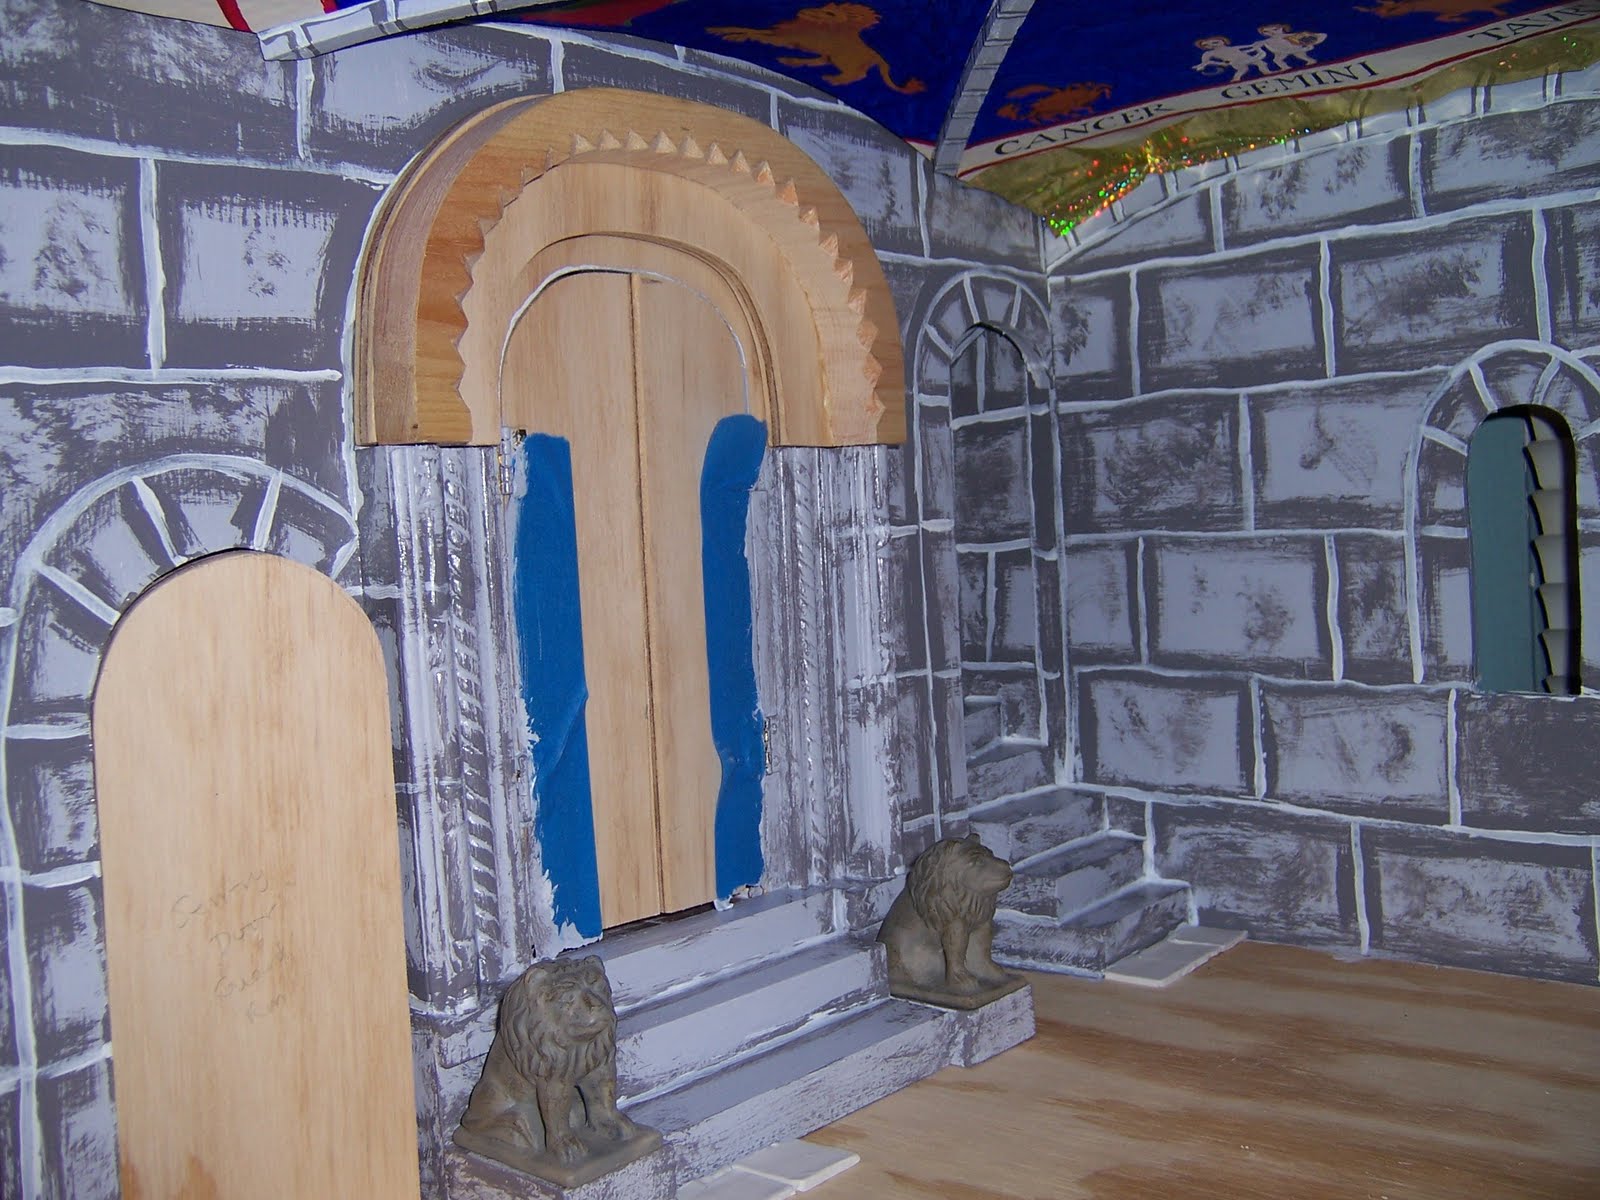
So getting back to the topic of the Guard Room, located at the entrance to the Castle, above the stables, it was going to be a quick matter of painting the walls in faux stone, vaulting the ceiling, and putting paving stones or tiles on the floor. Oh, and building the entrance doors, of course, and the stairs up to the Lord's chamber. Nothing very interesting or decorative in all that! Or so I thought. But then I started to think about the tiles that I needed to make for the floor, and I remembered that it was seeing the gorgeous medieval encaustic tiles that Nina had made for her Castle guard room that had gotten me started building my Castle Dollhouse in the first place! And I didn't want to just copy Nina's guard room. Actually, I wanted the encaustic tiles to go on the floor of my Great Hall, not the tower Guard Room. So I needed to make different tiles for the Guard Room. I decided to try plain old black and white faux marble tiles made from sculpey. And quickly decided to add gray marbled sculpey tiles to the mix. The photo below shows the beginnings of the floor and painted walls as well as some of the beginnings of the ornate doorway at the entrance to the Great Hall on the left. But once I'd gotten this far, I realized it was making the Guard Room into a more refined and elegant room than one would expect from an eleventh century castle guard room! So I had to add to the story a little bit......It turns out that the Guard Room is part of the Tower that was built by the ancestral Lord who went on a crusade (not sure which one!) and came back with all kinds of civilized ideas, and spent fortunes upgrading his old Castle! So he put in marble tiles in his entrance Guard Room.........

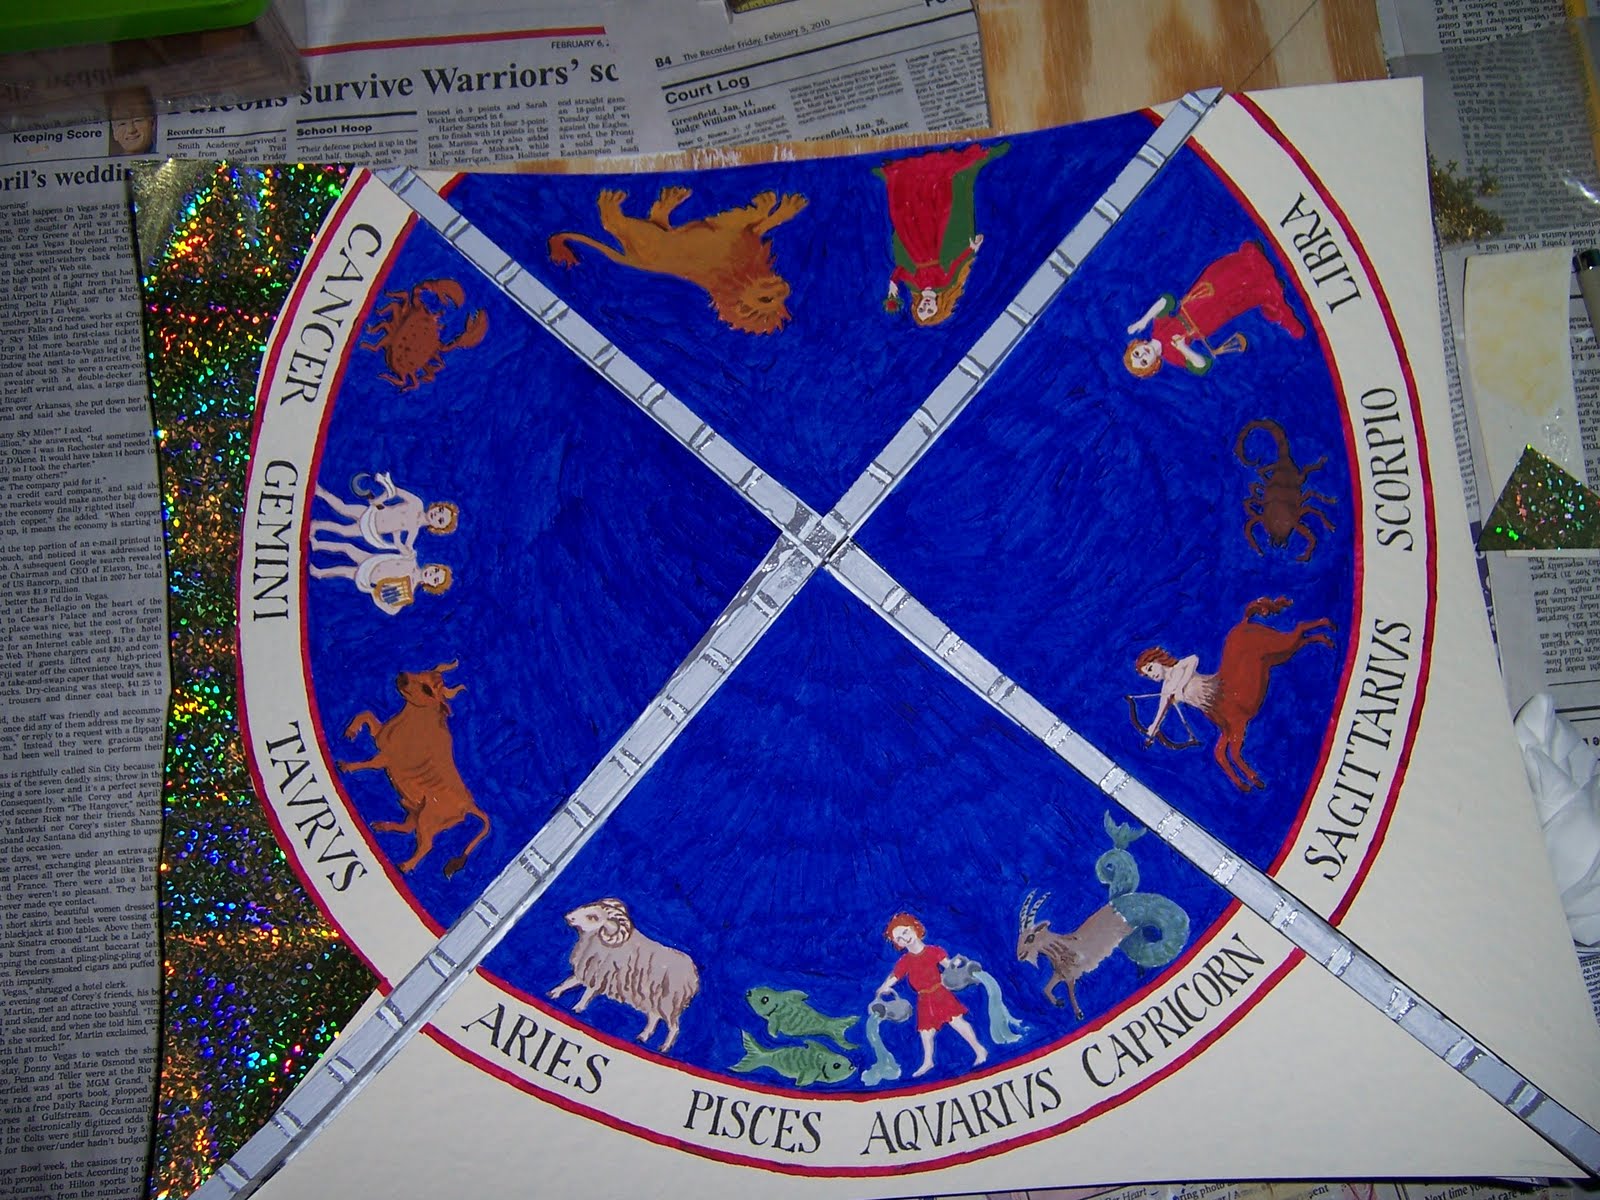
And had the vaulted ceiling painted with frescoes of the signs of the Zodiac, a wisdom he brought back from the East......


Here you can see the ceiling partly done and testing out the gilding around the edges......


And carved stone lions to guard the entrance to the hall........


Another view looking up at the partly completed ceiling.....


And some of the details of the trim around the door to the Great Hall.....


The lions look kind of friendly to me !


And here's the view of the completed ceiling.


So it turns out that there is a whole lot more decorating than I thought in a Castle Guard Room! I still have to figure out the windows....glass or none? Shutters for sure! And the details of door hinges and torches for lights, and a cache of weapons in the storage area beside the door! And the floor tiles need to be finished. But the project Supervisor is on the job making sure it is all done in the proper order and to the Lord's specifications!


So while I spent a couple of weeks working on this room last winter and early spring, I was actually moving VERY quickly for me! And while it may seem as though I am waiting for the "best" details to happen as part of the last rooms I get to work on.......I think I am finding that there are "best" parts of every room I work on! In fact, it seems as though each room feels like the "best" while I am working on it! So, I'm moving up AND I'm looking up!


Congratulations! And Looking Up!

Tuesday, July 13, 2010

Welcome Followers And Other Musings

Welcome Giveaway!

Dear Followers, one and all! Welcome to my blog!

In honor of passing the 50 followers mark I have made a little something as a giveaway prize. Having never done a giveaway before, I really don't know WHAT I am doing! Nevertheless, if you leave a comment on this post before Saturday July 16, indicating that you wish to be a part of the drawing.....one of my nieces will be visiting this weekend and SHE will have the pleasure of drawing the winner from the hat!
As you may or may not know, we have been suffering a heat wave in the New England region in the past few weeks. Temperatures in the 97 degrees F for day after day! Too hot to do anything! It is cooler now, thank heavens, but at the start of the heat wave on the weekend of July 4, I was watching the number of my followers climb steadily towards the 50 mark. Who would have EVER thought I would find so many followers? Certainly not me! But having witnessed other bloggers honor their 50 follower mark with gift giveaways......I felt I should make a stab at it myself. And immediately felt that old anxiety.....what should I make? I can't make anything really nice.... I'm too much a beginner....I don't know what anyone else might like to have ......I don't have time for this.... I don't know HOW to do a giveaway....and SO ON! To quiet that little voice I went and sat in front of my Lovely Old Dollhouse.....just to LOOK at it and be soothed. And then I noticed the little L.L.Bean "catalogs" I had cut out last summer as I was starting to work on the dollhouse. And then I noticed a few tiny seashells I had lying around the dollhouse just waiting for something........ Hmmm....then inspiration struck! I had always wanted to try my hand at decorating a piece of furniture with seashells. I had even bought bags of the tiny shells from craft stores years ago. They were just waiting for me to remember them! What better way to honor the start of this HOT summer than by making something out of seashells? So I quickly assembled a mirror frame from scraps of wood and a tiny mirror, and then spent a DELIGHTFUL day carefully glueing every tiny seashell in place on the mirror frame!
It and the tiny catalog will go to the winner of the welcome followers drawing!

Welcoming followers with gifts is an ancient tradition. But when I think of welcoming people into my life and my world, the most powerful image that always comes to my mind is gathering around the hearth and sharing the warmth of fire and food. So perhaps it is no coincidence that the other subject of this post is the most basic hearth of all.....the kitchen hearth....this time the one in my Castle Dollhouse. Now, as you already know if you have been reading this blog, I came to build my Castle Dollhouse at least in part from seeing the very inspiring work of Nina and the Knitwits on their Tudor and Medieval Dollhouse Project. When I started to build my Castle in February of this year, Nina had not yet started on her very amazingly awesome kitchen wing of her dollhouse. And you will remember that I had decided right from the start that my Castle would have the kitchen BELOW the Great Hall, in the cellars as it were. So I find it really interesting to see just how different our castle kitchens are! And I must also confess that when Nina DID start her kitchen (almost the SAME week I had gotten mine mostly painted) I was constantly torn back and forth thinking "ooooh look what Nina has built! Now why didn't I do it that way?" or "maybe I should tear mine out and start again"! But fortunately I did nothing so drastic! And actually, it really helped me to see that I was following the inner prompting of my OWN Muse and just needed to pay attention to what I was dreaming about.....no matter how quiet that little voice became!.

So here you can see the basic shell of the Great Hall (where Ken (or is it Sir Kai?) is standing) above the kitchen area and the storage areas. There are two storage rooms, one on the right is the Pantry (from Pannetry or bread room) and the one on the left is the Buttery (not from butter.....but from Butts of wine or beer! - and hence the term for Butler being the one who looks after the wine).. ...

(*please notice, Sans!, my antique sewing machine in the background at right) :)

Here you can see I have painted the entire area the light gray base coat (after giving it all a coat of primer). You can see I have built the fireplace, and for inspiration on it's shape and scale I referred to many of my Medieval Illuminated texts. I really must learn to assemble a few of those picture references and include them in my posts.....

You can see here a closer view showing the base covered with the "Bondo" - our version of Polyfilla, and the shapes of stones carved into it before it dried. (Please refer to Nina's blog for EXCELLENT tutorials about this!) I was carefully following her suggestions for this part! And here you can also see that I have attached two doors between the kitchen and the storage rooms. So far, I have been using the cut-outs from the plywood walls as the doors wherever possible. Once they are painted and trimmed they serve very well.


Below you can see the basic stonework painted in. And I couldn't resist painting a "trompe l'oeil" fire in the hearth. After all, it was winter as I was building this, cold and dark here in the North and I couldn't know how soon I would get to putting in the electrical fire. I was AMAZED at the immediate difference it made in the kitchen! It brought light and warmth and a focal point even though it was just illusion!


Here is a closer view of the hearth and the still rough painting.......


And the beginnings of the vaulted ceilings for the kitchen and storage areas.......


And here the ceilings are painted and loosely placed (NOT yet glued down!)


It was at about this point in my construction that as I was researching medieval castle hearths on-line that I realized I had left out an important element! The Bread Oven! Now, you must realize dear readers, that at the time my Castle was "built" maybe in the eleventh or twelfth century, they did not even have chimneys as we know them! Chimneys came into fashion during the thirteenth century. Before that, the fire was in the center of the hall and the smoke rose up and found its way out through openings in the wall near the roof. And at that time, the bread ovens were a separate structure outside the building, often a free-standing bee-hive shaped structure. So it is ENTIRELY authentic that my Castle would have added the ovens to the kitchen later, even after they had added the chimney and hearth against the wall as we see above.
Here, therefore, is the newly re-modeled MODERN kitchen with the convenience of an interior bread oven, fully smoke-removing chimney, hearth with more than one pot chain and shutters on the arrow-slit windows! This view is with the vaulted ceiling removed and the beginning of the painted stone arches where the vaulting meets the stone walls. The building overseer is inspecting the workmanship..... :)


Here the vaulted ceiling is in place.

Now, Dear Readers, you must realize that I was about this far along in my construction when Nina started blogging about HER Tudor Medieval Kitchen! And Oh what a kitchen that is! The details! The creative tutorials! The polyclay pheasants and potato barrels! The fires and spits and charcoal burners! I was BLOWN AWAY! Every day was some new GREAT idea! And the whole becoming such a richly authentic period room! IT stopped me in my tracks! Well, for a few days at least! :) I had to come to the realization that MY Castle kitchen WANTED to be a dark and moody STONE place! It was in the Cellars, after all, and OLD and the whole image for me had always been more cave-like than the clearly Tudor era kitchen Nina was building! So I made my peace with the differences in our kitchens, and stored up in my mental wish list all sorts of good ideas which will arrive in my Castle Kitchen in good time. Because, I also realized that there is no point in hurrying this project! The pleasure is at least as much (for me) in the doing as in the having.....so I have AGES of pleasureable mini-building ahead of me!

So the details continue to be added... the shelf along the wall for platters and jars....... the wooden table that happens to be one I built in my teen years........ the cast iron cauldron and pot that also came from a set I had in my teens and is PERFECT for this kitchen......... And a detail that I am proudest of is the "smoke" rising from the fire on the hearth..... with the glitter of cinders rising in the smoke....... made from a lovely gauzy smokey colored glitter strewn fabric...! It may be a long way from finished...... but it is coming together just the way I have imagined!


So, WELCOME to my Kitchen, One and All!


Welcome Followers and Other Musings

Thursday, July 8, 2010

Working From The Bottom Up

I left you last week with the promise of showing more of the vaulted ceilings in a later post. So that is where I will begin tonight. First let me remind you that I jumped in to building my Dream Castle Dollhouse after finding Nina's very inspiring blog about her Medieval Tudor Dollhouse Project. I must also credit her with the (to me) very brilliant idea of completing each room starting at the lowest level BEFORE adding the ceiling (which is obviously the floor of the above level) because it is so much easier to manage all the details while the ceiling is out of the way! I have always been inclined to think in terms of completing the whole shell first - more of a working from the outside in method - so it was truly a novel and EXTREMEMLY useful idea! But it really is a completely different way of thinking about the project for me.......I just have to learn to plan and think through and build or buy ALL the parts of each room before moving on up to the next one.

As I mentioned in my last post, my castle is made up of two tall towers, each with four floors, flanking the central Great Hall which is three stories tall, but only has two floors as the Hall itself is two stories tall. I began work on the towers first, beginning with the dungeons below the Chapel, and the stables on the bottom level of the Guard Room Tower. Now, in my imagination, neither of these rooms was where I had invested a lot of fantasy over the years. But once I had decided that the Great Hall would be above the kitchens, I realized that the chapel and guard rooms would need a "basement" level below them. The obvious choices were the dungeons and the stables. And because Nina's method makes SO MUCH SENSE to me, I was determined to get those useful rooms built and move on to the more "interesting" ones as soon as possible! So I jumped right in. But here I will have to confess that I have not REALLY stuck with Nina's method......I have MOSTLY finished the first level of rooms before moving up to the next ones....but not really in all their details. And I have cheated by moving on to the next room on the BOTTOM level before completing any of them! And I really bend the rules by leaving the ceiling removable for a very long time......! But more on that later.

So It was while I was trying to quickly get the dungeons (and the hidden postern stairs) built so that I could move up to work on the chapel where I had all kinds of exciting ideas roiling in my head, one of which was to paint a beautiful frescoed ceiling in the chapel, with vaulting and carved stone ribs and.....and ....and......that I realized that the dungeon level was going to NEED to be vaulted like a stone cave in order to be at all realistic. In fact, it was going to be the perfect place to PRACTICE making vaulted ceilings! In one of my books I found a beautiful photograph of the magnificent vaulted ceilings of the cellars of Fountains Abbey in the North of England. It had just the stone ribbing and brick infill look I was imagining. My version is only a pale imitation of the real one if you ever get a chance to compare.


So here are the beginnings of the vaulting. I cut arched shapes from plywood the length of the diagonal dimension of the room, intersecting at the center of the room. Here they are notched on the ends to fit around the beam that supports the floor above, and they only extend to the edges of the interior walls of the dungeon and stairway. But they are angled to appear as though they continue through the walls. I glue them to the ceiling board, leaving the whole piece removable by sliding it out. (So you can continue to work on it easily!)

When I was making this I had no idea I would be a blogger soon, and even less of doing a tutorial -so there aren't enough photos to really show the process. :(
Here you can see the corrugated cardboard cut to fit between the ribbing and glued in place. The corrugations allow you to crease the surface in the direction you want the rows of bricks to appear to line up. It is important to position the corrugations in the right directions relative to the vault ribs.

The ceiling was then given a coat of primer and a base coat of paint. I am using interior latex house paints because of the quantity needed and because I already have it in the colors I want to use. In this case I started with a light gray, but then realized the "mortar" would need to be a darker color to look realistic ie. old dirty and maybe mostly missing....you see, I couldn't decide if my ceilings were "dry stone" with no mortar - a really old method....or just really dark old mortar between the bricks. Either way it needed to be dark. So here is a shot of the dark lines painted on the corrugations, and the cross lines for the bricks. I really like the graphic quality of this shot........


Then I added the brick colors.....using a full range of earth tones mixed randomly to get a brick look.........


And I painted the mortar lines in the stone walls of the dungeons....and dirtied them up a bit. I think I will need to go back in and add another layer or two of grime at some point.....

Meanwhile, I was also starting on the stairs up to the next level, because you can't "finish" the bottom level until the stairs are done! And I realized that the inner walls for the stairs would need to be painted before the whole section could be closed in with the wall to the dungeon......So here is a view from the Great Hall through the doors at one end. The right hand door is the one down the stairs to the kitchen and dungeons. The center door leads to the chapel. The left hand door will lead up stairs to the ladies Solar. When we get there that is!


This is a view of the rather complex stair construction with the inner walls and dungeon ceiling removed. You can also see the first attempt of mine at making a faux stone floor on the dungeon level. Nina says to use "polyfilla" - a substance not available here and the closest I could approximate was to use "Bondo". I debated with myself long and hard about the need for that level of realism on the floor....and eventually decided to try it. I'm very glad I did! The layer of realism is really good! More details later......not sure I have a closeup of that! Anyway, you can see the hidden back Postern stairs in the corner, and the back dungeon in this shot.


This shot shows the same thing from a different angle, with a better sense of the two floor levels. The above level is the Chapel, in the back corner will be the Monk's cell with the hidden trap door to the Postern stairs. The Chapel floor level is lower than the Great Hall - allowing for the ceiling in the Chapel to be higher.


Well, you can ALMOST see the scribed stone shapes in the floor! When it is painted they show up better.........


Yes, I did upload this photo twice......sorry...... you get to see this ceiling detail again......


Meanwhile, I was also beginning the bottom level room in the Guard Tower. This was to be the stables. After all, every Knight must have his horses, a castle kitchen must have its chickens and cows......so a stable was in order. Here I must say I have indulged another very old passion of mine.......toy horses! I LOVE horses. Next to dollhouses (which I had) horse stables were the thing I most wanted to make when I was little. So once I got started the dreams all came rushing back to me......Stalls all lined up in a row, mangers for hay, tack hanging on the walls, and of course, the necessary steeds in residence!

Here you can see the beginnings taking shape, including the vaulted ceiling because this is on the lowest level of a big old stone tower!


Oh, and of course, first Ken had to bring the horses in to test the space for size.............

The noble steed..........


And the gentle palfrey.......


Before you know it the stable walls and the vaulted ceiling have been given their coats of paint. The stall partitions and mangers have not yet been attached.......


Even though the doors are still not done, the horses are right at home in their new stables.


They still don't have their tie-ups in place, so I'm afraid they are making good use of their freedom while no one is looking........


There are still a great many little details that are not completed in these lowest level rooms that will take me a long time to accomplish. But they will come to me in time. I am not in a hurry. Because I still have more bottom level rooms to build.....and none of my ceilings are attached yet......so I'm not REALLY moving up to the next level just yet........

but this is where I will END for now!


Vaulted Ceilings from the Bottom Up!