Showing posts with label Herringbone Floor. Show all posts

Monday, April 26, 2021

Floored....


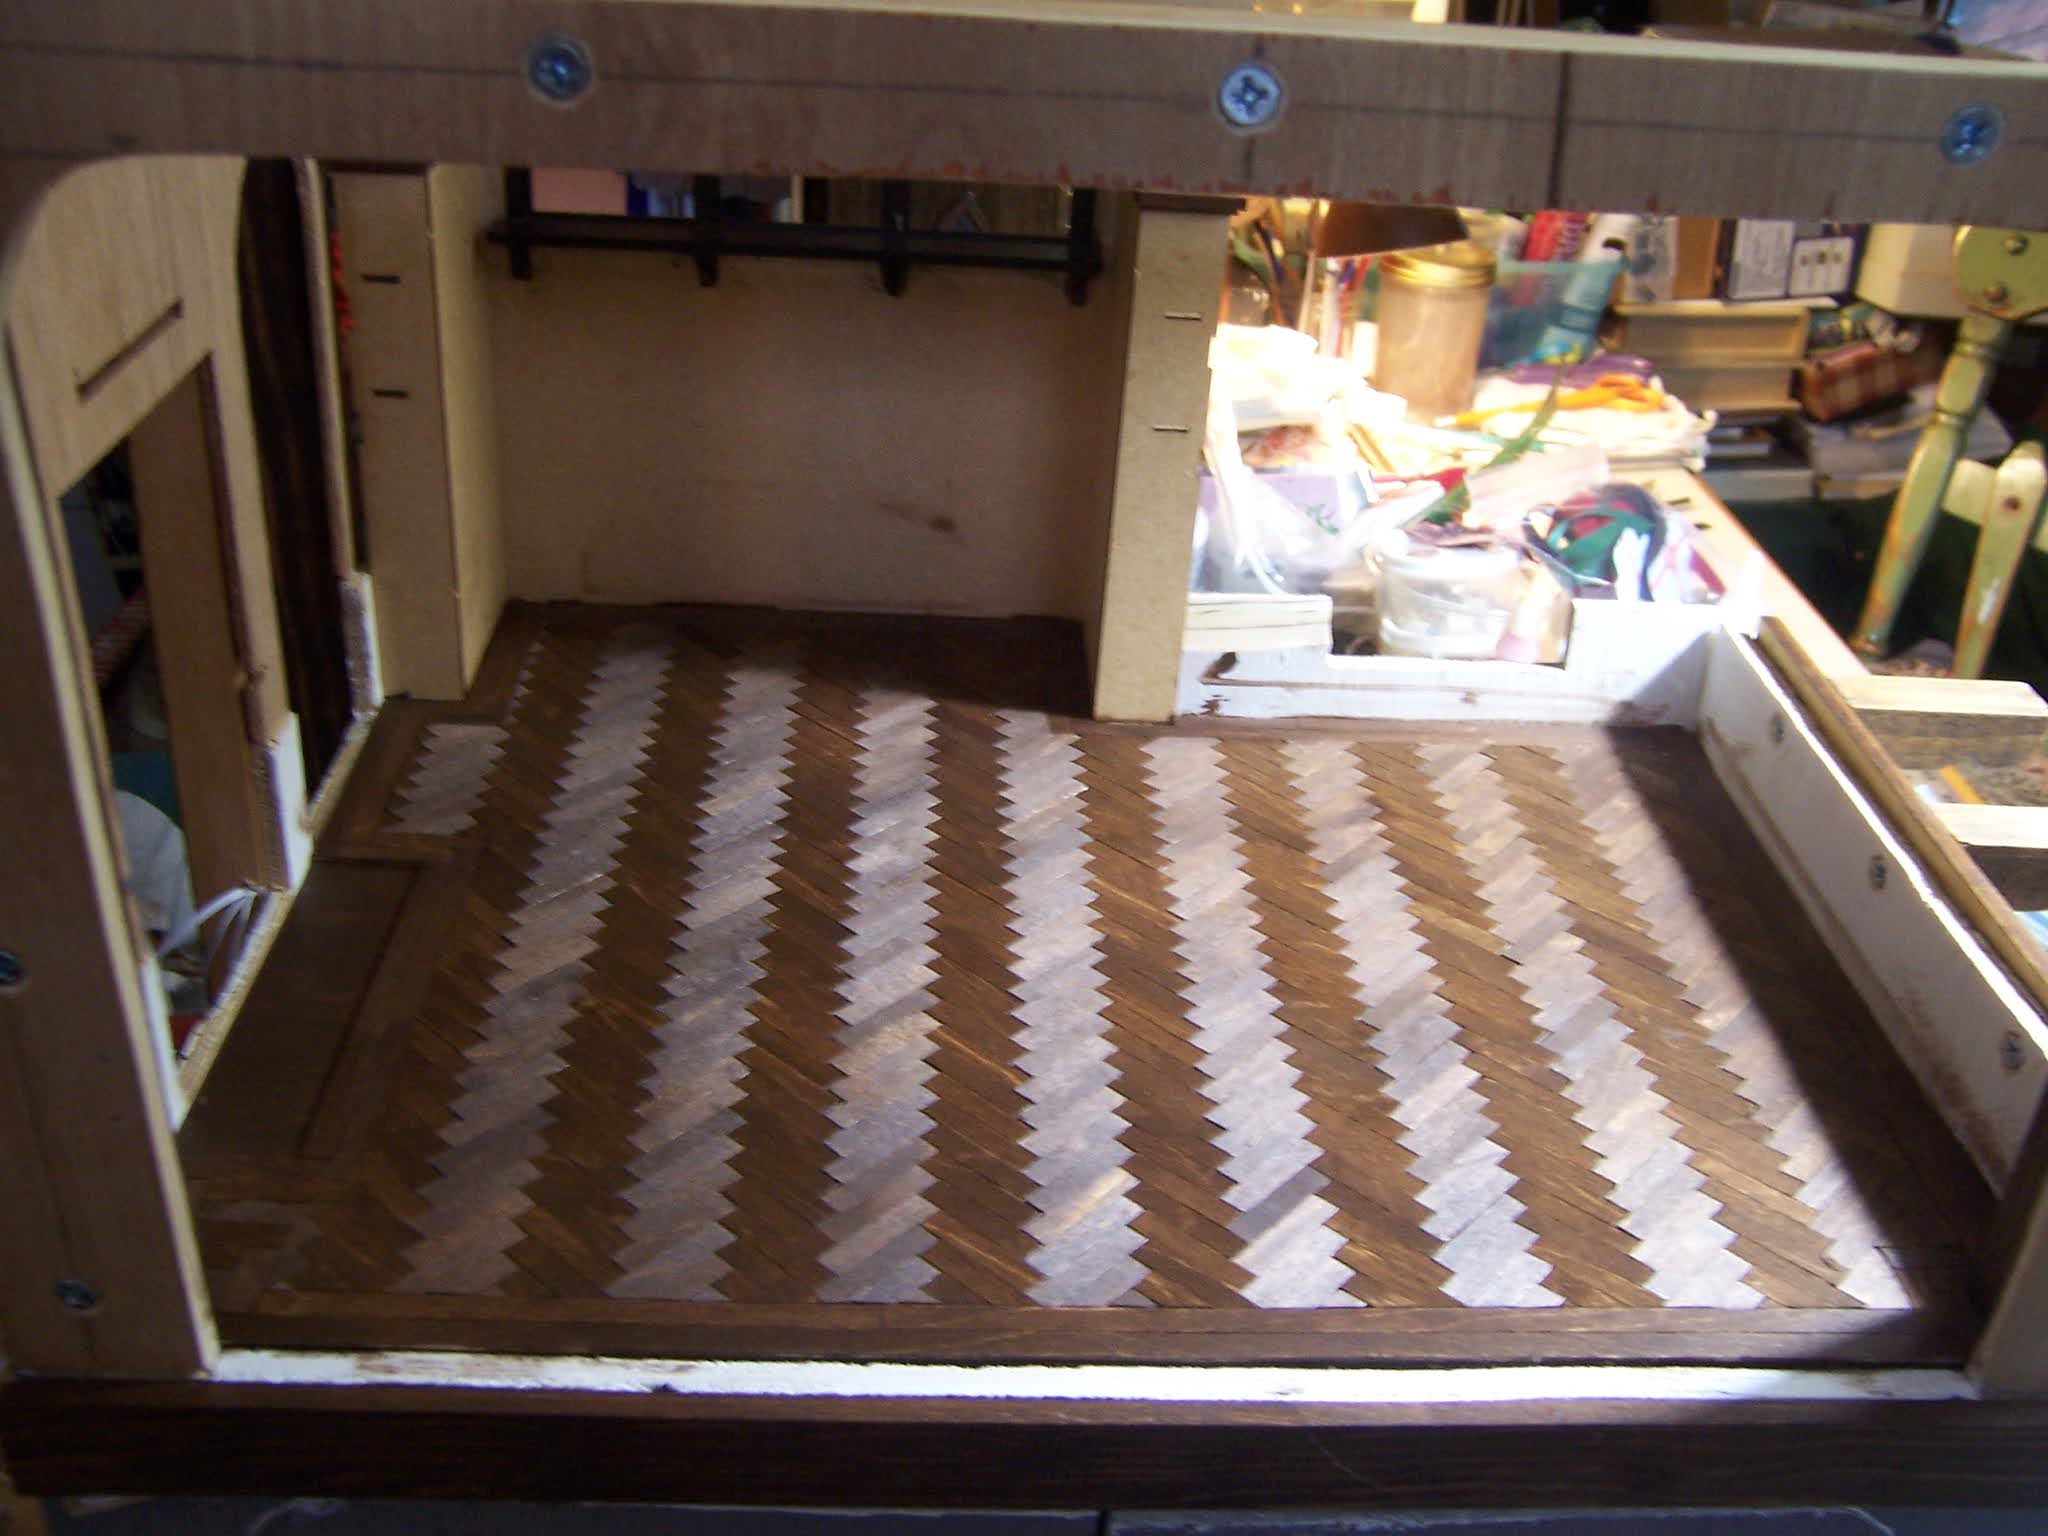
Herringbone Floor Completed....

Believe It or Not, Dear Readers, during the week I only managed to add a few pieces to the back edge of the herringbone floor. But the results were so encouraging that I really wanted to complete it over the weekend! Of course, the weekend is full of so many necessary tasks, it wasn't until late on Saturday that I could make any real progress. And then I quickly used up all the pieces I had already cut to size. But the remaining area to be filled was not too big so I had high hopes that I would get it done!

Here you can see how close to done I am!
I cut another ten sticks... making 70 more pieces.


And they turned out to be almost exactly how many I needed!


Here I have finished gluing! 
Even all those Teensy Tiny corner triangles!


See how tiny that one on the left by the door is?


And those tiny ones along the back wall?
(I almost didn't bother trying....)
I am so glad I did them!


There were five leftover pieces....
Which I used to make a stain sample...


So I could see how this wood took the stain.


Here is the test stain... dark walnut.....
Which went on well if you wiped it off fairly quickly.
 
So I got started....
(No dithering here....!) 


I know some of you will think it is way too dark...
 and wonder why I am ruining that beautiful floor...
But it is supposed to be an Old And Aged floor... 
and the colors for this room would not agree with a paler floor.
(Like with the green paneling in the room below... 
you will have to take my word for it!)
I only stopped to take the one picture...
 the process required quick work 
to brush on the stain in a small area
 and wipe it off rather quickly.


But oh my goodness...!
 In the right light it looks gorgeous!


The way the light reflects off the different directions of the wood grain 
is one of the special parts of this flooring pattern.


I added one coat of polyurethane varnish to seal it.
I don't want a glossy smooth finish... it needs to look old.
And all those cracks where my wood pieces 
don't quite align properly add to this effect!


I had to put the walls in place (temporarily) 
and add some of the furniture... 
just to see how it looks....


Well, Dear Readers, I don't know about you...
But it is so much better than I expected... 
I am Floored!
I just Love the way this turned out!


Monday, April 19, 2021

Herringbone Floor....


 Under Construction....

As you can see, Dear Readers, in the picture above, I briefly experimented with the idea of running the zigs and zags of the Herringbone pattern in the opposite direction. But I quickly decided that the initial pattern was the correct direction. I added a whole bunch of pieces to see if it made sense to try to count and space the rows before starting to glue them down. I estimated the distance from one zig to the next zag and measured a whole bunch of 3/4 inch spaced lines across the floor. While doing this I realized that I wanted to have a border of plain wood strips all around the edges. This would make all those tiny ending triangles less likely to chip and fall off the front edge at the very least. So I started there, gluing the edging in place.


I also remembered that I needed a hearth at the chimney side of the room,
 and made one to butt the floor up against. 
This is not attached yet so I can remove it to paint
 without worrying about the floor!


There are enough bump-outs and odd corners in this room
 that it makes sense to me to have a clean edge
 to work from with the herringbone pattern.
I made the edge two "boards" wide.
And then I started gluing the herringbone pattern...
starting roughly in the middle.


I made a little "square" out of legos
 (I raided my son's stash!)
which proved invaluable for keeping the rows aligned!


(My son has tons of fancy legos, 
so I was able to add a handy handle!)


There is really no fast way to do this!
Especially since my pieces are a little irregular...
They needed to be tested for fit before adding the glue.
And you need to be very careful to not get glue
 on the "right" side of the wood!


I got this far on the first day.


I love the way it is looking!
But I needed to see how the edges were going to work...


All those tiny pieces by the doorway....
And you have to get the wood grain running in the correct direction...


I'm not sure I'll be able to fill those tiny gaps at the corners...


Oh look! I did fill one of them!


And all the rest of the back alcove is finished too!


But that's as far as I got on day two, Dear Readers.
The herringbone floor is under construction...
and is more than half done!
I just Love the way it is looking!


Tuesday, April 13, 2021

A Stirring Tale...


Of Rescue...

You May or may Not recall, Dear Readers, that this Dollmaker's Studio project is a hodge-podge of leftover and lonely pieces mixed with Special kits (Sandra's kit that inspired the project) and Artisanal creations (the beautiful ook arched glass door on the ground level) to name a couple. It is also a venue for ordinary salvage, in this case a batch of coffee-stirrer sticks from work which were about to be tossed out because they fell on our floor (where barn boots regularly tread). I looked at them and thought "I can probably use those"! So they came home with me. I thought they would make a great rustic floor in some project or another. But there are not too many of them... and I belatedly realized that not all coffee-stirrer sticks are the same dimensions or type of wood. I had no idea what "make" these were, so what I got is what there is to use. It needed a small-ish floor area to work... and one where a different type of flooring one room to the next would not matter. So I started to test these pieces in the upstairs room. And because this is a small-ish project, but one filled with fancy details, I wanted the floor to be special too. I had long wanted to try a "herring-bone" floor, and this would be the perfect place to give it a try.

Here is the interior (sorry for the dark view...!)
with Sandra's alcove placed at the back and the window seat at the right.
(Neither are firmly attached yet.)
The space is about 9 inches by 13 inches give or take a little.


And with the morning sun hitting the spot!


So I started to cut some stirrer-sticks to see if this might work.
At one inch sections, I get seven per stick.
But I have to cut them by hand... and the stirrers
 are not identical or perfect in their dimensions.
(But I think that will add to the charm of the end product!)


Here I have laid out a very tentative section
 to see how the spacing and size will work.
I think they will look lovely!
But I have a LOT of cutting to do!
I estimate about 85 sticks will be needed.... 
each making seven pieces...
And there will be the inevitable spoiled and wrong length ones.


I think this is about twenty sticks.


I think this is about forty sticks.....
I made a system of cutting five sticks at a sitting....
Measure, cut, sand.... each one making seven pieces.
And since I spent so much time in my
 RL Garden these past weekends,
 I did not get much else done!
But it is a start!


I love it, Dear Readers, 
that the sticks that fell on the Floor by accident...
Can become the floor by Design!
A Stirring rescue all around!