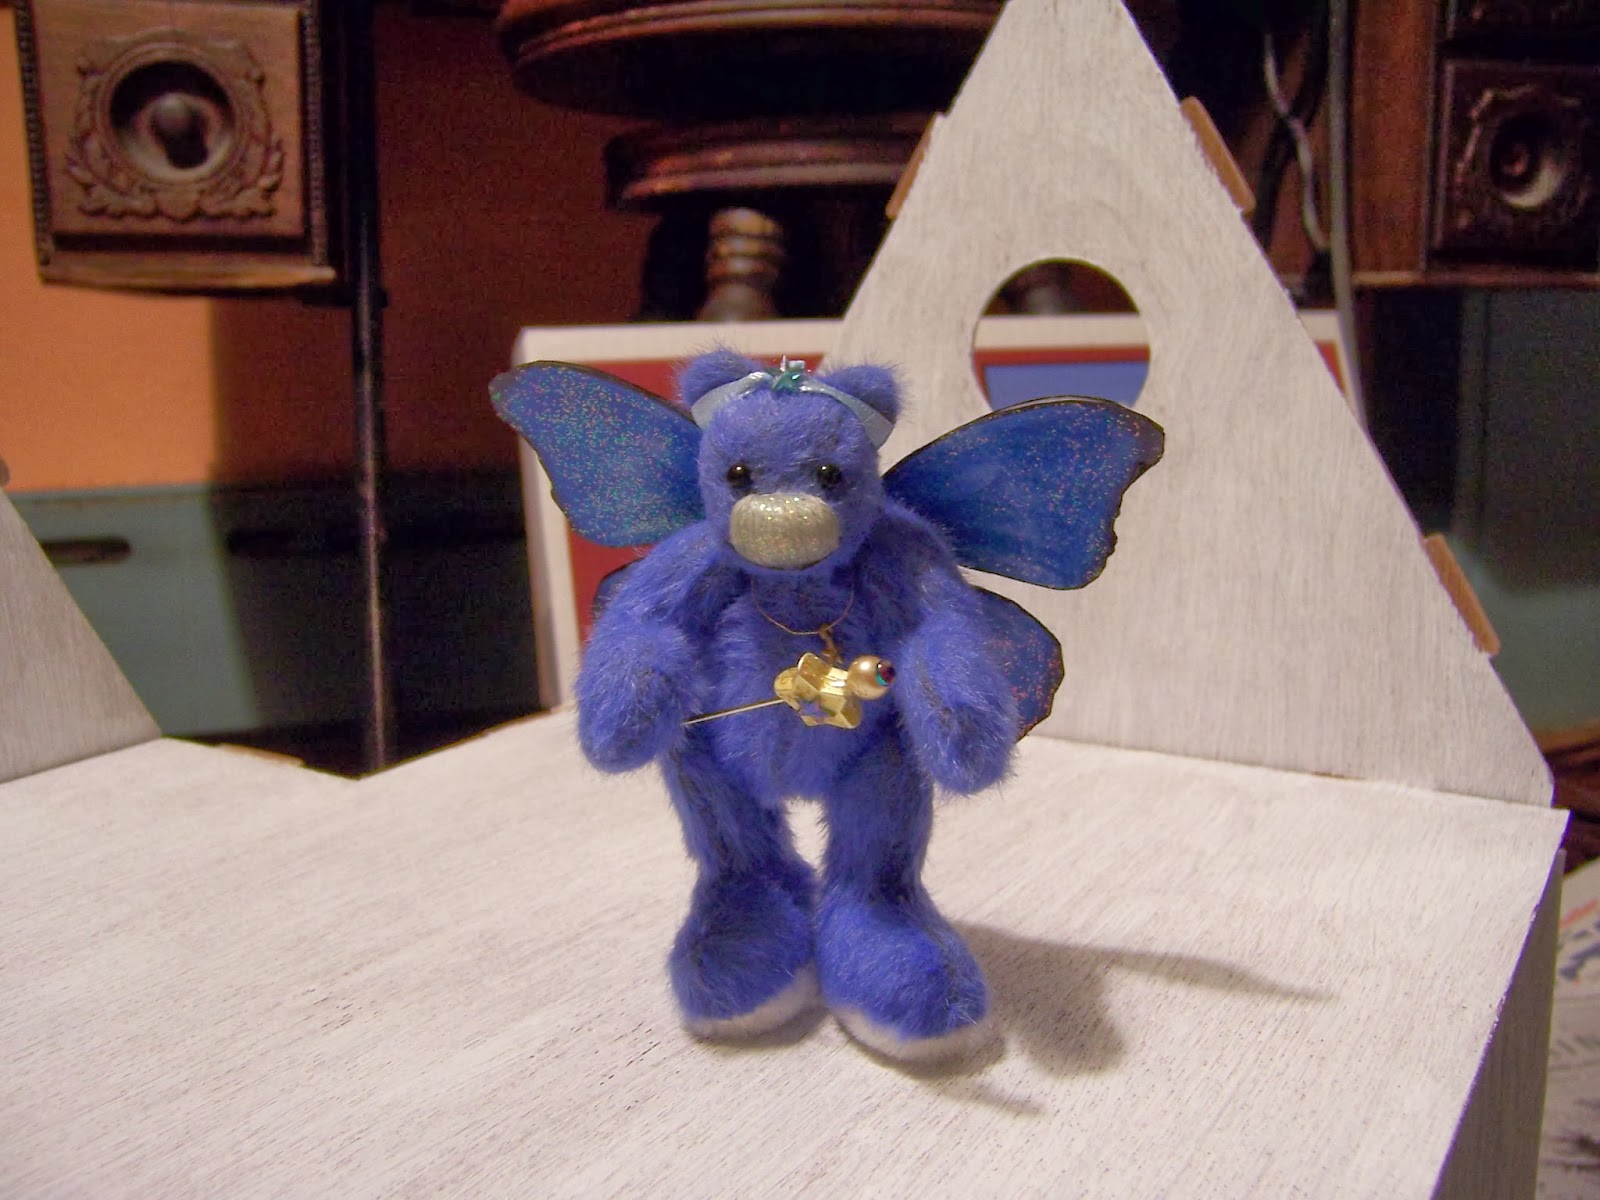
Monday, January 27, 2014

New......


Who (K)new....?

Perhaps it was the fact that it snowed much of the weekend, Dear Readers, the kind of light snow that blows sideways in the wind and never lands, but howls around and looks white and makes you want to stay inside and make things, or perhaps it was that so many others have been starting the New Year by starting a New Kit to build, or perhaps it was that the Little Fairy Bear Blue had decided to wave her Magic Wand over me, but so it was that I found myself Starting a(nother) NEW House! But Please, do not panic! I have not forsaken Any of the other projects! It is just that Sometimes when a project is burning a hole in your brain the Only solution is to start building it! And at least I can say that if you never start then surely you never will finish.... so it is better to start.... and start some more! And because I had promised Blue the Blue Fairy Beary that Someday I would build her a Fairy Palace in the Clouds, I thought I had better get started! And because Blue is not very big, I decided on the smallest little kit I could find. It is the "Buttercup" by Greenleaf and will be about 16" by 12" when it is done. Except that I am going to be making a few changes.... but we will get to that later! Here you can see she is visiting the cottage.....
It has been given a coat of primer 
and just roughly assembled to get a sense of the scale...

I apologize for the dark photos..... it is dark at this time of year....

Here you can see her so much better in the upstairs where there is no roof... 
but you can see that there will be plenty of room for such a little Bear under the eaves!
And with these kits you need to do a lot of the painting before you even assemble it.....
Especially if you are going to do any Fancy painting....!
So when it came to the choice of Color for the House 
and I asked Blue what she wanted.....
She didn't hesitate for a second!

It was Almost as if she waved her magic Wand!


Can you see how much she likes this color?
(Well, I did have to get out my brushes....!)


The front door will lead out to a Terrace.....

Where Blue can sit and eat.....
This little house will be the main room of the "Cloud Palace".....
But there will be other rooms too....

In fact, she reminded me that we needed a doorway cut in the wall....
In order to access the Tower......

Which I will make from Quaker Oats boxes.....
(I have been eating my oatmeal for breakfast...!)
They seem to be just the right scale for a little Fairy Bear to live in!
But as I am Sure most of you are aware of how long and slow the process is to 
"remove and prepare" each and every piece of these kits 
before you can even start to glue them together.....
You will not be surprised to learn that while the paint was drying....
I also was Starting on another Saint painting!
This is the final Saint for the ceiling and I wanted it to be Saint Brigid.

She was the Patron Saint of Ireland and lived in the fifth century AD. 
She established Monasteries at Kildare and performed many miracles.
I did my research Dear Readers, and to my surprise, 
I could not find a Single portrayal of Saint Brigid that was earlier than the fifteenth century! Her history and stories are well documented, but rarely if ever illustrated in the early years of manuscript painting.
So I had no choice but to design my own version.
I chose the simplest icon style I could find (from the many recent portrayals) 
and chose the attributes that I felt suited her best. 
In one hand she holds a torch (in some versions it is a bowl of flames) 
and nestled in her lap is a statue of the Church... 
indicating her role as founder of the Church in Ireland.

I managed to get most of the foundation colors painted 
and made a great start on her face.
And while I was painting her I realized that 
I was not happy with the colors of Saint Cecilia's gown....

If you look at the previous post you will see that the gown was gold...
It was too much gold.
So I repainted it white as an undercoat...
Then added the purple...

And while I was at it I also worked more on her face....
Still so far to go!

And I keep trying to get a good picture of the ceiling in place....
But the lighting and the focus are very challenging!
At least it gives you an idea of how they all look together....
And in case you didn't know, Saint Brigid is celebrated on February 1st, 
which coincides with the midpoint between the Winter Solstice and the Spring Equinox. 
In the Pagan times it was considered the first day of Spring, 
and the beginning of the Lambing season.

Over here we have adapted the Holiday to "Groundhog Day" on February 2nd. 
But whether you celebrate the day for the Saint or the Rodent.... 
it Truly does indicate the Time when the Days are noticeably longer 
and the Light is returning to the North!
So Dear Readers, whether it is a New Kit or a New Color,
or a New Saint Portrait...
I seem to have made a lot of New Starts this Year!
Who Knew!

Monday, January 20, 2014

More Bricks and Saints


Slow But Steady.....

It was easy enough, Dear Readers, to get the last few bricks attached to the chimney, (because there were so few still to add!) allowing for a brief sense of Euphoria that the Chimney was coming to Completion! All I had left to do was paint and grout the bricks and then attach it in place! Oh, and add the cap stones... and it would be done! So I set right to it! But I remembered that I would need to paint a coat of primer on it first... and while I was slowly painting it I remembered how fiddly it was to get the paint into All the cracks between the bricks... and ALL Four sides of the chimney! It took longer than I thought it would...

And then it needed to dry.... 
in all the cracks between all the bricks......
It took longer than I thought it would.....
And then the painting part....
I use acrylic artist paint and mix as I go....
It took longer than I thought it would....

 Because it needed two coats of paint on all four sides......
And then it needed more color and texture added in places....
(I forgot to take good pictures...)
And then it needed a coat of polyurethane sealer....
In all the cracks between all the bricks on all four sides....
Yeah, it took longer than I thought it would!
Above you can see it late Saturday night... 
painted but still no grout.... but progress had been made!

So Sunday morning I started right in with the grout.....
But first I took a Morning Light picture of the partly done chimney...
without the grout in place it is really difficult to tell whether the color of the bricks 
will match what has already been done.... so we just have to hope for the best!


And get started on the grout....

Section by section you push the grout into the cracks 
and wipe off the excess with a damp sponge....
The abrasion of the grout takes away the gloss of the polyurethane sealer...
In fact, it took away some of the skin on my fingers....
Which I didn't notice until later!
Hmmm... should I have used some gloves?


But eventually all the grout was applied....
And I just needed to wait while it dried....
And keep wiping off more of the dried loose grout.....
Yeah, It took longer than I thought it would!!!
But, Oh boy, the grout really makes it look like bricks!!!


Here you can see it in place....
And none of the bricks match very well....
But the Story is that it was constructed in several parts originally....
And it is very old so some of the bricks are more worn than others....
And it will be getting more "Aging" as we go....!


 So you can see that you will probably never even notice
 the different bricks when it is all finished....

Here you can see the end view.... 
without the cap stones....
 which I haven't made yet...
And which will be a whole other adventure....
But it is starting to look like I had imagined....

Here is the interior view....


I think those bricks look Amazingly real!!!
But before I can attach anything in place, 
I have also decided that the windows need interior muntins....
(All those little cross bars on the window panes)
It bothers me that they are only real on the outside....
So I stained a whole lot of thin strips.....

The window on the left is how the kit looks from the inside....
the one on the right has the interior vertical muntins 
but none of the horizontal ones....
(I forgot to take a picture of the completed window)
I have a Lot of windows to complete.....
but the one window didn't take as long as I thought it would!!

And last but not least, lest you think I was doing nothing 
while all that paint and grout was drying....
I started painting another Saint on the Castle Great Hall Ceiling....

This is Saint Cecilia.....
(Couldn't you tell...?)
She was surprisingly difficult to find ANY contemporary images to copy!
The only version I have is in the Hours of Catherine of Cleves, 
which has one of the most complete Hagiographic sections ever....
But I didn't like the image....
It didn't include any of her traditional attributes....
She is the patron Saint of Music.... and it showed her with a Hawk!
So I searched images of Rood Screens..
(Isn't the internet Awesome!)
And while I couldn't find an image that was hers for certain....
many of the surviving paintings are very badly damaged....
I found a pose and attributes I could use.....

But she is only just begun...
I have to invent most of how she is....

I apologize for the Lousy pictures... 
the lighting is so difficult at this time of year...
But you can see her in conjunction with the other saints.....

And here is a view with the ceiling in place...
Again, the lighting is difficult... 
it gives a much too orange cast to the painting...
And I have only one more Saint to begin!
But they ALL need tons of details to finish them!
So you can see, Dear Readers,
while it might take longer than I thought it would....
whether its Saints or Bricks....
Slowly but Steadily...
I have made Progress!

Monday, January 13, 2014

(Almost) Nothing To Show...


The 200th Post!

I hope you can forgive me, Dear Readers, for being Completely Unprepared for the Momentous Occasion of This, My 200th Post!!! I would have liked to have some thoughtful commentary prepared..... or a summary of the Life of this Blog to show.... or perhaps an update on all the ongoing projects..... or perhaps even a giveaway contest planned..... but, Alas, I have none of those to show! Instead, it was one of those weekends where the RL Chores ate up all my time and I got Almost Nothing Done in my mini worlds! I did manage to add a couple of rows of bricks to the top of the Chimney for the Conservatory.... in fact, I decided that the top of the chimney needed to be a little taller and fancier.... so what should have been only three or four more rows of bricks, grew to ten or twelve rows of bricks.... and it is still Not Quite Done!

Here you can see the brick portion in place.... 
between the halves of the Conservatory.....
I think the chimney looks more realistic when taller....

And here is the view from the side.....
Please forgive the poor lighting.....
It is that dark time of year!
(And now that all of the Christmas Lights have been put away :(
It Feels even gloomier...!)
That was all I accomplished this weekend, Dear Readers, 
so rather than leave you with So little to show...
I thought we could have a Closer look 
at the Dollhouse Annabelle got for Christmas!
(Several of you mentioned that you wanted to see inside it...!)

I made this little doll's dollhouse in 1974.....
(I was still a teenager)
And I had very few materials to choose from when building it.
It is simply painted cardboard.
It is front opening (unlike the Lovely Old Dollhouse)
and the front doors are "hinged" with strips of linen sheet material.
I carved a wooden peg as the latch to keep them closed.

Inside are four rooms and the central Hall with stairs....
On the right downstairs is the Dining Room....
With china and silverware painted on the table....
And a Maid ready to serve....!
And the upstairs is the Children's Nursery....

And on the left downstairs is the Parlor....
and Upstairs is the Master Bedroom...

The Parlor has a mirror over the fireplace made of Tin-foil!
And the sofa and chair are painted cardboard....
painted to resemble dark blue velvet (I think!) with brass tack detailing!
The visiting guests are "paper doll" cutouts... as are the Resident Hosts!
They appear to be dressed in the fashions of the Victorian era....

Here you have a better view of the Hallway and the stairs going up....
It is rather difficult to get good shots of these rooms.... 
the Parlor is only 1 and 1/8 inch wide!
The entire house is less than four inches long and 
about 3 and 3/4 inches tall including the Widow's Walk on top!

Here is a view of the Master Bedroom and the upstairs Hall...
(yes, that is my thumb in the upper corner!)
(And no, I don't have giant hands!)
The bed is also made of painted cardboard.... 
with an American Patchwork Quilt!

Upstairs in the Children's Nursery 
two children are playing with building blocks....
Once again, "paper doll" cutouts....
I even painted the candle sconce on the walls... 
visible on the right!
In places the paint has "crazed"....
but it really has held up very well over the years!
 
 
You can see that my measuring and gluing was a little off....
The floor is definitely higher on the left side!
The attic is not accessible..... 
and it is interesting to note that this cardboard is a good bit thicker 
than the average cardboard available now!

I hope you have enjoyed this Tour 
of Annabelle's Antique Dollhouse.....
Because without it, Dear Readers, 
I really would have had Almost Nothing to show you...
On This, My 200th Post!


Monday, January 6, 2014

Saints And Bricks


Progress.... Bit by Bit...

I hope you can forgive the Garish lighting and the awkward perspective, Dear Readers, but I have been working on painting the Saints on the Castle Hall ceiling and I wanted you to be able to see what it currently looks like when in place in the Hall. This is no easy task at the best of times... requiring one to get down on ones Knees and crane the neck upward at an awkward angle... and Hope or even Pray that the view in the camera lens is properly aligned! And at this time of year when it is Almost Always too dark... it is nearly impossible to get the lighting right. I have moments when I am wondering why I am taking so much trouble with painting the details on the ceiling.... but then I see it in place and I know it will eventually look the way I am imagining.... so I keep painting! I am keenly aware that it is becoming an amalgam of eras and styles, because I am trying to copy actual Medieval Images of the Saints... and it is nearly impossible to find ones all of the correct vintage to copy. Several of the images I am using are Stylistically later than the date set for my Castle. But I am allowing for "Artistic license" rather than period authenticity.
I left you last week with several Saints just in the beginning stages of painting...

I tend to get completely absorbed in the painting process and forget to take pictures until the end of the day... and I jump around a lot from one Saint to another..... 
so you will see only slight changes on some and big changes on another. 
Here above, you can see I have painted part of John's robes and most of the Eagle.....
And below you can see I have added much of the black linear details...

Another just begun Saint was Saint Luke...


He is the Patron Saint of painters... 
so he is shown working on painting....

Above you can see I have added most of his facial details....

Here is a closer shot....

And I also started on Saint Matthew....

I gave myself an additional challenge with Matthew..... 
I chose an image that I only have in a black and white photo...
because I really liked his expression and the linear style of his clothes....
But I am left having to invent all the color details!!!

We shall see whether I end up having any success with his robes....
I have made a start!

And lest you wonder what I was referring to in the "Bricks" part of my title...
I also chipped away at the bricks for the Conservatory archway!

I seem to recall that Last year on New Year's Eve 
I was making bricks for the Folly Chimney....
This year I got the arch section done on New Year's Eve....

And then diligently worked at the remaining bricks....
Attaching a row at a time...
in between painting Saints.
Mostly I forgot to do the bricks...
And kept on starting New Saints!

This is Saint Nicholas....
I forgot to take pictures of his beginnings....
And likewise for Saint Lucy....
there are many details for her still to do...

And here is another view with four of the Saints together....


The ceiling is still not attached in the Castle... 
so I am able to do the painting from a reasonable angle....

And I have nearly finished the bricks too....

Here you can sort of see it in place....
sticking up above the roofline.....
(The beautiful wreath is a gift from Birgit!)

And here is a view from inside...

I am really loving the egg carton color of the bricks here!
I still have to finish the top of the Chimney and then do the grout....
So it is still a ways from done.

As for the Saints....
Some more details on Saint Amand....
The details on his Crozier, shoes, hands and pen....
Amongst others too numerous to specify!

And some more on Saint Luke.....

Painting the Artist... 
Painting the Painting....
The more you do....
the more you see still to do!

But Bit by bit... Dear Readers,
I'm making Progress on the Saints and Bricks!