 The List
I began my Vacation, Dear Readers, with a List of things I hoped to accomplish in my Mini World. With a seemingly endless number of days stretching before me... well, at least it felt like numberless days at the BEGINNING of the Vacation, I had visions of making REAL progress on ALL my Dollhouses! The Joy of it was to be able to just jump in and make things without feeling any urgency about FINISHING things because I could just keep going Tomorrow .... and Tomorrow... and Tomorrow! The List had all sorts of Large projects on it, such as "Paint the Chapel Ceiling" and "Finish Wiring the Torches" and "Make a Wizard Doll", as well as smaller ongoing projects such as "Make Tiles for Hall Floor." Every day I spent as much time as I could working on one project or another. It was a wonderful feeling to just immerse myself in the creative flow! So you can imagine my surprise when at the END of my vacation I looked at the List and realized that I had NOT done ANY of the tasks on the LIST! Hmmmm....! So, I asked myself, WHAT had I spent my time DOING?
Well, for starters, I did get out the Sculpey and made a lot of "ironwork" for many of the doors that were still unfinished. I made some Elaborate Serpentine hinges for the Main Door of the Castle.... as you can see in the photo below.
 And I attached door "hardware" made out of jewelry findings to many of the doors. I used a particularly fancy one on the main door, and simpler ones on the less important doors. And of, course, I didn't take many photos of such a mundane task.... but close examination of some of the photos will reveal door pulls where before there were none!
And inside, in the Guard Room I added torch sconces to the walls..... similar to the ones in the Great Hall, but rough and rustic rather than elaborate and decorated. I just LOVE the way the torch light makes the gilded border of the ceiling glitter!
 In this view, you can see some of the Door Pulls on the Hall Doors....
 And this view shows a bit more of the ceiling illuminated by the torches....
Here also you can see that I have Not yet added the window shutters or the inner Arch of stone that covers the crack where ceiling meets wall.......
 And in this view you can see the fancy Door Hardware on the Inside of the Main door......
 This photo shows the shutters have been added to the windows... although the hinges still have not been painted black so they shine too much! Also, if you look carefully you will see that the crack at the edge of the ceiling has been covered by the inner arch of "stone"...... just one of the many tiny details that takes a lot of time but adds enormously to the finished look!
 And with slightly better lighting in this photo.... I apologize for the darkness of some of these photos... but I do like to take the nighttime torch-lit pictures! I ran out of the light bulb and socket units I am using for my torches, so I will have to wait for more to arrive before I complete the torches in this Guard Room.
 Here is a view showing the door hardware on the Lower Privy door.... as well as the "iron" hinges that were added. It also shows that I AM making progress on the floor tiles too! These are not attached yet, but are laid out to see how well they fit.... and how many I still need to make!
 The project that took the MOST time and provided the MOST satisfaction was building the Windows for the Great Hall! Below you can see the first stages where I had cut out the rough window shapes from thin Basswood and carefully sanded them until they JUST EXACTLY fit in the openings. (I really think it makes the Hall Look like a Great Beast with eyes!)
 Here is a closer view of the window frames cut from Basswood. I needed two for each window, and the glass pane will sandwich between them.....
 Here is a view with the carved "Stone" details added to the window frames and the painting done as well.
 And here's a slightly closer view of the "Stone" window before the glass is added.
 Here is the arrangement I used to paint the glass. I used glass paint with "lead" paint for the lines, and then a few colored panes of glass. This is a very typical window glass design from the fourteenth century.
 Here you can see that I have taped the glass pane over the drawn pattern, carefully aligned so the panes will fit in the openings of the window frame......
 And here is a view of the finished window in place. The alignment of the top rose window is just a little off center.... but it is not as noticeable in real life!
 And another view....
 And the whole Great Hall with both windows in place.....
 And a closer view in daylight........
 Oh, and AGAIN! Can you tell that I LOVE these windows? :)
 And because I can get to the back of my Castle now I can see the light from outside at night....!
 I Love the way the light shines through the glass and casts its image on the side wall outside!
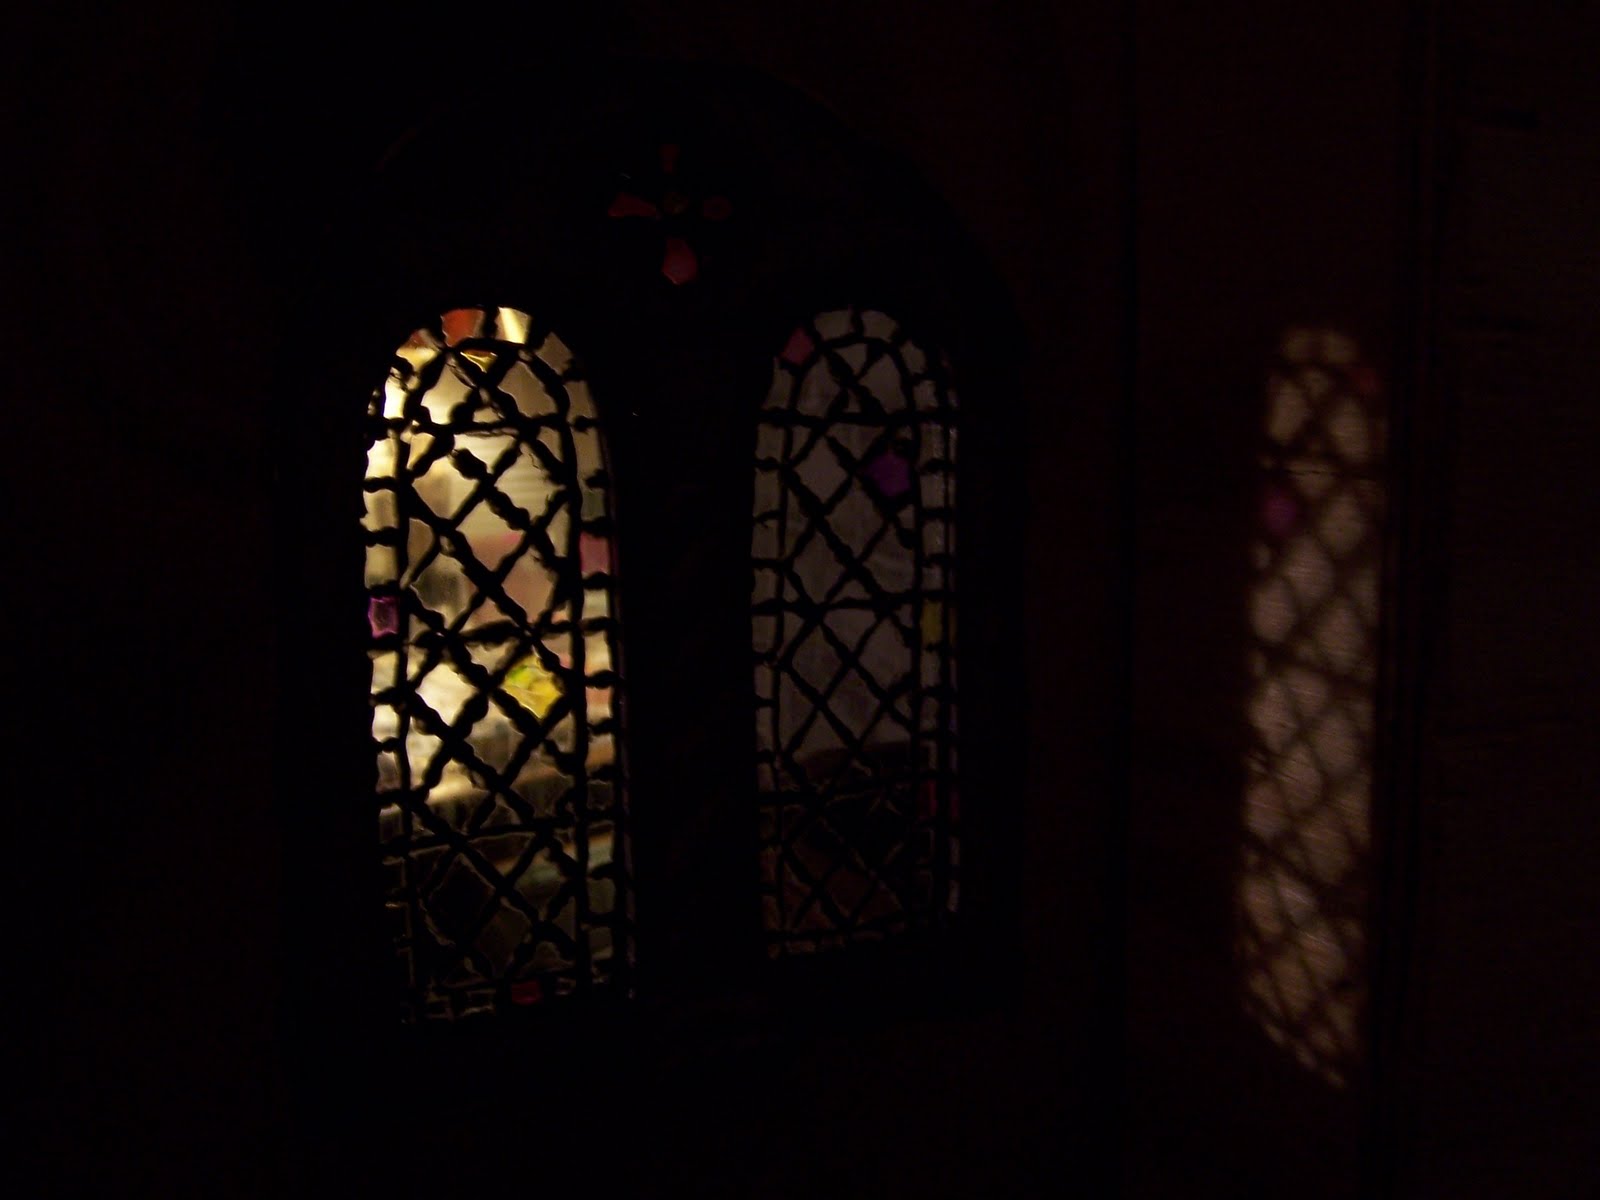 NOT on the LIST.... but That's
What I Did On My Vacation