Tuesday, May 24, 2022

Lilacs... And Labors of Love....


 Castle Windows Again...

It is Hard to ignore The Folly Lilac, Dear Readers, when the morning sun is shining on it, as it was this past weekend. I, like Will and Gabrielle, had to stop to admire the loveliness and grab a few pictures in those brief moments. And yes, it is a reminder that the months and Months of focused labor to create this blossoming shrub, were so worth it in the end! And sometimes I need that reminding as I slog through some of my other Endless-seeming projects, unable to see the goal posts in the distance! I was home on vacation last week and was thus able to tackle one of those daunting tasks I have set myself with the Castle construction. I refer to the hinged leaded glass windows which I deemed necessary to my happiness when I started this project! Believe me, I dare not even count the number of windows there are still to be made! But I can say I have completed one more of them! It took me most of the week to accomplish!

You might be amused to know that I thought
 I might be able to get all three of the remaining windows
 in this room done while on my vacation!
The one I began with was the one on the side wall
 with the lovely window seat that you see in the above picture.
I have developed a complicated method
 since all the windows are different
 and are quite irregular in their shape.
(They are all "arched" but the arches are all
 cut by hand and uneven to say the least!)
The first step is to make a paper pattern that fits
 the shape of the window, inside and outside,
 because you will need two thin frames made from plywood.


Here is the interior one.


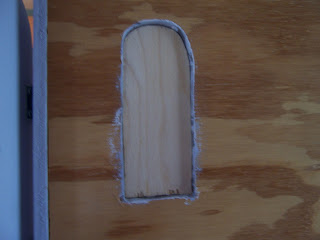
And here is the plywood piece for the inner one,
 shown with the flash so you can see how
 it fits inside the window opening.


Here is that viewed from the outside, 
so you can see the space for the outer frame to fit too, 
once it is cut out.
(It was at this point that I optimistically thought
 I might just start the other two windows as well!)


The next step is to cut out the "opening" for
 each window from the solid plywood.
Since the window is two sections, an upper and a lower,
 I begin by cutting across the middle and then around the sides.
The center crossbars will be added separately to make the frame.


Remember there are two of each section
 and you have to keep track of which side is the inner and which the outer
 or it will not fit the opening when finished!
Here they are being given a coat of primer.


Then I cut the glass panes to fit inside the window opening.
They need to be large enough that
 the frames will overlap their edges enough
 to hold them securely in the frame.
Here you can see the pattern I have drawn
 so my lead lines will maybe look straight and even!


The lead lines need to fit inside the opening
 of the frame so I am testing the fit of my pattern.


Then I apply the "lead" paint to the
 glass panes and leave it to cure overnight.
At this point it looks terrible... 
much too blobby and uneven and thick lines.
But I have learned that I can trim them later
 when they are partly dry.


I use a sharp exacto knife to trim all the lines.
The arched pane has been done. 
I hope you think it looks a little better!


Here you can see how the frame gets "inner supports"
 added along the edges to keep the glass in place.
All the wood is 1/8 inch stock,
 so the three layers make the window the same thickness
 as the Castle walls which are 3/8 inch plywood.


Here is the lower window frame with the glass in place.


And the top section of the window
 (which does not open)
 is glued in place.


Here is the view from inside 
with the flash on so you can see it...
 it is getting late again!


Because the lower section needs to swing open on Hinges...!
(Yes, this is necessary!)
It takes much longer to complete. 
Here it is being fitted to the opening again...
 and also tested for "swing" allowance.
I will need to trim along the side away from the hinges
 once the hinges are in place.


Please forgive the glare of those Large, Shiny Brass Hinges!
I love them because they are sturdy
 and do fit into the thickness of a 3/8 inch thick wall!
Carving out the rebates to fit them is another challenge. 
Exacto knives, saws, chisels, sore knuckles, swear words...
And then trying to drill the holes for the screws
 into the side of the window opening...
But I managed it well enough! 
(Not perfect, but functional!) 


And attaching the window frame to the hinges...


The open window from the inside!

All it needs now, Dear Readers, is the shutters...
and the window surround trim stones...
Which always takes longer than I think it will!


Cutting, painting, fitting.... adding Hinges!
Here you can see it with the flash, only partly done.


Top section in place....


Both sections attached... 
and the window surround "stones" also done...
with the flash so you can see them!


And both of them open, with the flash on...


And the window open with no flash...
yes, it is dark and atmospheric...
As a Castle should be!
And can we begin to glimpse why all this labor
 is going to be worth it in the end, Dear Readers?
Or do we need another Reminder...


Visiting for a moment the Lovely Lilac,
Even though the sun has gone.
Yes, I have faith that these Labors of Love
 are Worth it in the end!


Wednesday, May 18, 2022

Lilacs At Last....


And a Few Rocks And Roses...

Did You think you would not see the Blooming Lilac this year, Dear Readers? We have been having a late and colder than usual Spring in this part of the World, and my RL Lilac has finally bloomed this week! I thought we would never get here! And the blossoms on the RL shrubs all of a sudden everywhere in the neighborhood, reminded me that I needed to make the seasons change in my mini world too! Above you can see the blossoming lilac tucked into its protective box (a huge box, really!) where it hides in the eleven other months of the year (I do allow it to feature in The Folly Garden for a full month each year!) But in order to see it properly, it requires that I rearrange the dollhouses in my workroom so that The Folly can be in full view.

I imagine that You can imagine what a process it is
 to juggle all the parts while moving just two
 of my too many mini houses!
The Dollmakers Studio has retreated to the back corner, 
but rest assured, I have been working on it too!
Meanwhile it is a gloomy afternoon and the flash was required
 to show you the studio as it now is.... 
you will have to wait for morning for
 a better view of the lilacs with the sun shining in.


And if we catch it early, you can see
 the slender beam of sun that sneaks into the studio...
And if we wait a few minutes...


Ahhh.... the morning sun
 illuminates the shrub and The Folly Garden!
 

 There is nothing quite like it!
But it doesn't last.


Only a short while later you will have to make do
 with artificial lighting.


Oh, I Do Love to look at this blooming lilac!


It is a Dream come true!

And Dear Readers, I am sure you will not be surprised
 that while I was rearranging the Studio, 
I was still making a few more "Rocks"
 for the Lord's Bed Chamber.
I had happened, quite by accident, 
to discover that I was overlooking some
 crucial pieces of "rock for the Tower Structure!


My method of constructing the Castle Towers from the bottom up,
 thus allowing the ceiling of each room to be removable
 until the room is completed, 
means that I leave the top couple of "steps" unattached
 on each stairway where it goes up inside the walls.
This is because the ceiling of the room below 
(which is the floor of this one) is removable until the last step.
This is so the steps will fit right against the floor when it is finally attached.
Well, I attached this floor (the ceiling of The Lord's Council Chamber)
 way last fall and completely forgot that the top steps were not attached!
I don't think they were ever built at all... if they were, I couldn't find them!
So I built them from scratch... (not a difficult task)
And glued them in place!


Ta Da!!
(I was really shocked when I discovered
 that I had nearly overlooked this gap entirely!)

And speaking of other overlooked details....


Just to the other side of the door by those steps... 
the front corner of the Tower needed its Corner Post added!
Remember I had neglected to build these
 when I started the Castle Oh so many years ago!


Can you see it there now...? To The left of the door?
It does sort of disappear once it is in place!
It's a lot easier to attach before the stair wall is in place!
And speaking of other holes and missing rocks....


I had not finished making the "rocks"
 that surround the Doorway to the Spiral Stairs.
Here you can see I have cut and fitted them.
And the flash makes it obvious that there are a few "gaps"
 where the door wall meets the stairs.


Here the door surround "rocks" have been painted and attached.


And a couple more "rocks" have been fitted to cover the gaps!
One more still needed for the top step space.
(Fitting these "rocks" is not easy!)

And Did I mention Roses too?
Well, they are not yet blooming in my RL garden, 
but I have been making more of those gilded swags
 for the ceiling cornice of The Dollmaker's Studio.


They are composed mostly of Roses!


Here they are being glued together, plastic, metal, resin....
attached to a metallic mesh ribbon...
and then glued to the wooden cornice trim.
This is the section which spans the front opening side of the Dollhouse, 
and will thus be only visible when looking in through windows...
when it is all constructed I will paint it with primer and then the gold paint.


There are three primary swags along each side of the room.
The shorter sections at each end have unique treatments.
(But more about them another time!)


It is a slow process with LOTS of waiting for glue to dry!
Hence the many other projects in tandem...!


Here they are getting a test fit along with all the other sides.
The painted ceiling is removed and lying flat on the work surface... 
so you have to imagine you are looking up at the ceiling....
Progress is being made!

So there you can see, Dear Readers,
 the many pieces I have been juggling...
But Mostly I hope you have enjoyed seeing the Lilac blooming...


Even if it is a Cloudy Day!


Tuesday, May 10, 2022

More Carpet Details...


And Alterations....

I Finished the Fringe on Sally May's carpet, Dear Readers, and I think it does "finish it off" rather nicely! And then I trimmed all the loops too... and then forgot to take a picture in the lovely sunny morning light. So you will have to put up with the gloomy evening shot instead. I need to clean up in Sally May's living room before we have any pictures to show of it in place. But it is good to be able to call it finished now!

And as for the current stitching project,
 I suppose it would be asking too much
 for me to leave the pattern just exactly as it is in the instructions.


I was making great progress with stitching the
 first border that surrounds the central section.
I had completed all the little ovals and started the 
dark "spiderweb" around the white ones.
 These will also have the rose color for the background.
The gold ovals will be surrounded by
 the "spiderweb" in the dark blue color.
I was having a problem with the way it would look.... 
the dark blue and the dark mauve (chocolate almost)
 colors are really hard to tell apart.
 

These are the yarns...I love the colors, don't get me wrong...!
 But I thought the border was going to look
 a little "lack-luster" with just these colors.
And I wondered if I could just add a little bit of zing into the pattern
 with another color altogether... 
perhaps a lovely sky blue....?


Which I had a little bit remaining from another of Janet's kits....


I wouldn't do anything Drastic...!
Just maybe add the blue into the center of some...
 not all... of the golden ovals...?


Well, you know I had to give it a try...!
Can you even see the one that is stitched...?
And if it was hard to tell whether I liked it... 
shouldn't I stitch a few more... just to see...?


Perhaps just every other gold one?
And would I be able to tell if the rose color was not there yet...?


It always amazes me how much the appearance
 of a color is altered by the adjacent colors!
The rose color of the center is the same
 as the rose color of the border,
 but the border has more of the dark colors 
mixed into the pattern and less of the white...
so it appears to be a darker shade of rose (at least to my eye!)


As I am sure you have guessed, Dear Readers, 
by the time I have stitched enough background
 to know whether or not I like the change,
 it is way too difficult to unstitch the blue bits!
But fortunately, I have decided that I like the alteration!
 Yes, the blue is not expected in this carpet...
 but I think it does add that tiny bit of zing I was looking for.
It is a subtle change, and in some light will not even be noticed...
 but I will know it is there!


And of course, I will now have to deal with
 the temptation to just sneak a few more blue dots
 into the other sections of the border pattern... 
which have only just been started on the lower left corner.

So you see, Dear Readers, 
I still have more carpet details to stitch,
And I might not be done with the alterations,
But I sure do love playing with color!