Monday, September 25, 2017

What Are The Chances...?


International Guild of Miniature Artisans Show....

I wasn't planning on going, Dear Readers, and wasn't even aware that it was happening, but a complicated series of chances at the last possible hour found me signing up to take a class at the Guild Show! Some of you might also be followers of Rosanna's blog La Casa Rossa where earlier in the summer she posted about a beautiful "George III Serving Tray" that she had purchased at the SIMP show in Paris. It was made by Geoffrey Wonnacott, an English artisan, and she included the link to his website in her post. When I saw her tray I had one of those covetous moments we all experience from time to time.... I wanted one for myself! This is partly because I have one just like it in RL size, and mostly just because it is a beautiful design! But as with many things, I didn't have the time to pursue it and left it for one of those "maybe someday" wishes. But a little over a week ago, I noticed her post in my blog roll and had another look, and thought maybe I should check out the website to see if he had some for sale... so I went to his page and found a listing of upcoming shows where he would be teaching classes on his mini furniture. You can imagine my surprise when I saw he would be teaching a class on the George III Serving Tray at the Guild Show.... and that the show was taking place only an hour's drive from my home..... in less than a week's time! And that the class was an evening class that I could fit in after work!!! If I could register in time.... if there were still available slots... if I could reach anyone at the Guild numbers....! Two days before the class I finally got through and YES there was room still in the class! So last Thursday night I found myself sitting around tables with eleven other miniaturists happily making my own tiny George III Serving Tray guided by the very patient and knowledgeable Geoffrey himself!

We laminated the mahogany wood layers and
 engraved and cut the tiny pearwood oval and inlaid it in the center...
 (which you can see in the first picture.)
Then we cut out the oval and sanded it to precise size....

Next we carefully added the "gallery" around the edges...
and sanded the edges carefully...
(lots of sanding!)
The class ran later than the scheduled time, 
and I had to leave before the project was finished.
But we each went home with a booklet of instructions 
and all the pieces needed to finish on our own.
I still needed to add the brass handles, which you can see here...


And then it needed to be varnished....

Here it only has the first coat of spray varnish, 
and you can see it brings out the lovely wood burl...
But it still needs several coats of the varnish before it is finished.

And you can probably imagine, Dear Readers, 
that I simply had to go back to the Show on Saturday...
Where I found a few of those Treasures....

A tulip vase by Henny Staring-Egberts
had to come home with me....

As did this little doll... 
I am certain she is the big sister of Sweetpea and Little Rose...
(but she hasn't yet told me her name)

A spice cabinet with working drawers.... 
by Pam Boorum....

A sword for the Lord of my Castle....
 (when I find him...)

A beautifully stitched purple leather handbag.....

Awesome purple jeweled sandals by Patrizia Santi.....

Her shoes are just incredible!

Beautiful books.... readable... printed on every page.....

"Flora Londinensis" a nineteenth century edition.....

A fifteenth century Boccaccio's "Decameron"...

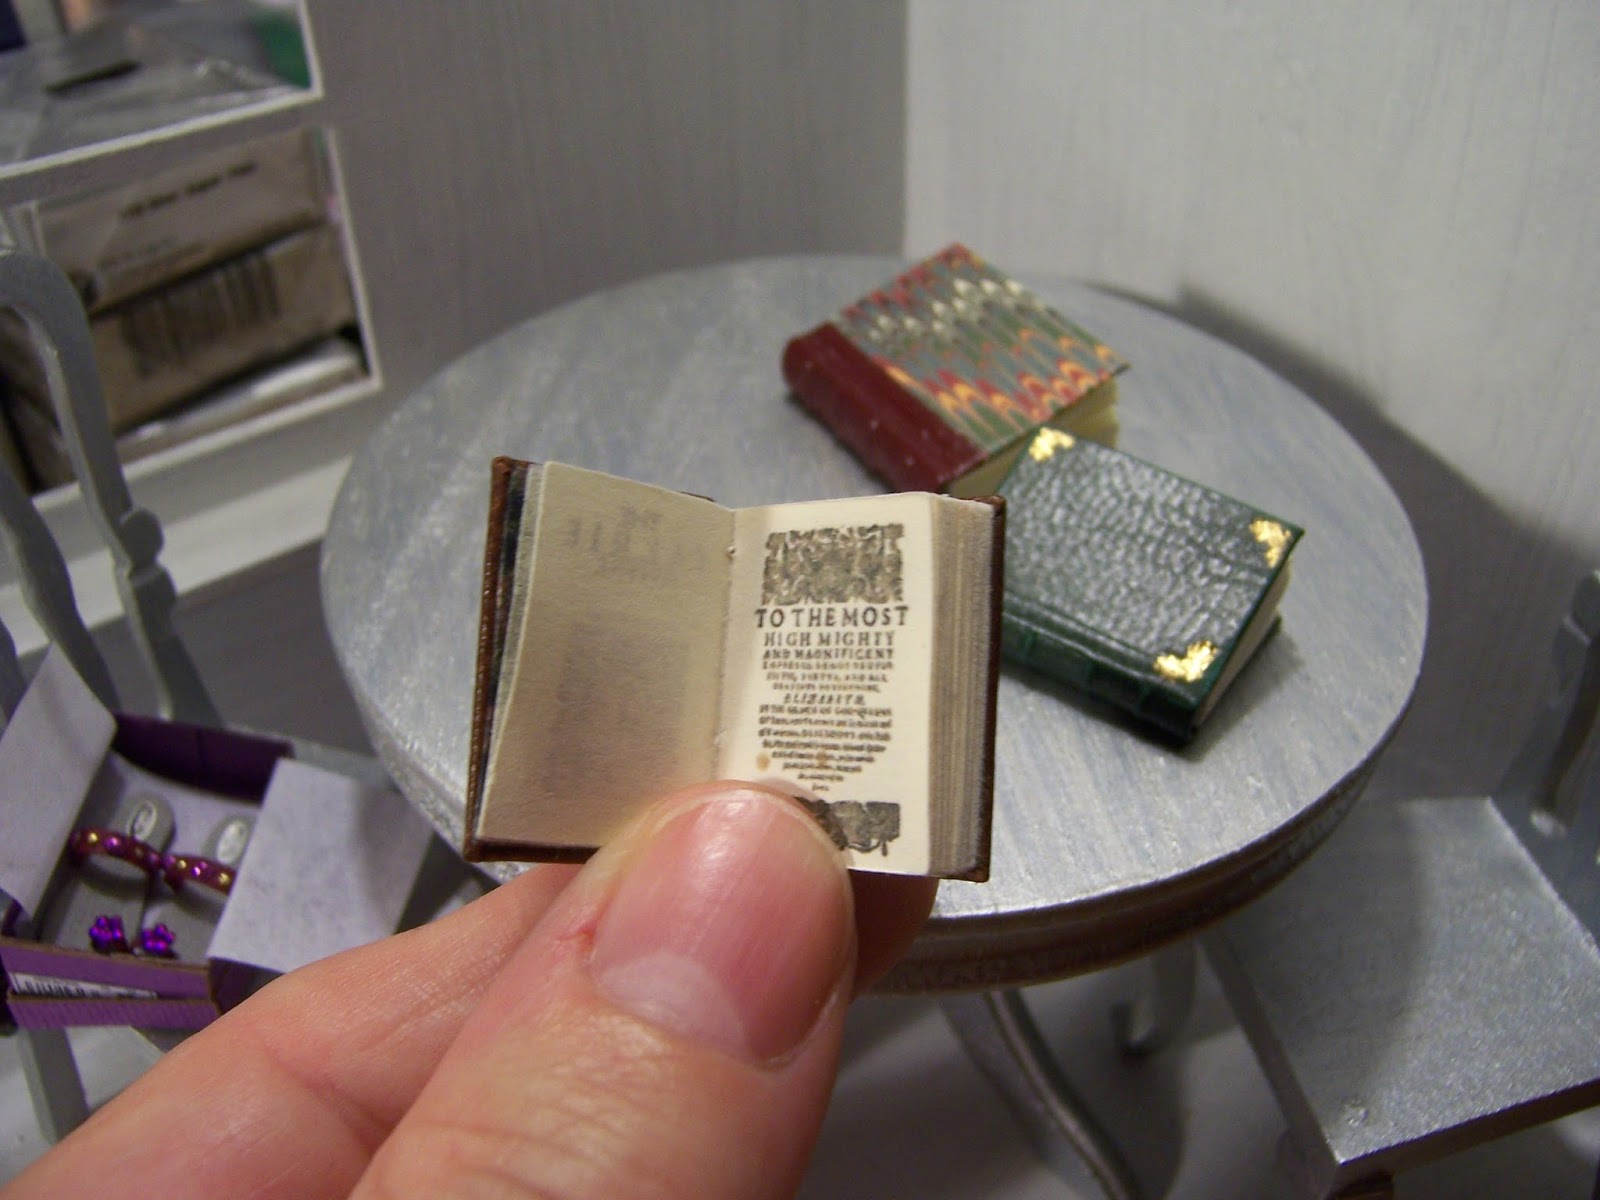
And a sixteenth century Spenser's "Faerie Queen"...

And I won't bore you with the other little ordinary minis I found.....!
But here I will show you the George III serving Tray in my RL...

Yes, it is a bit beat up and not an antique, but a reproduction....

 
And the mini one with the second coat of varnish...!

Can you believe it, Dear Readers, 
that I almost missed this opportunity entirely?
What are the chances that this very item 
would be taught in a class so very near to my home?
And that I would find out in time?
(I feel insanely lucky!)

Monday, September 18, 2017

Access Requires Doors.....


Doors Require Hinges... (I love hinges!)

I Think I mentioned, Dear Readers, that I was going to want access to the area behind the knee-walls in order to be able to reach the wiring that passes through that space. I decided that sooner was better than later for tackling the construction of the doors... the sort of task that brings a complete halt to further decoration if left undone! Above you can see the "workroom" wall removed (these walls are not glued in place) in order to measure and add a "brace" for the wall to butt against to keep it in the upright position. (Without a brace the wall can twist and not stay vertical.)

Here you can see both the walls removed 
and the knee-wall brace being tested.....

Here you can see the primitive wiring that I am going to need to upgrade...!
The Lovely Old Dollhouse is the first house I tried to do any electrical wiring, 
so it has been a learning project from the start.
The main wire for the outlet strip you see here
 is buried in the walls all the way down to the base of the house....
(I carved a channel and glued the wires in prior to decorating the lower floors).
This is the only plug strip for all the attic wiring! 
I am pretty sure my upgrade will consist of splicing the extension wires 
at this point rather than having these plugs which just come loose all the time.
Whether I add more outlets for each attic room 
and run new channels down the exterior walls is still undecided. 
It will depend in part on the total bulb count of the lights 
and the size of the transformer... I might need to get a larger transformer.
But meanwhile, I just needed to have access to the space behind the walls!

Here you can see the doorway cut in the wall, 
as well as a glimpse of the brace the wall butts against on the right...

And with the doors cut... testing for fit...

And with hinges attached....!

And with the doors open! 
(I Love hinges!)

And I needed to repeat the process for the bedroom side of the attic....!

Here you can see the Bedroom wall is temporarily removed to fit the bracing.
 
Nothing is glued in place yet because
 there are so many decisions about the wiring 
that I need to settle first!
For now the wiring is just extensions 
plugged into the plug strip in the hallway.

And with the furniture in place.... the doors are barely noticeable!

Hidden behind the furniture....

But I know they are there!

And in Pollyanna's Workroom too.... 
hidden behind all the tables...!

But Pollyanna isn't thinking about the doors at all...
She is trying to get started assembling some little furniture kits.
She is thinking she might need some better lighting....
and she is wondering if she has the right kind of glue!
So you can see, Dear Readers, 
(even though you can barely see them)
I now have my access doors...
And I got to play with hinges!

Monday, September 11, 2017

Pollyanna's Problem.....


Disorganized.....

It was one of Those weekends, Dear Readers, when very little got accomplished in my mini worlds, and there was really no excuse other than Dithering and perhaps more Daydreaming than Day-doing! I was trying to put a little bit of order into many parts of my life and not feeling successful at most of it. And so as a last moment attempt to feel productive, I decided to (finally) help Pollyanna with her workroom in the attic of The Lovely Old Dollhouse! From the start she knew it would need some attention to make it into a space that could be used for more than storage. And being optimistic, she was sure it would not take very much work! Fortunately for me, she doesn't measure the passing of Time quite the same way that I do.... so it was surely only a short while ago that she began to make her list of what would be needed...

Chief on her list was more work tables 
for all those dollhouses that had suddenly appeared!
But I knew that there were some more serious building "upgrades" 
that needed to happen before any more tables were added! 

To begin with, some of you might remember almost a year ago 
when I re-positioned the walls in the attic area, 
moving them closer to the stairwell 
and giving more room to the rooms on each side.
Because this is a retrofit on the old dollhouse 
and the walls could not be routed into the floor, 
I needed to support them with sturdy bracing at the ceiling and floor.
I had simply moved the bracing from the previous position 
to the new one, as you can see in the picture above, 
but I had not added the bracing along the floor
 at the rear section of each wall.
 
 
I decided that if I got nothing else done, 
I could at least attach that bracing!
It meant clearing out the furniture...
 and doing a lot of fidgety drilling 
and tightening screws in tight corners.... 

I used the last remaining pieces of bracing that I had removed last year... 
that way it matched the bracing already in place. 
I know these braces look large and rough and out of scale.... 
but this is supposed to be an old house with rooms tucked into the attic!
And you might notice the electrical "outlet" there in the back....
 I might have to upgrade the electrical too....
That is the only power coming up to the attic! 
But more on that another time.


Once I had added the wall bracing....
 I decided there was still time to start on the knee walls.
You can see in the above picture that the eaves are so low 
that the space is wasted and the furniture has nothing to lean up against....

The solution is a knee wall at the back of the room.
This is still not attached... I need to decide 
whether to leave access to the space behind 
in case I need to fiddle with the wiring which runs behind it... 
 
 and for the moment works.....!
I think the answer is yes, I do!
But meanwhile, the space is so inviting... 
it is irresistible to try out the new furniture arrangements!
 
Look at how much space there is here 
once the furniture is pushed against the wall!

Pollyanna has been borrowing tables from everywhere she can.....
really just to see what will fit and what is needed...

Of course, she keeps bringing in more projects.....
And while she is busy with arranging her room,
 I am building the knee wall for the bedroom across the hall....

Here you can see it has the same problem with the low eaves....
the furniture can only go so far back....

This wall is also not attached.... 
the electrical issues will have to be addressed first!

Here you can see it with the furniture in place.
It is barely noticeable but it does make a difference!

Oh look! Pollyanna has found another table!
This way she can have space in the middle of the room
 to work on her current project....

I can tell she has lots of ideas....!
Well, Dear Readers, I may be Disorganized....
but I managed to make a little bit of progress
helping Pollyanna with her Problem!

Monday, September 4, 2017

The Grand Nativity...


As Small As I Could.....

I Imagine you must be getting tired, Dear Readers, of seeing pictures on this blog of items so small you can barely see the parts I am mentioning as I describe my adventures in this Teeny-Tiny scale! Well, I hope you can bear with me a little while longer, and I also hope you are glad that I decided to keep the "Large" sized Nativity I had started last week. I wanted to be able to see the figures in the nativity, and I didn't think I could paint them any smaller! Above you can see my method. I simply painted the figures on a scrap of the card stock I had used to construct the stable. Hence the cutout outline of the stable could be my guide for the size of the figures. There was no point in trying to measure or sketch.... at this scale the pencil lines would be terribly thick! So I relied on the color to suggest the figures I was painting, and an occasional prop to emphasize the identity of the figure.

Then I needed to paint the stable itself... 
you can see it there on the plastic surface. 
It was quite challenging to hold it and paint it at the same time!

Then I had to cut out my tiny figures! 
I started with the ox and the ass as they would go at the back of the stable.
I used my sharp x-acto knife, very carefully 
slicing as close to the edges of the figures as I could, 
while not cutting off or leaving out necessary parts...!
 Can you see them there in the middle of my gray cutting mat? 
You really need to not take your eyes off them
 for even a second for fear of losing them!

I glued them into the stable right away. 
You can see how snugly they fit!
(You can imagine that by now I have given up on a smaller stable!)
 
And then I cut out the Holy Family figures and glued them in as well....
Yes, they completely hide the ox and the ass....
*sigh* But I know they are there!
By now we want to see how it looks with the hearth.....

It  is large... but not outrageously so....!
And how about  if we test it in the Parlor?

I think it looks lovely!
I do want to be able to see the figures after all...
But then You must understand that
 there are More figures needed for a Nativity...

At the very Least you need a shepherd with his flock of sheep......
 and an Angel... or two!
You can see I have painted them the same way I did the other figures.
And then because I start to worry that there won't be room 
for them all on the mantle With the candlesticks.... 
I decide it is time to glue the candlesticks on the mantle!

(There is only so much "testing" you can do with items this small...
they just don't stay put without the glue!)
And while I was adding the candles, 
I decided it was also time to attach the stockings...
 
 That way I could be sure the Nativity would fit around them and still be visible!

 And then we need to test it all in the parlor again....
(The Nativity is still not attached...)

I do think there is room for the shepherd and his sheep.....
which need to be assembled onto a tiny base of "grass"....

Can you see him? I have added the first two sheep on one side....

Here he is finished, surrounded by his flock!
(Right there next to the stable... 
please poke the pictures to see them larger!)
And then we have to see if they will all fit on the mantle....

I thought the tiny doll in the stocking would block them too much 
if they were on the right side of the stable.... 
But they don't look right at all in this arrangement....!

I think they look much better with the shepherd on the right side!

And here they are testing in the Parlor... yet again....!
I think that is the right arrangement... 
but we mustn't forget the Angels!

I carefully cut out the first one and attached it to the roof... 
as if it is just about to land....
Then we test it again...

I think it looks wonderful and "alive"!
But what about the other Angel...?
(You know there were more than One angel at the Nativity!)
I cut the second one out and glued it on the other side of the roof....

But the first attempt had it too close to the other Angel....

I moved it a little farther down the roof to give them space....
I think it looks more balanced now...
I wanted to be sure the figures are visible...
Can you see them here on my finger?

And shall we test them in the Parlor again...?

I do think they look Very Grand!
Even though they block the painting a bit... 
and when the chandelier is in place they might be harder to see....

In this Teeny-Tiny room in this Teeny-Tiny house....
Where there will also be all sorts of furniture
 and even a fully decorated Xmas Tree!

Lady Evelyn has come by to check on the decorations...
She is quite worried that so Little has been done!
Will it all get finished in time...?
Well, Dear Readers, that was all 
I accomplished over the weekend...
one Very Grand Nativity....
that was as Small as I could manage!