Tuesday, March 31, 2020

Lighting The Night.....


Why Things Take Longer....

It Was a Beautiful sunny morning on Saturday, Dear Readers, and I had high hopes of installing the Council Chamber fireplace and getting on with the floor grouting. There were just a few tiny details of the fireplace to finish first. Or so I thought. I had even put the first coats of blue (yes, my favorite Blue!) paint on the ceiling and was testing how it looked. Then I remembered that I had dreamed of lights on that castle Mantelpiece, and knew that I was going to have to test this idea before I attached anything! A few weeks ago (you might have noticed) I had attached the "iron" torch brackets to the chamber wall. These were made many years back when I was working on the lighting of the Great Hall... so long ago I am Sure it was the Dark Ages! And there was even one partly constructed "torch light" to try out.....

It was mid afternoon and the day had turned gloomy
 with the threat of rain
 before I had time to test the torch.... 
which was just as well, because it needed gloom
 to be able to see the effect at all.

I needed to find the mini "extension cords" 
to be able to reach the "candle" wires to the
 power strip on the back of the castle....
But as soon as I had one in place
 I could tell I liked this effect!

But is it too "Theatrical"?
It wasn't dark enough to really tell....

So I waited until it was night out.
And late.
I had spent the afternoon in the garden
 uncovering tiny bulbs and was too tired to think straight.
So the following day I realized that I should try
 all the lights that would be in the room before deciding anything.

It was a rainy day, which helped give a feeling
 of how the lights would look on an ordinary day.
(Forgetting that the Castle folk of long ago 
would not have wasted lights in the daytime...)

But they would have lit a fire on a cold damp day... 
so I had to "borrow" the fire from Hardwick Hall's
 unfinished Attic fireplace to test the fire....

And then had to rig up a second "torch" for the other bracket...
 to see if it cast too much light into the room... 
or lit the fireplace well enough that
 the candles on the mantle would be redundant....
But I couldn't really tell... 
because it was still daylight outside.

But if I unplugged the "candles".... 
I could maybe see how it would look if I decided not to use them....
Ahhh... clearly they would be missed!
Just the fire and the two torch lights would not 
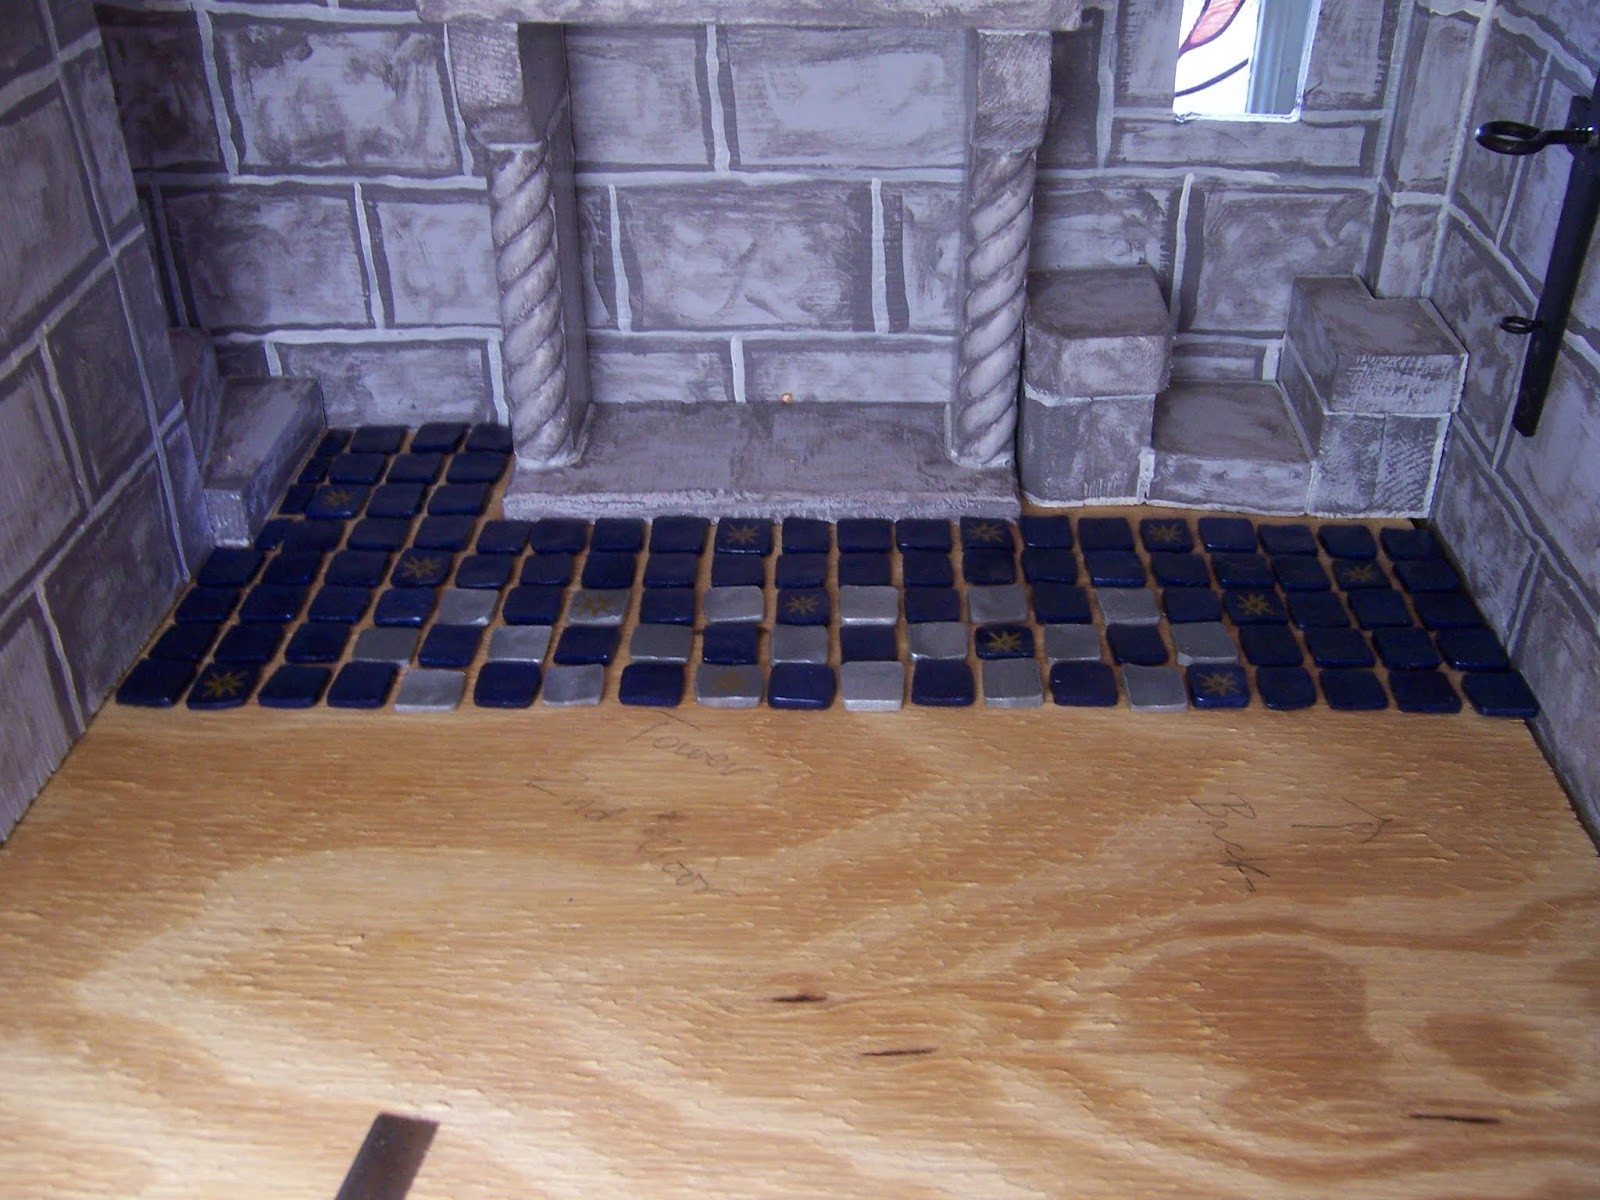
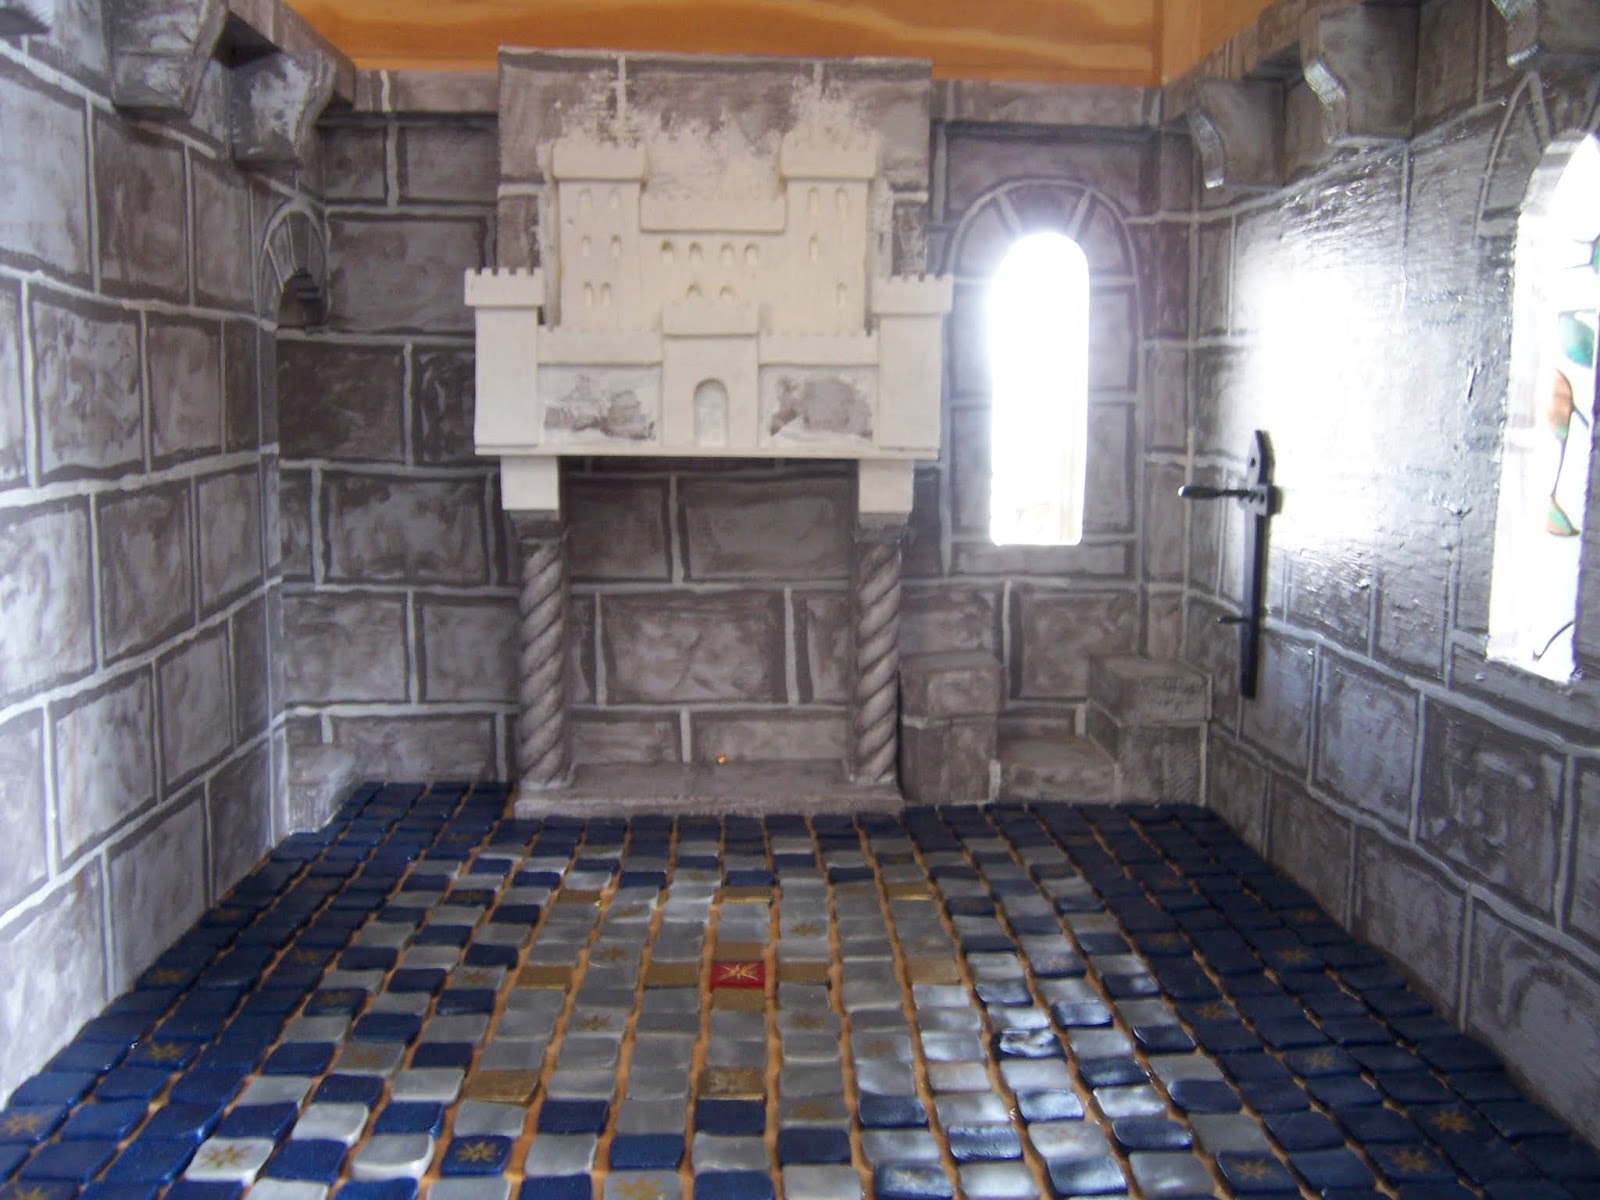
be enough light for the Lord's Council Chamber!
 
 
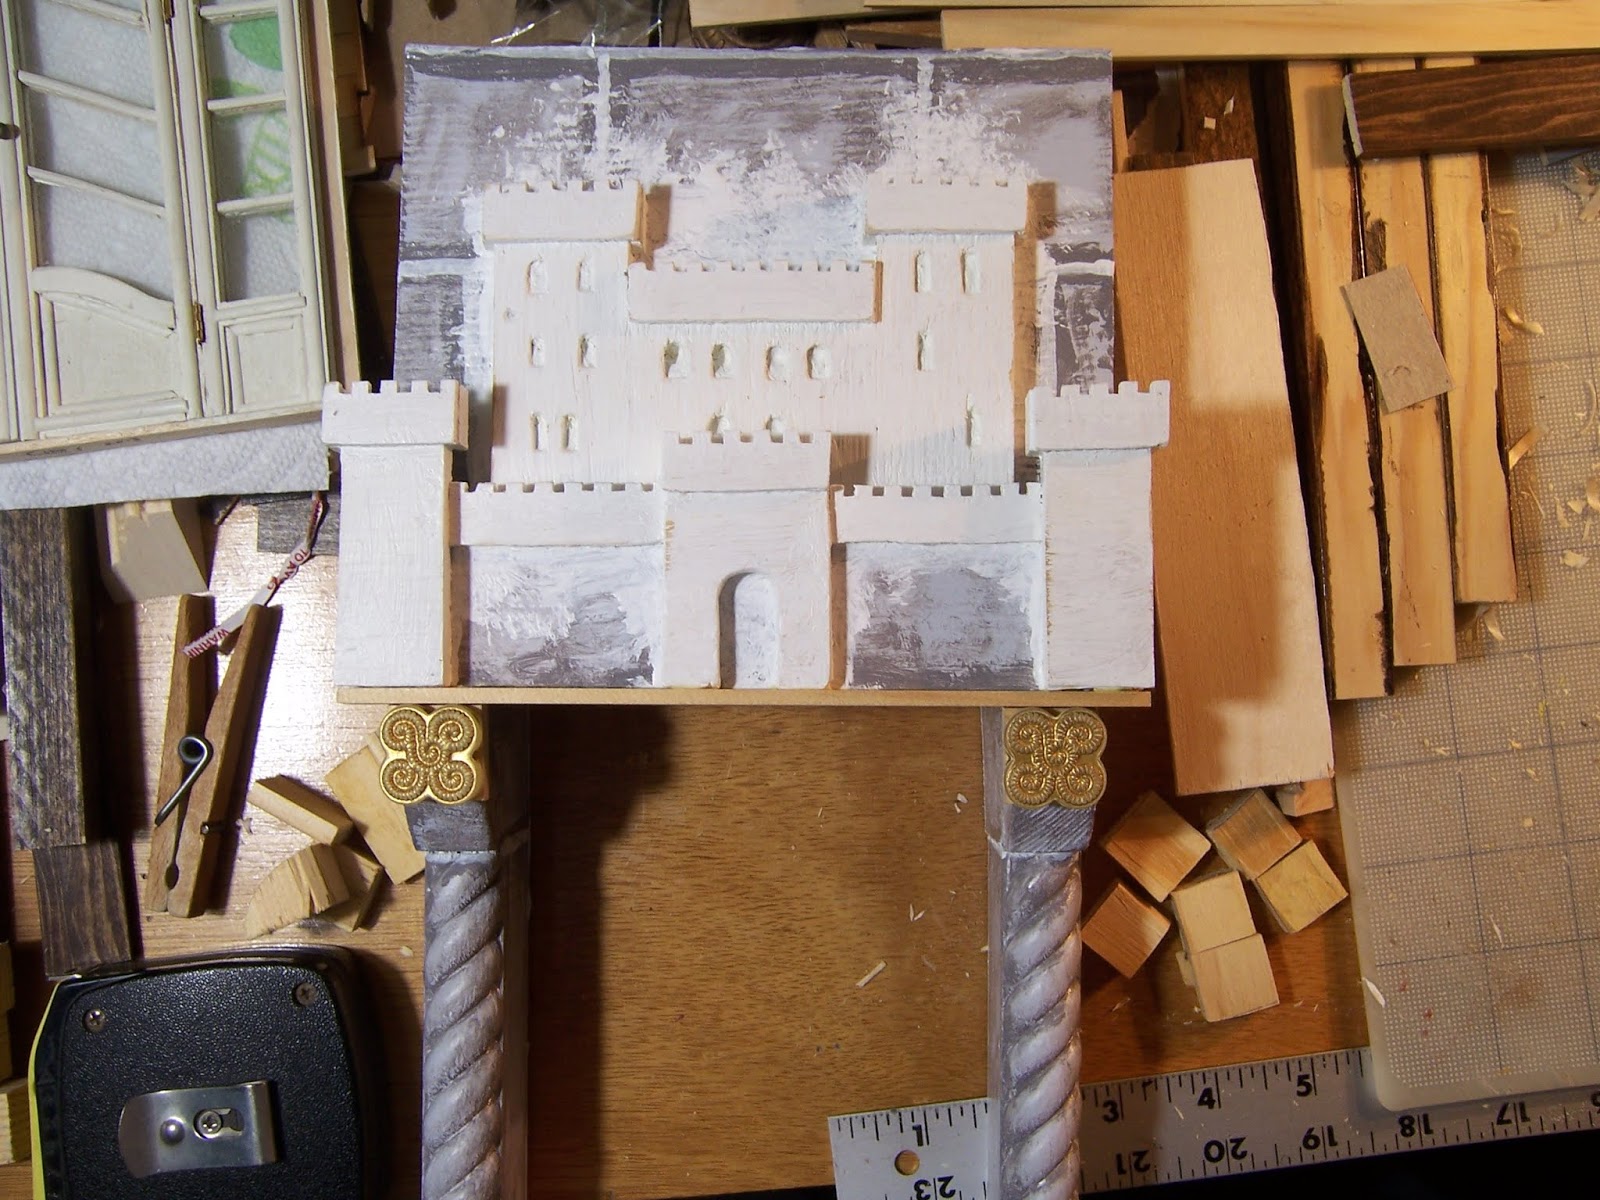
So I baked the candle sockets into some sculpey "candles"
 and glued them into the Mantelpiece.

And a closer shot.
I wanted them tucked behind the Castle Towers 
so they did not glare too brightly... 
pretend they are mostly burnt down!

By now it was night again...
I have spliced extensions on all those wires....
But it was too late to even think of gluing anything in place!

Which was a good thing...
 because by then I had realized that I was going to have to
 build that rear window frame, tucked into that far corner... 
and wouldn't it be a whole lot easier to do 
Before I had glued the fireplace in the way?

So perhaps you can see, Dear Readers, 
while I am lighting the Night
with the meager light of Medieval candles,
Why things just take longer...!


Tuesday, March 24, 2020

Floor Progress....


One Thing Leads To Another....

I had some Unexpected Time off from work, Dear Readers, while they sanitized the building where I work last week. It was supposed to be a day at home and then back to work, but it turned into three days at home due to the thorough nature of the cleaning. And since the weather was mild and virtually windless, I decided it was the right time to spray polyurethane varnish on the floor tiles which I could do outside on the porch. This required that I remove all the floor tiles, while keeping them in that perfect pattern I had so carefully arranged! You can see above a portion of the tiles spread out (in their exact arrangement) on cardboard so I could take them outside and spray them.

Pretty soon my entire studio was spread out with the drying tiles!
(This is only two of the five cardboards!)
I gave them two coats of the polyurethane.

And the following day I began the process
 of carefully spacing them in the floor... 
with the allowed spaces for grout.
This ended up reducing the pattern by two rows of tiles
  so I simply left off the outside rows of my pattern.

It was important to try and get the spacing just right.
 I occasionally swapped out a thick tile for a 
better shaped one as long as it was the same color.
And I needed to make sure the door would open over the tiles.

And once I had them all laid out correctly,
 I could begin the gluing process.

Once again, this required removing a small amount of the tiles at a time, 
keeping them in their pattern, and gluing them back into their place.
Once I had done the corner by the stairs,
 I could work the rows all the way across one row at a time.

I would remove the next row tile right after gluing the one above it, 
ensuring that my spacing stayed as unchanged as possible.
I wouldn't want to get all the way to the front row
 only to discover that there was not enough space for the entire tile to fit!

This took a very long time!
Hours and hours and hours.

But I got it done!

And in the morning light they look clean and sparkly!
I couldn't wait to get started on the grout!
But then I remembered that before I could grout,
 I needed to complete the fireplace and attach it in place.
"What, the fireplace isn't finished" I hear you say?
No, I had always thought it needed something more...

Ages ago, I had seen in one of my Medieval History books
 an elaborate Medieval mantlepiece that was carved to resemble a castle.... 
or perhaps I dreamed this, because I could not find the photo again when I searched!
But the idea stuck, and I began to try to piece together a version for this fireplace.
I dug through my box of off-cut scraps....

I found some likely pieces that needed almost no trimming to fit!
(This is Why we keep all those scraps....! 
I could not have designed this as well
 if I had to start from nothing!)

This too, took longer than I had thought.... 
I had to cut all those crenelations!
I used very thin 1/8 inch plywood because the crenelations
 would never have survived the cutting
 without the added strength of the plies.

And more crenelations.... !

And then I had to carve those windows.... 
because I wanted the Castle Keep to resemble the Dollhouse itself!
 (Without the outer walls, you understand...!)

Painting with primer was next....  
I know, it is really rough and not very stone-like.
But the same could be said for the Entire Dollhouse Castle!
(Imaginations are required!)

And then I decided that the base of the castle
 needed a little reinforcing....
And decorating...!
I found these bezels hidden away among pieces
 that were planned for this room ages ago!

Meanwhile, it needed to be tested in place....
 the primer is much too bright...!

Painting the under layer of light gray paint...

And then roughing in some of the darker "stone" colors....
highlighting the shadows and depths.

And seeing how it looks.....
Sill not quite finished...!
But that is as far as I got on my
 extra days off and the weekend too.
One Thing led to Another
 and I made a lot of Progress!

And on the Home front, Dear Readers, 
my workplace has set me up to work mostly from home.

My workstation is tucked snugly in
 among my upstairs dollhouses....!
The commute is very very brief!
 
I hope you are all staying as safe and Well as you can.
I am eternally grateful for the internet
 and the ability to stay connected
 with loved ones Near and Far!


Monday, March 16, 2020

A Taxing Time......


And A Tiny Update....

I had to Prepare my Taxes, Dear Readers, before the Social Distancing became too strict to allow for any meetings outside the home, so my weekend was mostly Not about minis. But I got my taxes done and filed and can rest easy on that score. We are still trying to behave as "normally" as possible in this time of upheaval, while taking all due precautions. Nonetheless, all the schools are now closed and everybody is preparing to stay home for a while. At my school the students and teachers have been on Spring Break, and that has been extended for another week, until the end of March. The plans for the rest of the staff are still being figured out, we have been going to work as usual. It is still a changing situation and we are heeding all the care recommendations.  But in spite of my focus being elsewhere, I did manage to paint a few more stars on the Castle Council Chamber floor! I am trying to keep the pattern a random "scattered" effect.

I will probably not add many more stars.

I think this is just about right!

And over in the Doll Maker's Workshop....

I cut and fitted the paneling beside the arched doorway.
 
 
Then I painted and stained and glued it in place.

And here it is right side up in the morning sun.

And that was All I got done, Dear Readers,
 in this Taxing Time!
I hope you All stay well, 
and your loved ones too.
And maybe even have a
 Little more time for minis!


Monday, March 9, 2020

Doors And Floors....


Panels and Tiles....

There Were Only a few more pieces of rails and stiles to cut for the paneling on the opening wall of The Dollmaker's Studio, Dear Readers, but they required much more patience than the others because of the opening doors. The panels just barely fit so that the central stile would span the crack between the sides when the doors were closed, but this meant I had to glue pieces on more carefully and align them around both the windows and the cracks in the doors. Above you can see the main pieces cut but not stained or glued.

And here you can see the stain has been added.
 I decided to glue all these pieces in place
 before trying to cut and measure the top rail for the middle section.
 I needed the pieces to stay put in order to measure properly.

Here the top rail for the middle has been added.

Here I am making sure the doors open properly..... they do!

And the view through the arched opening... both walls are paneled!

Testing with the arched door in place... those windows need cleaning!


And from the other end..... this really is a very small room!
And I think I need to make some kind of paneling 
for the walls beside the door.
 
But before I do that, Dear Readers,
 I wanted to show you the other project I was working on
 over my vacation a couple of weeks ago.
I had decided I finally had the time to make the floor tiles 
for the Lord's Council Chamber in my Castle!
(It has only been about .... 
I don't know how many years since 
I really made any progress on that room!)

I dug out the sculpey I had bought....
 all those many (seven, eight or nine?) years ago....
 and discovered it was Almost too old and stiff to use....! 
Almost.
With lots of patience and lots of kneading
 it eventually became usable... 
so I cut and baked tiles ... 
one brick per day (all I could stand to knead)
hoping I had enough of the colors I had bought!

I had Just enough, if I also used a few remaining tiles
 from the Conservatory floor... the gold ones in particular.
I wanted to make a pattern that emphasized the center of the floor,
 rather than have an over-all pattern.


 The gold tiles were a "mistake" I made years ago 
when I was making the tiles for the Great Hall Floor.
 The final step was to spray varnish over the painted patterns of the tiles.... 
I grabbed the gold spray can and only realized my mistake
 when the tiles were turning gold before my eyes!
In the right light you can see the painted designs through the gold.
I liked the effect and saved the tiles...! 
I think they work for this floor.


Then I added the Red Star Stone to the center...!


I think it is important to test these ideas in varying light....
Morning light adds a beautiful feeling!


And the next morning I like it even more!
(I can't tell you how long I have been dreaming about this floor!)

But it still needs some more embellishment....
(I do love lots of detail!)


I had always wanted it to have more stars in the pattern...
So I started painting some of the tiles with gold stars.
 

 Just a few to start with to see if I liked it....


And then just to be Sure I was happy with the Red Star Stone,
 I swapped it out for a blue one...
I definitely like the spark of the red one!
(And it will have a power role to play... you will see!)

So I kept adding a few gold stars scattered over the floor...


I will be adding a few more!
But that is as far as I got, Dear Readers,
While I was waiting for the glue to dry
 on the Paneling for The Dollmaker's Studio!