Showing posts with label Willowcrest Attic. Show all posts

Monday, January 22, 2018

Hardwick Hall Attic....


Fidgety Bits......

It has been so long since I last worked on Hardwick Hall, Dear Readers, that I couldn't even find the posts that last showed the attic in it's partly completed state. So I have no idea what you recall about my plans for this part of the property! The above photo shows the attic in it's most recent incomplete state, with the temporary styrofoam fireplace and the unfinished stairs and windows. This is a "Witchy" house, so I have allowed my decor ideas to develop way past what a real House would find acceptable. But at the same time, I have tried to stay true to some of the architectural norms for houses of this era. One of my favorite features of many "Victorian" houses is window alcoves with window seats built in.... and this attic has three alcoves just begging for built-in window seats! Also, while this kit did not come with any "Cupola" for the top of the roof, there are many houses in my town where there are lovely cupolas, so I decided to add one to the top of this house. Since I was adding a cupola, I had to add the stairs to the cupola.... hence the spiral staircase.....

I apologize for the dark night-time photos.... 
it is an eternal problem to get good pictures at this time of year!
Here you can see the attic without the fireplace and chimney... 
while I am trying to calculate the best position for the stairs 
to access the tiny cupola floor platform......

Which you can sort of see here with my cardboard 
floor mock-up sitting across the rafters...
It is a complicated geometrical problem... 
where to start the bottom stair so that the bottom step is accessible 
in all the clutter of this room 
and the top step lands at an angle where 
you can step off into the tiny cupola floor! 
(And don't forget there also needs to be "head clearance" on the way up!)
The answer is it's very very tricky... but doable!
The spiral has to start just off center below the cupola floor.....
which happens to be right at the side of
 the stairwell from the floor below... 
and right behind the only place 
the fireplace and chimney would naturally sit 
(based on where the other fireplaces in the house are located... 
because I get hung up on that sort of realism)!
And some of you might recall that
 the poor placement of the original kit chimney in this attic 
was one of the first things I had to change about this design!
The top photo shows you the mock-up
 of the fireplace in styrofoam that I have been using
 to determine placement and size options
in relation to the stairs and cupola.
I think the fireplace can only go in this spot beside the stairs... 
but that ugly styrofoam mock-up has been bugging me for ages!  
The shape is all wrong for this room!
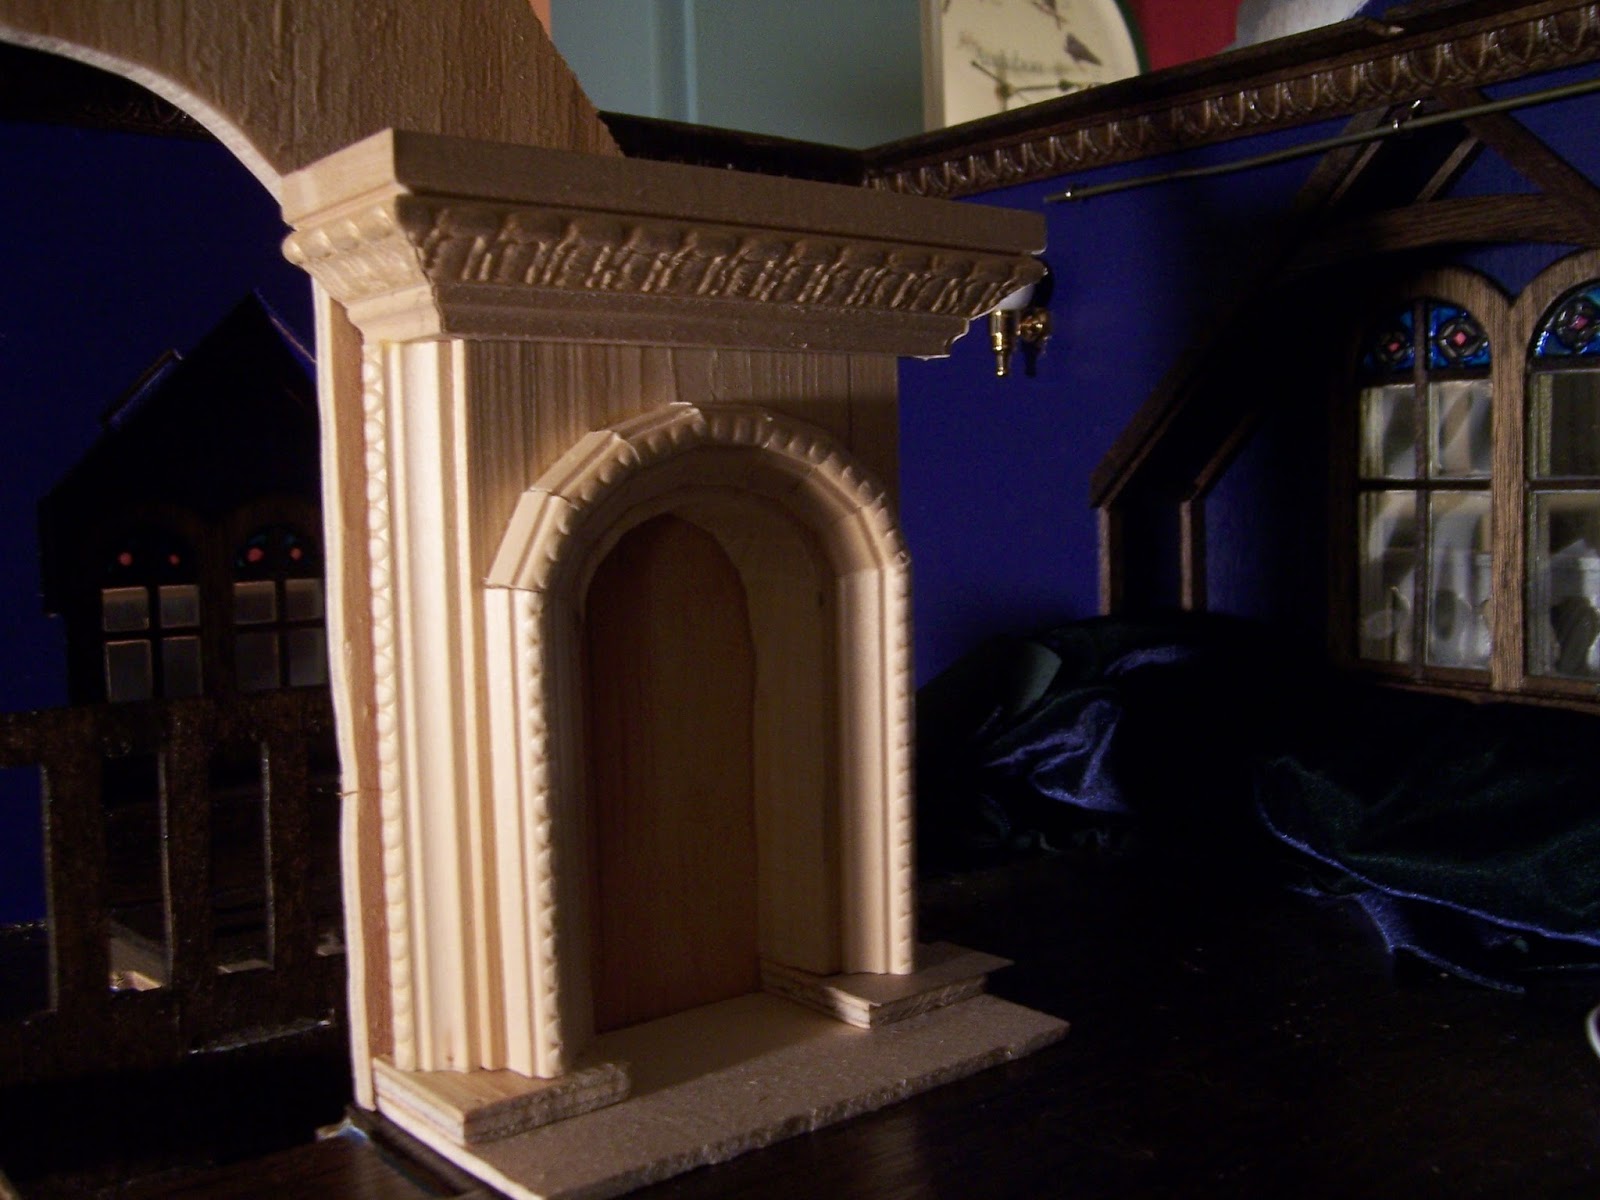
So I started to build a better hearth....

With more elegant lines... 
similar to the two other hearths in this house,
 but fitting for this room... which is to be 
the "Book Room" or "Reading Room"... 
the gathering place for the Witches... 
the place for researching spells 
and even brewing the odd potion or two!
There was an awful lot of fidgety cutting and fitting 
of that arched surround.... 
because my original cut-out is a little bit uneven too!
 
But I am getting ahead of things, Dear Readers.... 
First, I had to start on the alcove bench for the back of the room....
because I have realized that this area will have to be all finished
 before any of the "foreground" pieces are completed!
 
So I built a simple fitted platform....
 
 Then stained the wood
dark walnut to match the rest of the trim.
 

But I must test the look of the new hearth....
I am Loving how it echoes the window shapes!

Once the alcove bench is in place, I can start on all the fidgety trim.....
 trim that will cover all those ugly joins in the alcove...

And it is a weekend during the day 
when I can actually get some photos that you can see!

It was quite challenging to get the trim
 notched correctly to fit behind that arched "beam"....
(Don't look too closely please!)

And the facing pieces on the angled part.... 
which covers the worst of my gaps.
The vertical section will end up being covered 
by the built in bookshelves...
I am just waiting for the lumber to be delivered!
And then we simply must get an idea of how the curtains will look....

A Beautiful velvet that is a shimmery blue and green...

And I will also use it for a cushion on the bench...!
I know this is a dark room....
 but I love how this velvet adds 
to that dark mysterious feeling!

Meanwhile I am also continuing to work on the fireplace.....
It will eventually be painted to resemble carved stone...

Just testing it in place.... 
with the back wall section where the chimney will go
 up through the roof at an angle 
so it doesn't interfere with the cupola in the center.....

And testing the placement of the spiral stairs for "clearance issues"....
It clears with millimeters to spare!!!

I know.... you could barely see the bottom of the stairs...
 here I have shined a spotlight on them...
 because it is night-time again!
Well, it feels like a huge amount of progress, Dear Readers, 
but all I really did was cut a lot of fiddly little pieces of wood 
at odd angles and glue them in place!
But I love how the Hardwick Hall attic is developing!

And before I forget... 
I promised you a view of the finished Christmas Card....

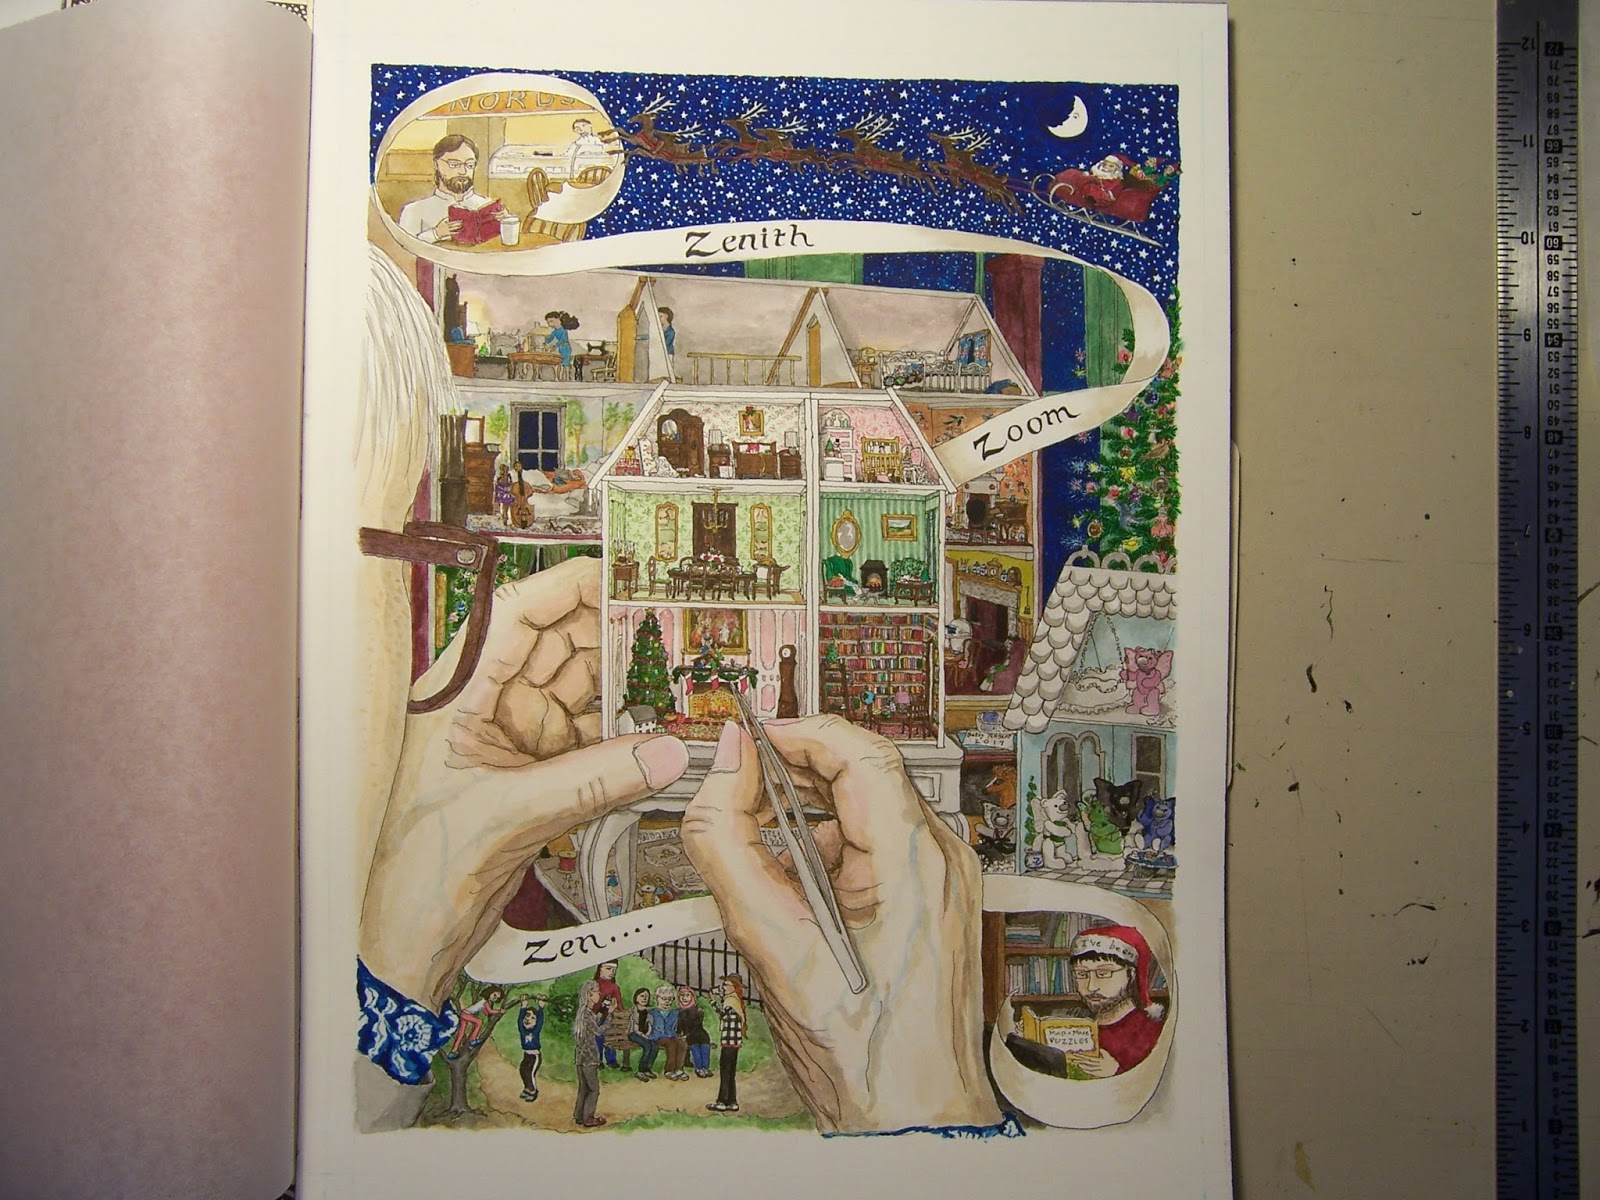
So here it is Dear Readers, my attempt at rendering in two dimensions 
that which I spent much of the year rendering in Three dimensions!
 The Secret Christmas house is drawn at actual size... 
I traced around the building onto the paper!
The card is 8.5 inches by 11 inches, 
watercolor and pen and ink on watercolor board.
Yes, those big claws are my attempt to draw my own hands full size!
(And you might notice that the Secret Christmas House is Still Not Done!)


Tuesday, January 16, 2018

January Dreaming.....


Looking Back.... Looking Forward....

I have to admit, Dear Readers, that January brings with it the inevitable urge to assess the progress, or lack of progress, made during the past year on any of many "in work" projects. And when I review last year's accomplishments in my mini worlds, the list is small! That might be in part due to the fact that I worked on the Secret Christmas House kits for much of the year..... and the results are Tiny! In a "regular" size dollhouse I would feel I had accomplished a great deal if I had built, decorated furnished and accessorized an entire house! But in this case... it is all so small it hardly seems to count! Not to mention that it is Not quite Done! In the above picture (taken back in November) you can see the "shell" of the house with the morning sunlight streaming in the windows (a rare thing at this time of year!) and illuminating the interior of the rooms before the furniture was added.

I love that you can see right into the tiny rooms 
as if they were much larger than they are!
But the chief thing I want to point out is that there is still No Snow
 adorning the exterior of the house!
Lots of lovely icicles but no snow!

Yes, I have been avoiding this step.... 
intimidated by the types of artificial snow and how to apply them......!
 I need to do some test samples to get familiar with the materials!
And because it is snowing right now in my RL world, 
and might snow all night and most of tomorrow... 
I might have a Snow Day to stay home and play with ... snow!

My lack of significant progress on any of my larger projects can really only be ascribed to my lack of focus.... (we won't mention the broken arm). I made a little progress on painting  the Castle Hall ceiling.... but didn't come near finishing it. I made a little progress on the Cloud Palace Roof... but didn't make any progress on the exterior walls... which need tons of egg-carton rocks. I made a little progress on the Gypsy Wagon interiors and windows, but didn't even get as far as attaching the walls to the base! 

I made a little progress in the Attic of the Lovely Old Dollhouse.... 
but didn't even get the new knee-walls painted! 
There was No progress at all in the chapel...

Even though Father Alban has been on the brink
 of an inspirational breakthrough... for ages!

No progress at all on the Tree House.... 
waiting patiently for the next floor to be worked on...

(I know, you can barely see it behind the lamp.... I can't find the better pics!)

But it is the Willowcrest, Also known as Hardwick Hall, 
that has been calling to me recently!

In particular, all the places on the exterior walls where the tabs show through...
making me decide that I must add clapboards to the exterior to cover them up!

Like right there above the bottom trim..... it's driving me nuts!

And all the corners on the dormers in the attic.... 
absolutely need covering up!
But then I have to admit, Dear Readers, 
that before I can add the clapboards.... 
I must complete the wiring of all the lights....
Yes, I tried so hard to run all their wires down 
through the center wall behind the fireplaces....

Except for the bathroom.......

Which has no wiring at all so far..... 
and the middle wall is the one beside the tub.... 
not really where the lights would be placed!
Not to mention the other side of the kitchen.... 
which right now only has the overhead light....

Shouldn't there also be a light over the sink? 
Which means running the wires down the outside of the wall....
And even in the attic..... there should be a couple more lights....

On the outside walls...
Which means running the wires down the outside walls...!
I guess it's Time to go back to the Drawing Board 
with the layout of the wiring!
Not to mention the interior trim needed to cover 
all those not very appealing corners on the dormers!

And the design for the cupola which brings light into the top floor.... 
and the chimney re-design since the kit placement was so not acceptable!
And speaking of little bits of trim needed in odd places....

The bay window in the living room has gaps between the panels.... 
where daylight shows through!
I filled the cracks with 1/8 inch square strips...

The clapboards will run between the strips....
I just need to decide how I am making the clapboards!
I bought some of the pre-formed basswood panels, 
but don't like the way they would need to join at the ends
 and overlap their sections.....

At least the strips have covered the gaps in the panels!
(But I still need to add the exterior window muntins too!)
So which comes first... 
completing the interiors with all the wiring
 so I can cover the exterior walls... 
or just getting the wires in place.... 
for all the remaining lights...
and decorate later....
 
And surely, the oven should have a light too?
I guess I have a whole lot of re-thinking to do with this house!
But that's what January Dreams are for Dear Readers,
Looking back so we can look ahead!
 
(And I did finish the Christmas Card! 
But I don't want to show it here until
 it has arrived at my family's homes.
 I will show it next week!)
 

Wednesday, November 11, 2015

Hmmmmm.... Where Was I?


Letting the Dust Settle......

Well, Dear Readers, I have been Trying to recall just What I was doing when I got swept up in telling tiny Tales.... and I had to browse through Weeks and weeks of photos that I have taken of the goings on in my Mini Worlds..... only to come to the conclusion that I have not accomplished even One Little project since before the summer began! It is a humbling thought indeed! Of course, I have started on several parts of the many projects I seem to have underway... only to hit a snag and put them aside... or simply get distracted.... or run out of Time to complete them. You might recall that I had started to paint the tiny figures in the border of the ceiling in the Castle Great Hall. I made a good start on the first side, but couldn't decide on all the subjects for the opposite side, so it is still just where I left it.... far from finished! But one morning the sunlight shone into the Hall, allowing me to take a picture in the beautiful light, so I thought I would share it with you, unfinished as it is!

And I had made a start with adding the exterior muntins 
to the windows of the Willowcrest....

If you look closely in this picture you will see 
that I have added them to the top portion of the window, 
but not the bottom.
This is because it is bothering me that the muntin will abut directly onto the exterior window sill.... which is not at all how window frames are constructed! Let alone that there is no offset for the "double hung" windows to be opened by sliding past the upper portion of the window!
And if I add a "bottom" crosspiece to the window above the sill, I will also have to add one to the interior side of the window.... which already has the frame in place.
These windows were not designed properly!
So I have not continued with adding the exterior muntins to all these windows
 while I try to decide what should be done.

I started to build the fireplace for the Willowcrest bedroom, 
using various pieces of decorative trim wood from the Home Depot.

I even gave it the initial coats of paint to make it resemble stone.....

But it is still unfinished. The first coats of paint didn't look right......
And I need to decide whether there will be a "lit" fire in this fireplace....
So I can run the holes for the wiring before I attach the wall in place!
And there are still a few details I want to paint on the walls... 
which will be so much easier to do
before I glue them all in place!

And I can't really get more work done on the Attic room
 until I have glued the Floor....
And exterior walls (which still are not attached) in place!
(I think I need to make a list of all the things that are 
keeping me from gluing those walls in place...)
Yes, precious little has been done!

So now that Everybody has gone home from the Halloween Party
 and the Dust has had a chance to settle, Dear Readers,
 I can see that there is Plenty that needs to be done.....
If I can only figure out What I am doing!!!
(Wish me Luck.... I really should be starting on Christmas!)