Showing posts with label Conservatory Bricks. Show all posts

Monday, January 20, 2014

More Bricks and Saints


Slow But Steady.....

It was easy enough, Dear Readers, to get the last few bricks attached to the chimney, (because there were so few still to add!) allowing for a brief sense of Euphoria that the Chimney was coming to Completion! All I had left to do was paint and grout the bricks and then attach it in place! Oh, and add the cap stones... and it would be done! So I set right to it! But I remembered that I would need to paint a coat of primer on it first... and while I was slowly painting it I remembered how fiddly it was to get the paint into All the cracks between the bricks... and ALL Four sides of the chimney! It took longer than I thought it would...

And then it needed to dry.... 
in all the cracks between all the bricks......
It took longer than I thought it would.....
And then the painting part....
I use acrylic artist paint and mix as I go....
It took longer than I thought it would....

 Because it needed two coats of paint on all four sides......
And then it needed more color and texture added in places....
(I forgot to take good pictures...)
And then it needed a coat of polyurethane sealer....
In all the cracks between all the bricks on all four sides....
Yeah, it took longer than I thought it would!
Above you can see it late Saturday night... 
painted but still no grout.... but progress had been made!

So Sunday morning I started right in with the grout.....
But first I took a Morning Light picture of the partly done chimney...
without the grout in place it is really difficult to tell whether the color of the bricks 
will match what has already been done.... so we just have to hope for the best!


And get started on the grout....

Section by section you push the grout into the cracks 
and wipe off the excess with a damp sponge....
The abrasion of the grout takes away the gloss of the polyurethane sealer...
In fact, it took away some of the skin on my fingers....
Which I didn't notice until later!
Hmmm... should I have used some gloves?


But eventually all the grout was applied....
And I just needed to wait while it dried....
And keep wiping off more of the dried loose grout.....
Yeah, It took longer than I thought it would!!!
But, Oh boy, the grout really makes it look like bricks!!!


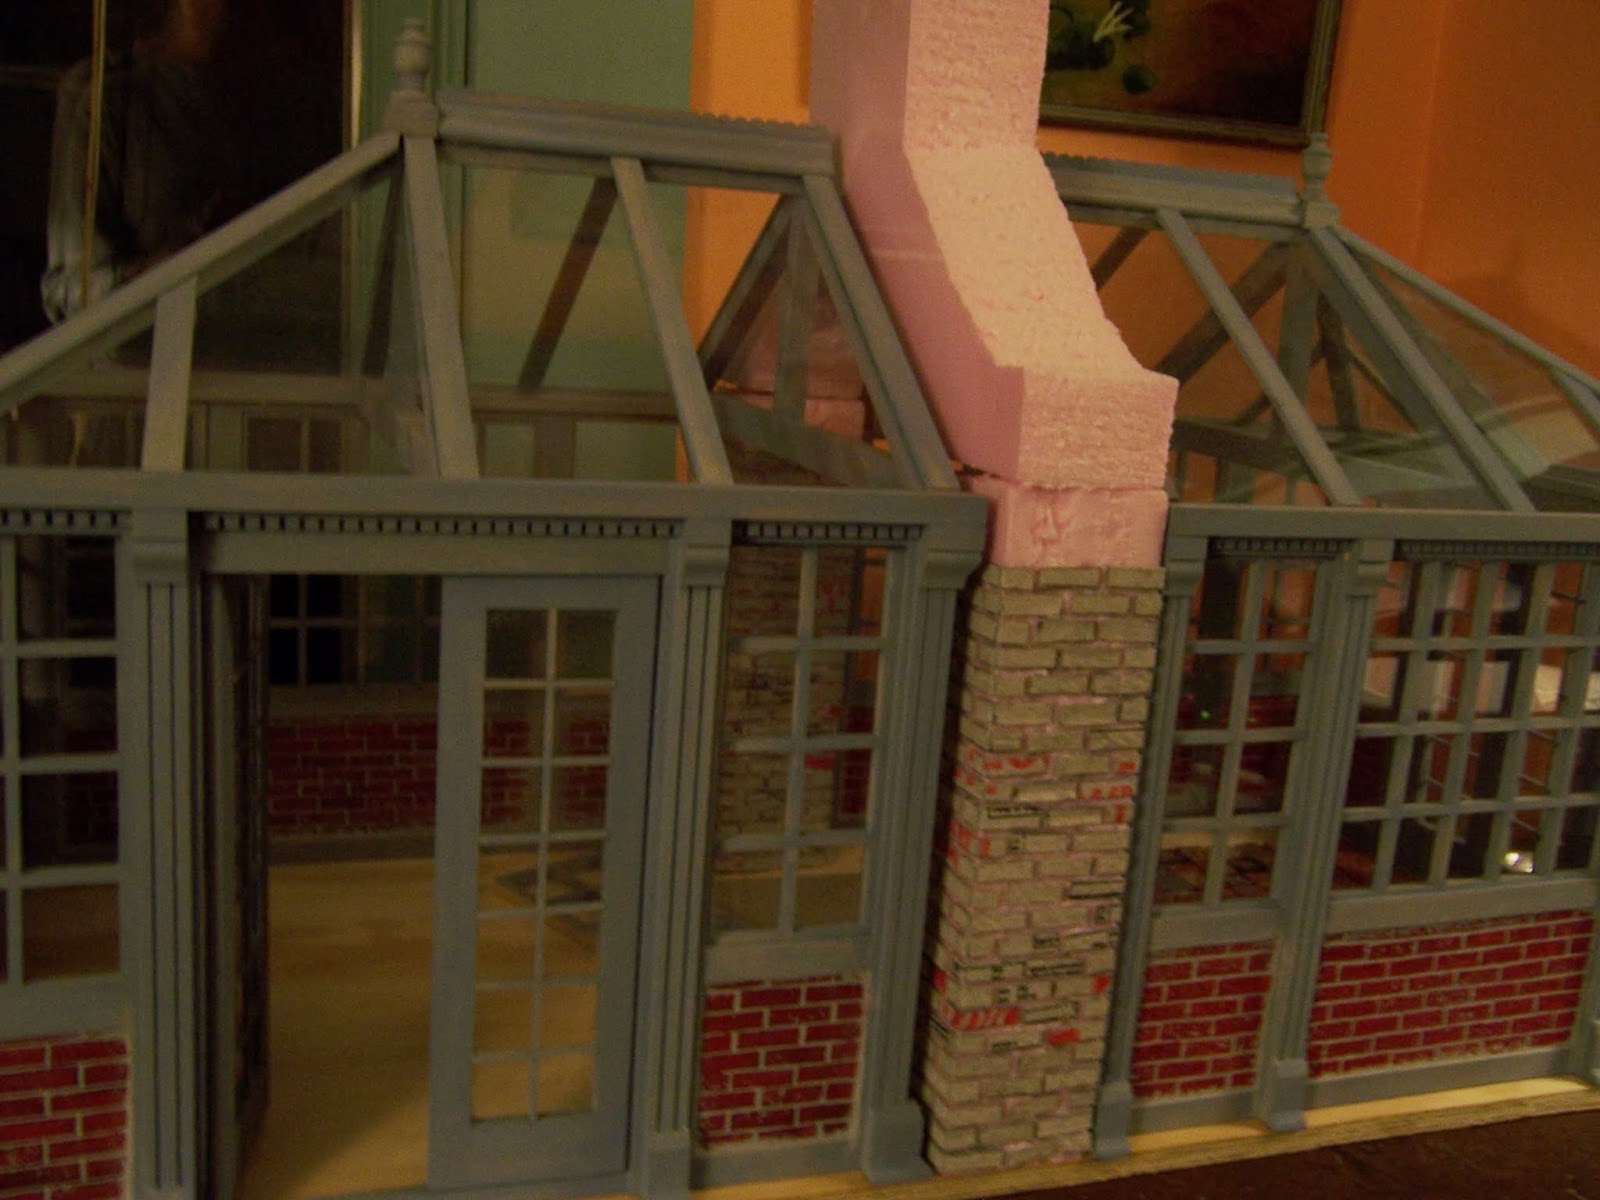
Here you can see it in place....
And none of the bricks match very well....
But the Story is that it was constructed in several parts originally....
And it is very old so some of the bricks are more worn than others....
And it will be getting more "Aging" as we go....!


 So you can see that you will probably never even notice
 the different bricks when it is all finished....

Here you can see the end view.... 
without the cap stones....
 which I haven't made yet...
And which will be a whole other adventure....
But it is starting to look like I had imagined....

Here is the interior view....


I think those bricks look Amazingly real!!!
But before I can attach anything in place, 
I have also decided that the windows need interior muntins....
(All those little cross bars on the window panes)
It bothers me that they are only real on the outside....
So I stained a whole lot of thin strips.....

The window on the left is how the kit looks from the inside....
the one on the right has the interior vertical muntins 
but none of the horizontal ones....
(I forgot to take a picture of the completed window)
I have a Lot of windows to complete.....
but the one window didn't take as long as I thought it would!!

And last but not least, lest you think I was doing nothing 
while all that paint and grout was drying....
I started painting another Saint on the Castle Great Hall Ceiling....

This is Saint Cecilia.....
(Couldn't you tell...?)
She was surprisingly difficult to find ANY contemporary images to copy!
The only version I have is in the Hours of Catherine of Cleves, 
which has one of the most complete Hagiographic sections ever....
But I didn't like the image....
It didn't include any of her traditional attributes....
She is the patron Saint of Music.... and it showed her with a Hawk!
So I searched images of Rood Screens..
(Isn't the internet Awesome!)
And while I couldn't find an image that was hers for certain....
many of the surviving paintings are very badly damaged....
I found a pose and attributes I could use.....

But she is only just begun...
I have to invent most of how she is....

I apologize for the Lousy pictures... 
the lighting is so difficult at this time of year...
But you can see her in conjunction with the other saints.....

And here is a view with the ceiling in place...
Again, the lighting is difficult... 
it gives a much too orange cast to the painting...
And I have only one more Saint to begin!
But they ALL need tons of details to finish them!
So you can see, Dear Readers,
while it might take longer than I thought it would....
whether its Saints or Bricks....
Slowly but Steadily...
I have made Progress!

Monday, January 13, 2014

(Almost) Nothing To Show...


The 200th Post!

I hope you can forgive me, Dear Readers, for being Completely Unprepared for the Momentous Occasion of This, My 200th Post!!! I would have liked to have some thoughtful commentary prepared..... or a summary of the Life of this Blog to show.... or perhaps an update on all the ongoing projects..... or perhaps even a giveaway contest planned..... but, Alas, I have none of those to show! Instead, it was one of those weekends where the RL Chores ate up all my time and I got Almost Nothing Done in my mini worlds! I did manage to add a couple of rows of bricks to the top of the Chimney for the Conservatory.... in fact, I decided that the top of the chimney needed to be a little taller and fancier.... so what should have been only three or four more rows of bricks, grew to ten or twelve rows of bricks.... and it is still Not Quite Done!

Here you can see the brick portion in place.... 
between the halves of the Conservatory.....
I think the chimney looks more realistic when taller....

And here is the view from the side.....
Please forgive the poor lighting.....
It is that dark time of year!
(And now that all of the Christmas Lights have been put away :(
It Feels even gloomier...!)
That was all I accomplished this weekend, Dear Readers, 
so rather than leave you with So little to show...
I thought we could have a Closer look 
at the Dollhouse Annabelle got for Christmas!
(Several of you mentioned that you wanted to see inside it...!)

I made this little doll's dollhouse in 1974.....
(I was still a teenager)
And I had very few materials to choose from when building it.
It is simply painted cardboard.
It is front opening (unlike the Lovely Old Dollhouse)
and the front doors are "hinged" with strips of linen sheet material.
I carved a wooden peg as the latch to keep them closed.

Inside are four rooms and the central Hall with stairs....
On the right downstairs is the Dining Room....
With china and silverware painted on the table....
And a Maid ready to serve....!
And the upstairs is the Children's Nursery....

And on the left downstairs is the Parlor....
and Upstairs is the Master Bedroom...

The Parlor has a mirror over the fireplace made of Tin-foil!
And the sofa and chair are painted cardboard....
painted to resemble dark blue velvet (I think!) with brass tack detailing!
The visiting guests are "paper doll" cutouts... as are the Resident Hosts!
They appear to be dressed in the fashions of the Victorian era....

Here you have a better view of the Hallway and the stairs going up....
It is rather difficult to get good shots of these rooms.... 
the Parlor is only 1 and 1/8 inch wide!
The entire house is less than four inches long and 
about 3 and 3/4 inches tall including the Widow's Walk on top!

Here is a view of the Master Bedroom and the upstairs Hall...
(yes, that is my thumb in the upper corner!)
(And no, I don't have giant hands!)
The bed is also made of painted cardboard.... 
with an American Patchwork Quilt!

Upstairs in the Children's Nursery 
two children are playing with building blocks....
Once again, "paper doll" cutouts....
I even painted the candle sconce on the walls... 
visible on the right!
In places the paint has "crazed"....
but it really has held up very well over the years!
 
 
You can see that my measuring and gluing was a little off....
The floor is definitely higher on the left side!
The attic is not accessible..... 
and it is interesting to note that this cardboard is a good bit thicker 
than the average cardboard available now!

I hope you have enjoyed this Tour 
of Annabelle's Antique Dollhouse.....
Because without it, Dear Readers, 
I really would have had Almost Nothing to show you...
On This, My 200th Post!


Monday, January 6, 2014

Saints And Bricks


Progress.... Bit by Bit...

I hope you can forgive the Garish lighting and the awkward perspective, Dear Readers, but I have been working on painting the Saints on the Castle Hall ceiling and I wanted you to be able to see what it currently looks like when in place in the Hall. This is no easy task at the best of times... requiring one to get down on ones Knees and crane the neck upward at an awkward angle... and Hope or even Pray that the view in the camera lens is properly aligned! And at this time of year when it is Almost Always too dark... it is nearly impossible to get the lighting right. I have moments when I am wondering why I am taking so much trouble with painting the details on the ceiling.... but then I see it in place and I know it will eventually look the way I am imagining.... so I keep painting! I am keenly aware that it is becoming an amalgam of eras and styles, because I am trying to copy actual Medieval Images of the Saints... and it is nearly impossible to find ones all of the correct vintage to copy. Several of the images I am using are Stylistically later than the date set for my Castle. But I am allowing for "Artistic license" rather than period authenticity.
I left you last week with several Saints just in the beginning stages of painting...

I tend to get completely absorbed in the painting process and forget to take pictures until the end of the day... and I jump around a lot from one Saint to another..... 
so you will see only slight changes on some and big changes on another. 
Here above, you can see I have painted part of John's robes and most of the Eagle.....
And below you can see I have added much of the black linear details...

Another just begun Saint was Saint Luke...


He is the Patron Saint of painters... 
so he is shown working on painting....

Above you can see I have added most of his facial details....

Here is a closer shot....

And I also started on Saint Matthew....

I gave myself an additional challenge with Matthew..... 
I chose an image that I only have in a black and white photo...
because I really liked his expression and the linear style of his clothes....
But I am left having to invent all the color details!!!

We shall see whether I end up having any success with his robes....
I have made a start!

And lest you wonder what I was referring to in the "Bricks" part of my title...
I also chipped away at the bricks for the Conservatory archway!

I seem to recall that Last year on New Year's Eve 
I was making bricks for the Folly Chimney....
This year I got the arch section done on New Year's Eve....

And then diligently worked at the remaining bricks....
Attaching a row at a time...
in between painting Saints.
Mostly I forgot to do the bricks...
And kept on starting New Saints!

This is Saint Nicholas....
I forgot to take pictures of his beginnings....
And likewise for Saint Lucy....
there are many details for her still to do...

And here is another view with four of the Saints together....


The ceiling is still not attached in the Castle... 
so I am able to do the painting from a reasonable angle....

And I have nearly finished the bricks too....

Here you can sort of see it in place....
sticking up above the roofline.....
(The beautiful wreath is a gift from Birgit!)

And here is a view from inside...

I am really loving the egg carton color of the bricks here!
I still have to finish the top of the Chimney and then do the grout....
So it is still a ways from done.

As for the Saints....
Some more details on Saint Amand....
The details on his Crozier, shoes, hands and pen....
Amongst others too numerous to specify!

And some more on Saint Luke.....

Painting the Artist... 
Painting the Painting....
The more you do....
the more you see still to do!

But Bit by bit... Dear Readers,
I'm making Progress on the Saints and Bricks!

Monday, November 18, 2013

Shedding A Little Light....


Oh So Little.....

It is that Time of year, Dear Readers, when it is so Dark.... Morning and Night.... that it is so hard to get good pictures of what little work has been accomplished in my Mini Worlds! You may recall that I mentioned I would be making a LOT of bricks for the Conservatory..... well I got started....

This was the total of what I accomplished on Saturday...


And Sunday I just diligently applied myself to Brick making and Gluing.....
It is surprisingly Slow work!

By Sunday night I had nearly completed the two pillars!

And here you can see them in place....


And you can also see the arched upper portion temporarily placed on top....
Still a Long way to go!

I must confess that it felt like I got nothing done!
And because you have been so kind as to nod agreeably as I bore you with pictures of Boring bricks.... 
I will add a few shots I took Early Saturday Morning of Sunlight shining onto the Folly...

The Winter sun slants low in the sky... 
and for a moment it reaches far into the room and touches the Folly....

And from the inside you can see the light shining into the Bednook..... 
which has been dressed with colorful patterned bedlinens and 
layers of wool blankets since you last saw it.....
 

And the booknook is also graced with this brief Morning Light.....
That hushed moment at the start of the day....

And the Kitchen, too, catches the brief Morning Rays.... 
reminding us perhaps how Much there still is to be done....

And even the Livingroom is adorned with this Perfect morning light...
Where Daphne still sits pondering the revelations from All Hallows Eve!
She has sat here so many times before... 
but mostly she has been accompanied by Will....
And she is just beginning to realize that she is enjoying being alone...
Free to think her own thoughts.....
And she has So much she needs to think about and make decisions about......
It has just always been so much easier to let Will lead the way!

She can't begin to understand What happened on Halloween... 
when her Mother spoke to her through a crystal ball.....
Had she Imagined that?
She was going to have to talk to her Mother and try to get some answers....

And meanwhile..... 
Will has been overseas....
On a buying Trip for his Antiques Store and Gallery.....

Roaming through all sorts of ancient Castles and Estates.....
seeking furnishings and Art worthy of his business....

He missed being at the Halloween Costume Ball at the Castle....
so he missed all the Excitement....
And even though he texted Daphne repeatedly...
She had left her phone at home....
And didn't get all his messages until later.
But after the Mysterious Vision of her Mother in the crystal Ball...
Daphne isn't thinking about Will!

Believe it or not, Dear Readers, 
it only took a few moments for the Sun to slip entirely away.....
But for a brief Time it shone fully on the Solitary Sunflower.... 
still blooming beside the porch.....
Reminding me that there is so Little Light at this time of year....
But what there is can be Just Brilliant.....
Shedding just a Little More Light on Everything!