Showing posts with label Spiral Stairs. Show all posts

Wednesday, April 13, 2022

Vaulting...


Finished....

I Left you last week, Dear Readers, with the "vaulted" ceiling in the back corner just begun. As sometimes happens, one forgets to take any more "in progress" pictures until the job is completed, and then suddenly the work appears finished as if by magic! In this case, it was not a lot of work, and not interesting work, cutting stone pieces to fit, stacking them so they cantilever over the open space, and painting them to turn them to "rock". It was done in no time! Above you can see the results in the morning light. They are not "shaped" to make a smooth continuous arch, but are more rough and step-like as they stack upon each other. But the principle is the same. Gravity keeps them from falling because most of their weight stays on the rock below, and with the decreasing size of the opening as they close in at the top, their "lateral force" keeps them in place against the other side of the vault. Simple physics! (But I did use glue!) Here, I will show you a closer shot....

Here you can see the first two layers stacked
 and the ceiling and arch out of the way.


And with the third layer in place.
All that was left to add in this corner
 were the stones at the corners of the window.


Which you can see added here.
It took longer to fit those corner stones 
than the entire vaulted part!

And the other corner, where the tower stairs spiral upward
 only needed a few small details.


With the door wall removed you can sort of see
 that the "doorpost" on the left was very uneven
 where it tucked close to the stairs.
(The flash was needed again)
There was a lot of carving off millimeters from edges
 of the door frame where it meets the stair wall to make it fit well.


And the hinges needed their sculpey "hinge straps" added.


And the brass parts painted black.
And I needed to finish all the parts of this door
 before gluing the wall in place.
Including a "ring handle" on the inside.
I couldn't find a plain simple one in my stash,
 so I improvised with a jump ring and some wire.
(And neglected to take a picture!)


Here you can see the door wall is finally glued in place!
(Yikes!)
And I have begun to add the stones which surround the door.


And here you can see the door opens!
(Yes, it needs some touch-ups!)


And if you look closely,
 you can see the improvised ring handle.
I still need to complete the stones that surround the door frame.
 And a few more at the top where the wall meets the stairs.
But I believe I can say the Tower Spiral Stairs are Finished!
Of course, the access at the top of the Tower is still not done....
but it will be a while before I get to that step!
I am So glad, Dear Readers, 
that I decided to try to make these Spiral Stairs work!


Wednesday, February 16, 2022

Retro-fitting....


The Castle.... Again....

It was Twelve years ago, give or take a day or two, Dear Readers, that I began to build the Castle Dollhouse! And you must imagine my amazement to realize it has been this long and I am only about half way through building it! As I am sure you have noticed, there have been a few detours along the way.... I don't seem to follow a straight path to the end. But I have been feeling a certain urgency to get the building constructed... none of us are getting younger... so I had better just get organized and ... well... work on it! So I have been making an effort over the past few years to accomplish some of the many remaining tasks. And because I started the "shell" of the building so long ago, and it being my very first self built dollhouse... there are many ways in which it needs "improving" from the original plans. Above you can see the Lord's Bed Chamber in the very first stages of construction. This room is the top most room of the Lord"s Tower and is directly above the Lord's Council Chamber. It is the uppermost room of this Tower (I cannot reach any higher...!) and above this room is the open top of the Tower with it's crenelated battlements. In the original design, I intended the stairs to the battlements to go up the outside of the Tower from the top of the Great Hall. This meant that there were no stairs inside the Lord's Chamber. The more I have thought about this, the more I wanted to put a separate set of stairs just for the Lord to use that would spiral up in the corner inside the walls. This way he would always have his own escape route up to the topmost battlements. Suffice it to say that I had to give it a try and see if I could make the stairs fit into the corner! 

I started by constructing a spiral stair from blocks of 1x2 pine cut to shape
(I made a diagram of the steps and cut each block and fitted it into the corner.
Here you can see I am trying to make sense of the structural elements of the room...
where does the bed fit... where does the fireplace fit.....
The wall on the left separates the stairs from below...
And you can see the spiral stairs cut across
 the windows in the back corner.
But I can make the window smaller....
By just filling in a part of it...


Here you can see it in the morning light.... 
with the wall on the left removed.
(All the stairs in this Castle go up inside the walls.)


I managed to find the very same piece that was
 originally cut out for this window... 
and fitted the top shape correctly!
I simply made the opening smaller.
And the lop-sided shape will be corrected 
when the window glass is fitted.


Here you can see it from the back side....
Remember I painted the backside last summer?


In the bright morning light... 
you can see I am testing the arrangement
 of seats below the window beside the fireplace.
You can also see that the stairs will need 
to be shaped to go above the window.


I also filled most of the other window in the stairway...
 turning it into an "Arrow slot" window.
It was simply too large to keep it a regular window shape,
 and too close to the steps... 
anyone would be able to fall right out!
This way it gives light and serves a defensive purpose.
Once again... I used the very same piece
 that was originally cut out of this window!
 (Do not throw away those "scraps"! They are amazingly useful!)


Here you can see I am starting to shape the
 underside of the stairs to fit over the window.
It took a lot of gradual cutting... with my hand saw...!

I am thinking of adding another window on the other side of the fireplace....
And I am testing the spacing of those heavy columns along the wall...
The one in back is needed to close in the stairs...
and shouldn't there be some symmetry to the structure?
(I like my engineering to make some sense!)


Cutting the extra window required emptying all the parts
 and moving the Tower away from the wall...
because the saw wouldn't fit inside so the cutting
 had to be done from the back side.
And I was reminded that I had not yet glued the floor in!
It is the ceiling of the Lord's Council Chamber... 
which had only been completed last fall...
(and I needed to wait a while in case I had
 forgotten something important...!)
So I got out the glue.... and the heaviest Book I own.....


This is a Momentous Day!
And while I waited for the glue to dry... 
I started to cut the window frame sections...


Which you can see is carefully fitted to the odd shaped opening.
I cut two of these from thin plywood (1/8 inch thick),
 and once they are fitted to the opening,
 I cut the window hole out of the middle, 
and sandwich the glass pane between the plywood pieces.
None of the pieces are glued in until all the parts are fitted.
In this case, I need to get the back windows finished
 before I can attach the stairs.


Here you can see I have removed the ceiling.... 
(the floor of the Tower Battlements...)
in order to cut the opening for the stairs to access the Rooftop!
I have not been at all sure how this
 will be "covered" up on the Tower top.
 The weather would rain in if the stairs were just left open...
 so a roof over the stairs would be needed...?
And some sort of wall around the opening...?
But I started by cutting the hole as it would
 need to be for the stairs to land at the top...


And once I had cut the opening.... I had a brilliant idea!
Why not just make it a Trap door... with Hinges???!
(Oh, I do LOVE hinges!


Here you can see the opening from below... 
(the side of the stairs will be walled below the opening)


And the open door from the Battlement side!


And closer... so you an see the top of the stairs....
 (the very top step has not been fitted yet....).
There will be a door at the bottom
 of the stairs to keep the drafts out.


And I decided it would be easier to paint the "rocks"
before all the added pieces get in the way...
You have seen this before....


First I draw the courses.... 
then add the rough texturing...


By now it is late.... dark....
And I am too tired to add the grout!


Which Never ceases to Amaze me, Dear Readers,
how it transforms the painted surface into "rocks"!


One slow wall at a time!
Retro Fitting the Castle....
Again!


Tuesday, May 25, 2021

The Next Steps.....


 The Tower Stairs....

As I am sure you have realized, Dear Readers, this project does not develop in a direct path with clear instructions. There are always raw edges that need to be completed after the main part has been done, necessitating all kinds of disruptions to the structure that was almost finished. In this case you can see the taped up section of the herringbone floor where the doorway to the Tower Stairs enters the room. the bottom of this door frame is the upper section of the ground floor room.... and it still needed the "rocks" (made of egg carton) added and then painted. Two tiny little areas of "stone" needed to be added and primed and painted before any of the walls or the alcove could be glued in place! And it was as I was adding these "rocks" that I realized that I needed to get this doorway properly aligned and the door attached before I completed the "rocks" so that the door could open properly into the Tower Stairs landing. And I am sure you have guessed where this chain is headed.... I needed to get that landing in place before I could attach the door...

You can see here my first attempt to attach the door, 
with no landing in place.
It did not align properly and I had to rethink
 the placement of the hinges!
 

Here's the view from the other side without the end wall in place.
It was clear I was going to have to back-track
 to the bottom of the Tower and just build the stairs first!
From the beginning of this project I have planned to use Quaker Oatmeal boxes
 as the structure for the Tower and have the stairs spiral up the inside. 
(The last time I did this was for The Cloud Palace
 and the stairs go up the outside of the Tower!)
I really just needed to know how many steps were needed
 and make sure they started and landed in the right place.
 I drew a diagram to calculate minimum step depths.
(Sorry my sketch is a bit faint....)

 
I calculated three-quarters of an inch height for each step,
 and would need a minimum of twelve steps for a 9 inch rise.
 I could space four steps in each 90 degrees of the spiral, 
thus using 270 degrees out of the 360 in a circle.
 (This means 3/4ths of the way around
 leaving room for landings. Just perfect!)
 

Meanwhile, I had decided that my initial "base" for the Tower
 was too small and the initial "post" was too wide
 (I had used a 1/2 inch dowel)
So I re-cut them both. 
The new base is 3/8ths inch plywood
 and the post is 1/4 inch dowel.
The steps are cut from 1inch builders foam 
sliced down to approximately 3/4 inch thickness.
It is hard to be exact when cutting the foam... 
and I am accounting for "discrepancies" in the "stone" steps.
The first steps are glued in the above picture.
 It takes a while for the glue to dry 
and you need to not rush too quickly... the steps will sag too much!


I glued a whole bunch of "pairs" 
so that I could add two at a time once they were dry.


Here is the view from above...
 trying to make sure I am getting my four steps 
into a quarter turn of the spiral....


If the lower stairs are firmly dry, 
the new pair will stay put while they dry!


Here the door has been re-attached... again...
I have made three attempts to get it right!
It now hinges off the back side of the support post.
This allows the Rock of the door frame more thickness 
and the door appears to be recessed.


The top steps always seem to be off a little bit....
Yes, there was some sag... 
and there was some allowance for different thickness
 of floor for the landing...


Here you can see the Oatmeal box temporarily fitted around the stairs.


And the "landing" floor temporarily placed to see how it fits.
I was able to re-use my original base for the landing!


Here you can see the stairs without the Oatmeal Box...
and the door and landing temporarily placed.
I am using some of the foam "slices" to shim
 the top step so it meets the landing properly.
(I didn't get a good picture of that.)
 
And while all those steps were gluing, Dear Readers,
I was adding the rest of the stone door frame to the wall...


And making sure it fit around the alcove posts and the fireplace...


Such a small amount of "stone-work"... 
but so essential!
Now I can glue the alcove in place!


And starting to fit the wallpaper too!


And with the ceiling temporarily in place....
(And the flash in play....)


Or maybe just the atmospheric light...!

But clearly, Dear Readers, the next steps
Just had to be the Tower Steps!


Monday, March 26, 2018

Branches....


Branching Out......

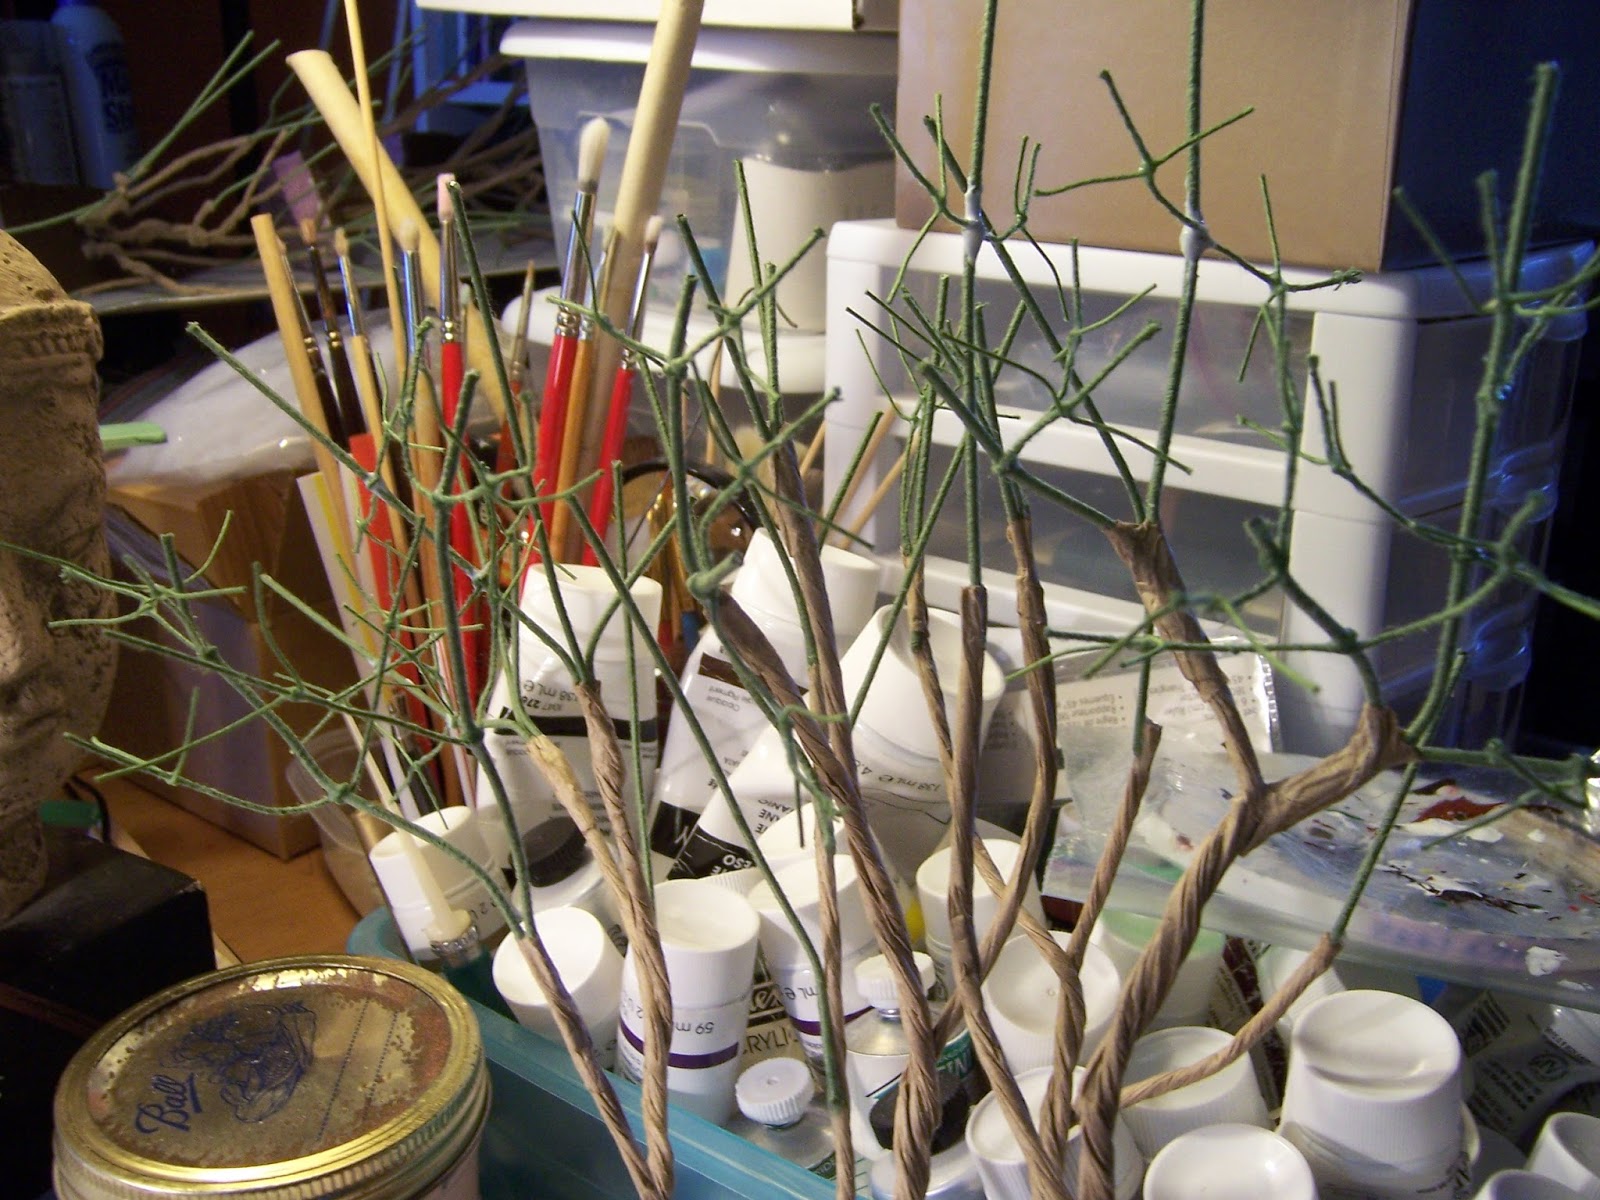
I hope it will not Bore you, Dear Readers, to return again to the project of making the Lilac bushes for the Folly Garden, because as I have mentioned, I am determined to make these bushes in all their glory... several times over! As with many things, it gets easier with the second and third versions... but the first one can prove to be very challenging, especially when it is something you have not done before, and you are not sure of the methods to use, or even whether the ones you want to use will be good enough. I am sure you have all experienced this in your own projects.... there is always a "learning curve"! I will confess that I have been unsure of the "proper" method for making and attaching all the smaller branches and twigs for my Lilac bushes.... and aware that each bush would need many many branches. Above you can see the main stems and the secondary smaller "branches" which established the basic skeleton of the bush. Clearly this was just the beginning!

I know it is difficult to see in these pictures....
 but the joins where the smaller branches attach
 to the larger ones needed to be "strengthened" 
by wrapping an extra layer of the paper around them.....
This picture is the "before" picture......

Here I am testing making the smaller branches with "twigs" ......
 by wrapping the thinnest wire around the slightly larger wire.... 
and covering the join with glue.
 
Here you can see some of the "joins" have been wrapped with extra paper....
 and I have added some twigs... 
(I have to prop the bush against my paint box while the stems are gluing...)
 Then I decided that "twigging" both ends of the branch first
and then wrapping the branch around the stems...
was twice as fast.....!
 
And I also decided that if I started with the "front row" of stems..... 
the ones that would be the most visible in the end.... 
it would be easier to tell where and how many branches
 were needed in the "back rows" of the bush!

So I started making "batches" of branches.... 
and kept count so I would know how many
 were needed on the next bush(es)...

Here you can see only a few of the small branches
 have been added at the front.... 
but I needed to test how they fit.....
And I needed to let the glue dry on the branches as I added them....
 to avoid knocking them askew as I added more...

And as the stems gradually filled with branches and twigs....
I could shape them more realistically... 
with bends and angles as though the branches are reaching for the light...

And I had to keep testing the bush in place
 to make sure the branches fit under and around the porch eaves,
 and could still be lifted in and out with out damage...!

And then More Branches.......
(thirty-six twigged branches... and counting...)

The smaller branches and twigs are very bendable.... 
the thicker stems are quite strong and stay as positioned.
It is starting to look more like I thought it should!

And I am sure you will not be surprised, 
Dear Readers, that while all that glue was drying, 
I was also working on a small stitching project....

This is another of the kits by Janet Granger 
that I bought a while ago.....
(quite a while ago!)
It is stitched on 40 count silk gauze
 and is meant to be a miniature "stitching project" 
for the mini people.... it comes with 
a lovely miniature needlework frame
 to attach it to when you are nearly done with the stitching...! 

Bit by bit I have been adding the details of the blossoms and stems.....
(yes, I use a magnifier for this!)

And as if that weren't enough of Branches, Dear Readers, 
I have also been making a few small adjustments
 to the Hardwick Hall Attic Spiral Stairs....!
 

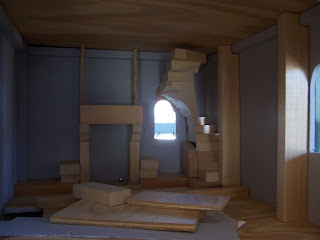
The original plan for the cupola above the Attic
 relied on a framework of "joists" to support the floor of the cupola
 at the height of what would be the "ceiling" eight inches from the floor,
 but several inches below the peak of the roof.
(See the original structure in the above picture)
I had assumed I would just use the right number of steps
 on the spiral stair kit to reach that height. 
 But while I was actually assembling the stairs
 it became clear that I would need to use all the steps...
 because the railings came in "three-step" sections.
I would need to use all 12 steps.... which rose to nine and 1/4 inches 
instead of the eight I had planned on.
 
 
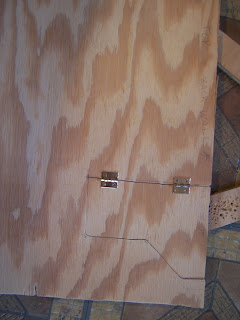
And another issue that had troubled me was the method
 of securing the stairs to the floor.... 
it would need to have a hole drilled to receive the "post"....
 and the floors on this kit are waaay too thin for that!
So I decided to add the "stone" base for the stairs...
 being the height of one step.
And maybe because I was thinking so much about branches and stems... 
and because trees are such a theme in this house... 
It occurred to me that maybe I could make a tree that would spiral up the stairs.... 
and the branches would support the floor above...
 and form a part of the cupola frame.....?

And with a tiny amount cut off the ceiling panels.....
 making the opening a tiny bit larger and lower.....

The top of the stairs now reach to the level of the roof!
Which just means the cupola will need to be a little bit wider and taller....

About like this.....
I think it will suit the proportions of the house
 much better than the first design.... 
 and I'm really glad I had not got very far in building it yet!

I have only just begun to build this tree, 
and I have no idea how I will make the branches or the trunk....
But I think I have to try....!
 
 
And then I remembered that I wanted to make "buds"
 on the ends of all the twigs for the Lilac bushes... 
using the "glue trick".....
 and maybe I should have added the glue to all those twigs
 before I attached all those branches......?
Ah yes, Dear Readers,
I am a long way from Done with all these branches...
somewhere on the Spiraling Learning Curve.....
Branching out....!