Showing posts with label Hardwick Hall Lights. Show all posts

Monday, April 25, 2016

The New Dollhouse....


It Was Just A Matter of Time....

I suppose, Dear Readers, that you want to see the Tiny roombox in its proper location on the bookshelf in The Folly Parlor. But I must tell you that it is incredibly difficult to photograph it there! I cannot seem to make the camera focus on the roombox, so it is always just a little out of focus! At least the morning sun was shining brightly on Saturday, allowing me to get this picture in the best possible light. It is not completely finished, there are still one or two details I think I want to add, but I was not able to accomplish any of them over the weekend. It was one of those weekends where I seemed to do a lot of little things that didn't add up to anything noticeable, and certainly no steps crossed off the lists!

( Where it all began... The Lovely Old Dollhouse.....)
I have also been aware in the back of my mind that last week was the Sixth Anniversary of this Blog...!!! (How does the Time go so fast???) I have debated having an anniversary drawing... but have been too disorganized to pull one together... so I mention this as an aside... that I might get one organized... so stay tuned! I also debated trying to do a "Review" but.... that just seems Exhausting! I cannot begin to summarize the Adventure that it has been for ME... connecting with so many Wonderful, Inspiring, Creative, Generous, Talented Miniaturists from All over the World...! I just Never could have Imagined how enriching and supportive and amazing this community would be! Thank you ALL for sharing yourselves and your creations in this amazing Blogland! I hope it continues being an amazing Adventure for many more years!


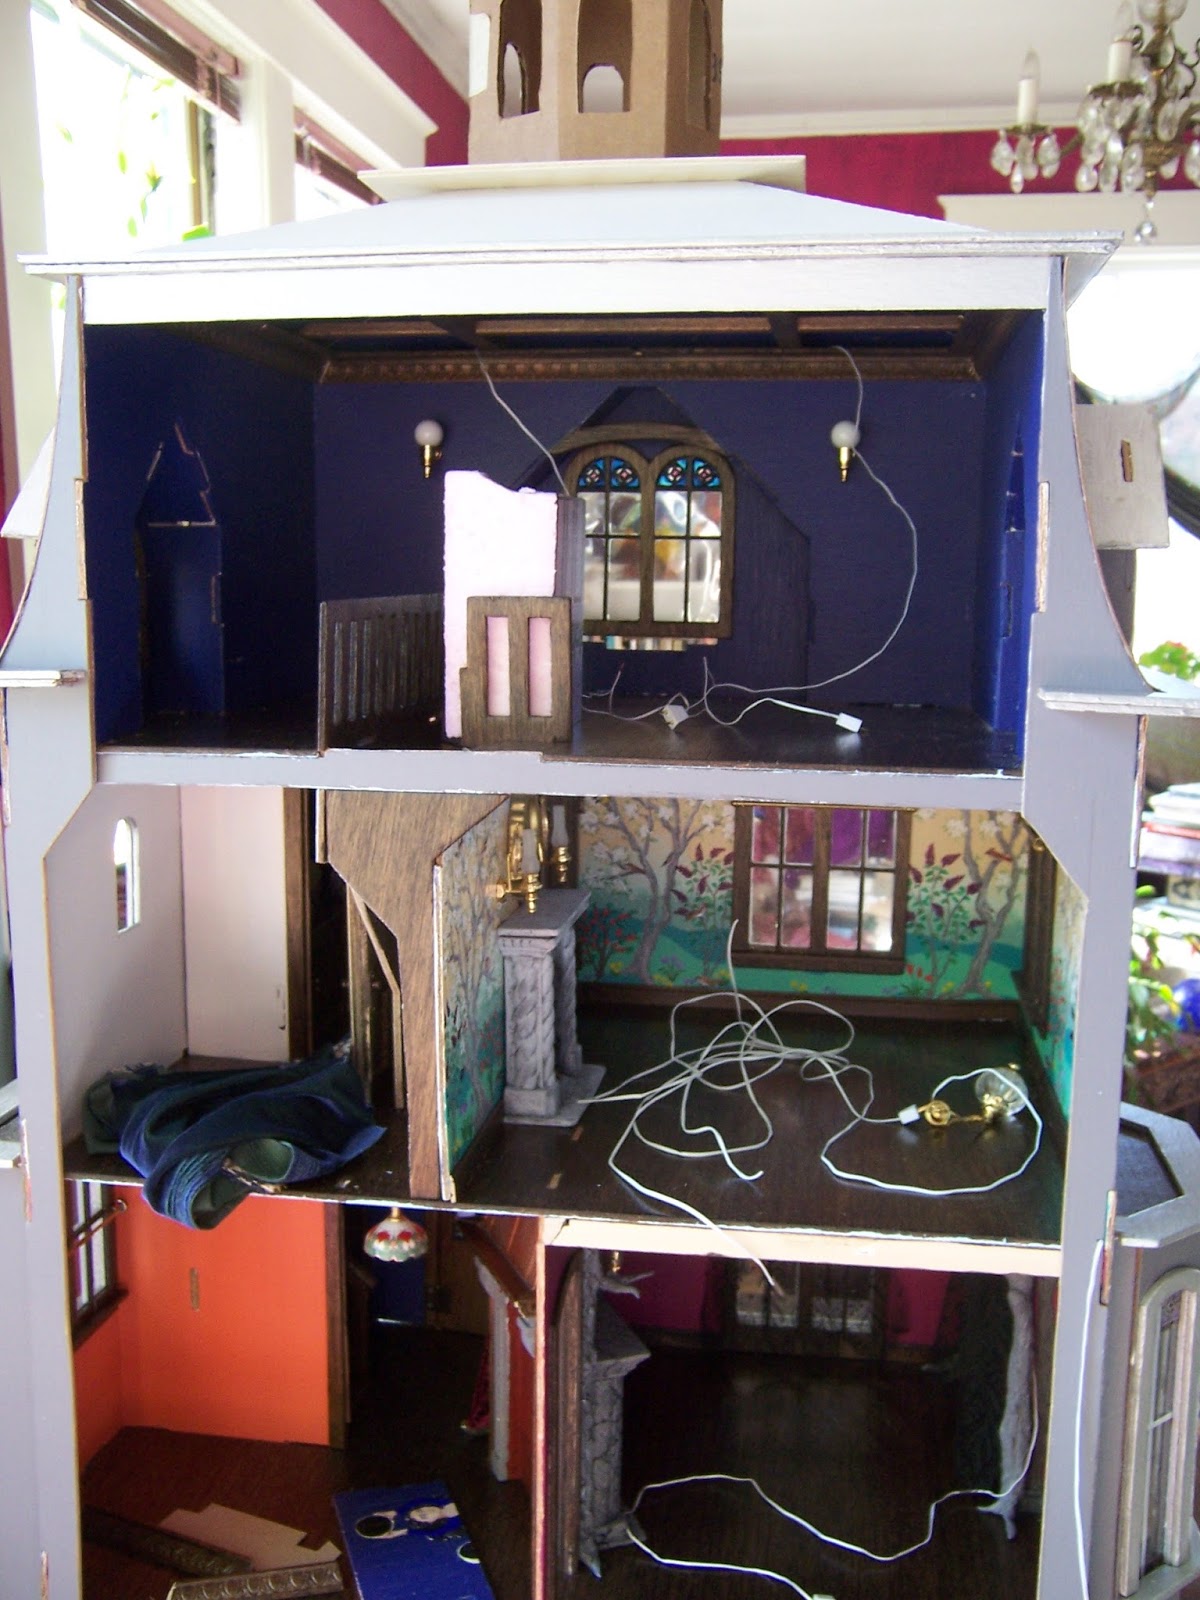
 As for the weekend.... I managed to work a little more on the attic of Hardwick Hall! Remember that LIST I made of All the steps I needed to accomplish before I glued the side walls in place? I know, it was a while ago... but One of those steps was to figure out the Wiring for the attic lights! So far the majority of the lights in this house are on the central wall, and the wiring goes down behind the kitchen hearth to the basement where it connects to a plug strip. Well, my Plan was to add sconces to the attic walls and to run the wires around to the back of the house and down the outer corners to the plug strips. These wires would eventually be covered by the corner trim of the house. Well, I got a little ahead of my plan, and glued the Mansard Roof onto the sides before I remembered to run the wires for the sconces..... which meant I had to Make a New Plan! I think the New plan will work as well as the old one so no harm was done and I did not have to remove the Mansard roofing! In the above picture you can see I have attached two sconces to the far wall, one on either side of the window.

Here you can see they are being tested..... 
it is such a dark room and it was a dark day.....
But the lights work!
The New Plan is to run the wires around to the back 
above the ceiling trim where they will not be visible. 
It will probably be easier this way!
I still need to splice extensions onto the wires 
because they have so Far to Go to reach the plug strips!
I think there will also be at least one overhead pendant light.... 
but the ceiling is still being designed... 
so I am not at all sure where those wires will travel!
I know it is not very visible in the above picture... 
but there are stars on the ceiling....

Well, of course there are!
But so far I have not been able to get a satisfactory photograph 
of them with the ceiling panels in place!

And Another small thing that I started but did not finish...

Was adding my favorite Silver paint 
to the table and chairs which will go in the Dining area of Hardwick Hall.....

It was a Very Gloomy morning.... 
and they probably need another coat of paint....

And there will be some other decorative details... 
so they are far from finished.... 
but I do think they look wonderfully... Spectral!
But what about the "New Dollhouse" I hear some of you asking?
Well, I was wandering through the Internet recently during my lunch break at work, 
and stumbled across the "Pickering Manor Dollhouse"!
It was Love at First Sight!
And it arrived Today!

Yes, I am in Trouble now, Dear Readers.... 
An entire Mansion in 1/144th scale!!!

It is one of those purchases that Surpasses the wildest expectations!

The interior is not divided into rooms.... 
so I can design them as I see fit.....!
Even the attic opens!!!

And just to see how the scale looks with my Tiny Roombox....

Yes, there is ample room for elegant interiors!!!
And if one wanted to, 
it could even serve as a bookcase in 1:12 scale!

But Where oh where am I going to "house" this "dollhouse"?
I don't think it fits into ANY of my current Dollhouses!
Who does it belong to?
What era will it be a part of?
Will there have to be a New Dollhouse to house the Tiny One?
There HAS to be a Story......!
Ah, Dear Readers, this Adventure is Far from over!
I have Always wanted a tiny dollhouse like this one!
I guess it Was only a matter of Time 
before I got another New Dollhouse!


Monday, February 22, 2016

Birds, Blossoms, Walls and Wires....!


Hardwick Hall Progress... And More!

Believe it or Not, Dear Readers, I added a few more birds to the murals on the Bedroom Wall in Hardwick Hall! And whether or not they can all co-exist in Harmony in the Real World, here on my Mini Paradise Walls, I wanted to include as many of my favorites as I could! So I added a pair of Tufted Tit-Mice, which you can see on the branches to the left, and I also added a pair of Common Yellow-throat Warblers to the tree on the right. Because I was home on vacation, I spent a snowy/icy/ windy/freezing day flitting from bird to bird in my own little Springtime! And because I had so much Time to pursue all those little Details on my List, I also began to run all the wires from the Bedroom and the Parlor through the kitchen and into the basement.

These are the wires for the two bedroom sconces, the bedroom fire, the front porch light, the downstairs hall light, the two parlor sconces and the parlor fire. They all needed to be lengthened in order to reach the plug unit which will be at the back of the house along the foundation. I carefully spliced longer wires, using shrink tubing at the joins. (I neglected to take pictures, of course!)

I used ordinary masking tape to "flatten" them against the wall, and to keep them separated from one another so they would not rub and cause short circuits. Because they will be covered by the Hearth wall, I am not concerned about the tape failing to hold over time. They will be held in place by the wall itself. (At least this is the theory!)

And here is the view of the underside of the house, 
where the wires come through the floor 
and pass out from the foundation at the back
(which is at the top in this picture!).
I tested every light before and during and after 
the procedure of splicing...
 just to be sure they still worked!

Parlor sconces and hearth fire and downstairs hallway.... check!

Front porch.... check!

Bedroom sconces and hearth fire.... check!
So far we are good to go!
And of course, there were still a few more Birds that got added.... 

There are a pair of Downy Woodpeckers, one on each tree (the female has no red spot on her head) and also a pair of Rufous Sided Towhees, scratching in the flowers on the ground. The female is more brown and is on the left, the male is black backed and is way at the right in the corner formed by the back wall extensions. I also added another flowering Quince shrub to that corner (still not finished in this picture!) My goal was to get this wall finished so it could be glued in place!


Then I remembered that there were two more lights 
that would need to be run down the kitchen wall...
One was the kitchen light itself.....
Here you can see that I have added a chain 
to support the light so the light is not hanging by the wire alone. 
I have snaked the wires through the links 
and added a jewelry finding as a ceiling plate.

The other light which will need to run down this wall is the upstairs hall ceiling fixture... which is attached to the underside of the third floor... so I have to get that floor glued in place before I can run the wires down... and before I can glue the third floor, I have to glue the outer side walls!
And the front hall upstairs will be forever viewed only through the adjacent doorways...

Here is the view looking down from the top before the third floor is attached....
The Moon Maidens are marching up the stairs from the front hall to the attic,
 each one representing a different phase of the moon.
There are thirteen of them in all.

And since I was finally done adding birds.... 
well, I could go on adding, but enough was enough!...
I had Finally reached that important step, Dear Readers, 
the one where I take my courage in my hands 
and GLUE the wall in place!!!

It was a tricky manoeuvre, Dear Readers, because the walls were a bit warped, and I still was not supposed to glue the top front sides together because the third floor needed to be tabbed into slots on all three sides before gluing could be done! Of course, I didn't take any pictures because it was late and dark.... but the next morning the light could shine into the bedroom with all the walls in place! (Although you can see from the gaps in this picture that I had not yet glued the third floor in place!)
I wanted to attach an outlet into the baseboard that runs along the outside wall before I put the ceiling on! The wire would run through the groove in the baseboard and out the back corner where it could run down the outside to the plug strip. This would be covered eventually by the corner trim boards.


Here the kitchen light is glued to the ceiling, 
but it's wires have not yet been spliced.

And then, because nothing else could be done 
until the third floor was attached....

You can see my inventive method of "clamping" the walls together while the glue dries...
Because I have no clamps big enough... and ALL the walls were quite warped and unwilling to just sit nicely in place until the glue dried! I used a toothpick to insert some glue into the cracks of the upper half of the front corners, added tape and braced the stick against a nearby doorjamb!
Then I went to bed! (It was late!)

And in the morning I went to see if all was well.....
So far so good!!!

But I still needed to attach the wires to the lights from the hall and kitchen....
and run them down through the basement....

Kitchen light.... check!

Upstairs Hall light.... (viewed through the bathroom door)... check!
And you can even see a few of the stars glowing!

Progress, Dear Readers, 
This is Progress!!!
 
But I promised you blossoms too, 
and so far they have been missing...
 Here you can see I found time to sew 
the backing on the needlepoint pillow 
and stuffed it with seed beads...

I am in love with these needlepoint kits!!!

I think it looks so comfortable on this settee!

And that is not all! 
Do any of you even Remember 
the embroidered curtains 
for the Thee House Pagoda Bed?


Well, I couldn't remember when I had last stitched on them,
 and couldn't find a good picture, 
and forgot to take one of the "before" 
when I started stitching again....
Only about half of the blossoms on the left hand curtain had been done.


They are each about two and a half inches long, 
the basting stitches outline the curtains edges.
They are getting very close to finished!
 
So There you can see, Dear Readers, 
between the birds and Blossoms and wires and walls,
I made Great Progress on Hardwick Hall!
And Beyond!


Monday, February 8, 2016

Aaaaarrrgggghhh.... The Agony!!!


Two Steps Forward.... Ten Steps Back......

I am Sure you have All had those moments, Dear Readers, when you just Can't believe that all that work you just completed with Such Satisfaction will probably have to be re-done! After weeks, no, Months of dithering, I had finally decided that I did need to paint those "Trees" that are such a large feature of the parlor in Hardwick Hall. Last week I showed them to you in their partly painted condition. All that was still needed was the "marbleing" to make them match the rest of the fireplace. It was something I could easily fit in around all the work of the RL redecorating, so I started right in!
Above you can see me testing the frame piece for the right hand side of the mirror.

Of course, I need to shine a bright light into the room 
for you to be able to see the painted effect! 
I thought it looked just right and started in on the remaining pieces.

Here you can see the left hand side painted too....
Still just being tested for color and uniformity of "marbling"....

Was it good enough? 
Was it ready for the Final step... gluing in place????
Yes!
It was Finally time 
to attach it all permanently in place... 
so we could go forward with the rest of the construction!

So I carefully threaded the wires through the holes in the wall 
where they would run down to the foundation and connect to the plug strip.
And piece by piece I glued the whole structure in place!

Including the extra branches on the outer side....
 

Doesn't it look Magnificent?
Of course, in order to thread the wires through the walls, 
I had to cut the plugs off and will re-splice them later. 
It was too late last night to do that step!
But tonight I wanted to take a picture for you 
of the completed hearth with lights lit, 
so I temporarily spliced the plugs back onto the wires....

But only One of them would light.......
It must be the bulb, I thought.... 
after all, it had fallen to the floor more than once...
So I dug out a replacement bulb.... 
but still no light....!
This cannot be happening I am thinking.... 
maybe it is just the plug....
so I hooked that plug to the coals in the grate....

The plug worked just fine.... 
the hearth glows Beautifully!
But only one of those intricately embedded lights works....!
AAAARRRRRGGGHHHH!!!!!

I don't know about You, Dear Readers, 
but I cannot believe I am going to have to dismantle 
that carefully constructed and firmly glued framework.....!
I can't imagine that the sculpey will all come off in one piece....
and even if it does, the light fixture is baked into the clay.....
and if the wiring of the fixture itself is compromised,
 I will have to start over from scratch.....!
AAAARRRRGGGGHHHH!
Yes, two lovely steps forward....
Ten Painful steps back!!!
The Agony!!!!


Tuesday, January 19, 2016

Not Much At All....


What We Can See....

Once Again, Dear Readers, the RL Renovation project consumed almost all of my Time and even more of my energy this past weekend, leaving me with very little to show you! But I did manage to accomplish two very small things in my mini worlds, so here I will show you a great many pictures about not much at all! The first thing I did was to test a "lampshade" of sorts for the candle light sconces in the parlor of Hardwick Hall. I cut the end off of a metal filigree jewelry part and placed it over the bulb to see if it would mute the glaring light from the bare bulbs, but still cast enough light. You can see it above in the branches of the tree by the windows. I think it succeeds in muting the light, and casts more wonderful shadows on the ceiling, but the question remains about whether it leaves us with enough light in this room! This is a Dark room, and all the trees are supposed to be spooky and minimally lit... and I have always felt that the bare bulbs need a shade of some kind.

In this picture you can see the sconces over the mantel are also on, but without any shades, they are a bit more glaring and make it hard to see the other features of the room. (One of the difficult features of this room is that the fireplace wall is angled away from the open side of the room, making a direct view of the fireplace impossible except through the windows on the side wall.)

And here is that view from outside, at night, with the sconces on.... 
the light is dim but at the same time too bright to see past the glaring light bulbs!

And another view of the mantel from the open side of the house....
this is as much of it as can be seen from this side!
I think I am going to try the "lampshades" on all the sconces and see how it looks....
but I only had the time to make the one shade so far!

I do like the effect of the one "lampshade" 
and I guess I will just have to wait and see 
whether we can still see enough when they all have "shades"!

The other thing I accomplished last weekend, Dear Readers,
was to glue a couple of additional boards onto the bed frames 
for the Cloud Palace Bear-Racks!

This is how it looked at the start of the weekend.....

And this is how it looked by the end of the weekend!
I think it makes the beds look much cozier!

This is a close-up of the lower bunk..... 
there is a shelf for bearsonal items....

And here is the upper bunk.... there is a shelf here too,
but the picture is a bit too dark....!

Hamish Harry has come to inspect the bunks!

He has even found a temporary pad to give it a try!
(There will, of course, be proper mattresses and bedding soon...!)

I think Hamish Harry looks Happy with the accommodations!
But I still need to build the bed for the loft ....

Where Brother Beorn will have his own Bearsonal Working space...
He is very patient!
 
So, Dear Readers, between the Bear Racks and the sconces,
I think you can see 
That there is not much to see at all!