Showing posts with label The Folly Glass House. Show all posts

Monday, October 3, 2016

Window Panes....


Painstaking Progress....

Windows were the big topic in my Worlds both Large and small, Dear Readers, as I faced the truth of Autumn's arrival in this part of the World. The day had come that I must bring my houseplants back indoors for the Winter, thus requiring me to rearrange all my Dollhouses to allow the plants to live in the sunny Windows! Alas, this means that the Conservatory has been shifted onto a chair in the corner of my Sitting room....


 And the Cloud Palace has Drifted up into the higher elevations 
of my tiny upstairs Studio!


 So that the plants can live in the sunny... (or dark) Windows!
It always makes me keenly aware of the Seasonal change...
 the oncoming Dark and cold.....

The closing of the windows.
The closing in of the year.
And with all that shuffling and rearranging.... 
the even more difficult truth that several of my projects 
were Larger than they were this time last year!
This is the natural result of trying to complete the foundations and bases....
which makes them a little bit larger 
and much harder to move and fit into corners.... 
here in my (too) small house....!
So while I was lamenting the necessity of moving the 
dollhouses away from the sunny windows,
 and struggling with where they should sit....
I was also slowly adding muntins to the windows of the Glass House....
One piece at a time.


Here you can see the beginnings.

I started with the cross pieces and then added the vertical muntins.

And on the door too.
Slowly measuring, cutting, sanding to fit, then gluing in place.
One piece at a time.
 
And you might have noticed, Dear Readers, that 
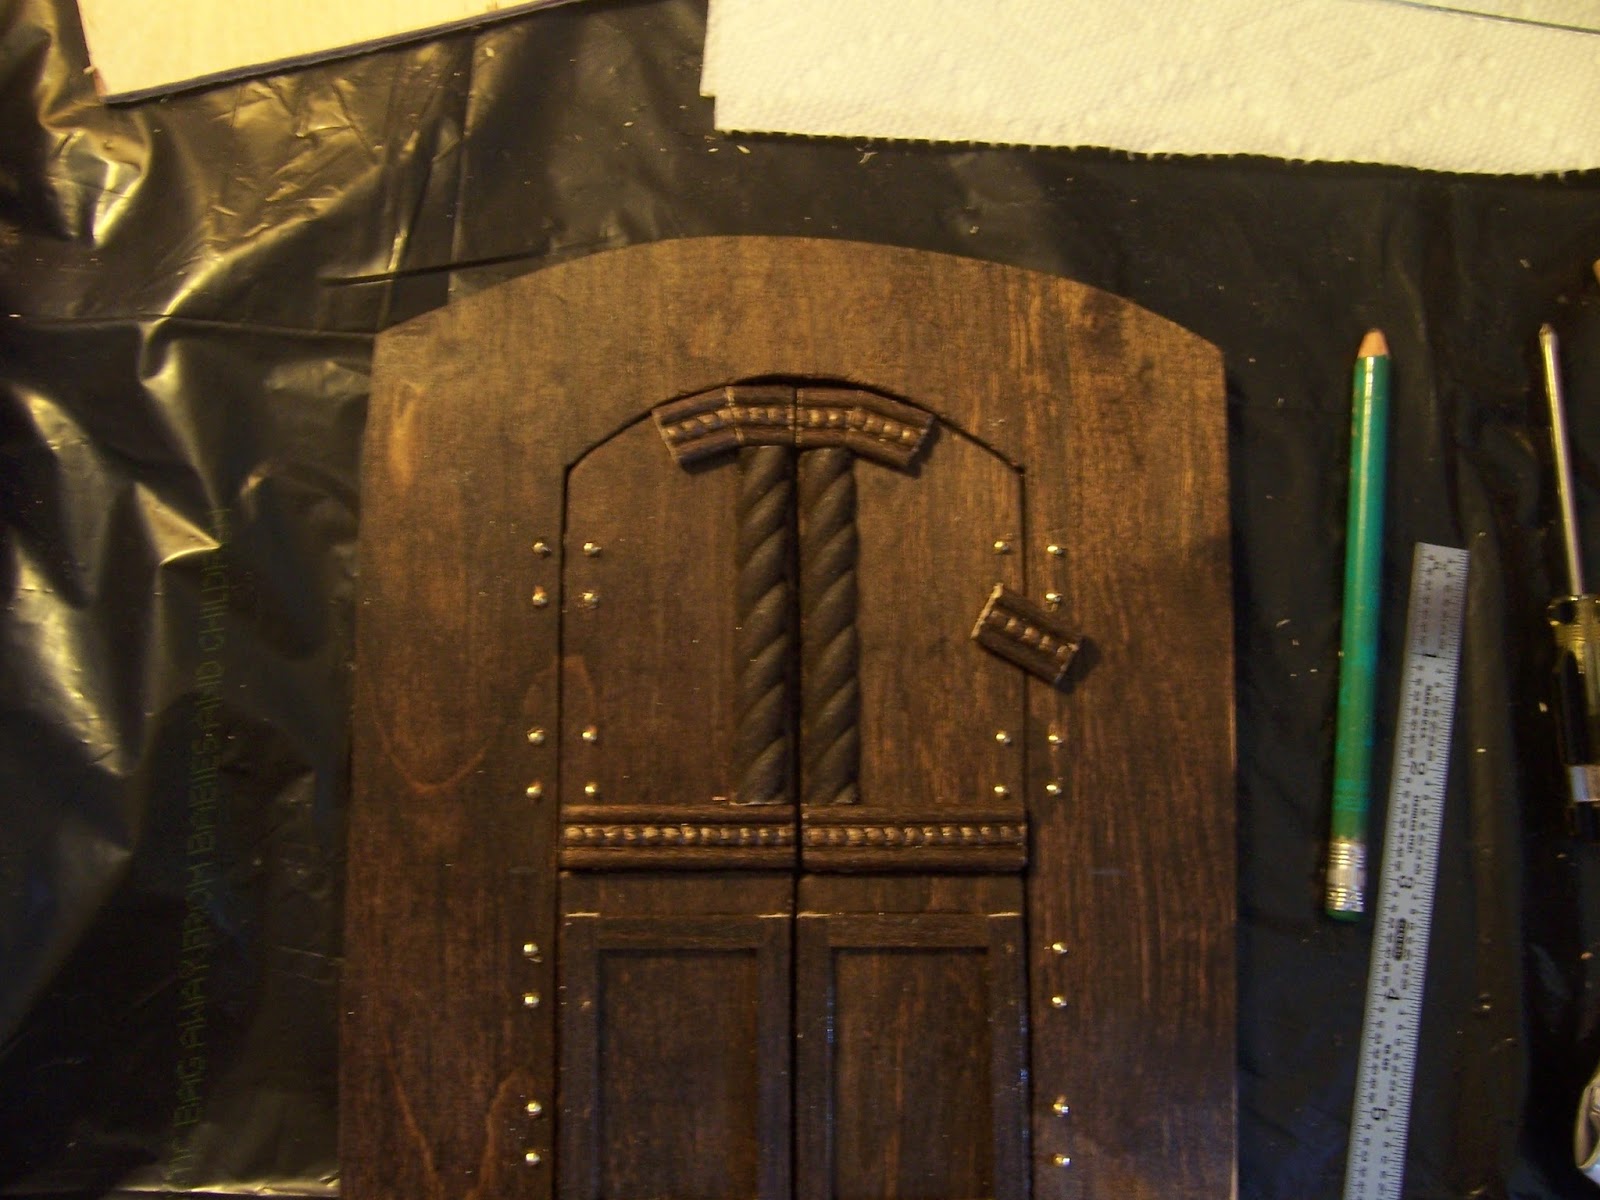
The Gypsy Caravan also got a set of front doors.....
Which needed to have windows cut into the upper half of each door.

These kits don't come with the doors, 
so I have cut them from plywood.....
Stained them the dark walnut color...
And attached them with hinges.....
(Can you believe how many hinges it uses????)
 
I really do Love these hinges! 
They are a bit large... 
but they are sturdy and will put up with a lot of use!
They will eventually look better..... 
aged and partly concealed by paint and trim.

(And the ends of the screws where they stick through 
the wood will be covered with more trim.)

But I do love my doors to open and close!
And the front doors really did need to have windows!
Now I only need to decide if I am making them with real glass...

So you can see, Dear Readers, 
my Painstaking Progress...
Making little Window panes!


Monday, September 26, 2016

Thrifts and Gifts


High and Dry In The Desert.....

I could not help but Wonder, Dear Readers, how a tiny sailboat came to be resting in the Desert Mountains of Southwestern New Mexico, where water is scarce, rivers are small and sporadic, and the very air pulls moisture from your skin! But there it was, on the shelf in the back room of the Thrift Shop where my Mother volunteers, and the minute I saw it I knew it had to come home with me. I could not promise it the wide Oceans, but I could imagine it on the shores of a gentle stream.... or fishing on a pond... or the shores of a lake... so many possibilities to Dream of, and all so tricky to build in miniature! Perhaps I felt a kindred spirit, having spent so much time in my youth sailing small boats and frolicking in the sea.... I always feel a little high and dry in the Desert lands! So it came home with me!  And that was not the only Treasure I found on my Travels.... there were several other small items in the Thrift Shop.....

The most noticeable being the bright red basket Baby Carriage 
which is actually a Christmas ornament!
And the cutest being the goggle-eyed Pup made from seashells......

Or maybe the flocked Moose key-ring.....
And the black Fraidy-cat!

But that was just the beginning, Dear Readers, 
because I was also Given a whole pile of Gifts
by a friend of my Mother's who used to make 
miniature dolls a number of years ago and had
 a whole collection of supplies to donate to me!

Everything from wooden horses and Christmas trees.....

To buckles and tiny buttons....
 
To a hand made hobby horse....


and a collection of old metal Monopoly pieces! 

Not to mention a Beautiful little Native American ceramic pot.....

And a gorgeous Guatamalan woven piece of cloth!
What a Treasure Trove of gifts!
Thank you Sarah!
I will have a lot of fun playing with these!
 
And once I was back home, Dear Readers, 
you can imagine how eager I was 
to visit all my projects with "New" eyes... 
a fresh perspective .... a renewed eagerness...

And with little time and even less effort.....
Brought water to the Folly Glass House....

Pieces that have been waiting for ages.....
and "say" so much!

And with the first frost of the season last night,
 it might be time to turn up the heat in the Glass House...
So the plants won't freeze!
(Every Glass house needs a good thermometer!)

Well, Dear Readers, I had a Wonderful visit with Family 
and safe travels there and back again.
And Between the Thrifts and the Gifts 
I am not at all High and Dry, 
But enriched with Treasured memories 
and renewed Spirit!

Tuesday, September 6, 2016

Glass House Glass....


Invisible Progress.....

Have I mentioned, Dear Readers, How much I Love it when the sun comes to play in my mini worlds? Sometimes it seems as though I can barely catch the brief moments when it illuminates my little worlds so brilliantly! Saturday was just such a morning and here you can see The Folly fully lit in the morning sun! But it was moving fast! I had to be quick with the camera!

Here you can see the Glass House fully lit by the sun... 
Before any glass was added to the windows!
I was able to get some glass panes cut on Saturday 
and immediately started fitting them to the window openings.
It is not as easy as it sounds! 
If the glass pane is just a fraction too large,
 you have to carve away the wood frame to make it fit.
But it really went very well.

I was easily able to cut and install the front windows.
Can you see the glass panes? No? 

How about now?
At least you can see the reflections in the windows! 

Here you can see the Glass House framework is removed from The Folly base 
so I can attach the glass to one of the window openings.
The window frame on the exterior is made a little smaller than 
the opening in the wall so it holds the glass pane in place on one side.
Once the glass pane is inserted in the opening, 
I add interior trim inside the window opening, 
which holds the pane securely in the wall.
In the above picture you can see the interior trim 
has been added to the rectangular window, 
while the triangular one still has not been fitted with glass.

Here we are on a sunny Sunday morning, 
and you can see I have drilled the screw holes for the roof sections
 so they can be firmly attached once the glass panes are added.

And here you can see the interior from above... 
with the rear glass pane being tested for fit.
Yes, there is already an old workbench in place, 
and an antique stove for heating the Glass House in winter!

Here you can see the roof panels removed for
 painting the trim edges prior to adding the glass.
Because the glass is "see through" you need to paint 
the inside of all the openings because they will be 
visible through the edge of the glass!
You can see the opening side of the roof is smaller than the front side.... 
this is so it can swing open past the roof eaves of The Folly!

Here you can see the roof panels in place..... 
with the glass installed!
Can you see the glass? No?

And here you can sort of see the end triangular window also in place!
Or you can see the window frames.... if not the glass!

There is only the tiny back wall window 
still in need of getting the window pane installed...

Here you can just see the opening through the doorway....
I will have fun cutting that window glass!
And then all the muntins need to be cut and fitted to each window.
So it is still a while before the Glass House will be finished.

But the sun came to play again, Dear Readers!
Just before sunset it reached into my work room from the west.....

Shining on The Folly Tree House in such a way.... 
I almost never see this!

Shining into the Salon through the tiny window in the stairwell....

Where there is a flower vase on the window sill.....

And shining through the dressing room window.... 
glimpsed from the Chinoiserie bedroom....

Shining through the lost marble window....
I know, it is hard to see these tiny rays of light....

And even shining into the bath chamber
 through the window in the toilet stall....!

And lighting the Dressing Room with the door opened....
Catch it before it is gone!

And glancing through The Folly bay window......
showing off the details we usually can barely see!

Well, Dear Readers, there really is not much to show 
for my three day weekend of work!
That's the problem with glass....
Invisible Progress!


Tuesday, August 30, 2016

More Progress.....


It's a Lot about the Hinges..... And a Little about the Paint...

I hope you will not be Surprised to learn, Dear Readers, that my solution to the colors for The Glass House involves More colors rather than fewer! All I had to do was step back (morning light helped me to see too!) and really look at the addition to The Folly in order to realize that it lacked the lovely Raspberry color in the trim! This was easily solved by adding the extra trim at the top and bottom of the facing wall! And I also decided that the door needed to more closely copy The Folly door, which was primarily the light blue with some dark blue accents.

Here you can see I am testing the Raspberry trim....

And with a glimpse of The Folly door.....
 
Here the trim has been attached 
but the darker blue on the door has not yet been added....
 

Here you can see the door with the darker trim...
And the windows will all get the light blue muntins once I get the glass....
Which is harder to find than I thought!
(I have to go to an old fashioned hardware store 
where they will cut me some panes of glass... 
not try to sell me a new window!)

(Sorry this shot is a bit dark again!)

And while I was waiting for those many coats of paint
 to dry on those tiny pieces of trim....
I was also playing with more hinges....!
Because, I must confess that I have embarked 
on another whole project that will not be quick to finish....

Well, I hope you will understand that 
the Gypsies must have their home!
(Please do not tell me you are surprised!)
And I know it will take me a while to get it ready.....
So the sooner I get started......

This kit is available from Lea Frisoni of  
and it gives you the basic starter pieces. 
But there are some parts not included in the kit that must be added, 
such as the doors and partitions and hinges!
So there is plenty of room for individual creative expression!
 You can see I have cut my interior partition for the sleeping area
 and am adding the hinged doors!
(You know how much I Love hinges!)
And because the hinge screws stick out on the back side, 
I am adding the decorative trim to cover them.

Here they are covered and the doors are closed.

And a view into the Caravan with the top doors open.....

And a little bit closer.... It is dark in there.... 
because there is so much still to add!
But you can see those hinges work!

And lest you think I had Forgotten, Dear Readers, 
all about Pollyanna's Attic dollhouse workroom....
I finally made some progress there too!

Most of the "Attic Stuff" has been cleared out and put in storage...
But the major improvements have to do with the walls themselves.

In case you did not know, Dear Readers, 
this house was built by my Grandfather 
for my sister and me when we were very young. 
And the original design (designed by my Father) 
left the attic all one open space with the stairs coming up in the middle.
(We used to lie down in it when we were little!)
When I was attempting to update it in my teen years 
(adding real windows and doors) 
I also tried to add walls in the attic to make separate rooms.
This was not easy, and I settled on the method you see above 
of adding "beams" that would hold the plywood walls in place. 
This was done by screwing them into the floor 
and the underside of the roof 
in pairs that would bracket the walls. 
This would make it much sturdier than just using glue,
and I had no way of routing channels into the wood instead. 
As the years passed, the plywood walls were lost, 
but the bracket beams stayed in place!
And when I started to rebuild this House a few years ago, 
I changed the way the stairs enter the attic, 
so now they turn in the middle and take up less of the attic space!
Which means the rooms could be larger... 
if I moved those wall bracket beams! 
I had already cut new walls a few weeks ago....
but neglected to take any pictures!
 
This is the other end of the attic, 
(where Victor and Joanna sleep when they visit)
 and the wall had been positioned just between 
the desk and the bedside table... 
you can see the dirt marks on the floor!
There was an additional set of brackets where the wall now is, 
(because originally all those years ago  
I had thought there would be a small closet in the hallway....)
So I simply removed the extra set of bracket beams....
and re-positioned them on the other side of the attic stairs....

Which allowed me to move this wall over two inches! 
I still need to remove the extra set of old brackets...

But here is the new wall in the new position, 
allowing Pollyanna much more room for her dollhouse workroom!
And because I was so busy adding hinges to all my doors....
I had to add them to the attic doors too!
So the doors now have their hinges!

And the stairwell no longer takes up too much of the attic!

So you can See Dear Readers,
With a little bit of paint and a whole lot of Hinges
I made some good progress!