Saturday, December 23, 2017

Deck The Halls.....


Finishing Touches....

It is almost Christmas Eve, Dear Readers, and in my eagerness to get the Secret Christmas House done in time for Christmas, I almost neglected to prepare any of my other dollhouses! So I hurried around today and made sure the trees were put up. Charles is admiring the same old tree in the same old corner of The Lovely Old Dollhouse. There is still a little time left for last minute preparations, but he is telling Helen she must not go out in this weather... it is too dangerous! It has been freezing rain all day and everything is covered in ice!  Helen is telling him she doesn't have any more shopping to do anyway, so she is happy to stay home and admire the tree. I must admit, I never get tired of seeing these mini tree lights go on!

The Silver Tinsel Tree has been put up in The Cloud Palace...
It is decorated with Golden "Wishing Stars" 
which are the Specialty of Blue the Blue Fairy Beary.
Sometimes just looking at the stars is enough to grant a fervent wish... 
So you better be careful!

And Brother Beorn has invited Sweet Pea to join him
 on the Palace Tower Garden Top 
to admire the "Christmas Beacon Pines"!
(Surely, Someday this Tower Garden will get finished!)

And since I left you wondering whether I would
 make a better tree for the Secret Christmas House,
 I had better show you what I have managed to do!

Here is the humble beginning... a mini "bottle brush" tree 
next to the paper version that came in the kit.

I started by trimming off all the fake white snow...leaving a narrow brush tree.
(I actually made it narrower than this but didn't take a picture.)

Then I coated it in glue and rolled it in some "landscaping material" 
which was left-over from the Tiny Garden kit I made last winter.
I thought it looked wonderful as is... 
but the color is just a bit too yellow for a healthy Christmas Tree!

So I painted it a richer green...
Which did start to make the texture a bit too "clumped"....
So I used my exacto knife to cut gaps into the shape...
but I am afraid you cannot see the difference.

And then I wanted to see if I could make some 
tiny "berry" garlands out of tiny nail-art beads.....
I spread a thin line of clear gel glue along the plastic surface
 and "roll" tiny beads into it and let it dry thoroughly.

When they are dry I glue them to the tree!
In order to see how this will look in the Parlor, 
I have to cut the tree from the thick wooden base...
 
It is just leaning in place to get a sense of the size....

Here I have added some tiny beads for Baubles....
(I am not sure they are tiny enough!)

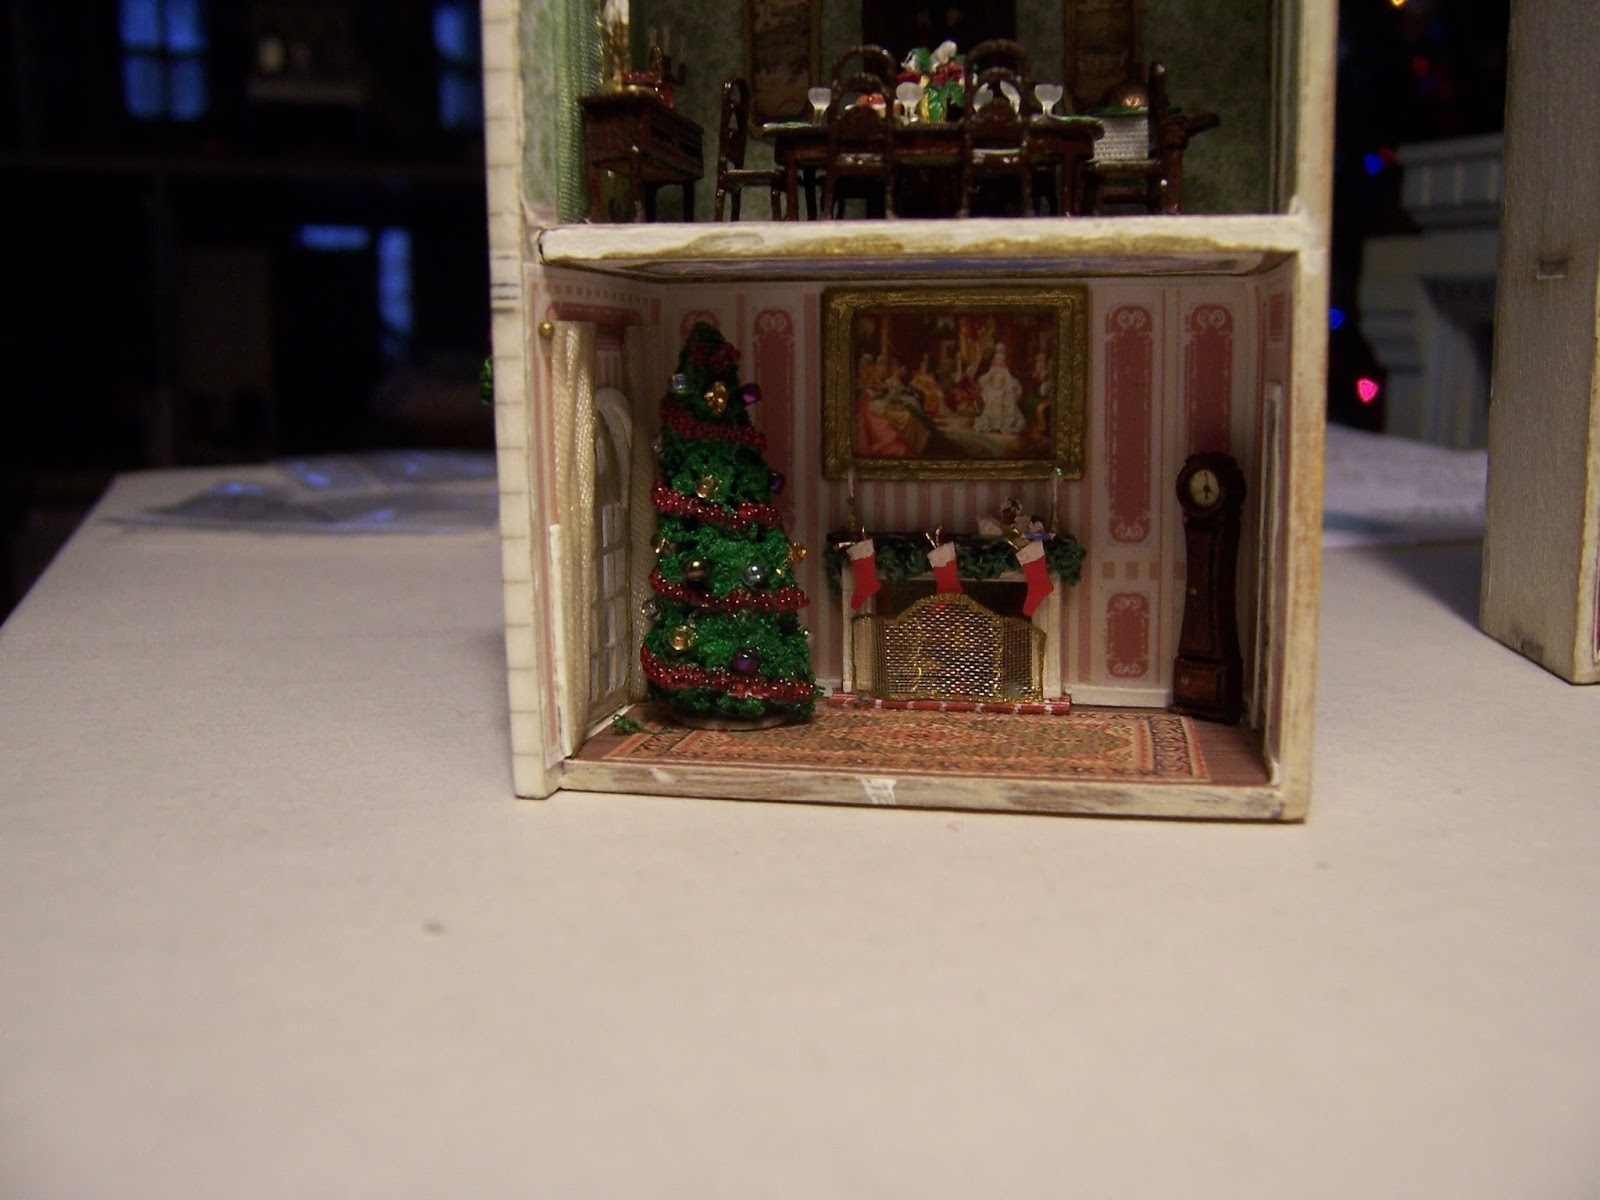
And of course, I have to keep testing it in the Parlor
 to see if I am getting anywhere!

And I have to compare it to the paper tree...
 to see if I am making any difference...
It is cute... but not there yet!

And while I am debating and Dithering, Dear Readers, 
Pollyanna has gotten involved in another Teeny-tiny project....

It is a Tiny Dollhouse kit by "Young At Heart" 
that I picked up last year at the Sturbridge Fair...

(I had to give Pollyanna some help... 
she doesn't have the right tools yet!)

I painted the floors red..... 
because the Lovely Old Dollhouse has red floors... 
and this reminds me of the Lovely Old Dollhouse!

With the remaining floor and side added.... 
not as easy as it looks! 
(I don't have the right tools yet!)

We are making some progress!

I painted it white and added the roof....

Oh, I LOVE this tiny House!!!

Meanwhile, Dear Readers, 
I have decided that I simply Must try to make 
some Itty-bitty candles for the Christmas Tree...
The paper version has them, after all.... 
and I have always adored a candlelit tree....
(I forgot to take pictures of the progress... 
but they would have been too small to photograph anyway...)

Can you see them here?
They are made of glue-stiffened sewing thread cut very short, 
with an end dipped in super fine glitter... 
and the bottom end glued to a piece
 of gold "glitter" (the ordinary kind).....
I am sure you cannot see all the bits in the pictures....

Testing it in the Parlor... 
I think the candles add a wonderful layer of detail!
And even though you cannot see it in photos, 
in RL the candles do sparkle!

And there needs to be a gold star on top!

And then I decided that I really did need to "touch up"
 the edges of the Creche figures... 
where they were cut from the card left some white showing
 that was very distracting... 
so I painted the edges of the angels
 with gold on the wings and
 blue and green on the gowns...

And then Finally.. glued it to the mantel!

And the Tree too.... glued in place!
(Oh, I also added more pieces of red "glitter" for baubles...!)

We are nearly done.... 
But the gifts are still not all wrapped!
(I may be running out of Time!)

But it is Christmas Eve...
 
Over at The Folly, 
Will has put up the little Creche....

Such a simple vignette, but so moving....

And in the Lovely Old Dollhouse too...
The usual creche is in the usual place...
(Although no-one can ever remember on which side the camel sits...)

Yes, I may be running out of Time, Dear Readers..... 
but that is nothing new.... 
(even when the Holy Baby was born... they were not quite ready...!)

So I am still Decking the Halls,
 and wrapping the gifts....
Adding the Finishing Touches.....
And I am still drawing the Christmas Card....

But Christmas Comes!
May you All have a blessed Holiday!

Monday, December 18, 2017

Another Teeny-Tiny Tree.....


Lost In The Details Again...

Some of you, Dear Readers, might be aware that this is the time of the year that I am trying to draw my Annual Christmas Card, a process that always takes me longer than I think it should, and that I have been doing for more years than I care to mention! It is a tradition that I can't bring myself to ignore because the drawing always includes images of my life during the past year, and has become a bit of a Journal of the Family through the years. (If you wish to see previous years' versions, they are listed in my side bar under "Christmas Card"!) So It is currently on my drawing table, being carefully worked on in all my spare moments... or almost all of them! I will admit that it will be Late again this year, in spite of my early start and my best intentions! Part of the problem might have to do with the Incomplete nature of The Secret Christmas House kit which I have been working on much of this year! One might suppose that this House would be included in this year's card..... if it were only finished enough to draw it correctly...! So which should I do first.... draw the card with an unfinished "Christmas House" or finish the House and draw the card Later.... possibly much much later? Well, while we ponder that question endlessly, I will confess that On a recent "Snow Day" while I was home from work because of a snowstorm, I decided to see if I could make one of those Tiny little additional pieces for the Secret Christmas House that were not a part of the original kit. I am sure not many people would think there was anything missing from the Dining Room as the kit was designed. In the above picture you can see all the parts in place (temporarily of course) and I have to admit the back right hand corner of the room looks very empty to me! I have been wanting to make a Tiny "carving table" ever since I noticed.... and really ever since I decided that the table needed to have plates and a basket of rolls and possibly a platter with a roast on it.... Where would the roast fit? So I started to build a Tiny carving table.....

From toothpicks and cardboard....
You will have to be patient here... it really looks rough...

And I wanted it to have wheels.... 
so it could be rolled in from the kitchen....

It looks a little better with a coat of paint!

And then we have to test it in place in the Dining Room 
to see how it fits..... with the covered platter too!
(It took me ages to find the piece of trim in my stash that had these
 little metal half moon pieces!)

Then I had to add the table to see if it all would fit and still be visible....
But the carving table was not done yet....

It needed a handle for pushing it and a cloth to catch spills!
 
And then I Know you will think I am just procrastinating, Dear Readers,
 when I should be just getting on with the Christmas Card... 
on this Snow Day...
But there was another Little something that I thought I needed
 that wasn't part of the kit...
 and might not take me too long to make....

I thought the Library needed a ladder... 
(How else was one supposed to reach the books on the top shelves?)
I made it from cardboard. 
I know, it looks rather crude.

It was actually a lot harder than I thought it would be 
to make it appear even and level and well spaced...! 
(Don't look too closely!)

Then I decided it needed to be shorter.... 
so it wouldn't overwhelm the library! 
I trimmed a step off the top.

Here I am testing the arrangement in the Library...
Well, it is a small room!
And then I decided the ladder really needed 
to have some Christmas decoration....

So I made another Teeny Tiny Christmas tree to sit on top!
But by now it was night and the snow was deep outside....
 
 Had I really spent all day on just these two little pieces? 
(Well, I did make Some progress on the Christmas card... 
but I can't show you that!)


Here I am testing the carving table in the Dining Room again.
But I couldn't even finish gluing these pieces into the House
 because there were still a few missing details...!
(Which I couldn't get to until the weekend.)
I thought there should be a carving knife and fork on the table...
 
I hope you can see them here....
 
I know... you can barely see them on the table, 
tucked under the edge of the huge platter.
But yes, I will know they are there!

And finally, it is time to glue the Dining Room furnishings in place!
The carving table goes first at the back of the room.

And then the two chairs on the far side of the table....
This is harder than you would think... 
they only get tiny dots of glue on those tiny chair feet...!

And while I am waiting for the glue to dry thoroughly on each piece,
 I am also adding a couple of books to the Library...
On the steps of the ladder... 
waiting to be re-shelved after the Holidays!

You can see them here.... 
just colored paper with cardboard for the pages.

And I glued it into the back corner of the Library!

And the Globe too... positioned where it can be seen behind the table....

With the glue still visible on the table legs!

And now the desk chair..... glued in place!

And the Dining Room table too....!

No I have not gone Nuts with the gluing... 
This was so I could glue the chandelier to the ceiling!

See? 

And the last two chairs in the Dining Room!
Oh my! Can we call this room finished?

And the second chair in the Library! 
Is this room done too?
Which brings us to the Parlor, Dear Readers....

Where there are undoubtedly a few details still to add...

Like a firescreen for the fireplace....
(I would not want embers to roll from the fire!)

And now it too is glued in place!

And is it time to try the Christmas Tree in the room?
I assembled the printed paper tree as the instructions say. 
It has "branches" cut from the cone 
that bend out to make a more three dimensional shape.
The kit instructions suggest embellishing the tree 
with more beads and ribbons and glitter... 
but I am thinking there needs to be more than
 just a little "embellishing" done!
O dear.... I wonder where this Tree will take me?
And with so little Time left before Christmas....?
Well, Dear Readers,
 I may have to make one more Teeny Tiny Tree....
And Doubtless, I will get Lost in the Details!
And as for the Christmas Card....?
I'm working on it!