Monday, April 30, 2018

And Even More.....


No End In Sight.....

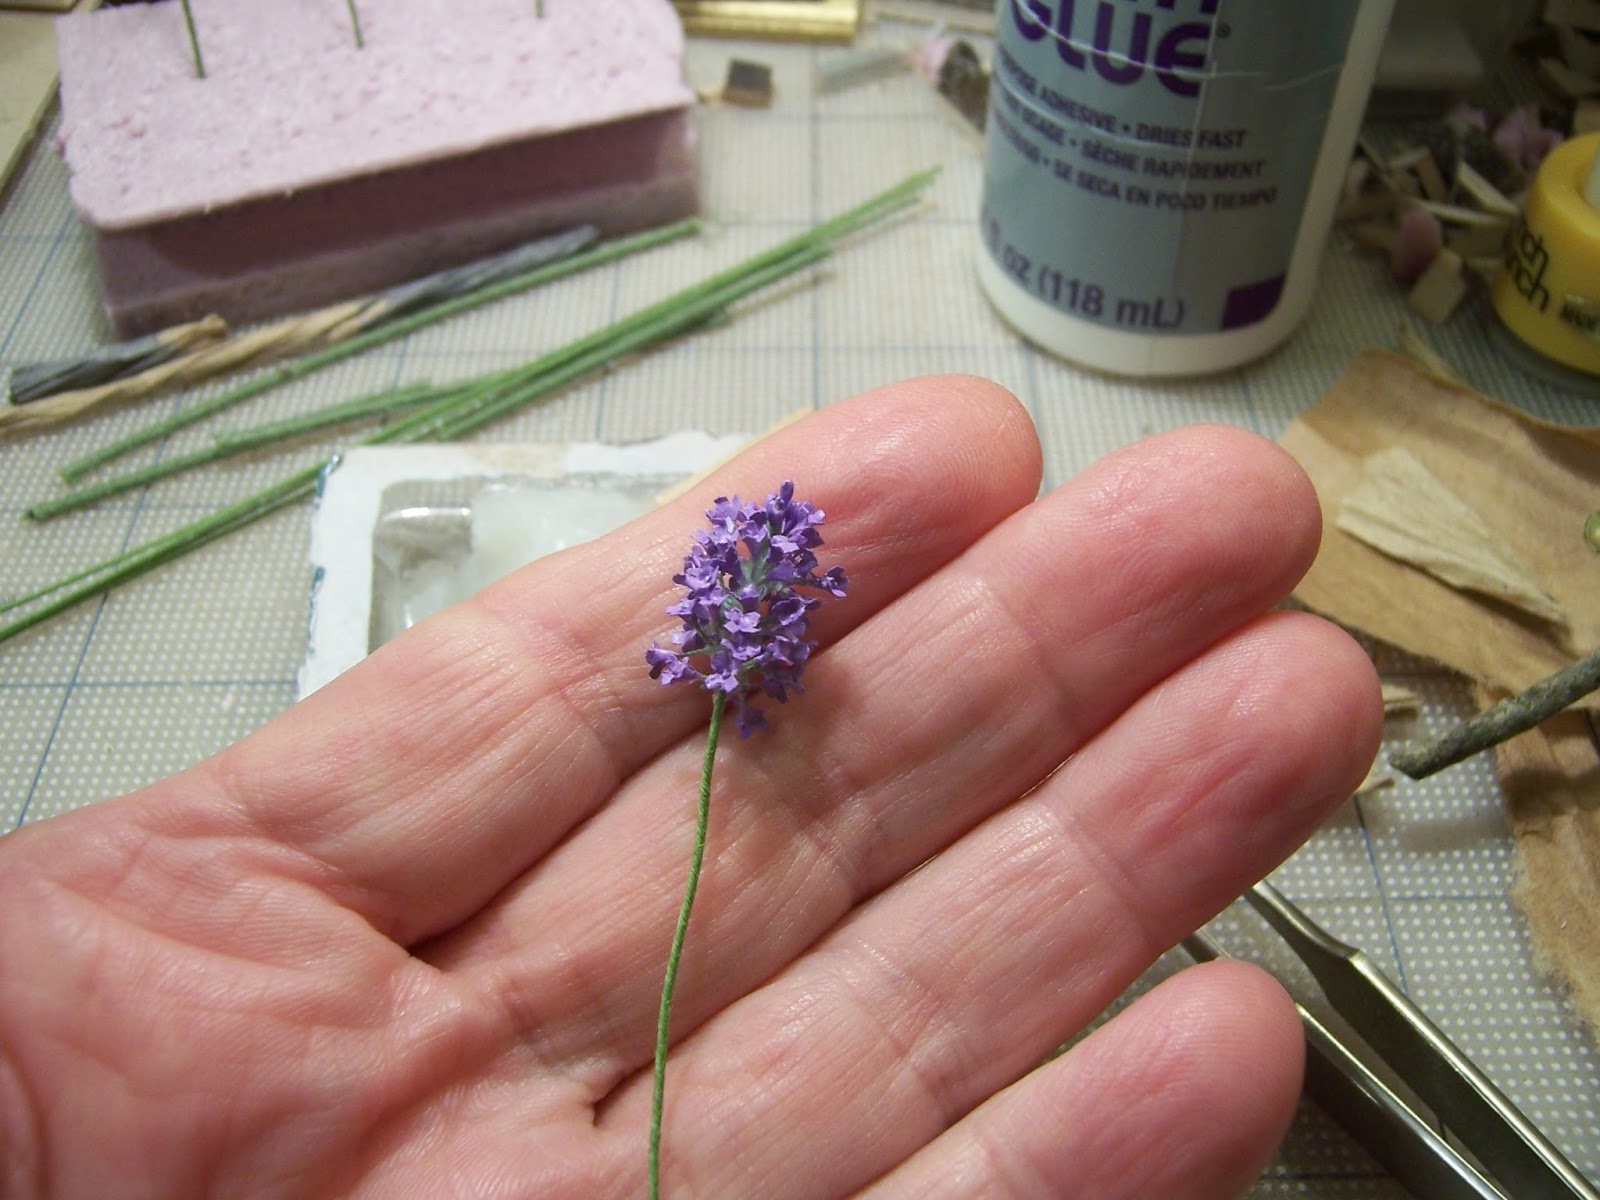
I Am Certain you will get bored, Dear Readers, if all I show you are Teeny Tiny updates of the Petit-point stitching project, and endless updates on the lilac blossoms! I have managed to add a few stitches (maybe as many as 60) to the cream background, and when held in front of a dark surface, you can actually see where they are! There is a long way to go still with this project, but I enjoy working on it in little bits. And I managed to get Almost two blossoms of the lilac finished this week... I was really hoping to manage two... but real life gardening got in the way. At Last I was able to work a little more in the real garden, uncovering the beds after this very long Winter! So the mini projects were fit into the spare minutes this week, and there is not much to show! As I said, I finished one more blossom and florets for the second, but did not get it assembled.


I am gradually getting the "production line" figured out...
making the clusters all at the same time...
But still, the gluing and waiting for it to dry takes time....
 and I have yet to figure out just how much time it takes
 from beginning to end for one blossom!
So rather than Bore you with Blossom production lines....
 I thought I would "revisit" a few more of those Old Unfinished Projects.... 
because Birgit was kind enough to remind me
 that I had not mentioned ALL of them!
Well, one of them that Most of you are familiar with is Hardwick Hall....
 and my Mother mentioned that it is also
the name of an ancient House in Britain.... 
which I was aware of... 
and must say that this House is No Relation
 of That Hardwick Hall....
 or if so, is of such distant and diminished cousinship
 as not to matter at all!
 
Here it is in its current unfinished state....
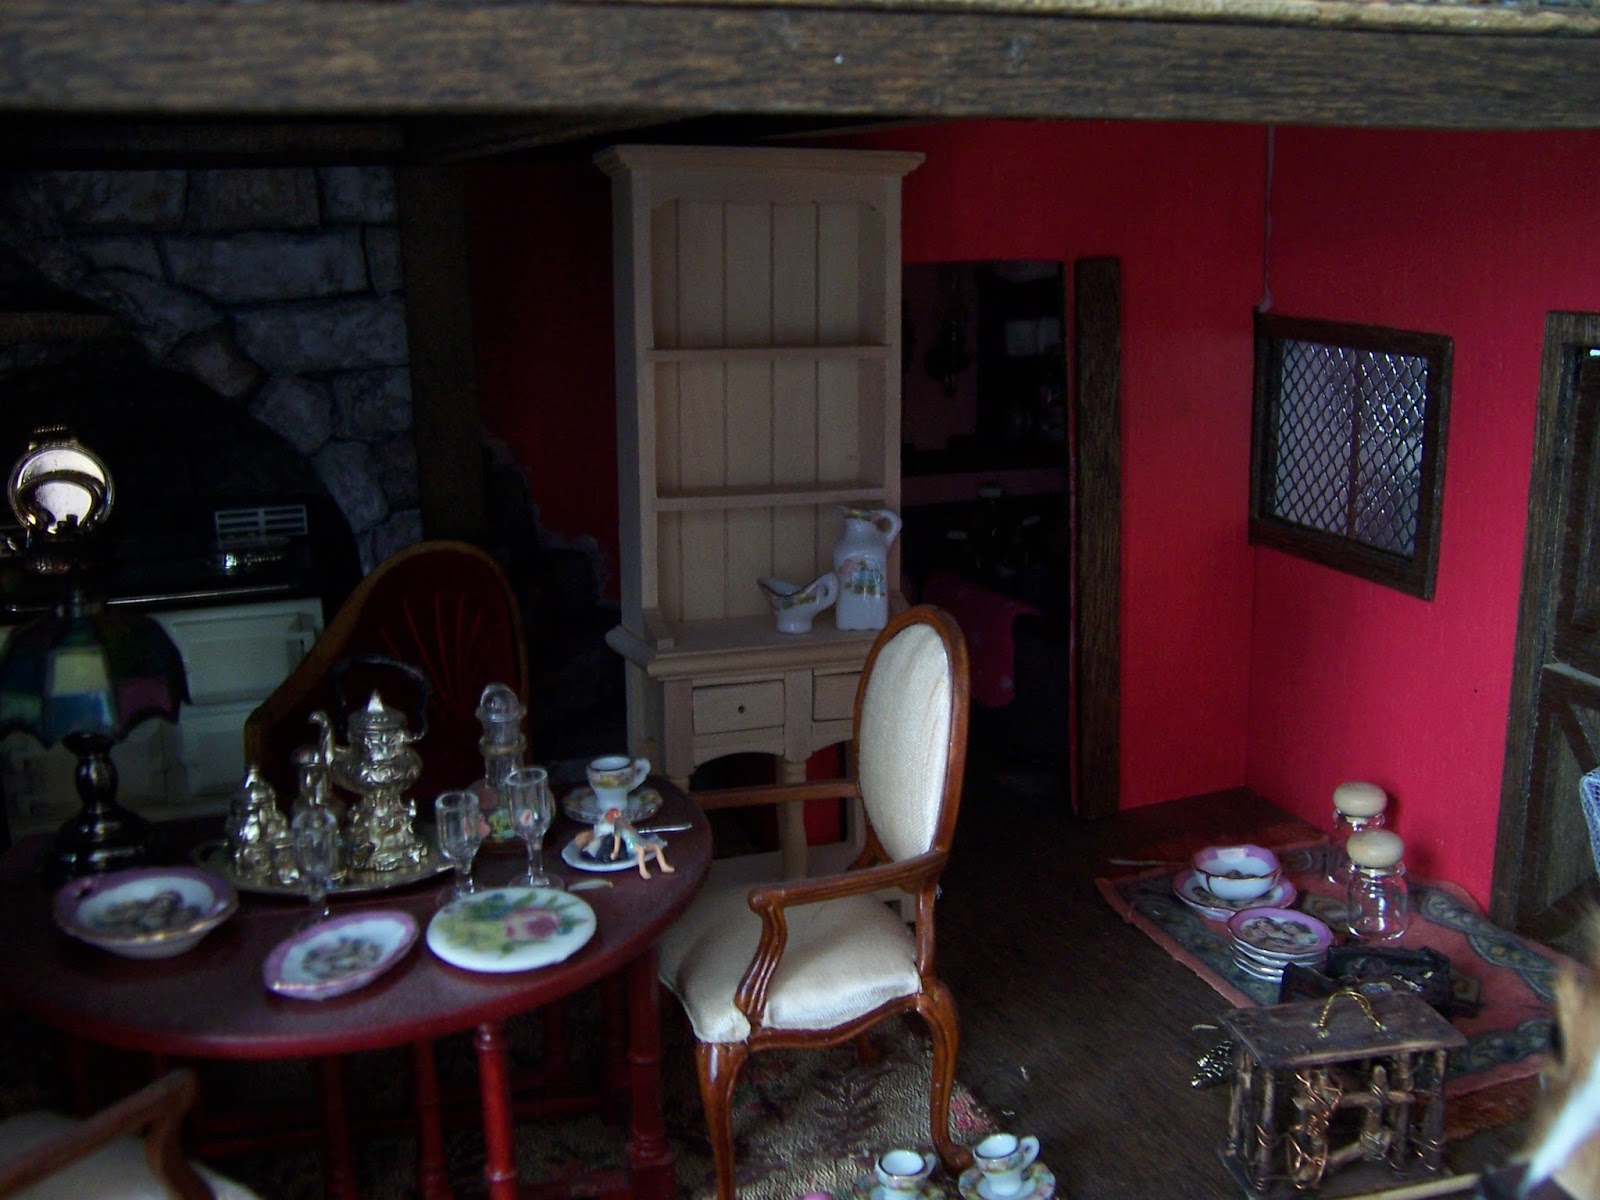
But I wanted to show you more of the Kitchen.
My Mother had also recently mentioned the Fridge...
saying it was exactly like the one she remembers
 from her childhood home back in the thirties!

I wasn't sure I would be able to find a fridge
 small enough to fit in this kitchen..... 
and was prepared to try to build one...
But I really think this one is perfect!
I will need to build a small cabinet to fit in the corner beside it.

This is such a wonderfully detailed miniature... 
heavy cast metal... with working door and removable shelves!
 
And there is still room for a work table too!
(And we won't mention all the unfinished wiring
 that still needs to be done before
 the hearth wall can be fixed in place....)

And you also have recently visited Rose Thorne Cottage.....

Which sits beside my drawing table.....
(For the Winter at least....!)

Where a teeny bit of light has been
 cast into the incomplete kitchen..... 
with the discovery of the perfect hutch...!
(Who knows how long it will take to complete this...!)
And speaking of Kitchens, Dear Readers, 
perhaps the most complete kitchen I have
 is the one belonging to Sally May and Chip...

In "The Shabby Sister House"....
Which is very similar to "The Lovely Old Dollhouse"
only it needs even more work done than 
"The Lovely Old Dollhouse " ever needed!
But don't worry, Sally May's husband Chip is a builder, 
and he assures her it will not be long before it is all fixed up!

And in case you wondered, this house
 has a remarkable ability to live in two different "eras"...
 it also houses Tommy and Beatrice and Caroline's Family
 while their "Town House" (The Cupboard House) is under construction!
They are Living in 1852, in case you wondered!
I am afraid the living conditions are bit primitive....
 there is still no electric lighting and no indoor plumbing!

And let us not forget that the Glass House 
beside The folly is also still unfinished....
No hardware on the doors, no trim on the roof windows...
And I need to run the wiring for the light ....
 which is one of those after-thoughts
 that can cause all sorts of problems!
But we will leave that for another day...
Because that is not all!
Surely you remember the incomplete Gypsy Wagons!

Both still under construction.... 
because the interiors really need to be done
 before you glue them together!
 And the interiors need to be so different...

The Fortune Teller's Wagon....

And The Tinker's Wagon....

The Interiors are only just begun.... 
with the Fortune Teller's having a Night Forest
 painted on the Sleeping compartment walls.....

And The Tinker's Wagon has horses frolicking in a meadow....
Yes, there is a long way to go before these Wagons are complete!
 
And let us not forget that Pollyanna herself 
has a few unfinished projects....

Piling up in her Not Yet Finished Attic Workroom.....
And there is even a whole Wagon full 
of Teeny Tiny Ladies seeking their Homes....

They were hoping to find something suitable
 amongst Pollyanna's projects....
 but now they are not so sure...
And need I remind you that the two youngest sisters
 of Lady Evelyn de Paradise are still awaiting their gowns?
And as for forgetting (or overlooking)
 a Project or two....
 I sometimes have trouble determining
 where one project ends and the next begins.... 
So the Wizard's Cave under The Castle... 
is or is not part of The Castle Project...?
And yes... the Stories....
They seem to have No End...!
(Will Tiny Bear Ever find the Little Dolls....? 
Will the Little Dreamers Ever find their Home...? 
Will Daphne's Story Ever be finished...?....) 
(Who knows these answers...?.... Not I!)
Ah Dear Readers, I hope I have not bored you
 with this little Tour through Time!
 
And did you want to see the fourth completed lilac blossom?
 
These tiny blossoms might be taking up all my Time, Dear Readers,
But I can promise you there will be More and more... and more!
And There's no end in sight!
(Because I wouldn't want you to be Bored!)


Monday, April 23, 2018

Blogging Still......


Where Have They Gone.....?

You Might not remember, Dear Readers, the condition of The Lovely Old Dollhouse when I first began to re-build it way back in 2009, before I had even discovered the world of Miniatures on the internet and had no clue about blogs! The above picture shows it shortly after I had begun the rebuilding. I had decided to add a few fireplaces and had begun to rebuild the stairs and then discovered electrical lights at a miniatures store nearby.... and my world was changed! It was not long before I was searching for mini lighting on the internet and stumbled upon the world of blogs.... miniaturists from all over the World at one's fingertips! I was smitten! And only a little while later, with the help of my tech savvy sons, I started this blog... my own contribution to this fascinating international exchange had begun! You might wonder why I am suddenly waxing nostalgic here.... and it is for two reasons. One is that a blogger I admire and who had not posted in a long time, posted again the other day... Helene at Pubdolls.... (please go on over and say Hi to her! ).... and she mentioned that she would have to have a look to see what I had been up to in her absence from blogging! My first reaction was to cringe..... how could Anybody Possibly review all of my... how many years is it now.... Eight years of loooong posts? It would not be possible! And then I realized the eighth Anniversary of this blog had recently passed... Eight years and I am still blogging! Helene had last posted in 2011.... and I was still building.... well... what was I working on in 2011? Oh, the years have been flying by! I think I was working on the Cupboard House.....

Which is literally an old cupboard that I am retrofitting to be a Dollshouse.
I ran into some technical snags with wiring
 and glue and wood shrinkage and have.... um....
 put it on the back burner.... for now.... 
while I figure those things out!
But I have not forgotten it!
And then in 2012.... 
I got all swept up in the Wedding of Pollyanna and Arthur..... 
 
You might not remember how many costumes
 I had to make to get Everybody ready!

And they barely fit into the Chapel of The Castle Dollhouse.....
And there was a Reception afterwards too!
And before the dust had even settled....
I began to work on the landscape for The Folly Dollhouse... 
and got swept into The Treehouse Project.....
Which as some of you might not know,
 is a Tree that stands on The Folly landscape.... 
that has rooms inside it which are the home of the Rats
 and are built in 1:48 scale....
And I became enchanted with the smaller scale....


Can you see the furniture at Belle's feet? 
And every now and then when the sun is shining on it 
I have a peek inside the Tree House....
 
 Samuel Whiskers is a bit surprised.....
 
Do you even remember this Parlor......

With the Gods cavorting in the clouds on the ceiling...?

Or the Library.... 
with all those Treasures and Paintings.... 
I know, it is a Mess and so hard to see....

I will have to get in there and put things to rights...

And the Bedroom too... 
with that Divine Pagoda bed... 
with the embroidered curtains....

And the Tree House Nursery... 
where we got side-tracked.... 
years and years ago....
Well, I think it was because I had to Tell a Few Stories....
 

I had to build a Conservatory.....

I had to build a Park.... 
that could even be visited on a rainy day......
And years and years go flying by!

I am still working on painting the Castle Ceiling.....
Someday it will be finished!
But for now, every so often when the sun is shining right... 
I can get good pictures....
It is dark in the Castle and you have to
 get down on your knees and look up.....
Those Saints are Very Patient!

Because, as some of you might know... 
I get side-tracked... 
and might have to take a year or two building only in 1:144th scale.....
 starting with the roombox on the shelf in The Folly Parlor!
(Do you see it there...?)
Oh, Dear Readers, I am afraid it is not Possible to review it all!
And did I forget to mention a Project or Two.....

The Cloud Palace is not yet done......

Nor Hardwick Hall.... 
Nor the Castle itself....!
And here I am ..... promising to make more....
Shrubs for The Folly garden.......
 
 Which I did manage to get mostly painted....
(the first shrub, that is....)

And more tiny Lilac blossoms!
Now there are three!

And here you can see the mostly painted shrub by The Folly.....
Still a Looong way to go, Dear Readers!
Yes, I don't know where the years go....
But I am blogging still!


Monday, April 16, 2018

Every Little Bit Counts....


Doing The Math.....

It Might not look like very much has been accomplished in my Mini Worlds this week Dear Readers, but I have been telling myself that every little bit Counts. And if there is anything that I have been doing a lot of lately, it is counting! The petit-point stitching requires very careful counting of nearly invisible threads.... to make sure the stitches are exactly where they need to be. I use a magnifier for this scale of stitching... it is 40 stitches to the inch and the finished stitching will be a little under 1.5 inches square, or 56 stitches by 58 stitches... a total of ....um....3248 stitches if I do it right and don't miss any! There are ten colors, and the vast majority of the threads are for the cream background.... because there is a lot of background needing to be filled in! I have made a start....

But it is really difficult to see!
It is the upper right hand corner.....

Here is a closer look.... maybe you can see now....
I have a long way to go.... 
but every stitch counts!
And Another project where it seems that not much
 has been done is the Lilac blossoms...
I left you last week with the first blossom still not quite finished... 
and I was counting the florets carefully
 so I would know how many were needed for each blossom....

Here is the first one finished!

And a closer view....
It has 48 florets, not counting the six "unopened" buds at the tip!
And I must admit that a RL lilac blossom
 probably has two or three times that amount.... 
but... I am willing to compromise!
And just to be sure I had counted correctly... 
and to continue on my self-appointed schedule
 of "one or two blossoms per weekend"..... 
I started right in on the next blossom!

Yes, this is 48 florets, most not yet painted, 
and the little unopened buds along the left hand edge of the baggie
 (it makes a great non-stick work surface
 when doing lots of tiny gluing and painting!)
I tried to time the process... 
and managed to make twelve florets in 30 minutes, roughly,
 not including the painting or assembling..... 
a much more time consuming part
 as it involves waiting for glue to dry!
(But who's counting, right?)
So while I was waiting for all that glue to dry,
 and not wanting to start another batch of florets
 because that might confuse my counting.... 
I decided to start the next step on the lilac shrubs instead.
 Which also involved a lot of gluing!
And counting.
 

You might remember me mentioning that each of the stems
 would need to have a "bud tip" added to the end of the stem....
 this is partly because the wire tips needed to be a bit camouflaged,
 and partly because the shrub needs to look like it has buds on the stems...
And it might have been easier to do this step
 before I attached all those branches to the stems! 
But I wasn't sure how many branches I would be needing
 or whether some of them would be cut back... 
and this is the Prototype shrub... I am learning as I go!
So Now I needed to add a blob of glue to the tip of all those stems.....
(which you can see in the above picture.)
Shall we count them? 
(So we can be sure we are getting it right on the Next one...
 and the next and the next one too?)
I counted.
There are for each "shrub" 6 main stems 
with a combined total of 29 secondary stems. 
And on those secondary stems there are
 a total of 48 "twigged branches"
which, once they are attached
 make a total of  96 twigged tips, 
for a total of 192 twigs....

Here is a close-up.... 
I know the blob doesn't really look much like a bud tip.... 
but I am going to add paint and "refine" them eventually! 
(The glue also serves to keep the wire covering from unraveling.)
It took a while... and I had to reach the glue in
 among all the stems which was awkward...
And no, I did not glue all the tips of the 192 twigs.... 
I decided to wait until after I had painted the shrub
 to determine if that was necessary!
What? You are going  to paint the shrub? I hear you say.
Yes, Dear Readers, that has been part of the plan all along,
 because as ideal as the texture of the paper stems appears to be...
 the green stems do not match and only the newest growth is green!

And to aid myself in determining the correct color
 I went out and pruned a couple of twigs from my own RL lilac bush.
 One is Old and nearly dead, and the other is a newer more vigorous twig...
 and here you can see them with a piece of the paper wire
 painted with a test color... yes it needs adjusting!
It is a very grayish brown, or brownish gray, 
with red overtones in the younger twig.
And it is really difficult to replicate....
 because it looks different in different light...

But you just have to jump in and see how it looks....
Here I have painted a part of the shrub, only the green stems so far....
and am trying to hold one of the twigs next to it for comparison...
 of course, it is a gloomy day and artificial light is not much help!

The RL twigs are on the left, in case you couldn't tell the difference!
And maybe we need to see how it looks in place...?
 
Only the branch on the left side has been painted.... 
and it reflects the light differently than the green cloth wire....

And with the two RL twigs next to it for comparison..... 
can you see the difference?
Well, I will probably paint and re-paint the stems
 every time I view them in a different light! 
But even this much painting took several hours....
 every side of every wire has to be covered!
(What was I thinking?)

And in case you (or I) need reminding.... 
there are three more shrubs in the wings....

They have all their main stems and
 almost all of their secondary stems...
 but none of their branches or twigs so far!

And as for the blossoms...
 did I finish the second blossom, I hear you ask?

Yes, I did!
 48 florets and six unopened bud tips.....!
Two blossoms in Two weeks!
And how many will I need.....?
Well, as I am sure some of you are aware, 
Lilacs bloom only for a blissful 10 or fifteen days every year.... 
so only One of the shrubs will require blossoms!
 (This fact is what got me started on the changeable garden plan...)
Even so, There are 29 secondary stems on the shrub.... 
and stems often have a pair of blossoms.... 
and  even if I argue that it is an old and sparsely flowering shrub.....
I don't imagine I will be happy with fewer than 29 blossoms....
Let's see... that is about 1392 florets!
Well, that's about the same number as the tiles I made
 for my Castle Great Hall Floor....!
(each one cut, baked painted, glazed, and aged before installing!)
 And that only took me a year or two 
(or was it three....?) But I got it done!
And we won't mention the possibility 
that more than twice that number
 will be needed in the end....
(Because, who's counting?)

So, you can see It really doesn't Look like
 much progress has been made Dear Readers, 
but I can assure you,
 I have been doing the Math, 
and Every little bit Counts!