Monday, March 28, 2016

What.... Another Project...???


Just a Little Diversion.....

Believe It or Not, Dear Readers, my weekend began with Nothing out of the ordinary on the Horizon. I started on the many small steps needed for the re-design of the Attic roof for Hardwick Hall, one of them being attaching the decorative ceiling crown molding trim while the roof was still open and unobstructed. I am using the same pattern wood that I used in the Parlor and the Kitchen, stained the same dark walnut color. And since there were still parts of the kitchen crown molding that had not been cut yet, because I had to complete the hearth inner wall before I could know the proper dimensions to cut... I decided to also work on the hearth and see if I couldn't also attach some of the kitchen molding. I had noticed a small scrap of paper lying around (because we don't throw these away!) that was trimmed from the ceiling "embossed" paper and it reminded me of the kind of trim you see when metal sheets are joined it looked like a row of rivets....

 I thought it would be perfect for the hood on the hearth in the kitchen,
 which I wanted to look like an old copper covered hood....
So I glued some strips in place....

Then I added a coat of iridescent copper paint.....

With the darker gray coat still showing through in places....
Then we have to see what it looks like in the kitchen.....

Yes, I am liking this!
(And you can see one piece of the crown molding has been attached...)
But that is not all... there is a mantelpiece too...

Yes, I know the copper is really shiny here... 
the light is hitting it just right....

Inside the kitchen it is not so garish!

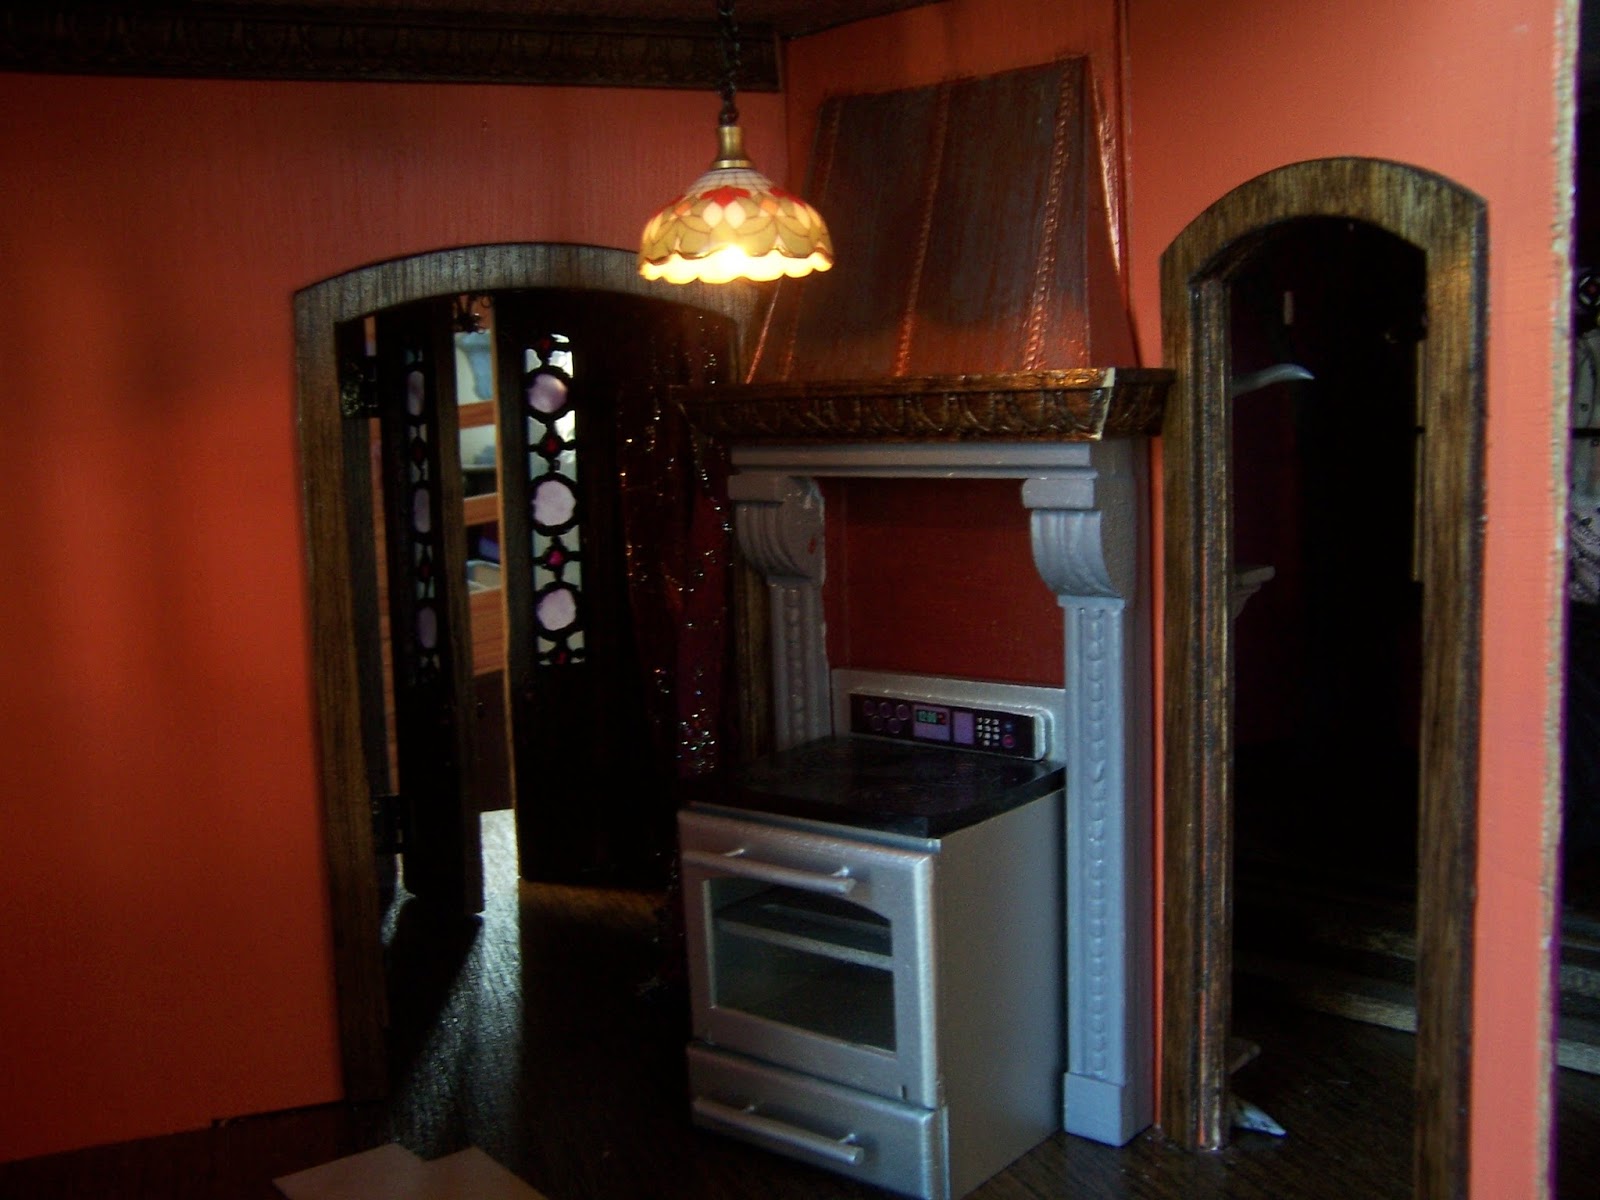
Maybe we need to see how it will look 
with the stove added and the light on.....
I still need to add the bricks to the hearth itself and the chimney back...
but it is starting to look like I imagined it would!
 
I hope you will Believe me Dear Readers
 when I tell you that I Intended to keep working 
on the attic structure and the Belvedere....
But then I Dreamed all night about building Tiny Tiny 
Dollhouse roomboxes in 144th scale!!!
And when I woke up I realized I'd never thought of 
just making a roombox in that scale.... 
And if it was JUST a roombox, how difficult would that be?
Well... I had to give it a try ... just to see....

And as I thought about Where this tiny Roombox would live.... 
I realized it had to be on a shelf somewhere where it could be easily seen....
And what better shelf than one of the shelves beside the fireplace in The Folly?
So I made sure to build it so it would fit.....
And then I realized it would be fun 
if the scene were to "mimic"  The Folly Parlor itself!
 
 
Which meant there would be a fireplace....

So I glued some tiny scraps of wood to a piece of cardboard...
With several layers to make the decorative profile....
I could have used just cardboard, 
but I had some tiny slivers of wood just begging to be used!


Then I painted it to look like a brick fireplace....

And attached it to a "marbled" hearth base......
(sorry the glue is still not dry and rather obvious!)

It still needs quite a few details.... 
like the flames and the logs... and the coals.....!

And here it is inside the roombox....
I will need to build the shelves that flank the hearth....
And the books that go in the shelves....
Because to tell you the Truth, Dear Readers, 
my Dream was all about those Teeny Teeny books 
and how to make the shelves 
and whether it would be a Library or a Bookstore....
So maybe this is just for practice....
 
Just a Tiny Diversion......
Except I had to see if I could make a Tiny Person too....
 
Here you can see the beginnings...
At one-half inch tall she might be a tiny bit large for the scale....
and I have only just started to figure out the costuming....

But I succeeded in making a carpet for the floor!

And while I was test-building the roombox... 
I made a couple of them..... just in case.....
There could be a Library AND a Kitchen..... !
Because, really... they don't take up much space!!!
And I am pretty sure there will have to be more than one Tiny Person!
Oh Dear, WHAT have I gotten myself into???
But just to reassure you... 
The Kitchen Hearth in Hardwick Hall 
has not been abandoned....

And every little bit of Progress Counts!
Because the Roomboxes, Dear Readers,
Are really just a Tiny Diversion!


Tuesday, March 22, 2016

Of Plans and Pillows....


Kits and Kit Bashing.....

The Other Needlework I have been doing recently, Dear Readers, is the Petit-point Pillows made from Janet Granger's Lovely kits. I showed you the first pillow all finished, and the beginnings of stitching a second one, using the same design, but changing the color of the background. I also only had a 28 count fabric instead of the 22 count that comes with the kit. Here you can now see the two cushions together, and the difference that a higher count cloth makes in the size of the finished pillow! Of course I also started stitching yet another one of Janet's kits, this time in the Tree Of Life pattern.

Here you can see I have completed the stitching,
 but have not yet made up the pillow.
I love the design for the Tree of Life, 
but I found it harder to follow the pattern, 
and made a mistake in counting the stitches in at least one place!
I also found it quite challenging to stitch the white, or cream colored,
 background because it was harder to tell where you had stitched!
But nevertheless, I really am enjoying these little kits!

As for the Big Kit I am currently working on, 
the Willowcrest, which I have named "Hardwick Hall", 
construction is finally at a point where I have decided I need to make 
some serious changes in the design of the structure!
 
The attic level is meant to be just that... an attic. 
Here you can see the space is one main open area 
with the stairway to one side of center.
The problem arrives with the placement of the chimney...

Here you can see where the kit wants you to place it.... 
right in the center of the room.... 
right in the way of Everything! 
They have it attached as a piece of one of the main roof supports... 
and even if I take that support and "flip" it
 so the chimney is on the other side of the room, nearer to the stairs.....

I still think it is in an awkward position over the stairs. 
It would still have to be re-built to fit around the stairs!
 So I decided that this chimney is just not usable! 
I must cut this chimney off and build my own to fit.

 
And besides that, I don't like these "roof supports"!
They are utterly unrealistic and block the view of the upper part of the ceiling!
So they will have to be changed too!
 
Here you can see the upper portion of the roof from the top, 
with the chimney in the "flipped" position..... 
and I have no problem with the basic roof shape.
But the "new" chimney is going to have to exit the roof 
in a slightly different spot... so I will be making changes here too!
But the Truth of the matter is that I have always envisioned this Room at the top of the House as the Witch's "studio" or "Library" or "Spell-room".....
And because Madame Artemis is the Lady of the Moon... 
I want there to be a Skylight in the roof 
to let the Moon-light into this Space!
After all, those Moon Maidens are marching up those stairs to this Room....
We simply Must let the moon-light in!
And rather than a skylight in the modern sense, 
I have been thinking of a Cupola.... or a Belvedere....

So I made a cardboard mock-up 
just to see how it would look from the exterior.....
But really, Dear Readers, I had decided I would build this even if it looked awful!
So I was really just deciding on proportions and dimensions.....

Here you can see the rear view....
(The paint cans are weighing down the floor while a support is being glued!)
And before you could blink,
  I had cut the roof panels to make an opening at the top....

And I have lopped off the chimney support too.....
but I still need to completely redesign the roof supports!
They will need to be more like real rafters and allow the view up into the cupola.
But for now they hold the roof panels properly in place.

And I am using a block of pink styrofoam 
to play with the placement of the new chimney and fireplace... 
because there will have to be a hearth to go with it!
And I must confess, that I am scheming 
on how to make a spiral stair up to a landing 
that would allow the little people 
to look out the belvedere windows! 

I think it will work if I make the floor a metal mesh 
that still allows the light to come through to the main room below!

And I have to confess that I also started another one of the
 little pillows in the Tree Of Life pattern...
on the smaller cloth, and with a slightly different color green for the leaves.... 
I think the light green supplied with the kit 
is a little pale against the cream background!


So I guess you could say that I have been Kit Bashing, Dear Readers,
Whether it's Hardwick Hall or the Petitpoint Pillows....
I have been changing the plans!


Monday, March 14, 2016

Tree House Bed Curtains Completed!


Stitches.... And Love....

Can you Believe it, Dear Readers, but after All this Time spent making these Tiny Bed Curtains for the Pagoda Bed in the Tree House, I am a little sad to be finished? Don't get me wrong, I am Overjoyed at  how Perfectly they turned out! But I was enjoying the process of Stitching those Tiny flowers and vines so much... and now they are Done! I find myself thinking I need to start some more just so I have them there to stitch on a Sunday morning...! But let me show you the finishing of the curtains. As you  might recall, all I had left to add was a small amount of "ground" at the bottom of each curtain.

Here you can see what I mean.
I added a closely stitched gold border at the very bottom, 
to act as a hem, because I intended to pull the threads
 and make a fringe with the silk, 
rather than actually hemming the bottoms.
And just above that I stitched a small layer 
or "hill" of light blue-green to be the "landscape".
And with that the embroidery part was truly finished!

Next I took some very thin silk charmeuse in an ivory color.... (made from an antique slip...) and stitched the cloth right sides together along the two sides that had no fringe. I first pressed the other two edges so that when it is turned right side out, the hems would be already turned under and correctly aligned with the fringe edges. (See above!)

Then I cut the curtains apart from each other, 
leaving about a quarter inch for seam allowance.
(This is the back side of the embroidery!)

Then I turned them right side out and carefully... 
with tiny stitches, sewed the two open sides of the lining 
to the fringed edges of the curtains.

This is the reverse side of the finished curtain... 
with the fringe pulled at the bottom edge.

And then I had to run and get the Tiny Bed to test the curtain....
 
Oh! OH! OOooHHH!!!
I am in Love with this bed!!!
 
Here is a closer view.... and this is just the First curtain!

And the other one..... 
they are still not attached, 
just tucked under the gilded trim....

And just testing the bed in the Tree House... 
but it is getting late and dark and hard to get good pictures.

Here you can see the two curtains side by side.....
the first and last time....
because now it is time to glue them in place!


Which was easier said than done, 
because there was so little space under the edge 
of the gold trim on the bed frame....

Then I just have to see how it looks in the Chinoiserie Bedroom....

And with the fire lit.....

 
And from a little further back.... 
it is hard to get it all in focus!

And then in the morning light the next day.... 
can we get better pictures?
 
I think they turned out as Fine as I could have Imagined!

And then just to remind you of the scale of the Tree House....
 
Here it is in the Bedroom of Hardwick Hall!


 Oh, Dear Readers, I cannot express in words
 how much I adore this little Bed!!!

I don't know about you, Dear Readers,
But, I am in Love!