The Castle.... Again....
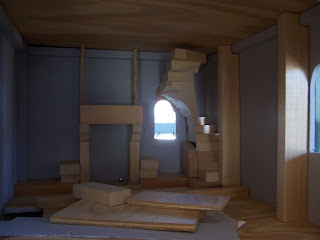
It was Twelve years ago, give or take a day or two, Dear Readers, that I began to build the Castle Dollhouse! And you must imagine my amazement to realize it has been this long and I am only about half way through building it! As I am sure you have noticed, there have been a few detours along the way.... I don't seem to follow a straight path to the end. But I have been feeling a certain urgency to get the building constructed... none of us are getting younger... so I had better just get organized and ... well... work on it! So I have been making an effort over the past few years to accomplish some of the many remaining tasks. And because I started the "shell" of the building so long ago, and it being my very first self built dollhouse... there are many ways in which it needs "improving" from the original plans. Above you can see the Lord's Bed Chamber in the very first stages of construction. This room is the top most room of the Lord"s Tower and is directly above the Lord's Council Chamber. It is the uppermost room of this Tower (I cannot reach any higher...!) and above this room is the open top of the Tower with it's crenelated battlements. In the original design, I intended the stairs to the battlements to go up the outside of the Tower from the top of the Great Hall. This meant that there were no stairs inside the Lord's Chamber. The more I have thought about this, the more I wanted to put a separate set of stairs just for the Lord to use that would spiral up in the corner inside the walls. This way he would always have his own escape route up to the topmost battlements. Suffice it to say that I had to give it a try and see if I could make the stairs fit into the corner!

I started by constructing a spiral stair from blocks of 1x2 pine cut to shape
(I made a diagram of the steps and cut each block and fitted it into the corner.
Here you can see I am trying to make sense of the structural elements of the room...
where does the bed fit... where does the fireplace fit.....
The wall on the left separates the stairs from below...
And you can see the spiral stairs cut across
the windows in the back corner.
But I can make the window smaller....
By just filling in a part of it...
Here you can see it in the morning light....
with the wall on the left removed.
(All the stairs in this Castle go up inside the walls.)
I managed to find the very same piece that was
originally cut out for this window...
and fitted the top shape correctly!
I simply made the opening smaller.
And the lop-sided shape will be corrected
when the window glass is fitted.
Here you can see it from the back side....
Remember I painted the backside last summer?
In the bright morning light...
you can see I am testing the arrangement
of seats below the window beside the fireplace.
You can also see that the stairs will need
to be shaped to go above the window.
I also filled most of the other window in the stairway...
turning it into an "Arrow slot" window.
It was simply too large to keep it a regular window shape,
and too close to the steps...
anyone would be able to fall right out!
This way it gives light and serves a defensive purpose.
Once again... I used the very same piece
that was originally cut out of this window!
(Do not throw away those "scraps"! They are amazingly useful!)
Here you can see I am starting to shape the
underside of the stairs to fit over the window.
It took a lot of gradual cutting... with my hand saw...!
I am thinking of adding another window on the other side of the fireplace....
And I am testing the spacing of those heavy columns along the wall...
The one in back is needed to close in the stairs...
and shouldn't there be some symmetry to the structure?
(I like my engineering to make some sense!)
Cutting the extra window required emptying all the parts
and moving the Tower away from the wall...
because the saw wouldn't fit inside so the cutting
had to be done from the back side.
And I was reminded that I had not yet glued the floor in!
It is the ceiling of the Lord's Council Chamber...
which had only been completed last fall...
(and I needed to wait a while in case I had
forgotten something important...!)
So I got out the glue.... and the heaviest Book I own.....
This is a Momentous Day!
And while I waited for the glue to dry...
I started to cut the window frame sections...
Which you can see is carefully fitted to the odd shaped opening.
I cut two of these from thin plywood (1/8 inch thick),
and once they are fitted to the opening,
I cut the window hole out of the middle,
and sandwich the glass pane between the plywood pieces.
None of the pieces are glued in until all the parts are fitted.
In this case, I need to get the back windows finished
before I can attach the stairs.
Here you can see I have removed the ceiling....
(the floor of the Tower Battlements...)
in order to cut the opening for the stairs to access the Rooftop!
I have not been at all sure how this
will be "covered" up on the Tower top.
The weather would rain in if the stairs were just left open...
so a roof over the stairs would be needed...?
And some sort of wall around the opening...?
But I started by cutting the hole as it would
need to be for the stairs to land at the top...
And once I had cut the opening.... I had a brilliant idea!
Why not just make it a Trap door... with Hinges???!
(Oh, I do LOVE hinges!
Here you can see the opening from below...
(the side of the stairs will be walled below the opening)
And the open door from the Battlement side!
And closer... so you an see the top of the stairs....
(the very top step has not been fitted yet....).
There will be a door at the bottom
of the stairs to keep the drafts out.
And I decided it would be easier to paint the "rocks"
before all the added pieces get in the way...
You have seen this before....
First I draw the courses....
then add the rough texturing...
By now it is late.... dark....
And I am too tired to add the grout!
Which Never ceases to Amaze me, Dear Readers,
how it transforms the painted surface into "rocks"!
One slow wall at a time!
Retro Fitting the Castle....
Again!


Hello Betsy,
ReplyDeleteI see that you still 'Rock' on! It looks good. I like the spiral staircase in the lord's bed room. Adjusting the windows is laborious but castles in those days were built and altered as required. Strict symetry was seldom the goal or wish of the owner. That changed at the end of the middle ages but to me adjusting the room to accomodate the stairs makes it more realistic. And the added window is a great addition to the room too.
In European castles you often see simple turrets built over stairs to keep the rain out of the castle. Since the staircase is in the corner you could perhaps extend the crenelations, using the first gap in the corner as a centraly placed window for the turret?
Huibrecht
Dear Huibrecht, Your information about "real" medieval castles is invaluable to me! (We don't have any real ones over here!) But I do have lots of books and study them often for clues to style and window type and turrets.... Your suggestion about the small turret over that corner of the battlement is exactly what I have been thinking of making! (Eventually, when I get the roof of this room glued on!) And the concern for symmetry being a later thing... that makes sense too. I am trying to have this castle be as old and Early Medieval as possible... but I keep getting pulled into a more Modern era, say the fourteenth century rather than the twelfth! But as you say, even castles were modernized and added onto... so I will continue to "improve" mine as the Dreams lead me on! :) :)
DeleteDear Betsy, great minds think alike? ;-)
DeleteWhatever your choice will be, I love to see and read each installemtn on your castle. (and also your other projects ofcourse!
It is very exciting to see that you are still at it!
ReplyDeleteLos castillos se construían poco a poco y en varias fases. Así que el tuyo no es diferente. Bien colocada esa subida y me gusta la idea que has tenido con la trampilla.
ReplyDeleteLots of progress Betsy! That’s great! So am I right that you will not put in the left wall where the stairs were to be, therefore making the room bigger? I think that is a great solution, as the Lord needs his space! The stairs are looking great and they add onterest and I think would’ve been quite accurate for escape purposes. Enjoy the rest of your weekend!
ReplyDeleteThis beautiful castle is going to be huge.
ReplyDeleteHi Betsy, twelve years is but a blink of an eye! I truly think that mini-time is slower than RL time you are building a castle after all! I have visited some castles in my time that had the most ridiculously narrow, steep and tiny spiral stairs, it always amazes me how people managed to get up and down (then again they were much smaller in the past!) your stairs remind me that I need to address the absence of stairs issue in Daviot House before the inhabitants resort to flinging themselves out of unfinished doorways! Jonquil
ReplyDeletePhew, I'm once more late... but as a very positive side effect I was able to enjoy two posts from you enabling me to admire your incredible progress. I love every single bit of the developing Lord's bedroom... and I know you do too! Despite all the work with for example planning and testing the steps of the stair you have finally been in the hinges again! Hooray!!! ;O)
ReplyDeleteHugs
Birgit (Who is totally impressed that you not only have the window cut outs still in your stash but even more that you managed to remember that you do have them and where... you're my hero! *smile*)
You planned and executed this perfectly!
ReplyDeleteBrilliant! Brilliant! Brilliant! Oh Betsy! I love how you have redesigned the bed chamber to be able to add in all of the amazing elements! It all makes perfect sense, and adds such merit to the story! Your ability to hand cut and shape plywood is a REAL SKILL, and your creative ability to retrofit and problem solve a space is inspiring!!! I bet you are floating on wings to see all your ideas come to fruition for this room, and I am excited to be back in time to follow the progress!
ReplyDelete