Wednesday, February 26, 2020

Paneling Progress....


Rabbeting Rails and Stiles....

I had a week of Vacation, Dear Readers, but you would not know it for the meager progress I made on the Dollmaker's Studio paneling. I had high hopes of completing at least one wall and maybe even adding the electrical fixtures... but there were many other RL tasks that slowed my progress. At least, I can blame it on that, but it probably was more to do with my uncertainty of the method to use for making this paneled wall! You can see in the above picture that I have cut a length of wood for the bottom "rail" of the paneling to fit along the length of the room. I had several unanswered questions about the technique to use to make the "rails"(horizontal pieces) and "stiles"(vertical pieces) of the paneling. Should I rabbet the edges of the rails and stiles so the panels were partly overlapped on each side and thus held securely in place? This would need thicker wood to begin with. Or should I use cardboard "spacers" between the panels and overlap the cardboard and panel edges with thinner strips that didn't require the rabbet on the edges? This would require thinner wood and several thicknesses of cardboard strips. And should I glue all the pieces to a mat board and then place it in the room.... or should I glue everything directly to the plywood wall....?

I started by turning the studio onto its side... or back, 
so that I could work on the wall with gravity in my favor!
I took the bottom rail (1/8th inch by 1/2 inch stock) 
and manually cut a "rabbet" (or rebate) along the under side edge. 
This turned out to be easier to cut than I had feared.
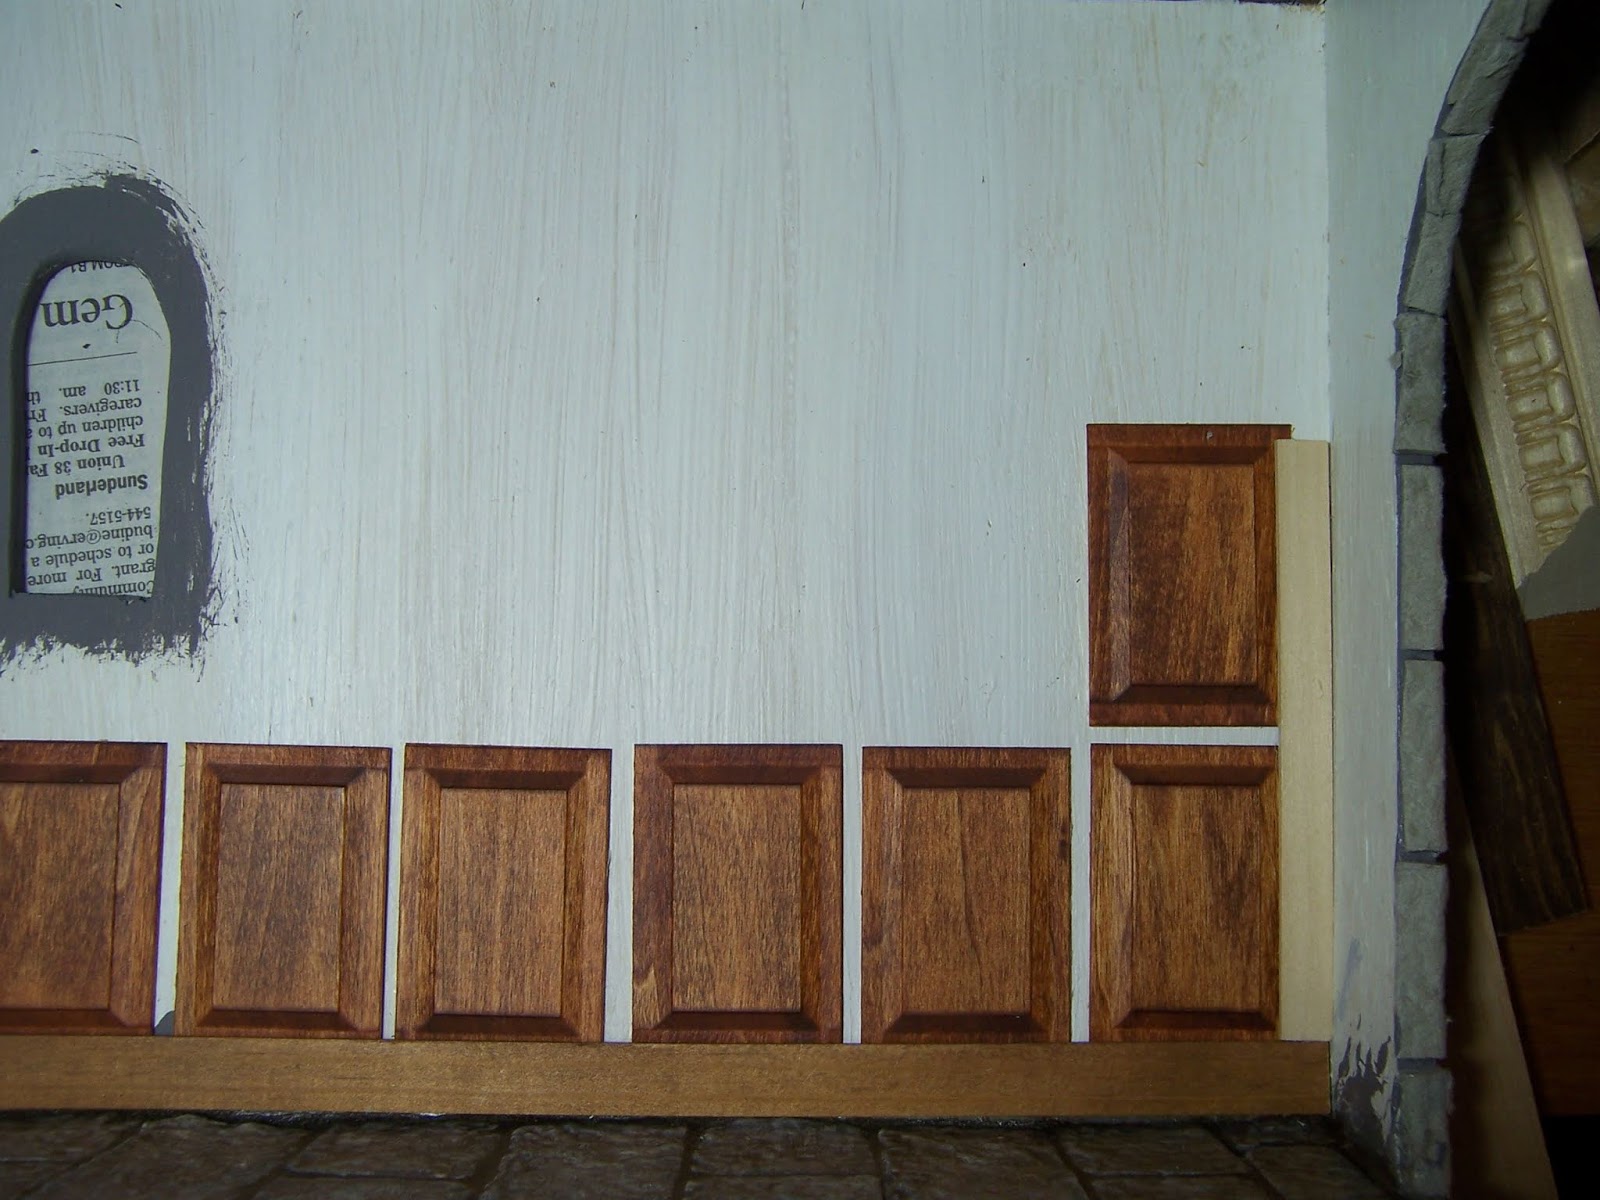
Then I spaced the panels across the wall 
to get a good idea of the precise measures.
The panels would space neatly with 1/8th inch between them
 and 1/4 inch at each end. (This convenient spacing made life much easier!)

I added the next row of panels and tested 
the spacing for the different widths of wood....
1/2 inch wide or 3/8th inch wide stock for the rails and stiles?
I preferred the look of the 3/8th inch stock 
for both the rails and stiles.
And it would still allow enough overlap for 
cutting the rabbets at 1/8th inch on each side.

This is just another view of the Studio on it's side....

Here is a view of the underside of the bottom rail... 
showing my messy manual rabbet...
It is all cut with the exacto-knife.

I decided to make the manual rabbets in the thicker wood (1/8th inch stock)
 in part because I think it will make the paneled wall 
more structurally sound in the long run to use all wood. 
(I could be wrong about this!)
I also decided I needed to build the paneling directly into the room.
 This is mostly because the room dimensions are not perfectly square
 and the plywood is a bit warped in places.
I didn't want to get it all built and then discover it 
wouldn't quite fit past the edges of the opening 
or the floor was too warped....
 (remember the warped floor?)
And knowing how quickly small measuring discrepancies
 can add up to a large error... 
I decided to cut and fit each piece individually... 
no mass cutting of pieces that turn out a fraction too short....!
I started by fitting the end stiles which are against the side walls.
Then made the stiles for every second pair of panels....
you will see the pattern as it develops.

It is hard to see the wood when it is blonde.... 
I am "staining" it with a watered down burnt sienna acrylic paint.
The paneling will not end up this color, so I don't need to match exactly.

The only piece that has been glued in place so far is the bottom rail!

This is the underside of the center stiles.... 
my cutting doesn't need to be exact, just needs to fit between the panels.

Here you can see it from the "side" 
showing how it sits over the edges of the panels.

Once the taller stiles were all cut,
 I could measure accurately for the rails that fit between them...
And then the short stiles between the rails...

All of this fiddling and dithering, Dear Readers,
 took days and days!
And still nothing was glued in place but the bottom rail...

No, I did not glue those vertical stiles in the wrong places! 

The not exact nature of the plywood walls
 meant that the rails in the middle row
 are a tiny bit longer than the bottom.
This is the advantage to building it the slow way!

It was at this point that I decided the bottom row of panels
 and the rails and stiles needed to be glued down.... 
there was too much "shifting" happening... 
and I needed to find out how well the glue part would work...!

So I took my courage in my hands 
and started to apply the glue to each piece....
trying to position them exactly 
and not get too much glue in the wrong places...
 
 
And then needed to find the right sized books to weight it all down!
(I had not thought that through!)
Then I let it dry.

The following day I was able to position the 
remaining panels in their places (no glue yet!)
And I also discovered that 
not all the glue was sticking properly.... grrrr...
I am using ordinary wood glue ... 
because this is wood....
but the plywood has been primed
 and I know this interferes with good adherence....
 Sigh.
I am still deciding what to do.
One or two of the small stiles are not attached. 
A couple of the ends of others are not Well attached....
There is a chance I will be picking it apart
 and using different glue on some or all of it.
 
I am not looking at it for a couple of days...
It might not be as bad as I think it is....!
But that is as far as I got, Dear Readers,
On my Vacation paneling project,
Rabbeting rails and stiles.


Tuesday, February 18, 2020

Lucky Winner!


Legos and Other Little Things....

A Few weeks ago, Dear Readers, I was lucky enough to be the Winner of Noelle's giveaway on her blog Nono mini Nostalgie! I could not believe my good fortune to win her teeny tiny mini Lego set! My sons' favorite toys were Legos (and we still have a big box of them!) so I was enchanted to see them in mini on Noelle's blog. But for some reason our emails would not connect to each other... so after a couple of tries both ways I put my mailing address on her comments so she could send me the prize. It worked and the little package arrived last week in my mailbox. I tell you, I am always amazed that a little parcel can cross the Ocean and reach its destination without mishap!
But here it is!!! 

The little box itself is a tiny wonder...!

But the contents are beyond amazing!

Can you believe how perfect these tiny Legos are?
I feel so Lucky to have them!
Thank you, Noelle, for sharing your treasures!
They are Awesome!

And in another way I also feel very lucky, Dear Readers,
 because I have had a few alarming set-backs
 with my stone floor for The Dollmaker's Studio....
which might have turned out alright after all!

You might recall that I had showed the floor
 with the newly applied grout all dry and ready for "dirtying up"....

The pale color of the dry grout was too new and
 clean looking for such an "old" stone floor!
So I mixed up a watered down acrylic mix of brown and black
 and began to brush it onto the floor, 
planning to wipe most of it off the stones 
but leave the grout a darker shade.

I started in the back corner where it would naturally be very dirty...
and quickly realized I had not swept off the dry grout residue
 from the original application.
 It would be too gritty if I didn't clean it first.
So I did a little careful sweeping... 
only to realize that the grout was lifting out of the cracks...!!

Yikes! That was not supposed to happen!
Since most of the grout was still in the cracks,
 I decided to go ahead with the "dirtying" process... 
and fill in gaps later if necessary.

You will understand if there are no pictures of this part of the process...!

As I brushed on the dirty water.... 
the grout just melted... 
apparently it had dried to dust!!
 It was really very alarming....! 
So I just "dabbed on" the color... 
and wiped it off with a paper towel... 
and where the grout "lifted" I smeared it back into the cracks 
with the wet paint mixture...
And then I let it dry.... again....!
I could not get the paint tones to mix carefully.... 
it was scrub and dash and smoosh and dab....
Yikes!!!

Here it is part way dried....  
At this point I couldn't be sure
 if I was going to have to scrub it ALL off and start over.

So the next morning I had a closer look
 once the "grout" was dry again.
I was planning all along to add a sealer coat of matte varnish, 
and decided to give it a try
 in spite of the gaps and the uneven colors..... 
it is supposed to be an Old floor after all.

Of course, the newly applied varnish 
just adds a milky looking glossy sheen.... 
so it is really hard to tell how it will look when dry....
But at this point I was telling myself 
that I could just  cover the whole floor with a carpet....
(possibly part of the plan anyway...!) 
so who cares how it looks?
(Yes, I Know.... I would know anyway....)
So I let it dry and refused to look at it for a couple of days!

And when I did look at it again,
 I scuffed the tiles a bit with a scrubbing sponge.....
 and decided that they might not look so bad after all!

There are a couple of spots where I will 
"repair" the missing grout with a paintbrush....

 
Somehow, Dear Readers,
 the floor seems to have turned out alright....
and I guess I am starting to feel like 
I'm a Lucky Winner after all!

Monday, February 10, 2020

Painting Bricks.....


And Grouting Stones.....

Before I could progress any further with the floor of The Sugarplum Studio, Dear Readers, I needed to complete the fireplace that stands between the doors on the end wall of the ground floor room. This was because in order to add the grout in the floor, the fireplace needed to be in place. And if I were to add egg-carton bricks to the fireplace, I would surely wish to do that before I got out the grout, so all the grout could be accomplished at once. And even if I decided to just use paint for the bricks, that would be easier done before the fireplace was attached. As I was debating the merits of paint versus three-dimensional egg carton bricks, I was thumbing through an old book I have about miniatures. It was talking about the "Nuremberg Dollhouse" one of the oldest known "baby houses", built in 1639, and mentioned that paint was used throughout the house very effectively to suggest three dimensions where only two existed. Aha! (thought I) If paint alone is good enough for the Nuremberg House, then surely it is good enough for the Sugarplum fireplace! So I jumped right in and began painting the faux bricks. In the picture above you can see the beginnings... just rough covering of the cardboard with a mixture of brick-ish colors. I use red oxide, burnt umber, alizarine crimson, black and white mixed in varying amounts.

It is best to keep it very rough and imprecise.
Then I started to add the rough "grout" lines in gray.

The spacing is not precise....
The effect will be not closely examined when done...

Then I started in making the bricks...
Trying to keep them in line....
but not being too precise.
(This will mostly not be visible in the end....)

(Please don't get out your rulers!)
 
Testing the hearth in place....


Then it needed more soot on the bricks...
And testing it again.... I think it will do!

Time for Glue!
(And those trusty sophisticated clamps!)

And then finally, Dear Readers, it was time for the grout!
I don't know why this step always makes me so nervous....
but it does.
I spread the mixture over the floor....
it is such a small area it didn't take long.

And then I wiped the excess off with a damp sponge.
It really didn't take long at all!

It didn't take off enough of the "glossy" effect of the polyurethane....
but I will be "dirtying" it up a bit when the grout dries.

When the grout is dry it becomes too "clean" and new looking.

The grout is just too invisible when it is clean...

But I really like how it makes the stones look more real!

Well, Dear Readers, that is as far as I got.
Perhaps you can tell me which is more faux... 
the bricks or the stones?


Monday, February 3, 2020

Sugarplum Studio.....


Shedding A Little Light.....

Some of you, Dear Readers, might recognize this picture as it was the setting of Last Year's Christmas Card, but that is not why I am showing it here now. It is simply a way of showing you the challenges I face with Lighting my own Studio in order to get good pictures of my projects. This room I call my large studio is really meant to be the living room in my small house, but I have it set up as the dining room because it is the only room big enough for the dining table and the hutch (which is off to the right in this picture). And a "dining room" in my life has always ended up being where I work because the table begs to be used! And after a while it just becomes my studio and I no longer pretend to have a "dining" room! And because this house is an older house with limited electrical fixtures... the only "overhead" light in this room is the candelabra you see... yes, it really is only candles! I have one old table lamp on the table and one old standing lamp that can be repositioned depending on where I am working. I also have a couple of old clamp lamps which sometimes are used to add light to dark corners... but they are tricky to manage as they sometimes un-clamp themselves in dramatic ways. I have one small point of use table lamp for the cutting mat work area to ensure good light in close detail work. And that is pretty much it for the light in my studio! As you can see, it is dark in all the corners and the "pool" of light under the standing lamp is the primary available light. And at this time of year, while the days are lengthening noticeably, it is still dark in the evenings when I might want to take photos of my work progress. So I hope you will understand, many of my photos are just not well lit... but I might only have that picture to show my "progress".

And I have been making some progress!
The "stone" floor of the Sugarplum Studio got a coat of primer.

And then I painted the first coat of color....
 a light gray that I use all the time.

I also started to position the rafters,
(which you can barely see overhead)
 but they are not attached as they will just get in the way
 while I am working on the floor and walls.

Here you can see I am testing some paneling options...
I have had these panels for years and there are just enough for this project!
 I will be using a different color on them.
And you can also see that the Sugarplum kit is a Small kit!
The main room here is only 9 inches deep  and 14 inches wide.
(Hmm... I just realized those dimensions 
are similar to my RL studio room dimensions!)

But the first task needing to be finished is the stone floor!
I began painting the dark gray into all the cracks
 and adding some "brushing" of  dark texture on the stones.

Again, these are the same two grays I have used for years
 to make the "stones" in my projects... the Castle in particular.
And I realized that I have a natural tendency to think stones are gray...
 rather than yellow-ish or red-ish or brown-ish..... 
because the rocks in New England are mostly
 gray slate and gray granite.
(I wonder what color the stones are where you live?)
 
Next I started to dab on bits of ocher and red oxide and burnt umber
 to create some variance in the "gray" of my stones.
(This picture is terrible... ! )
But you can see I was very rough and random with the dabbing.

Then I began with the next layer of gray... the lighter gray again.
This time I dry-brushed it lightly over the whole stone
 and then used paper towel to smear it and remove excess paint.
 I didn't want the light gray to completely cover the under colors.
I have only done the stones in the left hand corner in this shot.

I think this shot is slightly better....
You can see that the gray paint is changing the tones, 
making them more uniform and lighter.

The stones on the left half have been done here.... not yet on the right.


Here the stones have all been "grayed" ... 
(but the lighting is terrible!)

That's much better!
I am not going to over-work these stones Dear Readers,
 because it is only a small floor which will probably have a carpet
 and be hidden by the furnishings too. 
But I wanted a relatively uniform look
 to the stones and a over-all gray-ish tone.
And  because I am planning on using grout with this floor,
 next I added the first of several coats of varnish to seal the paper surface.

Of course, it makes the stones look way too glossy.
But I am fairly confident that the grout will scuff up the glossy surface
 and it is better to add enough protection 
for the paper "stones" before trying to grout them.

And that's as far as I got, Dear Readers, 
working on the Sugarplum Studio floor. 
But I feel as though I'm finally making a little progress... 
And I hope I have shed enough light for you to see it!