Thursday, January 30, 2025

Stitching Update....


Tiny Stitches... 

It Has been a while, Dear Readers, since I showed you any stitching project progress! That is because until recently there hasn't been any progress. From the beginning of December until the middle of January my energy was devoted to the Christmas Card and little stitching projects were strictly forbidden as way to distracting! I had been making good progress on the Tiny Mille Fleures Tapestry pillows, little kits by Mary Corbet of "Needle 'n Thread" blog. Her designs were meant to insert into jewelry bezels or make into scissor fobs.... but I wanted to make them into dollhouse pillows! this meant extending the frame to a square shape and adding details in the new corners. Above you can see where I left off at the start of the Christmas Card work. These are stitched on 48 count silk gauze..... and believe me it is challenging! It requires very good light and a magnifier, which I use for all the stitching over 30 count. Even so, the evenings are long and too dark to work at this time of year. And when I was delving back into the petit-point projects I came across one of the Baktiari carpet inspired pillows I had started.... and it being on only 40 count silk gauze, I gave it a try in the evening light.

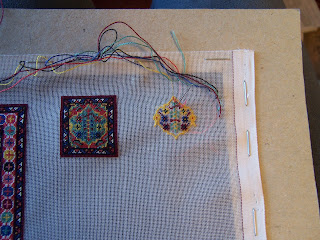
You might recall that I had decided to make several pillows
 by taking parts of the design from the still not quite finished carpet
 (it needs the fringe added once it is removed from the frame)
 and adding a small edge border. 
The first one was not square.... 
a detail I overlooked when beginning the project!
The second one I am trying to make closer to a square shape.
 

I still think it is off by one stitch....
 but keeping the design balanced meant I had to compromise.
The stitching goes quickly compared to the tiny Mille Fleures designs.
 

As you can see I am using a different colored
 section of the carpet for my second pillow.
I still have not decided how the border should go.


And meanwhile, I did get back to work on the Mille Fleures pillow.
I started adding in the bright red background color,
 beginning in the upper right corner.
And I finished designing the added flowers for the new corners.
 

And because I was getting close to the finish of the first pillow...
I decided to stitch the framework for the next one.
 

Here you can see I have finished adding
 the flowers to the new corners of the first pillow.
 

And here you can see the bright red 
background is all completed too!
It was very very challenging to get all those
 red stitches located and properly stitched!
Because the stitches are so tiny
 it was nearly impossible to notice missing stitches.
 I had to consult the chart very closely!
Holding the stitching up to bright light helped too!
(Those missing stitches showed as a tiny prick of light!)
 
 
And then I was off and running with pillow number two!
Here you can see I didn't even stop to take pictures
 'til after the bunny was nearly complete!
And then, Dear Readers, the usual thing happened....
I wanted to make changes to the design!
*sigh*
(Why does this happen so often?)
I looked at the pillow shape 
with that lonesome bunny off to the left side... 
and thought "surely where there is one bunny another is nearby!"
 

I got out my graph paper and colored pencils
 and sketched a companion bunny using
 the approximately same amount of stitches tall and wide, 
but in a slightly different position. 
I tested it the best I could against the chart....
 

The graph paper is almost the same size as the printed chart....
 just a tiny bit smaller, so the actually stitched bunny will be a little larger.
 But it looked as though it could work
 without making too many changes to the blossoms.
Close enough that I went for it!
 

Here you can see both bunnies have been stitched.
It remains to be seen how the blossoms will have to shift...
 I will address that as I get to them!
 

Here you can see I started with the blue blossoms
 that would not need to move at all.
This is so I could have a good reference for counting
 the stitches in order to place the yellow blossoms.
 Some of them needed to move a lot.... 
most only one stitch to the side.
Later I added an additional one on the top of the bunch.
 

Adding more blossoms....
The blush pink ones to the right of the
 new bunny mostly had to move over!
 

Here you can see the blossoms are mostly done
  and I have begun stitching the greenery.
It is impossible to tell at this point,
whether or not the new Bunny has improved
 or spoiled the design balance.
With the addition of the blossoms in the corners, 
there is a shift of the colors overall.
The two tan bunnies in the center
 with the bright yellow flowers
 might look imbalanced when finished.
But even if it does, 
I think I will be glad I added him in the end!
So that's what I have been doing, Dear Readers,
 in this cold winter weather....
 Stitching teeny tiny flower blossoms
 and warm brown bunnies!

Thursday, January 23, 2025

Winter Wonderland....


Snow That Sticks Around....

We have been having a Somewhat snowy Winter, Dear Readers, mostly because it has been so cold that even the very tiny amounts of snow that have fallen don't melt even on sunny days! And most of those amounts have been what are called "a dusting"..... not really even measurable! But on a couple of occasions we have had a more robust amount collect, five even six inches have piled up. And almost every time the beautiful early morning before the snow is blown off the trees and bushes we have that magical "Winter Wonderland" outside our doors! And so I wanted to remind you of the beauty of this by bringing out the Winter Lilac Shrub and showing the fresh snowfall at The Folly Dollhouse. (Yes, it snowed here in RL a couple of nights ago!) Do you even remember the epic 18 months process of building the Lilac Shrub in four seasonal versions? The entire reason for this idea was so that I could show you The Folly in Winter as well as Spring and Summer! And once this idea had come to pass, it necessitated that all The Folly Garden flora be produced in seasonal variations. Above you can see the Lilac in it's Winter finery. But as some of you are aware, this year I have added the Rhododendron Shrub to this Garden, with the flowering shrub in May and the Summer Green one in July... all I needed to do was make the Winter version, right?

Oh Look! The sun is coming out as we stand here!
Isn't it beautiful?
And if we step back just a little....
 

Wait... is that Snow on the Rhododendron too????


Heavens, what a beautiful sight!
 

Wow!
 

Well, Dear Readers, this is the reason I go to so much trouble!
It just is so darn beautiful!
(And I wouldn't want to have to give up on the May blossoms either!)
And no, I am not quite Super Woman and
 already made the third Rhododendron shrub...
 I took the already "finished" summer leafy one
 and just added the snow to it!
This is partly because I was not satisfied 
with the "end product" of the Summer one... 
the leaves were not quite assembled to make
 the best "dense coverage" possible
 and so it always looked a bit sparse to me.
I was going to need to start over with a different leaf attaching plan.
But rest assured, I have been making leaves!
 

All Fall and well into December
 I continued the daily leaf batch factory.
There are more than 50 batches in the above dish.... 
(each batch is forty leaves)
just waiting for me to get out the glue and start attaching leaves!


And, of course, the sun didn't stick around long.... 
it faded back into the overcast sky...
 

But I don't mind....
 it just means the snow will stick around for a while!


And I can give it the attention it deserves!


Oh, and I see Mr. Gnome is out to have a look as well!
(His home is hidden in the Garden somewhere....!)
 
And in case you wanted to see my RL garden, Dear Readers,
with the snow not melting because of the cold.... 
it has not gone above freezing for days
 and has been down to -9 degrees Fahrenheit the other morning!
(That is nine below zero fahrenheit!)
 

The view from my window!
 

And back in December, the picture perfect snowfall
 coated my RL Rhododendron with 
exactly the evidence I needed 
to complete my Winter Wonderland Rhododendron!
Isn't it gorgeous?
 

And the close up view.... 
just so you know I am not making this up!
It's the Real Winter Wonderland, Dear Readers,
Even if this snow did not stick around
Quite as long as the mini snow will!


Monday, January 13, 2025

What Happens.....


When Elves Come to Play....

Well, Dear Readers, I hope you will understand that I fully intended to get my work table cleaned up and "fully operational" for a New Year's blitz of project progress in every possible direction! (New Year's Optimism is going strong!) And step One of this clean-up required that I "Tidy away" a few incomplete little items I had added to the mess in recent weeks under an excess of "Christmas Decoration Mania"! I refer, of course, the The Teeny Weeny Secret Books kits by Robin Betterley that I had finally begun on Christmas Day itself. And there were the beginnings of those two Tiny Elves which I had rashly started to construct using the "glue trick".... just waiting for the paint.... and the tiny kitchen stove still didn't have the Teensy tiny gingerbread houses painted and those itty-bitty little plates that needed to be cut out and added to complete this tiny kit.... would I ever find all these bits and pieces, let alone finish one single tiny kit if I "tidied them away" now.....? (What a silly Question!) It was obvious that it would not take long to paint such tiny figures....(and surely then they would at least be visible!) So out came the paints... Above you can see I painted the heads and hands a flesh color.

                        And here you can (sort of ) see I started to paint their faces and legs.....

 Meanwhile I also started to paint the teensy-tiny gingerbread houses....
I placed them on a strip of double sided tape so they wouldn't get lost!
Here you can see I added some glitter to the "snow" icing on the houses!
 
Next the Little Elves got their tunics painted green!


And here I am starting to add the hair... 
it is just six strands of regular sewing thread... 
glued across the top of the head.
 

And here the second one is started.... 
You can see I trimmed one side of the first one...
 so I could use the remains on the second one!
 

And while the hair is drying, 
I cut out the itty-bitty tiny plates and "cupped" them...
see them there on the mat? 
I need to make sure they fit right above the "stove".
 

Now both the Elves have had their hair trimmed... 
they just need their "shoes" added....
which required a little bit more glue in the toes!
 

And they needed caps... 
these are just a tiny scrap of paper toweling
 cut in a cone shape and painted red.
While it is drying I shape it slightly into a rounded cone...
 and glue it to the head.
 

And both the caps are attached!
And then I got a bit carried away, Dear Readers,
 with the assembling process 
and forgot to take any pictures for a while...!


Here you can see the Elf on the Stove... (not the shelf!)
So it can reach the shelf-top of the Stove...!
As well as the Teensy-tiny Gingerbread houses in place, 
two on the top and one on the base.
Also the little plates have been attached to the wall.
And the Elves' "shoes" have been painted too!
 
I confess that there was some anxiety on my part
 about whether the whole arrangement
 was going to fit inside the Book Cover....!
 It is only 3/16 inch deep!
I had to flatten the Elf as much as possible
 and it barely slides in...!
 

Here is the decorated "Stove" inside the Book box...
And the little rustic stool positioned beside it...
All it needs is the second Elf...
(but first I had to give her a glitter frosting covered knife... 
because she is still decorating the gingerbread house!)
 

Like so...!
 

And does it fit inside the Book Cover....?
(Well, I had to bend her foot back a tiny bit...!)
But yes! It Fits!
 
Boy, that was fun!
 
But..... Wait a Minute....!
I looked over beside my shoulder and noticed a strange sight...
 

What's this..." More Elves...??? I thought?
 

Whoa.... ! Look at them all.....!
 

How many are there....?
 

Who started this Mischief anyway...?????
 
Well, Dear Readers, I suppose you can imagine
 that I did not get Any progress made 
on cleaning off my Work space for 
New Years projects...! 
Maybe that is just what Happens
 when Elves come to Play!


Monday, January 6, 2025

Traditions....


 The Card....

Well, Dear Readers, it is The New Year, and some Traditions really should not be ignored! I refer to my personal "Tradition" of being so late with my "Christmas Card" that it is a wonder it is still called that! As I have mentioned a time or two, I have been drawing an annual "Christmas Card" now for more than forty years. When I was a child, the sending of "Christmas Cards" was quite a big deal and you could buy many many commercial options to send to friends and family. Because my family leans to the artistic side, we often made our own. My Father designed and had cards printed some years... I remember quite a few of those, and recently came across one of his designs. Because "four color printing" was so expensive, his designs were black and white. Remember, these were the days before photocopying was possible! (Can you remember that?) When I was a teenager we made some linoleum cuts and wood-block hand printed cards.... I can clearly remember some of them, but don't think any of the originals survived. It was great fun to set up the "printing" process and make prints that had to be hung to dry all over the house! And then one year in my early twenties I discovered there was a local shop that would "photocopy" your original artwork in black and white...! I made a drawing and had it copied and hand colored the drawings at home. In the above picture you can see the first twenty-five years of the "official" Christmas Cards I began when my (now ex) husband and I got together in 1983. I began innocently enough with just pen and ink drawings... my favorite medium at the time and easy to get "photocopied"! As is often the case with my projects... I didn't have a clue what I was starting... but it very quickly became a "tradition" especially with the addition of children to the picture. If you look closely at the bottom right corner of the above picture you will see color copies had entered the world! My cards became pen and ink and watercolor..... which meant they took twice as long to make.....! So this year's addition to the pile.... not as late as some years.... again is a bit dark....

                                      I hope you don't mind that it isn't very "Christmas-y".

And I hope you will understand that 
my Father's death last April has colored the year. 
It has been a challenge to "find Christmas" this year. 
But the card must happen anyway... 
so I am calling it an "honest" card....
 telling the story of this difficult year of sorrow.
The minis are in there... 
along with the Family events.... 
You might just have to look harder to find them!
So Thank you, Dear Readers,
 for your understanding and patience 
with my personal Tradition 
of being Late with the Christmas Card!