Tuesday, September 27, 2011

Something Old And Something New

And Maybe Even SOME Progress!

Dear Readers, You MUST be thinking that I have Forgotten about the Wedding I am supposed to be planning in my Doll World. But let me assure you, nothing could be Further from the truth! Pollyanna and Daphne have been hard at work researching Gown Styles.... and they have even convinced me to bring home a Bridal Magazine or two to help with the Inspiration that seems to be lacking! As for setting a DATE..... you will just Have to forgive us, but we are Still trying to track down Arthur's FATHER! He was last heard to be chasing rare butterflies on Mount Kilimanjaro, but nobody has heard from him in a while. Celeste thinks we should just go ahead and plan the Wedding without him (she would perhaps rather NOT see him....) and Arthur and Pollyanna are starting to believe they may have to do just that. So we shall see..... it looks as though the Soonest they could get married would be sometime in November...... and that is only IF Pollyanna can get a Gown made in time....... and ALL the OTHER Wedding Party members too.... did I Realize what I was setting myself up for? I am not even sure whether some of the dolls' clothes are removable........ oh dear..... this could be complicated..........!
But for NOW, Pollyanna and Daphne are studying the LATEST Styles...........

There are some STUNNING Gowns that would be an incredibly difficult thing to make in mini....

But with some of the MOST FAMOUS Designers present....
we could perhaps get some great tips....

There is Certainly a LOT to consider.......

And some VERY Beautiful Gowns.......
that Might be Just what we are looking for.......

What do you think......?

So While you are thinking....... I have ALSO been working on the tiny bits and pieces for the Cupboard House. In particular..... I spent an Entire Day cutting and fitting and gluing the Muntins (those vertical dividers) for ALL the windows! It was VERY fidgety work as they really had to fit precisely and there needed to be one on the inside and the outside of the window, both top and bottom...... here you can see the kitchen window completed!

And a view from the outside.... I just LOVE these windows! They actually go Up and Down!

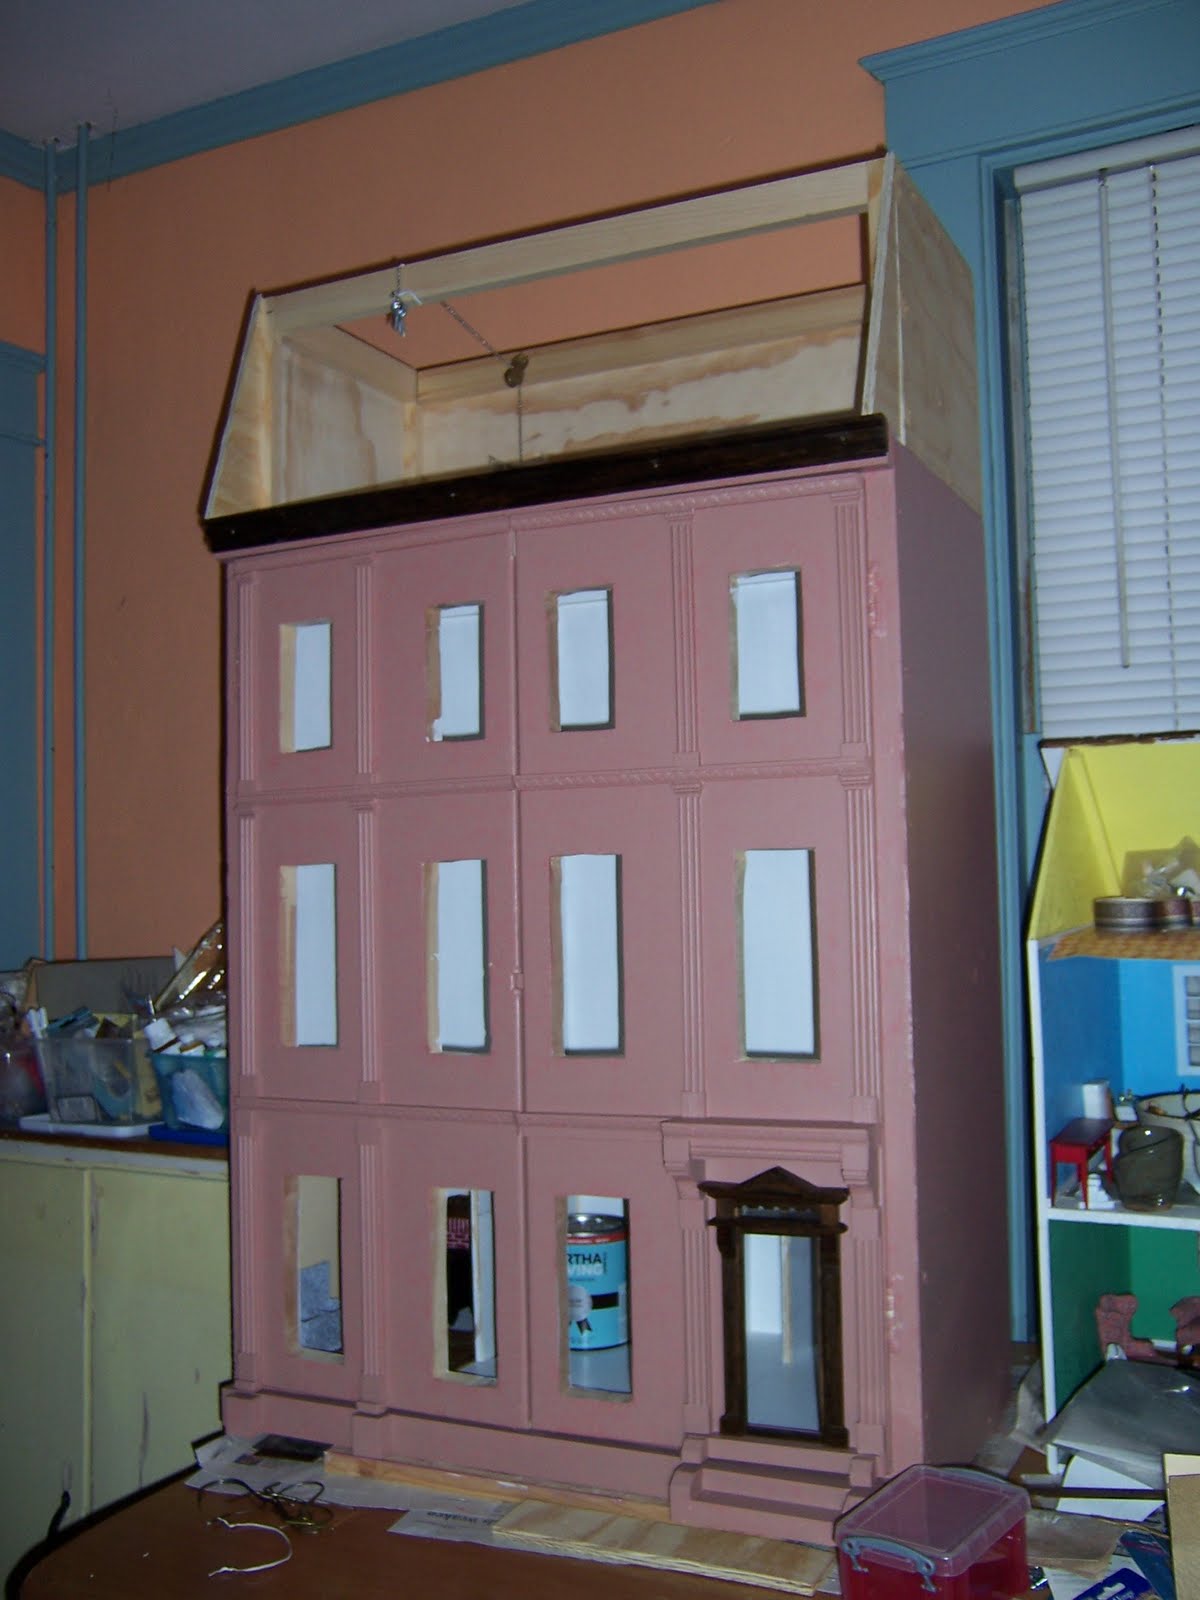
And once they were all done....
I temporarily attached them (with Museum Wax) to the House....
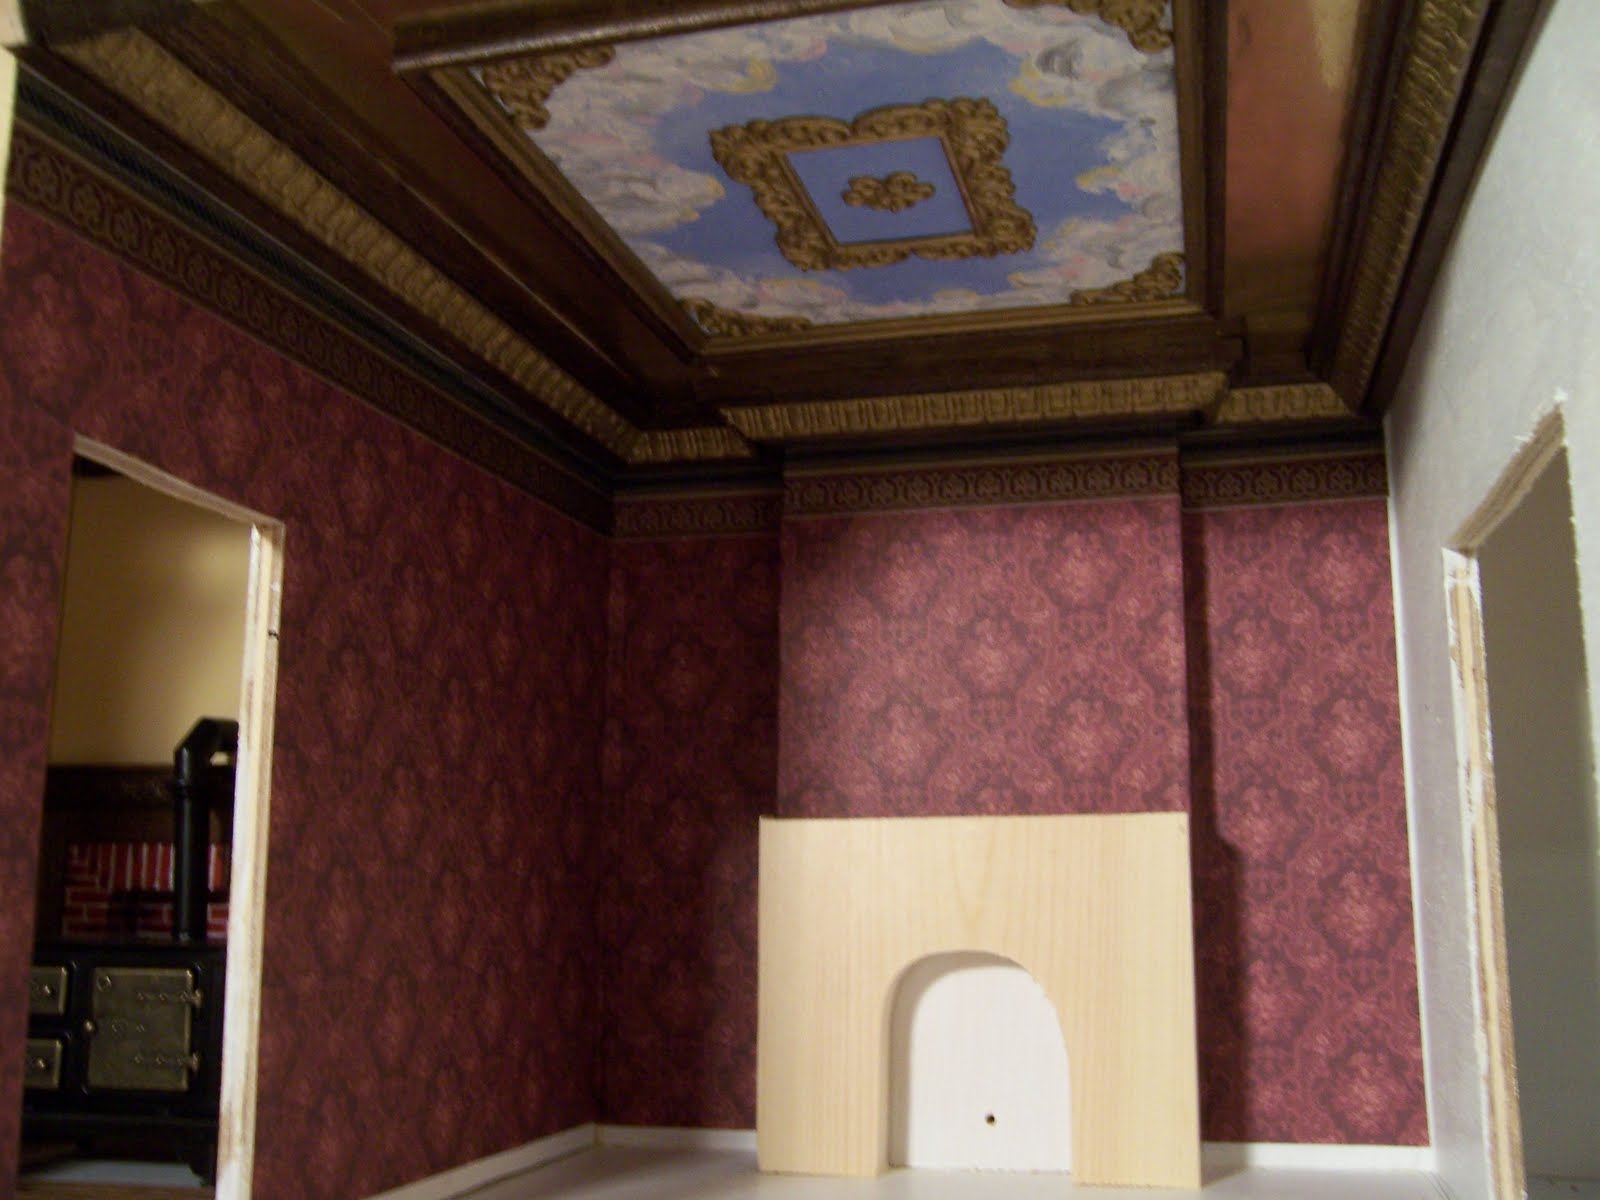
I am Very Happy with the way they look!

And even with the way they look on the inside....... because the front of the cupboard is so Thick there is a lovely Deep window embrasure..... I will need to line it with a sort of extended window frame......

And Another little bit I have been working on is the Plumbing for the Kitchen of the Cupboard House...... specifically, I have tried to make some tiny faucets in a Victorian style.......
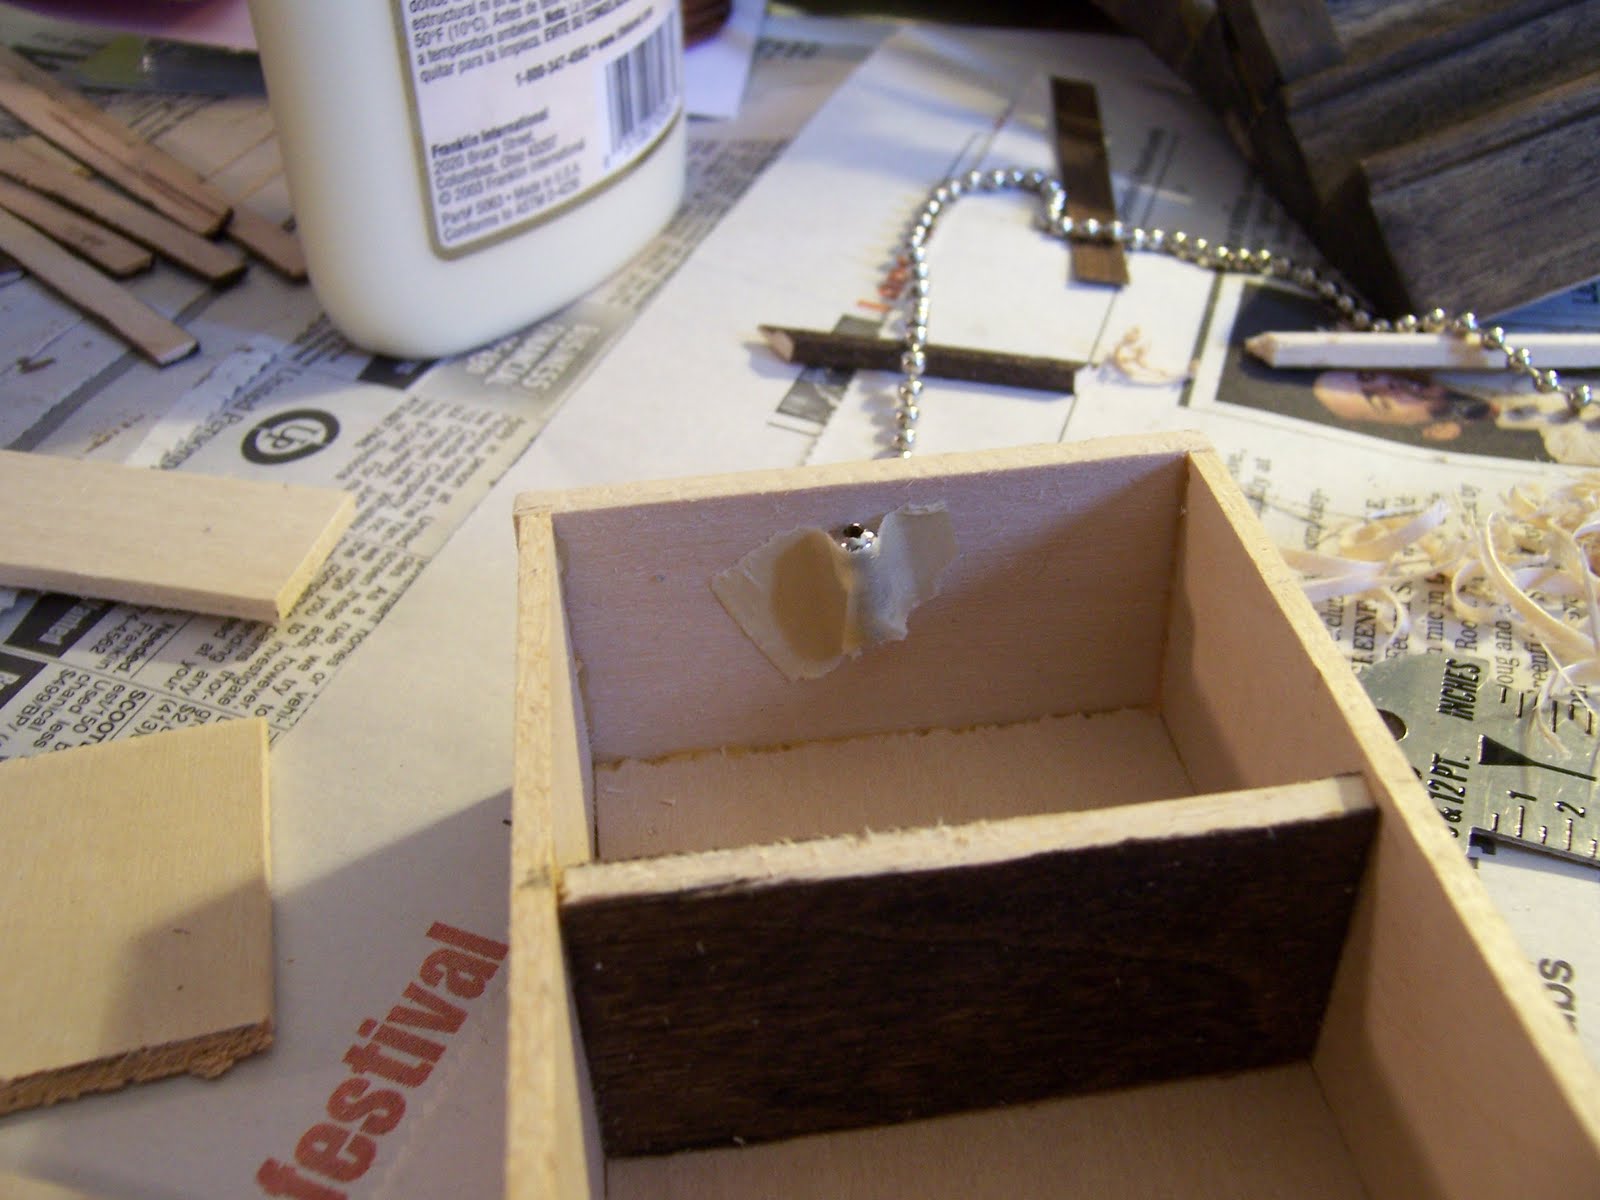
Here you can see my first attempt......

It is made with wire and jewelry findings and Sculpey all glued together and painted.....

The only problem is that they are JUST a BIT too BIG! So I tried again with Smaller parts......
Here you can see the Sculpey (black stuff) on the wires and glued together before painting.......

And here you can see the two sets together to compare the size.....

I ALSO started to make the pipes for the Hot water tank...... but I am not sure they are right either...... and I need to add the intake and the outflow pipes... as well as a drain faucet...... so I MIGHT have to make some changes..... and I need to figure out EXACTLY where the pipes GO so they are cut the correct length ....... so you see I have a ways to go with this part.....

Here I have glued the smaller faucets onto the sinks.....
I set them low as there will be wooden hinged Covers on the sinks.......
.
And here it is in the Kitchen.....
I can't Believe so Little improvement took so MUCH time!

But I am SO glad I have completed the windows.....
they make the Cupboard start to Feel like a HOUSE!

And Now that they are in place on the Cupboard House......
there is Space again in MY House......
to start filling up with more projects!
Maybe I WILL get started on a Wedding Dress.......


Something Old IS Something New

Sunday, September 18, 2011

Steaming Ahead!

Roses, Wall Paper, Egg Cartons and Broom Sticks!

Dear Readers, I just can't tell you how MUCH I am enjoying my Mini Rose Garden by the Folly! This is how it looked this sunny Autumn Sunday morning. The Sun no longer strikes directly into the room... it has headed South for the Winter.... but even so, it lights up the tiny Roses and they keep on blooming! This white one has a delicious vanilla scent to it..... wish I could send it through the internet!

And while we are looking closer..... there is a lovely little birdsnest hanging from the eaves of the Folly! It is a jewelry pendant I found at Michael's last week..... and couldn't resist!

Here ..... you must have a closer look at this beautiful blossom...... they may be out of scale for minis... but they are tiny as far as Roses go! And they do make SUCH a lovely little garden hedge by the Folly! I am just in LOVE with them!

And speaking of Roses.... I chose this wall paper for the Dining Room of the Cupboard House at least in part because the pattern is bouquets of Roses...... in a very dark Old Fashioned Rose Color! Here you can see I have started to attach it to the walls!

And this shows how it looks when the doors are in place..... so Dark and Rich and Victorian!

And here it is with the third wall done.......
I love the way it reflects a Rosy hue in the gilded ceiling!

And Paper in ANOTHER form.... Egg Carton paper .... has FINALLY been tested out for the brick floor of the kitchen underneath the cast iron stove. I have been intrigued by the idea of egg carton bricks ever since seeing other bloggers using them to such great effect.... but I had never tried them myself. It seemed like an awful lot of steps were needed ...... cutting the bricks, gluing them on, painting them, sealing them and finally grouting them...... and I had never used the grout so I was NOT sure it would be successful! But I finally convinced myself that this small corner of floor would be a good place to test them out.... and if they didn't work.... then I would try a different method. So I cut the bricks.... not very precisely, I might add, and attached them to a cardboard base that was cut to fit the space exactly. This served to give the right thickness of floor and also made it removable! Here you can see them all attached......

Then I painted them and sealed them with polyurethane. They didn't look like much so I neglected to TAKE a photo of that step! Then I had to try the ALL IMPORTANT Grout! I carefully spread it on.... not too thickly.... making sure it went into all the cracks.... and wiped it off carefully so that only the grout in the cracks remained...... and left it to dry! At THIS point I began to see WHY people like it so much....... they REALLY started to look like BRICKS!!!! I am a complete convert! I LOVE them! I want to put them everywhere..... well, maybe NOT everywhere.... but I REALLY am impressed!

Just LOOK at how Wonderfully REAL they look!!!!!

And here's a view with the stove in place!
I Just Could NOT be Happier at the way these turned out!!!

So by now you must be wondering what the Broomstick part of this Post is all about! Well, I had an idea for making a water heating tank for the Kitchen, but it required the SACRIFICE of the end of my Broom handle.....

I thought about it for a Long time... but I am not very tall.... and heaven knows I don't Sweep very often.... so the end of the broom handle will probably NOT be missed....... and it IS for a Good cause.......
So I sawed the top four inches off......!

And painted it a beautiful shiny Copper color......
(more coats of paint will make it even shinier...)

And WHEN I attach all the copper pipes and faucets.....
it will make the PERFECT Hot Water Tank...
a VERY MODERN technology for the year 1852.....
Providing STEAMING Hot water for the Kitchen!

You will just have to IMAGINE the pipes for now.... as I didn't get that far this weekend......
But here is a peek through the almost finished window into the kitchen... oh dear.....
it is a bit dark and badly lit.......
I will have to do better next time.......

That's it for now!
(Not Steam Heat) but Steaming Ahead!

Tuesday, September 13, 2011

I Couldn't Wait

One Thing Leads To Another

Once the Idea of a Dumb Waiter in the Doll House had occurred, I simply COULDN'T wait to get started! But before I show you what I have done so far.... let me show you the Facade of the Cupboard House in more Natural morning light. As I mentioned in my last post, this is a difficult color to photograph... primarily because it is Two colors overlaid in stipple effect... in order to try to duplicate the color of the natural stone. The stone itself has a range of variation.... but it generally is a reddish brownish color which changes depending on the light. So this picture below shows you the clear morning light.... it has a grayer tone to the reddish brown .... hard to describe!

And now on to the Main Event..... the Dumb Waiter project!
I began by constructing a smooth metal channel for the box to slide in. I used common aluminum roof flashing and creased it to fit the opening beside the hearth. This was harder to do than I had imagined as the flashing was HARD to crease evenly.... and I HOPE I have managed to do a good enough job of it! At least it fits the space just beautifully ..... as I didn't want to waste any space in this already small corner! Here you can see the shiny aluminum inside the closet door opening....

I needed to make the entire chute in one piece so there would be no seams between floors.....

Which meant thinking UPWARD to the TOP floor of this house.... a floor I hadn't even CONSTRUCTED yet!!

Which actually was a GOOD thing..... because otherwise I probably WOULDN'T have built it until much later after I had done much of the other interior floors.... Much better to get the rough carpentry done now before the delicate parts are added! So I constructed the frame of the Attic floor. This will be where the Nursery and Children's Rooms are, and even though I have ALWAYS imagined this Cupboard House with an Attic built on top...... it is taking some getting used to now that I have built it! It just makes the house look so TALL! It will be a Mansard Roof, possibly even with a Roof Walk and a Tower on top! For now it is just the rough framework.....
but Necessary for attaching the pulley mechanism at the top!

Now that I had the exact dimensions of the opening, I could build the box...... I started simple with some basswood from the craft store.... lightweight and not too thick. I attached a chain at the top.... the kind of chain used in old fashioned pull-chain lights...... it is small, sturdy and flexible and smooth at the same time...... and comes in any length you want them to cut it at the hardware store!

I added one of the end fasteners to hold it in place.... but that hung down too far... so I taped it to the top and then added an inner ceiling to the box, trapping the fastener in place.... hope it works!

Then I added more to the front sides of the box.... the goal is to make it as smooth as possible on all it's surfaces so nothing obstructs the movement in the channel......

This is a close-up view of the box before I stained and sealed it. I left the inside walls the lighter wood so you could SEE inside the box.......

And of COURSE I had to test fit the box in the channel a few times....... it slides just SOOOO nicely!

See, when it goes up you can see the aluminum channel below it......

So we HAVE to test run some DISHES to make sure they fit........(WHEW... they do!)

And close that door with it's TINY little hinges.......

And pull on that chain ........ while trying to take a picture at the same time........
SEE, it is GOING UP!

And UP!......... Yes, I will have to build the front wall all the way up too!
But for now you can see it going up......

And Up......

And UP!......

All the way to the TOP! And here you can see the VERY simple pulley rig I have made..... so far..... I will have to figure out all the fastenings and guide channels etc. as I go........
But first I need to decide whether the chain will be accessible from the SIDE or the FRONT of the house.......! DECISIONS!
But for NOW, it is enough that it Goes UP AND DOWN........

The Aluminum channel walls will hold their shape better once the surrounding structures are built...... but they work SO Smoothly! I think this really will work!

I HAD to show you!
I Just Couldn't Wait