Tuesday, November 25, 2014

Moonlight And Maidens


Just a Little Bit of Light....

A Glimmer of Light in the Darkness, Dear Readers, is all I have to show you this week. Real Life is full of Holiday Schedules and obligations, making Time for Minis more scarce than usual. But I did manage to work on the "stained glass" windows for the upstairs hallway in the Willowcrest. I used the same method I had tried with the smaller window in the stairwell, and for lack of a better method, I will probably use it on many of the windows in this house! This method is to use the "lead lines" paint that is meant for painting glass to resemble stained glass, but in this case it is used on the plastic windows I am making to replace the ones provided by the kit. Because it is plastic, I cannot bake it, and thus I decided to use nail polish for the colors, rather than the glass paint. Above, you can see I have designed the windows to continue the Moon Maiden theme that began in the lower hall and marched up the stairs. These Maidens represent the full of the moon..... it is hard to tell which is the "fullest", and I will probably adjust one of the moons to have a slight dark shadow as it begins to wane.

Here you can see I have started to add the color.... 
I even went shopping for a few new colors.....
One of which is this brilliant blue!

And then a paler blue for the gown......
and a pink for the flesh tones....
(It is hard to see these colors here...)

And a glimmering Gold for the hair on the Maiden on the left....

And here you can see them with the light from behind....
I know, it fades the colors almost to nothing.....
And the Moons have been painted with a pale yellow, too.
And now, we just want to see how they will look in place in the hallway....
But there is So Little light at this time of year!

You can barely see them at all in my Dark house!
But I found an ingenious LED Light at Joanne's Fabrics....

These are LED battery "tea lights" 
that turn on with a twist....
and are waterproof!

I am not certain I will be using this permanently, 
as I need to have access to turn it on and off...
But it is very handy for testing.....

I suspended it with a wire over the hallway.....
where the Moon Maiden Window is temporarily taped in place...

Just so we can get a Glimmer of an idea how this will look....
from inside the hallway....
(the Maiden on the right is mostly unpainted so she is barely visible)

And from the outside.... with the light on inside.

And slightly further away... the outside view.

But then I realized that I wanted the Moon Maidens 
to all have slightly different coloring...
So I went back for More nail polish!

And painted the remaining Maiden in Pearly white
With Scintillating Silver for her hair!

With the light shining through, it is still difficult to tell the colors....
I might consider adding a layer.....
But first we need to test them in place again...
The view from the inside....


And from the outside too.
 

Alas, it is so Dark, Dear Readers,
we can barely see them.....
Where is that Moon Light?

 Of course, the polish is rather reflective....
But the Moon light sure makes a difference!
Inside....

And outside!
Well, Dear Readers, it doesn't seem like I did much,
Except shed a little Glimmer of Light
On the Moon Maidens.

Monday, November 17, 2014

Slow Progress...


You Would Think Nothing Had Been Done....

Progress on all fronts is Excruciatingly Slow, Dear Readers, and it is not for lack of trying! The above picture is the present condition of the Conservatory, after a week spent working at it! Does it look as if anything at all has been done? Well, if you know where to look you will see the tiny bits of progress! The wires on this end back wall have been glued "out of sight" under the window ledge which has also been glued on! The most important detail, though, is virtually invisible.... The walls have been glued in place!

And with the wall at the end glued firmly in place, 
I could complete the cornice section over the wall which opens......


Which you can see here with the wall opened and the roof in place, 
supported by the new cornice which does not open!

Here is the view from above....
The roof sits on the lip formed by the new cornice 
and the support beam I added at the top of each wall.
And every little step needs to be carefully thought through.... 
in case something is being forgotten....
or an unforseen snag arises!


 I have not glued the roof in place yet... 
but the walls for this end are all attached.
And a start has been made on the other end.....
But as I mentioned last week, 
it presents an entirely new set of engineering challenges!
The chief one being the relocation of the wall with the doors to the side of the structure.
One tiny detail I had ignored was that the door wall 
is one half inch narrower than the side walls.
This means that when I swap them, 
the "end" wall of the conservatory on this end 
will be a little wider than on the other end!


But we are going to overlook that trifling detail.....
and maybe just "pretend" that it was built in two sections.....
and they didn't measure exactly.....
or maybe since it is very old.... 
the walls sagged and are no longer equal.
So when I figure out how to fit the sections together..... 
there will be more progress.


But for now, at least the back wall is glued down 
and will no longer fall over at every touch!

And another Tiny bit of progress has been made with the hall of the Willowcrest.
I decided to try the "lead" line paint that you use for glass painting 
on the plastic window in the stairs.

I had bough a larger bottle of the stuff, 
but it comes with a pre-cut tip, which makes a wider line than I was expecting.
It makes the drawing look very crude.
And because this is on a plastic sheet, I can't bake it to cure it.
But I decided that it will be on the interior of a window you can't reach, 
so it will be protected from wear and tear.
Rather than use the glass paints which require baking....
I decided to try nail polish....
It comes in such yummy colors these days!

 
You may remember that I wanted it to look like a continuation 
of the painted tree in the wall mural...


Of course, it is now the Dark time of year...
It is so difficult to get pictures with the lighting right....

Here you can see it in the view from the parlor with the flash!
(And the fireplace now has a coat of paint too...)

And while I was being bold and trying this method, 
I decided to use it on the front doors too!

Once again, the line is much thicker than I would have liked.....

But I think the colors look wonderful!


And if you hold it so the light can shine through....
(Please overlook the crude, rough leading!)


And here they are propped in place on the front of the house.
I will need to attach them with the screws from the inside....
so I am not completing this until all the hardware is in place!
Yes, this front hall requires you to think everything through.... 
because when it is enclosed it will be impossible to reach in there!

And that is not the only place Dear Readers, 
where you will think there has been no progress at all!
I am sure you will have despaired of ever hearing more of Daphne's Story!
You might recall that we last saw her when 
she told Will she could not love him as he deserved.
And you might remember that she had been on her way 
to the DeMontaigne family Town House 
when she passed the Park and chanced to see her child at the Fountain.
And then she had confronted Will.
 
When she left Will in the Park, she realized she was too upset 
to continue on her way the the deMontaigne House.


She realized that too much had happened that she hadn't planned on
 for her to continue with her first plan.
She needed time to think things through.
She hadn't thought Will would be here asking questions....
meeting her child....!
She had no idea what the repercussions of that might be!
So she returned instead to her Pension and sat with her tea in the garden.


She needed to think things through and come up with a plan.
And the more she thought about it, the more she realized that she didn't want to alarm the deMontaignes at all! She wanted to be able to get along with them.....

She wanted them to know how she felt and what she hoped for.
She decided the best thing would be to write them a letter.....
that way she could say all the things she might not otherwise tell them....
about her desire to be a part of her child's life.

Yes, she would write them a letter telling them exactly what she would do. 
And she would give them a week to think about it....
And then she would go see them as she had at first planned.
She didn't want them to be alarmed when they saw her after all these years!

Well, Dear Readers, it might seem as though nothing has been done at all.
But if you look closely, I think you will see there has been some 
Slow Progress after all!

Monday, November 10, 2014

Doors and Hinges


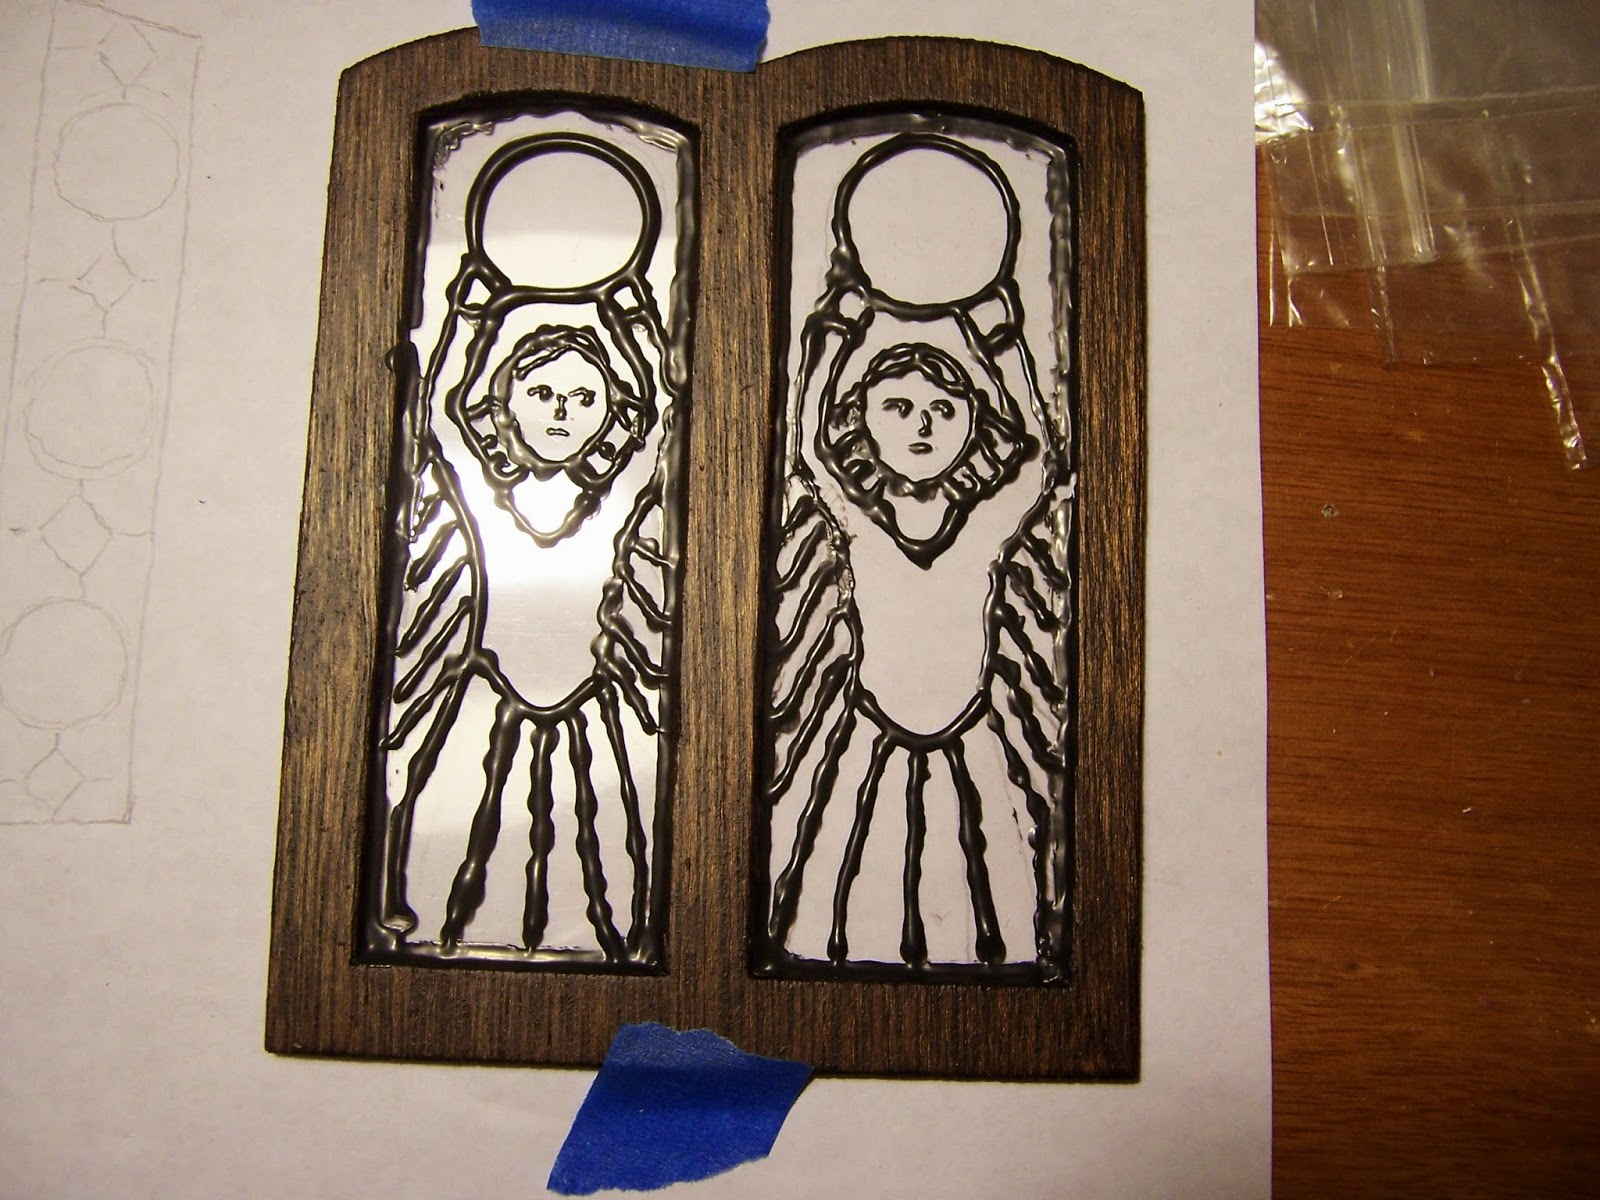
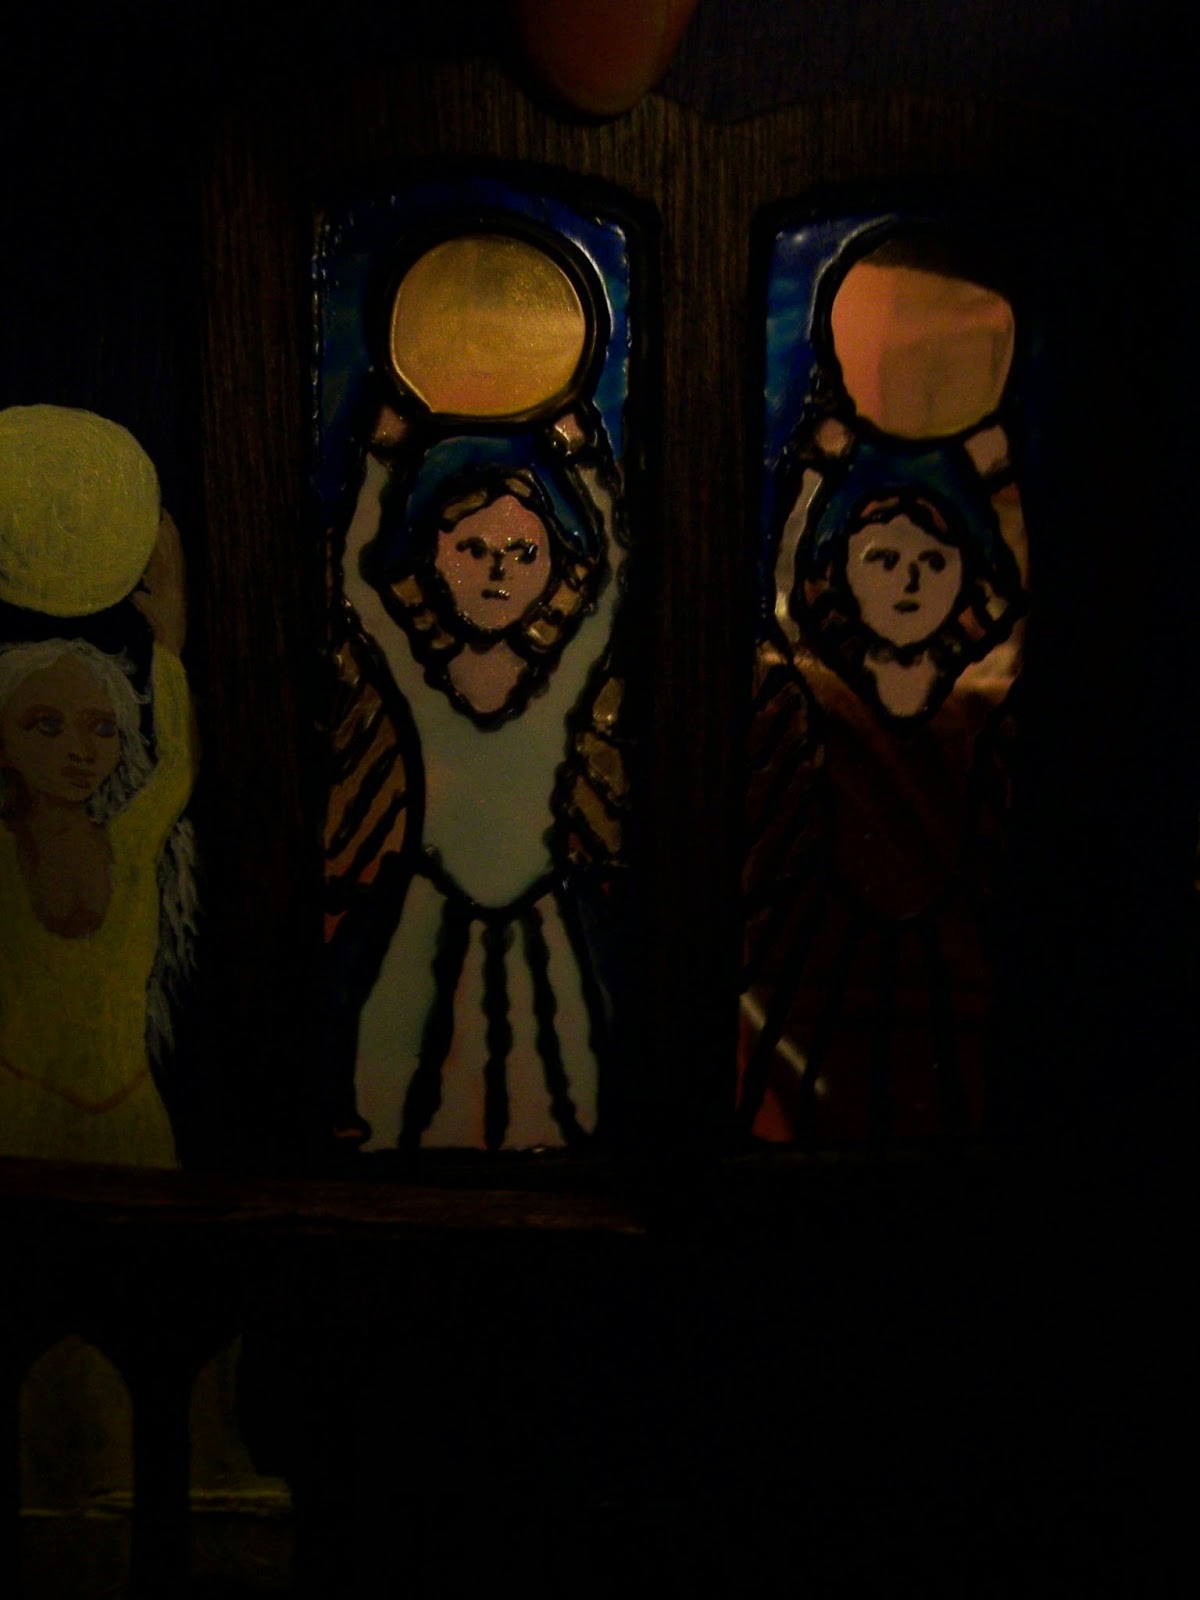
And a Little Bit of Light.....

I Left you at the Top of the stairs in the new Willowcrest House project, Dear Readers, where I confess, the mural painting had come to a screeching halt! It had become clear to me that I was going to have to solve several technical issues before I could go any further with this build! The first one that needed solving was the Doors.... the bedroom doors and the front entry doors, both of which are accessible through the hallway. The kit instructions have you attach them in the final steps.... and have you glue them in place! The above is the view through the bedroom doors (not yet in place!) to the hallway where the Moon Maiden murals are barely visible.

This is the view through the opening to the front hall..... 
it would not be visible if the doors are glued in place!
I insist that my doors can be opened.... and that requires hinges!
So the doors need to be completed before I can finish the hallway...
as well as the window to the stairs that I mentioned last week.
So I pulled out the sheet of window "glass" that comes with the kit....


I am sorry, but I just can't go with the white painted window dividers!

And here I am testing the panes for the front doors....
The white dividers just look ridiculous to me!
So I had to cut new pieces of plastic.....
I used sections of plastic packaging that I have kept....

And here I am gluing them between the layers of the door panels.
I will figure out some way of adding the decorative "panes" that I want.
But the doors needed to be assembled before I could attach the hinges....

And I also need to figure out how to attach the hinges to this thin plywood kit....
I think it would be best to have the exterior trim already in place to add depth for the screws!
I have yet to do any of the exterior trim!
And the next issue I need to solve is the lighting.....!
I will not be able to reach into the hallway to attach anything when the kit is done....
So the lights will have to be done first.....
I haven't had Time to buy the lights I will need for this house!
So to distract myself from these unsolved problems....
I decided to build a better fireplace for the parlor....

The ones that come with the kit are rather pathetic.
I started with some plain pine stock and added decorative trim pieces.
It is a bit rough because the fireplace will be difficult to see.
It sits against an angled wall.....
which is angled Away from the open side of the house...

And can only be viewed head-on when looking in through a side window!
I will gesso and paint it to resemble stone.....
But again, I could go no further without getting the lighting issues settled.
I think the best location to run most of the wires will be on this chimney wall,
the back side of which is the kitchen wall 
and can be covered in a "brick" facade to hide the wires.
So with all those unsettled issues getting in my way, Dear Readers, I did what I often do....
I jumped to an entirely different project!
Remember the Conservatory?
A year ago, on this blog, I described the way in which I hoped 
to make changes in the original kit design, 
causing it to open on the sides and have the roofs attached.
But those changes would require some engineering to work!
All year the kit sat "put together" with masking tape holding it up!
And since I recently had to move it away from the windows 
to bring the house plants back inside for the winter, 
it now sits on the corner of my work table....
"Sort of in the way" of all the other projects!
and if you bump it wrong.... it all falls apart.
So I decided it was Time to tackle those engineering challenges!

I hope you will not be surprised to learn that it involves Hinges!
Above you can see the doors to the kit as they come...
 they are hinged with pins which poke into the door from the top and bottom.
If they are not centered just right they run the risk of breaking the wood when they are opened.
You can see that problem on this door, the wood at the bottom is cracked. 
I had debated whether I would change the hinges on these doors, 
but when I saw the crack I knew I would have to.
It is So much easier to do this Before the walls are attached!

Here you can see the doors removed and the new hinges attached.
I debated using smaller hinges.....
 but I knew they would see a lot of action, so I went with the larger hinges.
I had to cut the screws down by half their length....
and even so, the holes I drilled penetrated through the doors.
This caused me to need to add a layer of Trim to the exterior of the doors.... 
(which you will see in a later photo...)
And on the inside I "disguised" the brassy hinges 
by making them appear to be old patinated brass.

But the biggest engineering challenge was building the new roof support structure....
so that the roof would be held in place firmly when the side was opened.
The kit is designed for the roof to sit on the top edge of the walls.
So I built an extension of the walls vertically, raising the roof line....

(And I also added a shelf as a window ledge.)
I had pondered for ages how to build this new roof support structure.
But the idea for the raised roof edge was made simple for me when I realized 
that a particular decorative trim I get from my local Home Depot 
would make the perfect new Cornice at the top of the walls!

Here you can see the front end wall with the added Cornice...
and if you look closely you can see the doors with the screw holes....
before I added the new trim to cover them!
And because I needed to get at least One wall "finished" 
and attached firmly in place in order to figure out 
the attachment for the hinges on the opening wall.....

I needed to add the lights on the back wall before attaching it in place!
I had bought them a while ago....
They are simple brass bi-pin bulb "candle" lights.
I painted them black to look like iron, and "aged" them with a little bit of rust.
Because this is an old conservatory.... the lights are supposed to be candles....
(the bulbs are not in them for protection while building!)
The wires are being sort of hidden by running them 
under the window ledge and out to the back side.
No, I have not yet figured out where I will hide the plug strip!

Here is the re-built wall from the inside....
The cornice is taller than before, 
and I think it makes a wonderful improvement!

And here is the view from the outside.... 
forgive the blue painters tape, 
it is holding the corners together!

And here is another view from the side 
showing the old structure on the left side of the brick chimney, 
and the new raised side to the right.

And here you can see the new trim added to the fronts of the doors....
and the door hardware too!
But by far the trickiest part has been the engineering of the hinged "wall"!
The kit was originally designed to have the side walls "dovetail" 
into the end wall, with a nice deep groove 
and little rabbit ear tabs that overlapped at the corners.
I had to remove all the rabbit ears and fill the groove 
and add another thicker stronger piece to receive the screws for the hinges.

Here you can see the hinged wall after the hinges were attached!
I got too involved in working out the kinks to remember to take photos!

So far, the back wall on this side is the only one that is glued in place!
I needed to get the hinges attached to the opening wall 
before I could glue the end wall in place....
and I still want to make sure all the clearances are good with the chimney side 
before I glue this end wall down. 
That, and I discovered that the plywood base is a little bit warped....
I will need to shim the front wall slightly!
Meanwhile, I have started on the other end of the building....
 By extending the top of the wall with the new cornice...


 But, the placement of the doors on the side rather than the end wall,
creates an entirely new bunch of engineering challenges!

For now it still sits "in the way" on the corner of my worktable, Dear Readers,
But I have made a whole lot of progress with the Doors and the Hinges...
and even a little bit with the lights!