Wednesday, June 27, 2018

Three Little Things...


Adding Up.......

I don't know about you, Dear Readers, but the month of June has flown by and I feel as though I have accomplished almost nothing in my Mini projects. This is always a disappointing feeling.... because I have so many projects and always am planning the next steps for them in my head... and not always managing to find the Time to make it happen. So in an attempt to not be too disappointed by the teeny amount I accomplished last weekend, I will instead proudly proclaim that I added to Three of my ongoing mini projects! Above you can see that I have made quite good progress (depending on how you are measuring it, of course...) on the petit-point stitching that I began last Winter. The background has been slowly filling in with the cream color that is so difficult to distinguish from the mesh cloth threads.... it is so easy to skip stitches...! But it is nearing the point where I must decide whether I will be leaving it a "work-in -progress" with a few stitches left undone as if the mini person is still working on it.... it comes with a lovely sewing stand to mount it in, which I still have to assemble.


So really, this project is progressing nicely!

The second little thing I accomplished
 was to attach the tiles that make the top surface
 for the base of the Gypsy Wagon cooking hearth.....
 nine whole tiles glued to the cardboard surface!
 
You can see it above... 
I know, my picture is quite dark, 
even with the spotlight shining on it....
(You would think that on one of the Longest Days
 of the Year I would be able to capture it in sunlight.... 
but that did not happen...)

Here, you can see it a little closer..... 
these tiles are so wonderful.....
I do love the patterns! 
I will still need to trim the front edges to the right depth....
 and the base still needs to be textured to resemble stucco....
 None of which I had time to accomplish last week.
But the base now looks more like a
 part of the hearth which is what I had hoped!
 
And the Third little thing I accomplished, Dear Readers,
 was the fourteenth Lilac blossom!

Here you can see All the little florets lined up
waiting for their paint color to be added.....

And much much later, the assembled blossom!

And here you can see it added to the collection in the Safe Box....!
Fourteen blossoms completed!

And even though this might be the Shortest Post
 I have ever posted, Dear Readers,
And all I have to show are Three little things,
They are Adding Up to a whole lot more!


Tuesday, June 19, 2018

Gypsy Wagon Hearth Tiles....


Cutting And Fitting.....

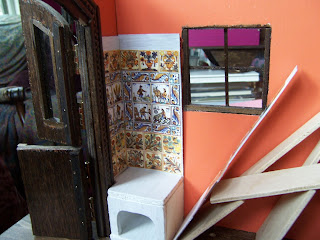
The Living quarters in a Gypsy Wagon, Dear Readers, are quite small and require very careful planning and measuring and cutting and fitting to ensure that everything will work in its designated place! In the picture above (alas, it is a rather dark one.... the sun had left for the day....) you can see the beginnings of the general layout of the hearth side of the wagon. The hearth is in the corner right inside the door (or should I say left inside the door?) and occupies a space just over 2 inches wide.... or approximately 25 inches in RL measure. I know it looks terribly confined.... and it is.... but I have known apartments with smaller cooking stoves! Next to it, under the window will be a sink or wash bowl stand, and next to that beside the sleeping compartment is a bench seat with storage underneath. I have cut a simple framework that separates the parts, but have only started to build the hearth. The trickiest part is that it needs to be surrounded by ceramic tiles to protect the wooden walls of the wagon from the heat which would be emitted by the old fashioned wood burning stove, and it needs to have a "hood" above it to contain the chimney pipe where it exits the roof of the wagon. And since the walls on this wagon are not yet attached.... so that fitting and measuring and painting might be a little easier.... I needed to build a little "framework" for the hearth so I could attach the tiles and still be able to disassemble the walls when needed. The base for the hearth is plywood, but the tile surround is just cardboard because I didn't want to lose any more space than necessary with the thickness of the tile walls.

As I mentioned before, I have two different patterns of tiles
 that I am mixing because I don't have enough of either one
 to complete the tiling needed for one hearth.
And since there would be gaps 
where the tiles were already cut apart
 (not just from one printed sheet)
 I decided I needed to cut all the tiles apart
 and glue them on individually.
 Above you can see I have made a start
 gluing the tiles to the very carefully fitted
 cardboard hearth sections.

Here I am starting to add the tiles of the second pattern.

I love these tiles, because they portray 
the labors of the seasons, a very Medieval theme!

In this case the labors only cover ten tiles
 because this set was already cut up by someone
 before I ever bought them. 
(Bought at a going out of business sale long ago.)
But it is just enough to fit this space perfectly!

And of course, I had to test the fit.... 
again and again....


And try to get a sense of how much 
would be visible from the door of the wagon....

And a closer view....

And the other side wall.... 
once the tiles were trimmed to fit.... 
(and the trimmings Not thrown away... 
because they will go around the wooden door trim....)

Here all three wall sections are propped in place.....

But the trim around the doorway would also need tiles
 to protect the wood from the heat.... 
so I add that section and use the trimmed ends 
of the tiles for the  edge you will never see.... 
(But I will know it is there!!!)

And with the section of tiles that covers the door frame trim. 
The wall sections are now almost complete, Dear Readers,
but I still need to finish the base.
Because I don't have enough tile to cover the entire base as well, 
only the top surface on which the stove will sit,
 I decided to try to make the base a "stuccoed" brick structure. 
(But I have still not figured out how to make the
 appearance of stucco on the wood...)
 I decided it would have terracotta bricks for the bottom layer.... 

Which I have only painted on here.... 
(hoping that the painting will resemble the bricks well enough... 
once they are dirtied up and covered with wood for the fire....)

This is Not yet finished.... 
it's just a start..... 
to see if it looks the way I imagined..... 
but I think I need to finish the tiling on the base....
 and the stucco..... and "age" it a bit..... before I can really tell.

But you can sort of start to get a feeling for the space.... 
I will need to manufacture a little "cast iron" stove.... 
because I have not seen any that would be small enough! 
And have the right features....
(such as a railing to keep pots from sliding off....!)

So that is what I accomplished on my weekend, Dear Readers, 
a Little bit of Tiling, lots and lots of cutting and fitting.
Oh, and the thirteenth Lilac blossom too!

Which you can see here
 with the slowly growing collection!


And the hearth for the second Gypsy Wagon
 is waiting its turn....
I have the tiles, but they will require
 the pattern to be designed for the space....
And lots more cutting and fitting to be done!

Wednesday, June 13, 2018

Are You Going To The Sturbridge Fair.....


Porcelain, Books, Radiators and Toys......

The Sturbridge Miniatures Fair was held on the first Sunday in June, Dear Readers, which was also the final day of my vacation week, and it really was the icing on the cake of a wonderful vacation. It did seem as though it was a little emptier than usual, of both vendors and buyers, which could be a sad result of the ease of internet marketing. I do enjoy being able to see the items I am buying up close and for real, and enjoy the exchanges with the crafts-people and artisans who give so much to this Miniature World! This Fair happens only once a year and I count myself fortunate that it is only a little over an hours drive from where I live. And because my RL world recently has been rather full of visiting relatives and no time for minis, I will share with you some of the Treasures I found at the Fair. The china dishes in the above picture are old and well used, but I think that makes them perfect for the Fortune Teller's Gypsy Wagon! I found quite a few Treasures in the bins of sellers who were clearing out inherited collections.

Like this very Tiny Nativity!
(Because I surely don't already have enough Nativities!)

And a charming basket filled with skeins of yarns.....
 
And a whole selection of metal wares..... 
sconces, old cutlery, a bed warming pan, 
candlestick and candle snuffer, 
and a lovely copper grater!
And then there were the usual (and not so usual) 
commercially available pieces....

An assortment of books...
 most with empty pages but evocative titles.....

And some with a definite destination.....

If I ever get to start building my "Someday" Santa's Workshop......
(No.... don't cringe....!)

And some with gorgeous craftsmanship.....

And fully illustrated pages.....

The Book of Myths and Enchantment Tales......

And the Edmund DuLac Fairy Book.....!
These last two were purchased from
"Art To Play With Hitty"...
a showcase for Hitty artisans.
(I did not know about Hitty dolls, but they seem to be
 carved wooden jointed dolls much like my own Penny Wooden!)

And of course, there were dolls.....

A lovely "antique style" china doll... (a doll's doll)...... 
dressed as if from the mid nineteenth century, 
made by Ethel Hicks.
She is just under two inches tall,
 so she would be a large doll, and is jointed porcelain...

And can be convinced to sit in a chair... sort of... 
those petticoats do get in the way!

Also by Ethel Hicks there were two "Fashion Dolls"
 which caught my eye and had to come home with me.....

Meant to resemble Barbie dolls... 
these are not jointed and are 1 and 1/2 inches tall, porcelain beauties.

The detail work on them is very fine,
 and I'm afraid my photos do not do them justice!

And the most remarkable polymer clay food you will ever see anywhere....
made by Twin Heart (www.twinheart.com)

Every item is realistic in every detail.... 
the cabbages are layered and can be cut open and "shredded".....!
(I will have to practice carefully when I open them!)

The orange can be peeled and the sections separate inside....!
The bagels and breads can be sliced and are textured inside!

This tomato is cut in half.... 
but can be further sliced if desired...!

And the broken egg!!!
What can I say?
It was difficult to choose from her selection.... 
next year I will buy more!

Of course there were the run-of-the-mill regular sorts of kits too....

Some old House of Miniatures kits....

A 1/144th scale Pub kit by Templewood Miniatures....
 and a kit for a Victorian parlor table... 
And I just could Not resist the "Ravenwood"

Robin Betterley's Haunted House kit in 1/144th scale!
(It seems I have No impulse control when it comes to her kits!)
And at the very end, Dear Readers,
 when I thought I had found everything I could ever need... 
I remembered that I had hoped to find
 a couple of those old fashioned radiators (made of resin)

because the Lovely Old Dollhouse is still needing a few...
and I found them among the supplies offered by Aminithing!

And I'm sorry to say I just can't remember 
which vendor sold the tiniest set of "jacks" you ever saw!
I know, my picture does not do them justice....
 I will have to get them out and play a game of Jacks...
 I played a lot when I was young!

Oh, and I almost forgot to show you the twelfth Lilac blossom....!

Lest you think I had slacked off....

In spite of all my last minute guests... 
I completed the twelfth blossom!
( I think I've got a system!)

So Dear Readers, I went to the Sturbridge Fair....
 And I found Porcelain, Books, Radiators and Toys...
And Kits and Food and Trinkets too.....
And I am so glad I could be there!

Monday, June 4, 2018

Scattered....


Where Does The Time Go....?

I had a Vacation week, Dear Readers, but when it begins with a Three Day Holiday Weekend, then somehow the rest of the Vacation feels a little shorter than usual! But nonetheless, it allowed me to continue right away with the painting of the doors and the fourth wall of the little sleeping compartment in the Gypsy Wagon. Above you can see the finished painting as it would be viewed from inside the compartment (if there were light enough to see it!) with the doors closed. One more hen and one more bunny have joined the others in the Meadow.

And here is the view from the other side, with the doors open.
But perhaps you want to see it in the wagon....

With a spotlight shining in
 so you can see it on this dark rainy day....!

And a little farther back....
 the bunny is clearly running for shelter
 and the hen is flapping her wings....
But wouldn't you run for shelter
 if your Meadow was suddenly opened wide....?
And because it was still
 the beginning of my week of vacation, 
I decided to continue with
 the interiors of the Gypsy wagons.

Here I am starting on the second wagon interiors...
I have had to build a "painting box" 
to keep my new cat away from the painting
 which is done on my floor.....
 right in the middle of his play-space!
(Actually we've had him for months now
 but he is very very shy and is finally beginning to get friendly!)
So far Dusty has no respect for paint
 and likes to contribute hairs generously!


Here you can see the Fortune Teller's wagon
 will have a lovely pink interior space....
It is called "Hibiscus Petal".....

I love the way it looks with the
 dark brown trim and the raspberry exterior.....
(I know my lighting angle is poor...)

But the real thing I was trying to make some progress on
 with these wagons, Dear Readers,
 was the layout and furniture for the interiors....
As I am sure you can imagine,
 these wagons have to be carefully designed
 to fit everything in! 
And there are some traditionally accepted
 arrangements of the necessary features....
The stove tends to be on the left just inside the door,
 beyond it is the seating area for a table.
In this wagon the area for the stove is very narrow
 due to the placement of the windows.
There are two windows on each side of the wagon,
 one in the sleeping compartment and
 the other midway on the wall of the main area.

The "hearth" area will need to hold a stove
 and will need to have a tile surround
 to keep the hot stove from burning the walls!
I have a small selection of lovely tiles to use.... 
but needed to make the arrangement fit the tiny space.

(Sorry this picture is so dark... I wasn't paying attention
 to the lighting as I fiddled with the construction....)
 I am building a "brick" base for the stove to sit on....
 with an area under for storage of wood...

(Amazing the difference a sunny morning makes...!)
Here you can see my rough progress... 
there will be a cabinet under the window with a sink basin...
and the seat for the table will be right against the compartment wall... 
with a pull-out table tucked under the bed...
There was an amazing amount of cutting
 and sanding and fiddling and cutting again....
And thousands of falling over pieces.....
But I gradually got the basic design worked out... 

And had to adjust it all again to allow for the thickness
 of the cardboard which will hold the tiles.....

And trying to work out the tile arrangement... 
because I have not enough of two different tile patterns.... 
which combined are enough.....

Here I am just testing the tiles for basic size .....

And still wrestling with the design....
I have painted the cardboard white 
where the tiles will be glued...
 I am planning to cut them all apart, 
since there are already pieces cut apart, 
I think they should all be cut apart...
 but the space they fit in is very tight and
 I don't want to lose the lovely designs too much!

The stove base has been painted white with primer...
 I am going to have to add all sorts of layers
 a la Elizabeth of "Studio E" blog 
to make it look like stuccoed brick....!
(Must gather my courage and some materials...!)

Meanwhile, I have also been making
 the same structure for the other wagon....

And forgetting to take pictures of the duplicated efforts.....

But here you can see my "work table" for these wagons.....
(Yes, I'm a little over-booked and have run out of work space....)

Because I also got all the branches added to the third lilac shrub....!

And added paint and tested the fit of the "cages" 
on the Gypsy Wagon addition...

Added a little more cream background to the petit-point stitching.....

(Did a whole lot of outdoors gardening in my RL Gardens....)
Oh, and went to the Sturbridge Miniatures Fair on Sunday....!!!
(But that will need to wait for another post...!)
 And yes, I did complete Lilac blossom number Eleven...!

And here they are all in the box!


So it was a busy week Dear Readers, 
Filled with minis and much more...
But I just don't know where the Time goes!
And I still feel a bit Scattered.... 
(Which I'm sure you understand, 
has nothing to do with too many projects!)