Monday, April 8, 2013

Curtains!


The Well Dressed Bed....

I was Procrastinating, Dear Readers, so what I have to show you this week is not at all what I had Intended to be working on! But since the results of my Procrastination were SO pleasing to me...... I couldn't wait to share them with you! Some of you may have noticed that I have not mastered the art of making Curtains for my dollhouses.... and this is in part because I love the way windows look with no curtains... and so my attempts are mostly just lace scraps pinned over the windows! And while I like my windows to have no curtains.... I think all beds should have them! I can blame it on my Medieval Tendencies.... because when you think about it, Historically they put curtains on the beds Long before they started putting curtains at the windows!So it is that I have from the very beginning envisioned the bed in The Folly tucked into that nook and draped with sumptuous curtains! I even knew exactly which Fabric I wanted to use.... and I was pretty sure that somewhere in all my "supplies" I had a beaded fringe that might be perfect for the trim!
And because I was procrastinating, I thought I needed to find that beaded fringe.... 
just to see what it would look like with the fabric... 
It took a while, but I DID find it!

 
 Here I am "Testing" the fit of the fringe 
on the quickly thrown together "Test" sample of the fabric,
and because I was just testing things, I didn't take many pictures of the process.... 
It was just slow and careful stitching of slippery fabric to wiggly beaded fringe, 
after all... just "Test" stitching... 
to see if it would work the way I hoped... 
The stitching was very slow and took much of the afternoon....
(This is that glitter strewn gauze that I use so often for my "Smoke effects" in my fireplaces...
 and the glitter pieces for candle flames....)
You can imagine my surprise when the beaded fringe turned out to be EXACTLY the right length!!

So then I had to do a "Test" of how it fitted in the opening for the Bed Nook......
Just thumb-tacked in place temporarily....  
And, of course I just Had to see how it would look pulled back to either side....


So I quickly wrapped a fine piece of gold thread around the curtains 
and attached it to the thumb tacks...
And then I thought we should see it with the lights on... 
even though it is the middle of the afternoon.....

Aaah..... that is Really looking Just the way I had Imagined it would!!!

Even though it is just Temporarily pinned in place...... 
because the bed still isn't even made up....
Can you imagine sleeping there?

And I had to take more pictures the next morning.... 
because the sun was shining into the room.....
Would you close the curtains when you slept...?

And let me bore you with some more pictures.....
I was procrastinating.... so I had to play for a while.....
and added some trinkets to the mantle...
(the books are some of Dark Squirrel Victoria's Divine creations...!)

And then Joanna heard there was work being done on The Folly.....
So she had to come and have a look....
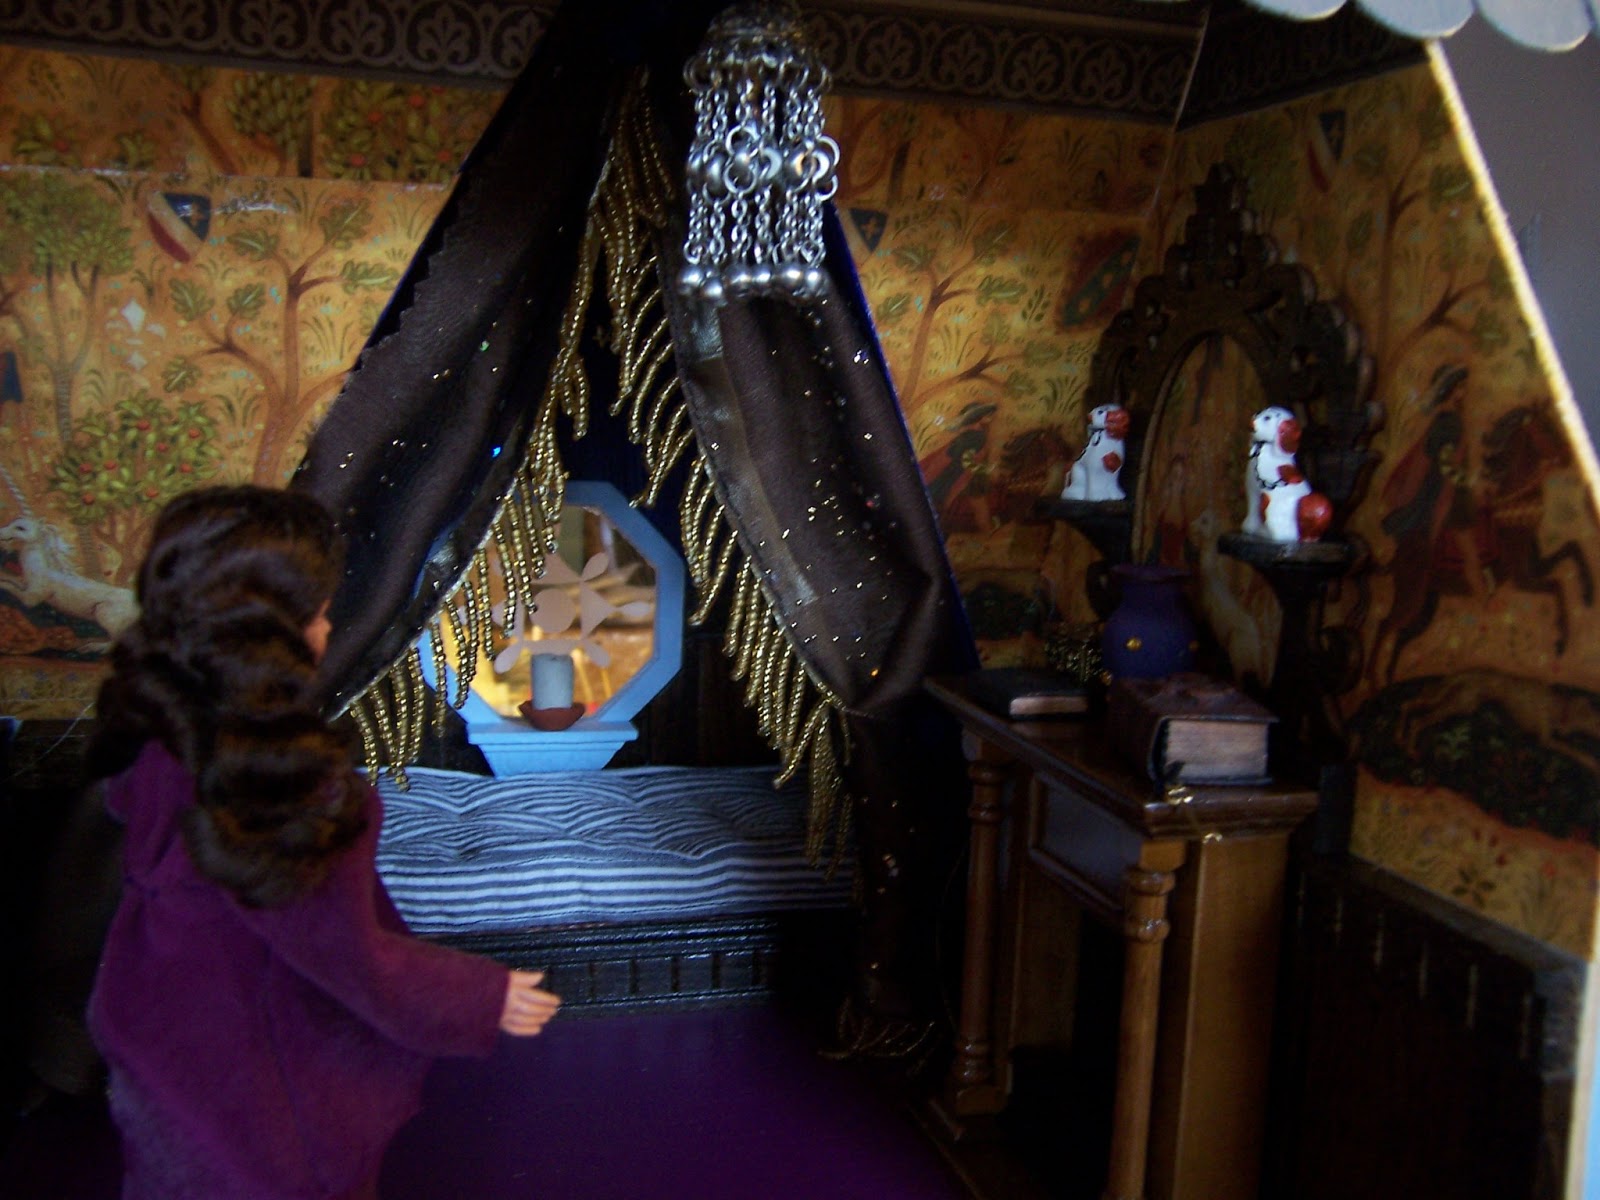

She noticed the decorations right away.....

I has been such a long time since she visited at The Folly....

She really couldn't remember whether the curtains had been there before.....

But she was fairly certain she would have remembered such a Gorgeous Fringe...!

And the mattress.... as old as it looked... 
she was sure it hadn't been there when she last stopped by...
It was surprisingly soft for such an old mattress!

But after so MUCH Procrastination, Dear Readers, 
I Did finally get started on the project I had been intending to work on! 
And what was that, you ask?
Curtains, of course! 
Tiny Bed curtains for the Pagoda bed in the Tree House! 
But it already has curtains, I hear you say.....! 
Alas, those are just the lace Under-curtains.....
I really wanted it to have embroidered silk curtains... 
And I wanted to use that green silk.... 
in particular I wanted to have the gold fringe edging of the silk be the edging for the curtains!
Which meant carefully figuring out How I was going to embroider the silk!

Here you can see I have basted the green silk to a piece of muslin.... 
so the whole piece can go into an embroidery hoop.....

And if you look very carefully you can see that I have added some stitched guide lines.... 
so I know the area I am to embroider within....
And then I dug out my Treasure worth almost more than Gold itself.....
I inherited some of my Grandmother's sewing things....
These are Antique Wooden spools of Silk Sewing Thread!!!


In a lovely assortment of Rainbow colors.....

And because I have not Embroidered anything in Quite a few years....
I am just Testing....
(Which really means making it up as I go...)
Starting with a vine in green silk... using a simple back stitch....
 
I started with the curtain that will face the back wall.... 
so I have room to make mistakes...

And I added the flower "branches".....

And started on the flower blossoms.... 
in red, mauve and coral.....
Using a simple satin stitch....

It is supposed to end up looking like "Crewel" Embroidery... 
a style often worked in wool and having varied and exotic flower and plant forms...
So I am just making the shapes up as I go.....

One flower after another.....

Although I did make myself a rough sketch as guide....
To keep the stitching at the right scale.....
Each curtain will be two and a quarter inches long....
But because I Procrastinated so long in starting... 
It is a long way from done!
But I am really NOT sorry that I was procrastinating.... 
especially when at the end of the afternoon as the sun was setting, 
It reached all the way across my house and shone into The Folly.....

A slice of sunlight just hitting the Window Perfectly.....

Casting the beaded Fringe Aglow....
Oh, I LOVE that magical light!!
And even though they are not Finished....
Neither the Tiny Embroidered ones, nor the Sparkly Beaded ones....
Yes, I  do think Every well Dressed bed should have Curtains!

Monday, April 1, 2013

Flashback!


A Dream Within A Dream.....

I can Barely believe it, Dear Readers, but it was a weekend of (Almost) NO Minis! What? How could That happen, I ask myself... as I wrack my brains for Something to Post about! But, Alas, it is true.... due to Taxes and the first weekend of the Gardening Season.... all my Time was consumed by RL activities! Well, Almost all my Time.....because I am incurably absorbed in my Mini worlds.... but I will get to that in a minute! First I want to share with you a few of the Small Improvements that have been made in one house or another over the past months. It often happens that when I cannot make my mind up about a detail of my Current obsession... the Quarter scale Tree House.... I find myself working on details of the Larger scale houses... but I never get around to sharing them here with you! So I will welcome this opportunity when I have nothing new in the Tree House to report about, to show you some of these small details.
As you may be aware, I am trying to complete the wiring and hence all the Lighting, for The Folly. And I have always imagined that the house was originally built before the era of electric lighting, and so all the lights would have been added after the house was built. This is important in deciding what style the lights should be... because none of them are "original" to the house! So it is that I have imagined the Bathroom is an After Thought as well.... it was probably added where originally there was just a closet..... So you will have to forgive me if my Imagination just would not get past a "bare" lightbulb as the lighting for this room! Sometime last Winter I decided to give a try to making the fixture that holds the bulb.......
You can sort of see it here below.....
along with the "pull chain" made of beads.....

It is made of layers of card stock glued together and painted gold.... 
it ended up a little large for the scale.....
but close enough to work in this small room....
where at first I was going to just hang it crudely from the ceiling.....
 
But having seen on another blog, the beautiful job of attaching just this sort of bulb in an attic setting.... (Thank you Brae for the Inspiration!)
I decided to try my hand at a better attachment, and came up with this.....
I built a ceiling panel with a metal "collar" for the wiring....

Which looks So Much better and more realistic!

And when I got all the wiring hooked up....
 (more weeks of passing time...)
You can see the effect with the light on!

Isn't that Brilliant?

As for the other little "Flashback" I wish to show you, Dear Readers, 
it has to do with another Little Person who came to live in my Doll World ....
We were at The Cape last Summer and I found her in that Museum I visited... 
and she just looked like she needed to come home with me....

But you might recall that after last Year's Wedding Extravaganza.... 
I had banished all my Dolls to remote Locations.... 
(Temporarily, you understand,)
so that I could Concentrate on Finishing some of their Houses!!! 
(The Stories have a way of Distracting me from Building...!)
And one of those "Remote Locations" happens to be a bookcase in my Living Room....

Where I set up some "Temporary" Vignettes....
Celeste and Harold are still visiting a cafe under the stars.....
 
Pollyanna and Arthur are still headed off for their Honeymoon....

And Daphne and Will are still gazing into the Fountain of Dreams in a Garden....

Which is where they have all been ..... 
in Suspended Animation..... for an Entire Year......!!!
While I am Absorbed in building the Tree House
(Which I hadn't even Dreamt of when I put them here...)
And all this year I have glanced into these Vignettes 
and Imagined the Worlds they are in....
Until this weekend when I had an idea....
Or was it a Dream....?
 
They were standing at the Well of Dreams, after all.....
What are they Dreaming of....?
And Where are they......
 
A Garden of Dreams that Seems so Familiar....

What is Daphne's Dream...?

Or, rather... Who is Daphne's Dream...?

What is her Name...? 

And What is She Dreaming of....?

Can they see each other...?

Do they Know each other...?

Can they Touch......

Or is it Just a Dream......???

I am Afraid I do not yet know the Answers, Dear Readers!
All I did was grab a couple of minutes to cut some pages from an old wall Calendar 
to see how they fit as backdrops for this little Vignette.....
And the Rest remains to be seen....
A Flashback.....
And A Dream....
Within a Dream....!

Monday, March 25, 2013

La Recamier


Learning As I Go.....

I am Rather pleased, Dear Readers, with the results of this Tiny furniture experiment! I have wanted to make a Mini version of the Iconic Recamier sofa ever since I can remember! There are many commercial versions you can buy, and I think someday I might even try making one in 1:12 scale, but I just could Not resist attempting one for this Tiny Tree House bedroom! The sofa has many variations in form, some with a low back rest on one side, some with equal height curved ends, and some with a recurved foot like the one I have made. I did not make up this design, I saw a picture somewhere on the Internet and knew at once that I wanted to copy that design! I will confess right away that my version is Not perfect... there are things I would do better if I were starting another one.... But  nonetheless, I started with a Tiny to scale sketch...
Which is Very faintly drawn here.... 
I refined the sketch on the right... and cut out patterns.... 
and started to cut the tiny pieces from thin plywood....

The pieces are Very Tiny.... 
and I used my small files to refine the shape more....
and attached them to the seat.....

I did not file the curved end down enough... 
it ended up getting thicker than I had imagined especially after the upholstery was added.....

But I thought at the time that it matched my drawing well enough... so I kept going....
I added cardboard for the shaping of the curved ends....
and cut tiny legs from the tips of spindles...
 
I Really love the profile.... 
but ultimately think the foot curve should be smaller in proportion to the whole sofa.....
Of course, I had to test it in the Tree House.....

And then it needed painting black.....

And Upholstering!
Which took quite a while!
I have the PERFECT pale green silk.....
But I wanted to have tufting like on the original...
 
I used manilla folders for the paper base..... 
punched a pattern of holes....
I used a layer of felt as the stuffing....
And carefully stitched it together....

And glued it to the outside of the foot of the sofa!
And did the same for the head.....

The seat section is covered with an un-stuffed layer...


because there will be an additional tufted cushion covering it.....


As you can see, the upholstery is making the curved end much thicker than in my drawing....


But it is also because I did not file it down enough...... 
the whole foot should be a bit smaller.... and a little less incurved.

Perfect or not, I also wanted it to have lovely gold trim.... 
which I made by gluing gold thread....

One tiny section at a time....

On both sides.....

It is starting to look Almost as I had Imagined Dear Readers.... 
but what Recamier is finished without a bolster pillow?
You can see the beginnings below.... 
it was the most time consuming part of the entire sofa!
Because I wanted it to have tassels... 
Gold tassels.... 
and the first pair I made with the same gold thread I used for the trim... 
but they were much too coarse and large. 
Fortunately I found some gold sewing thread and made a much smaller pair!
Here you can see I have attached them to the ends before gluing the cloth to the bolster....


And here you can see the completed bolster....

What a lot of trouble just for a bolster!

But I really do think it makes the piece!

And while I might wish the foot was a smaller curve... 
I think it works Just Perfectly in this room!
Talk about a Learning Curve! 
It may not be Perfect, 
but I LOVE my first Recamier!