Monday, March 19, 2018

Hardwick Hall Hallway.....


Silver of the Moon... or Sliver of the Moon....

Some of you Might recall, Dear Readers, the Hallway in Hardwick Hall, that region that is tucked into an impossible to access corner of the House, which required that it be "completed" long before the rest of the structure was even constructed. And you might remember that I painted the Moon Maidens carrying the Moon up the stairs, each maiden carrying a different phase of the moon.... and that I added trees to the murals and stars to the Heavens above.... all of which is barely if at all visible now that the walls are in place! It is such a Dark and Hidden Hallway, and I thought I had "completed" it a long while ago. But in the back of my mind was the idea that I should have added a "Hall table" in the entrance area.... because surely every hallway needs a place to drop ones hat and keys! And recently I had bought a few pieces of unfinished wood furniture, amongst which was an "old fashioned" Queen Anne style side table..... which looked like it might just fit in the corner under the stairs...

Which you can just barely see if you look
 from an angle over the kitchen stove.... 
Imagine my surprise when it fit the spot exactly!
All I would need to do is add a mirror over the table,
 a little paint and it would be done!

Here you can see I am testing the small piece
 of mirror glass I cut, to see if it looked right.
It required quite some contortions to measure 
the height from the table to the underside of the stairs...!
Truly, this is the only view you get of this tiny space!
But it was just begging for a little Hall Table!

But then I decided that the "frame" for the Mirror needed to be
 a bit more elaborate than the normal frames..... 
I wanted it to be like the one over the Living Room fireplace,
 with the branching trees.....
 if any of you can remember That frame... 
which is also really hard to see in this House 
because it is angled away from the open side of the house...!
(Who designed this property anyway...???)

So I got out my wire to make an Armature.....

And added sculpey to the wire armature... 
being sure it would lie flat and cover the mirror edges properly.
I baked it with the mirror in place to ensure a good close fit with the glass.

And added paint to the hardened sculpey.... 
because the dark gray would just disappear in that dark Hallway....
I decided to paint the frame Silver.....

And the table as well.... 
in case you hadn't noticed Dear Readers,
there is a "silver" theme in this house!

Here the frame has its coat of silver paint.... 
which made it too shiny!
I decided I would need to "tone it down" a bit....

Here you can see the parts placed next to each other.....
 the frame is much shinier than the table itself....

But I needed to test it first in the hallway..... 
with the lights on.... 
to be sure it fit, and to be sure I needed to
 adjust the brilliance of the silver paint.....

I added a "marbling" effect... 
to resemble the texture of tree bark.....

Here you can see it in the Hallway again....
And I decided it is good enough to attach the frame to the table.... 
which required building a support framework.....


Which you can see here with the silver paint added .... 
to blend in wherever the frame support ends up being visible....

And finally the framework is glued to the table!
Only, now I am deciding I might need
 to "marbleize" the table top as well.....!
But first we need to test it in the Hallway again.....
 
Here, I have even moved the kitchen stove 
out of the way so you can see the entire table....!

Perhaps we will put a vase with flowers there....
A tray for keys and letters....

 
And when the Front Door is open.....
And you look in through the door.....

 
You can just catch a glimpse of the Moon Maiden 
carrying the Sliver of a New Moon.....

Which maybe you can spot here.... 
in the branches over the roof...... 
The New Moon.....

I tried to zoom in....
(but it makes it blurry.....)


So the Silver of the Moon... 
spills onto the branches below....
Bringing a Glow to the dark corner 
that is the Hardwick Hall Hallway!
And if you want to see more of the Moon Maidens,
 Dear Readers, you will have to go Here...
Yes, they are invisible....  
But I know they are there!


Monday, March 12, 2018

Making Books......


Now And Then......

I Know I am not alone, Dear Readers in my Love of Books, both RL sized and Miniature. It has been one of the constants in my miniature buildings that there would need to be books, shelves of books, reading nooks, whole Libraries of books. I bought the Secret Christmas House kit because it had a Library.... I just had to have it! I have collected mini books made by miniaturists from around the Globe whose workmanship I admire immensely. I have been sent gifts of mini books from readers of this blog on more than one occasion! And I have dabbled in making my own mini books... trying out various methods offered by other bloggers.... using printed pages shared by other miniaturists. Sometimes the books are "readable".... sometimes they are covered blocks of wood never meant to be opened. I do not remember just how young I was when I made my first dollhouse book... but I still have it and I was probably about ten years old when I made it. I was thirteen when I took an art class that taught us how to properly bind a book... stitching together the quires and making the spine and covers in the traditional methods. In the above picture you can see a mini book I made a couple of years ago, just to test the traditional methods in mini scale. The pages I used were "antiqued" (ie tea stained) and don't lie flat.... and the cover material is a "faux leather" I wanted to try out....

But I don't think it looks very good in close-up shots..... 
it is supposed to look worn... but it actually looks too threadbare
 and you can see the cloth texture in places.
But I really wanted to see how the binding methods would work
 in projects this small...

Because if you stitch the pages together right 
and attach the "spline" correctly...
 to the cover and not to the back edges of the pages....
 then when the book is opened, 
the pages fan out without damaging the binding.....!

I did it incorrectly on a book I made in my teen years....

I had stitched the pages together correctly... 
but I had forgotten that you don't want to glue
 the spine to the back of the pages.... 
I think I was impatient and wanted to get the cover on....
so I could do the illuminating.....

This was made in 1974.... 
well before the era of color copiers... 
or black and white copiers for that matter!
 Hand painted and lettered.
 

Still incomplete... I admit!
I never found the "right" cloth for the cover....
So why am I showing you this, you might ask?
Well, a recent Reader's comment asked 
whether I planned to fill the shelves in 
the Hardwick Hall Library with individual books
 or "dummy rows" with a few real books?
And I have to confess, Dear Readers,
 that I had not decided the answer to that question!
My Bookbinder self wants to make all real illuminated books.....
 but my saner self knows that this is not the Library
 that should hold those books!
The main problem being access.... 
way back in the corner of this Dark attic... 
behind the spiral stairs and the Hearth...
And a lesser problem being the lifetime(s) it would take
 to make all those books!
But Millicent's question led me to think that 
I should at least test out some of the book-making techniques 
that might be appropriate for this project....
 to see if I could manage to get it done in a reasonable amount of time!

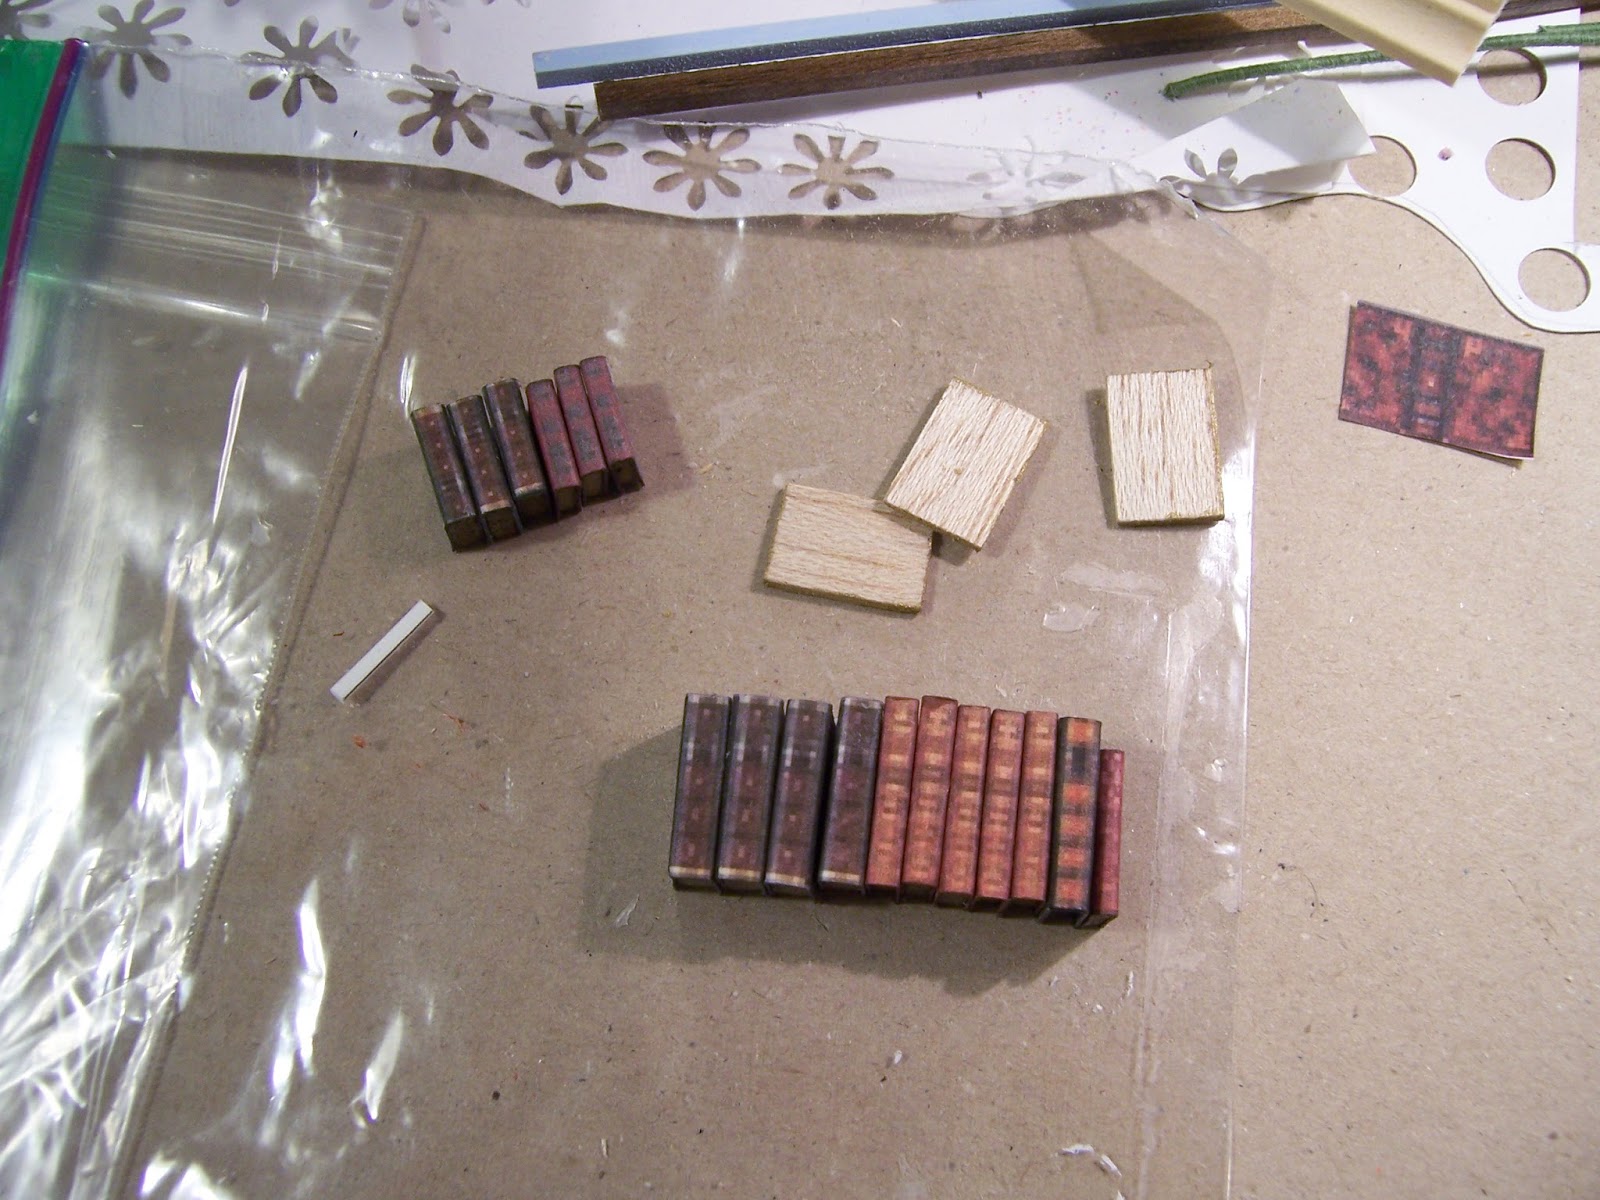
The simplest of these methods seemed to be the printed covers
 glued around a block of wood method...
 and I even had the materials on hand..... 
having intended for years to try this method!
I had printed out some copies of book covers
 that were shared by someone a long time ago... 
I have forgotten who!
But I had printed them on paper not card stock...
 before realizing my error! 
So that meant I would need to glue the paper to card stock
 before cutting the covers out....
And it was a bit tricky to match the thickness of the printed books
 to the balsa wood I had bought long ago.... 
lots of extra cutting involved to get the shapes right!

And the balsa wood needed to be painted gold on the edges that would be the "pages"....

And the edges and inside border of the covers needed to be painted as well.... 

Because if you don't paint them,
 the white edges will show and ruin the effect!

And eventually I had a whole row of books
 in "sets" that would maybe fill a single shelf!
But how to get them into the shelves.... 
way back in the dark corner of the Attic Library...
That was the Question!
I am always reluctant to glue things down.... 
I like to Play with them....
 the Room isn't ready yet... 
what if I need to change my mind about something....?
But what good will all these books be if they don't get into the shelves....
And what good will all these shelves be if they don't get filled with books...?
Then I remembered a technique 
that somebody showed on their blog a long time ago... 
so sorry that I don't remember who.....
Which was to attach the items to a strip of clear plastic....

Cut from a clear package cover.....

Using a tiny dot of Museum Wax on the bottom......

The row of books will hide the plastic strip.....

Like so!

Here you can see the bottom side.....

But they are easily movable... 
and even removable... 
without damaging the books!

So we have to test them on the shelves.....
I think it will work! 
This way I can re-arrange them as I see fit 
once more of them are made...

Which I started right away in a slightly larger size
 after realizing that the first batch end up being quite small.... 
only 1/2 inch tall!
I had printed out sheets of the larger size all those years ago... 
and even though the print quality was not very good... 
the pixels are too large at this size... 
I think they will work well enough 
for the dark back corners of the Library...
And I had printed them on card stock which was slightly easier to use...
but still needed the edges painted....

You can see the two sizes here for comparison.....

The thickness of the wood matters!

Another row attached to the plastic strip.....

And testing the fit in the shelves.....
Gosh it's dark in there.....!

What if we turn on the spotlights.......
Or try them on different shelves.....


Here you can see them on the other back corner shelves.
 
Well, Dear Readers, I am sure by now you have realized, 
that I have realized that I will be making a lot of books... 
and most of them will not be "real" books....
And they may or may not be firmly attached to the shelves.
But every Now and Then, 
there will Possibly be a book or two
 that are made from the Pages to the Spline
 in Complete mini bound book fashion....
Because I just Love making Bound Books!

Monday, March 5, 2018

More.... So....


Shelves and Stems Continued... Plus a Pot or Two....

In Case you might think I have forgotten the Attic Shelves, Dear Readers, in my excitement about the Lilac Bushes, I wanted to reassure you that I have been continuing with their construction too! You will understand that there are quite a few things that can be worked on while waiting for glue to dry... and the Lilacs need a lot of waiting for glue to dry! You might recall that I had completed all the shelves for the Attic except for the small ones right at the front by the open side of the House. The space here is quite narrow, only about 1 and 3/4 inches wide, but being right by the opening it makes a good place for easy viewing of any Treasures stored on these shelves. And because the shelves are so narrow, I thought to make them a little different from the rest of the shelves in that one section would be compartments for holding scrolls, and the other would have drawers for storing ingredients used in potion-making! I began the unit for scrolls first as it would be simpler to construct...

Here I have added the facing trims, 

And started the dividers for the scroll compartments....

And added the glittery silver paper too!

Alas, it is night-time so it is difficult to see it in place....

But I have also started the other unit.... 
which has the spacing of the shelves closer together 
because there will be drawers instead of open shelves.
(When I get those built!)

But at least I have the basic unit constructed!

And here you can see them in the bright light of Morning!
These are the shelves which will hold scrolls...

And here are the ones which will eventually
 have drawers in the openings... 
so I have not added the silver paper to these.

Here you can sort of see the whole Attic....
Those units at the front make it harder to see the sitting alcoves...
 but that just  makes them feel more secluded and intimate!

And another little project I was working on while
 all that glue was drying on the Lilac Bushes, Dear Readers,
 was the modification of some lovely ceramic beads.....

Which I thought would make lovely little "pots" for tiny plants....
So I glued a "base" on each bead made from card stock

And painted the silver rim eyelet white  to look like ceramic.....

I think they have a lovely little shape and a beautiful pattern.....

And there are a whole bunch of them.... 
each in various stages of painting.... 
they needed several coats of paint
 to get the silver to look like ceramic....

Still needing more paint.....

Nearly done! Now All I need to add is the crocus..... 
and the Muscari...

Meanwhile, Dear Readers, I have been
 working relentlessly at those Lilac Bushes...
(and forgetting to take pictures as I go....)

I decided that the bush needed more of the "stems" to be old and twisted....
(I had bought more of that paper covered wire)
and each time I added one to the "primary Pod".....

I had to add one just like it to the Three other seasonal "pods"......
(the fourth one just isn't showing in this picture)
before I would forget just what it was I had added or changed....
Because I am Determined to make all the shrub "skeletons" 
at the same time so that Eventually I will have
 all the Seasons represented! 
(This might take a while....!)

And these are just the Main stems! 
The smaller branches all still need to be added!
(What was I thinking?!)
So Now I not only have to make an incredible amount 
of Books for those shelves, Dear Readers, 
but I also need to make an unbelievable amount
 of leaves for the Lilac Bushes, 
as well as an ever growing number of Lilac blossoms....
And the Vinca Too....!
It seems that the More I make, 
the More I have More.... 
so So much More still to do!