Wednesday, August 11, 2010

Folly By the Sea

Follow Me To The Sea


Every year since I can remember (with very few exceptions) I have spent at least a small amount of time at the seashore in the summertime. I know I am not alone in this ritual. The lure of the ocean is powerful at any time of the year, but particularly so in the summer. I am not sure whether this is because so much of my childhood was spent in swimming and sailing on the waters of the Cape or whether the feeling would be as strong if we hadn't had that pleasure every year. But either way, I cherish the small amount of time I can get away each year and visit the sea. I know, too, that everyone has "their" ocean. The one that speaks to them the most clearly. For some it is the rocky coast of Maine. For some it is the Islands of the Carribbean. For me it is the sandy shores of Cape Cod, in particular, the Outer Cape where the land narrows to a thin strip, embraced on both sides by the sea. I am so lucky that my Father and his Partner live there for half the year and are happy to host a never ending procession of friends and relatives! And this year was no exception!


So I went to the seashore. And while my Father and his partner Diane don't live right on the shore (which is actually a very good thing because the shore doesn't stay put very well in some places...) almost everyone I know dreams of a visit to a cottage on the shore. So you may imagine my surprise when I came across this lovely little cottage by the shore that was NOT already booked for the WHOLE summer!


It looked so familiar!


My friends and I engaged it on the spot!


Oh, did I forget to mention that besides my son, a bunch of my little friends decided to come with me to the shore this year? It was one of those last minute decisions, but they all wanted to come!


Ken has decided to go for an early walk on the beach before the crowds arrive!


Oh, and my time traveling friends are here too! I'm not sure how long they are staying.


But they wanted to check the place out.


I know they have NOT brought their bathing suits so there will be no swimming. But a walk perhaps?


But not a very long walk in those gowns!


Someone should have warned them how sandy it would be!


Charlotte and her children came too! They were very eager to spend some time at the shore!


They are VERY good children. But she did have to warn them to be careful and not stray too far. And they did NOT bring their swim suits either. It was a last minute decision to come after all. But that is just as well. I don't think she would have let them swim anyway because of the Sharks!


Maybe not any farther than this!


(Tommy is sure that sharks won't come this far ashore!)


Oh, but WHO is this? Have we even met before?
Would you care to go for a walk on the beach?


Felicity is happy to go for a walk, even though she just got home from staying out all night at a ball..... (NOT a beach ball in that gown!)


It is such a lovely view!


Or they could stay and join Charlotte and the children for a picnic breakfast!


But I am not sure if anyone remembered to pack the picnic basket..... it WAS such a last minute decision!


So you may be surprised to find out that some small improvements have been happening recently to the Folly! It has NOT been ALL fun and games! Come on in and I will show you!


The most noteworthy improvement has been the addition of a cornice trim in the parlor. I found some small scale trims in the ready-made wooden moulding sections of the local Home Depot. I painted them in the light blue with gold in the recessed parts. I think they add a good framework that was missing before with the painted ceiling.


I know you won't remember how it was before, but the fireplace has been painted to resemble black marble around the firebox. And the firebox itself has had the brickwork painted in.


This close-up just shows the rough nature of the paint job.


I think it will need a little touching up!


So far, the only improvements to the windows has been the view.......Come look!


I sure wish I could curl up and sleep by this window!


As for the outside, the missing shingles on the roof ARE slowly being completed!


I don't know about you, but I will ALWAYS dream about a cottage by the seashore.


I'm glad you could join me in a little Folly by the Sea!


Follow Me To The Sea

Saturday, July 31, 2010

Wainscoting For the Kitchen

You may remember, Dear Readers, that when I painted the kitchen of the Lovely Old Dollhouse a very bright yellow, I also mentioned that there was no need to worry about the brightness being too much as I was planning on adding wainscoting which would mellow the effect of the bright yellow. Now, the wainscoting as I was envisioning it was another of these projects that was giving me plenty of reasons to procrastinate! You see, all the wainscoting I had made so far for the house was of the "Panel" type commonly built in the Colonial style homes. But the wainscoting I was envisioning for the kitchen was going to be the more modern Victorian Era type known as "matchstick" or "beadboard" paneling. It was made of narrow strips of wood with a vertical beaded edge, creating a very striped appearance. Typically it was taller than the older Colonial style of paneling which went only to chair rail height, or about 30 to 36 inches from the floor. The matchstick paneling was more commonly as tall as 4 feet from the floor. The idea was that the kitchen of the Lovely Old Dollhouse would, naturally, have been "modernized" in the Victorian Era! They would have added a wood burning or coal burning cast iron stove in place of the open hearth cooking still in use during the Colonial times. And they would have added the paneling and cupboards that were coming into fashion at that time. So I was going to have to figure out how to MAKE this beadboard paneling! And what to make it out of! And how precisely detailed it would be! And even before I could make it, I would need to finish the trim around the window and doors....... so you can see that there was LOTS of room for procrastinating! And then, just to distract myself from the wainscoting, I went and started building the Castle Dollhouse! But I did not forget the wainscoting, and as is often the case for me, the project was "brewing" in the back of my mind the whole time I was doing other things. So when I finally did start the project this spring, it went together much more smoothly than I had ever imagined it would!


Here you can see the kitchen with the freshly painted YELLOW walls!


And here you can see the window trim and the completed REAL window in place!
And the sink which was just like the one in my first apartment!

Here I am test fitting the cabinet which will be over the sink.......


Now, I know you will agree that the wainscoting needed to have that same not-quite precise look of the rest of the woodwork in the Lovely Old Dollhouse. (Quite frankly, I think that is one of the things that adds that undefinable charm to this house - the home-made not quite exactly to scale woodwork!) I debated in my mind for a long time about the type of wood to use - should I go with very thin plywood and cut the ribbing in it... or should I use more of the wood my brother had made for my "dollhouse lumber" that had been so perfect for the rest of the wainscoting...... or should I try some other type of method altogether....... ! I was worried that the dollhouse lumber stock would not be enough to do the whole job as there were only a couple of pieces left. And I was not sure how well it would go together as the pieces needed to have the grain of the wood running vertically rather than horizontally as they were for the rest of the wainscoting in the house. That meant the paneling would be made up of sections 2.5 inches wide and nearly 4 inches tall. At long last, I decided that the only way to tell if there was enough of the lumber was to make an exact plan of what would be needed! (Some people would save themselves a lot of trouble if they would learn to do this BEFORE they waste a lot of time fretting....!) So I measured the spaces and figured out how many sections I could get out of the lumber that remained......... and was I ever AMAZED when the amount of lumber was EXACTLY enough to do the job!!! So I cut the sections to the right length - about 3.75 inches - allowing for a narrow "cap rail" at the top. I carved narrow grooves in the panels to approximate the look of the old beading - don't look too closely as my "carving" is a bit irregular! Then I stained the pieces the same "Old Pine" color as the rest of the kitchen woodwork. (Of course, I did not remember to take any pictures of all these steps!)


Here you can see the panels roughly set in place before the top rail was added.


I still have not added the bottom mop board to the paneling....... but here it is with the top rail and the cabinet in place...


I sure LOVE the way the morning sun streams in that window! And even though the mop boards are not done, someone has the mop out ready to go!


I could not be happier with the way the kitchen wainscoting turned out!

It is EXACTLY what I was envisioning!

Friday, July 23, 2010

Windows

If Eyes Are The Windows of the Soul, Are Windows the Eyes of the House........


Lest anyone think I have forgotten the Lovely Old Dollhouse in my Castle Building Frenzy, I will reassure you that nothing could be farther from the truth! While my recent posts have been all about the Castle, the Lovely Old Dollhouse has seen a number of VERY important improvements during this time. The most important one, and the one of which I am the MOST proud is the windows! You may recall me mentioning in an earlier post that long list of improvements needed in order to repair the Lovely Old Dollhouse and to make it the house I had always dreamed of. Well, the tasks I have already undertaken that were on my original list, have each seemed to grow and change and blossom into something unexpectedly MORE than the original idea once I started them. The chimney with it's original fireplace became two chimneys with four hearths! The trim and wainscoting became MORE elaborate and decorative. The front door, while replacing the original in the same framework, became MUCH more detailed and elegant. And NONE of these outcomes were the least bit expected by me as I set out to do the project! So you may forgive me for developing a sort of anxiety about starting on the windows! WHAT would I be getting myself in for?

To begin with, I must explain that, as with the wainscoting, I had set the pattern for the windows all those years ago in my teens. You see, from the earliest years I had wished my dollhouse had "real" windows. There was always something so empty and unfinished about those holes in the walls called "windows"! I can't describe exactly why it is, but those empty window holes just feel so unprotected, so bare, so vulnerable, as though the soul of the house was just ......blind or missing altogether! So right from the very beginning I have intended to make real windows and I actually completed one entire window frame with real panes of glass when I was working on the house in my teen years! I had carefully carved and notched the wooden pieces for the frame, made from some of the "lumber" my brother had brought from his woodworking classes, and cut and inset panes of glass, complete with glazing putty to hold them in place! You must remember that this was AGES before I had any idea of window kits or ready made stock lumber. And because the whole frame was never glued into the dollhouse, it was removable and was carefully stored away with all the other dollhouse furniture in that box marked "Betsy's Dollhouse Furniture". So, THERE IT WAS when I finally opened that box last year and started to work on the re-building of the Lovely Old Dollhouse! It was the simplest thing to slip it into place in the window opening of the parlor - the room it had been made for - as you can see in the picture below!

And while nobody had washed it in the thirty plus years it was packed away, it was unbroken and fit as though it had never been removed. You can sort of see the outside of the framework in the picture below. There has always been, for me at least, a heartwarming sense of cosiness in looking into lit rooms from outside in the dark of night, it makes me think of winter when the dark comes early and everyone is heading home to warmly lit houses.......


The frame had never been painted and was just the tiniest bit lop-sided and uneven...... but I had been quite young when I made it and I think it came out pretty well! It certainly fits with the rather rough look of the rest of the woodwork in the house. So, while I considered VERY BRIEFLY starting over with entirely new windows and just not using that original one...... I was just too fond of it to NOT use it! So that meant all the other windows were going to HAVE to be made the very same way.......... slowly....piece by piece....


As you can see from this picture of the master bedroom with the beautiful hunting scenes wallpaper, the empty window is just not acceptable!


And the same is true of the bathroom........without a window with glass........ it looks so unfinished and somehow so vulnerable........


And even the cheerful second best bedroom, which is slowly being painted with a sort of Chinoiserie mural, it looks DESPERATE for a real window with GLASS panes!


So after a great deal of dithering and considering and planning I pulled out my box of lumber that I had saved for all those years and started to carefully measure and cut each window frame to fit into the opening of each room. I needed to make five more windows in all. I hoped that the lumber I had would be enough to make all the windows as it was more or less the same dimensions as the wood of the original window I was copying. I am sorry that I did not take more pictures of each step of the process, but I was not yet thinking about blogging or tutorials.


Here you can see three more of the frames fitted to their windows.


Here you can see the frame inset into the window before the glass panes were added........


And the frame for the bathroom window............(as well as the rest of the tiles on the walls)


And the frame for the window in the Master Bedroom too......... you can see that the frame already makes the window feel more "present" and somehow protective.....


So, dear readers, it was about this point in my life that I had started my blog!.....and was now thinking of taking more carefully detailed pictures....at least when I remembered to! So I have some shots you might like of the windows getting their glass panes cut and fitted......


Here we have several frames already primed and stained or painted the correct color......as well as the glass cutting tool and the metal straight edge I use. And you can see I have cut paper patterns from the graph paper to test fit in each opening of the frame before I cut the glass. My openings were not exactly consistent because they were all hand cut and fitted...... but the variance was within one eighth of an inch. But glass is fairly unforgiving and needs to fit closely. If I had a piece that was just a tiny bit too large, I sometimes shaved the frame off a tiny bit instead of cutting new glass......


And a closer picture of the frames with partly completed glass....


And an even closer shot of the framework....... click on the pictures to enlarge them if you REALLY want to see details of my rough building...........


GOSH , Another shot! With Glass! I AM so proud of these windows!


And ANOTHER view of the framework


And now, since you have been SO patient with me and put up with too many shots of the same thing......here is a view of the Lovely Old Dollhouse with the windows in place, showing the putty that holds the glass in place just like real old fashioned windows!


I don't know about you, but I just LOVE how they look!


And can you imagine how amazed I was when the amount of lumber I had kept for all those years was just the right amount with a little bit to spare? There are no words to describe how satisfying THAT was! And even after all my worrying and fretting, the cutting and fitting of the glass panes went together SO smoothly - I did them ALL in ONE evening! With NO bad breaks and misfit pieces! I'm sure it was because I made such good patterns first.......

So, It is with GREAT RELIEF I can now report that the LONG anticipated making of the windows for the Lovely Old Dollhouse yielded NO unforseen problems or unimagined outcomes! They are JUST EXACTLY what I was wanting them to be!


And I don't know if I am just imagining it, but.... I think the house looks.....well.....HAPPIER than it ever has before...as though with the windows in place IT can SEE the world!


Windows ARE the Eyes of the House

Monday, July 19, 2010

Congratulations! And Moving Upward

First I want to say Congratulations to the winner of my 50 Followers Giveaway! The winner is The Old Maid! She was one of my first followers and I am very happy to be sending the tiny seashell mirror and the little catalog her way! They will be setting out on their journey overseas shortly and I hope they get there quickly.


Meanwhile, back at the Castle, time has not been standing still. Now, I want to warn you right at the beginning that I do not consider myself to be a fast worker when it comes to my creative projects. (I can hear my family members chuckleing as they think of all the projects I have been working on for twenty years or more!) In fact, I rather LIKE to take my time and savor the process. Or at least that is the excuse I give for being indecisive and needing to stop and think through each new step. And even more than that, I am one of those annoying types who will get a gift and NOT open it right away because I want to keep it and open it at just the right moment, when I'm ready, with my tea by my elbow and the time free to enjoy the opening. I like my dessert AFTER dinner. I like to save the best for LAST. So, in a strange way, this business of working from the bottom up on the building of my Castle Dollhouse fits right in with my natural tendencies to want to save the best for last. At least if you think that with each rise in floor level, you are moving further up in the level of richness that would have been present in the decor of a real castle. The basement level being the roughest and dingiest, the Lord's and Lady's chambers being the richest. And beyond that, I certainly will have had enough practice runs by the time I reach the top levels, to be able to make them the best! So it is easy to feel that as I am just moving up to the next level and starting to work on the Guard Room at the entrance to the Castle Dollhouse, that it will be just another of those rooms I need to get "done" in order to move on to the "fun" ones. I mean, it's A GUARD ROOM, for heavens sake!


But before I get going on that topic, I first want to quickly show you more of the kitchen level that was not included in the last post. At the entrance to the kitchen I have built a well with a fountain-head which channels water from the roof-top to the well. Now this is a feature that was normally found outside the castle in the courtyard area where the entire community would have access. But seing that this Castle has no courtyard, and that water was one of the MOST essential features of a successful stronghold, I have taken the liberty of including it under the roof of the main building, next to the kitchen where it would be most needed! I tell myself that the story goes like this..... Originally the oldest tower of the castle was the chapel of an Abbey which itself was built on an ancient sacred site. This well was the sacred spring and has long been thought to confer special powers on those who drink from it! When the Abbey fell into disuse and was taken over and added on to, becoming a fortified Castle, the sacred spring became the castle well, and continued to confer special powers......or so the legend says! You can believe it or not!


In the picture below you can see the lion's head fountain I built onto the wall, and the "stone" arch to hold the pulley for raising the bucket easily. The bucket will arrive later along with a few other details.

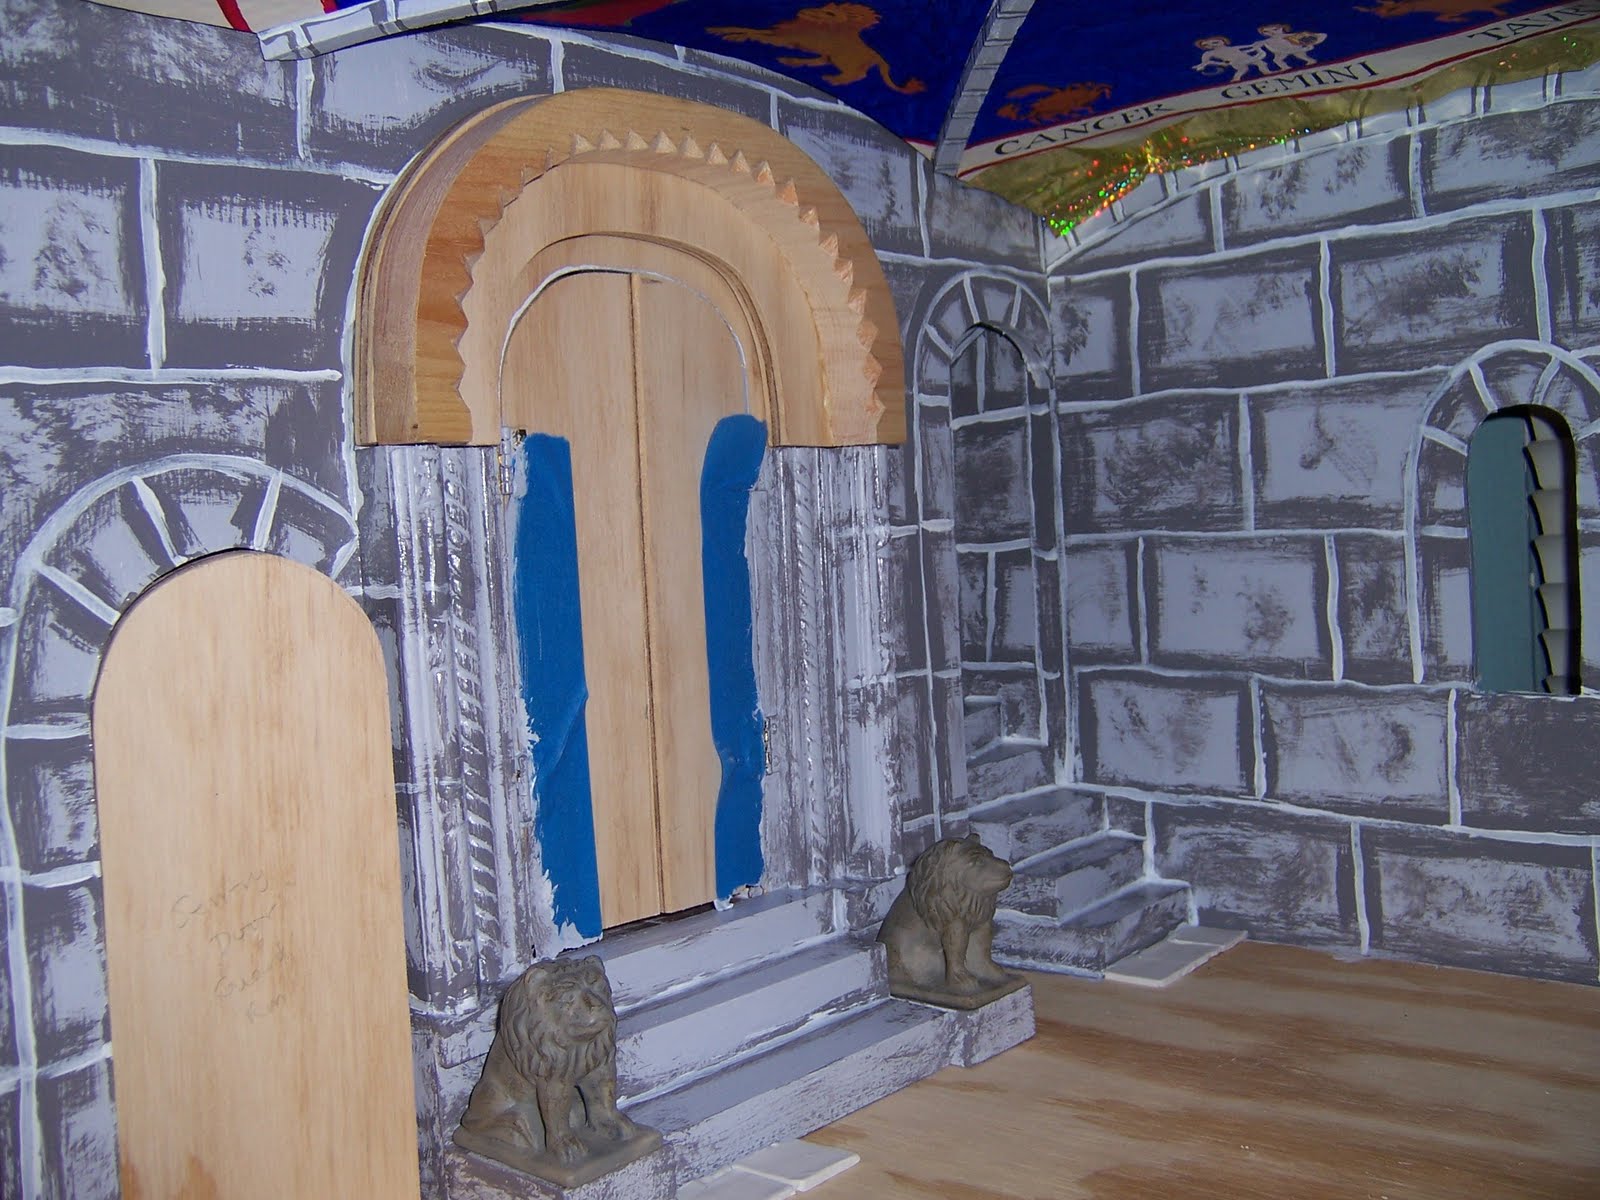
So getting back to the topic of the Guard Room, located at the entrance to the Castle, above the stables, it was going to be a quick matter of painting the walls in faux stone, vaulting the ceiling, and putting paving stones or tiles on the floor. Oh, and building the entrance doors, of course, and the stairs up to the Lord's chamber. Nothing very interesting or decorative in all that! Or so I thought. But then I started to think about the tiles that I needed to make for the floor, and I remembered that it was seeing the gorgeous medieval encaustic tiles that Nina had made for her Castle guard room that had gotten me started building my Castle Dollhouse in the first place! And I didn't want to just copy Nina's guard room. Actually, I wanted the encaustic tiles to go on the floor of my Great Hall, not the tower Guard Room. So I needed to make different tiles for the Guard Room. I decided to try plain old black and white faux marble tiles made from sculpey. And quickly decided to add gray marbled sculpey tiles to the mix. The photo below shows the beginnings of the floor and painted walls as well as some of the beginnings of the ornate doorway at the entrance to the Great Hall on the left. But once I'd gotten this far, I realized it was making the Guard Room into a more refined and elegant room than one would expect from an eleventh century castle guard room! So I had to add to the story a little bit......It turns out that the Guard Room is part of the Tower that was built by the ancestral Lord who went on a crusade (not sure which one!) and came back with all kinds of civilized ideas, and spent fortunes upgrading his old Castle! So he put in marble tiles in his entrance Guard Room.........

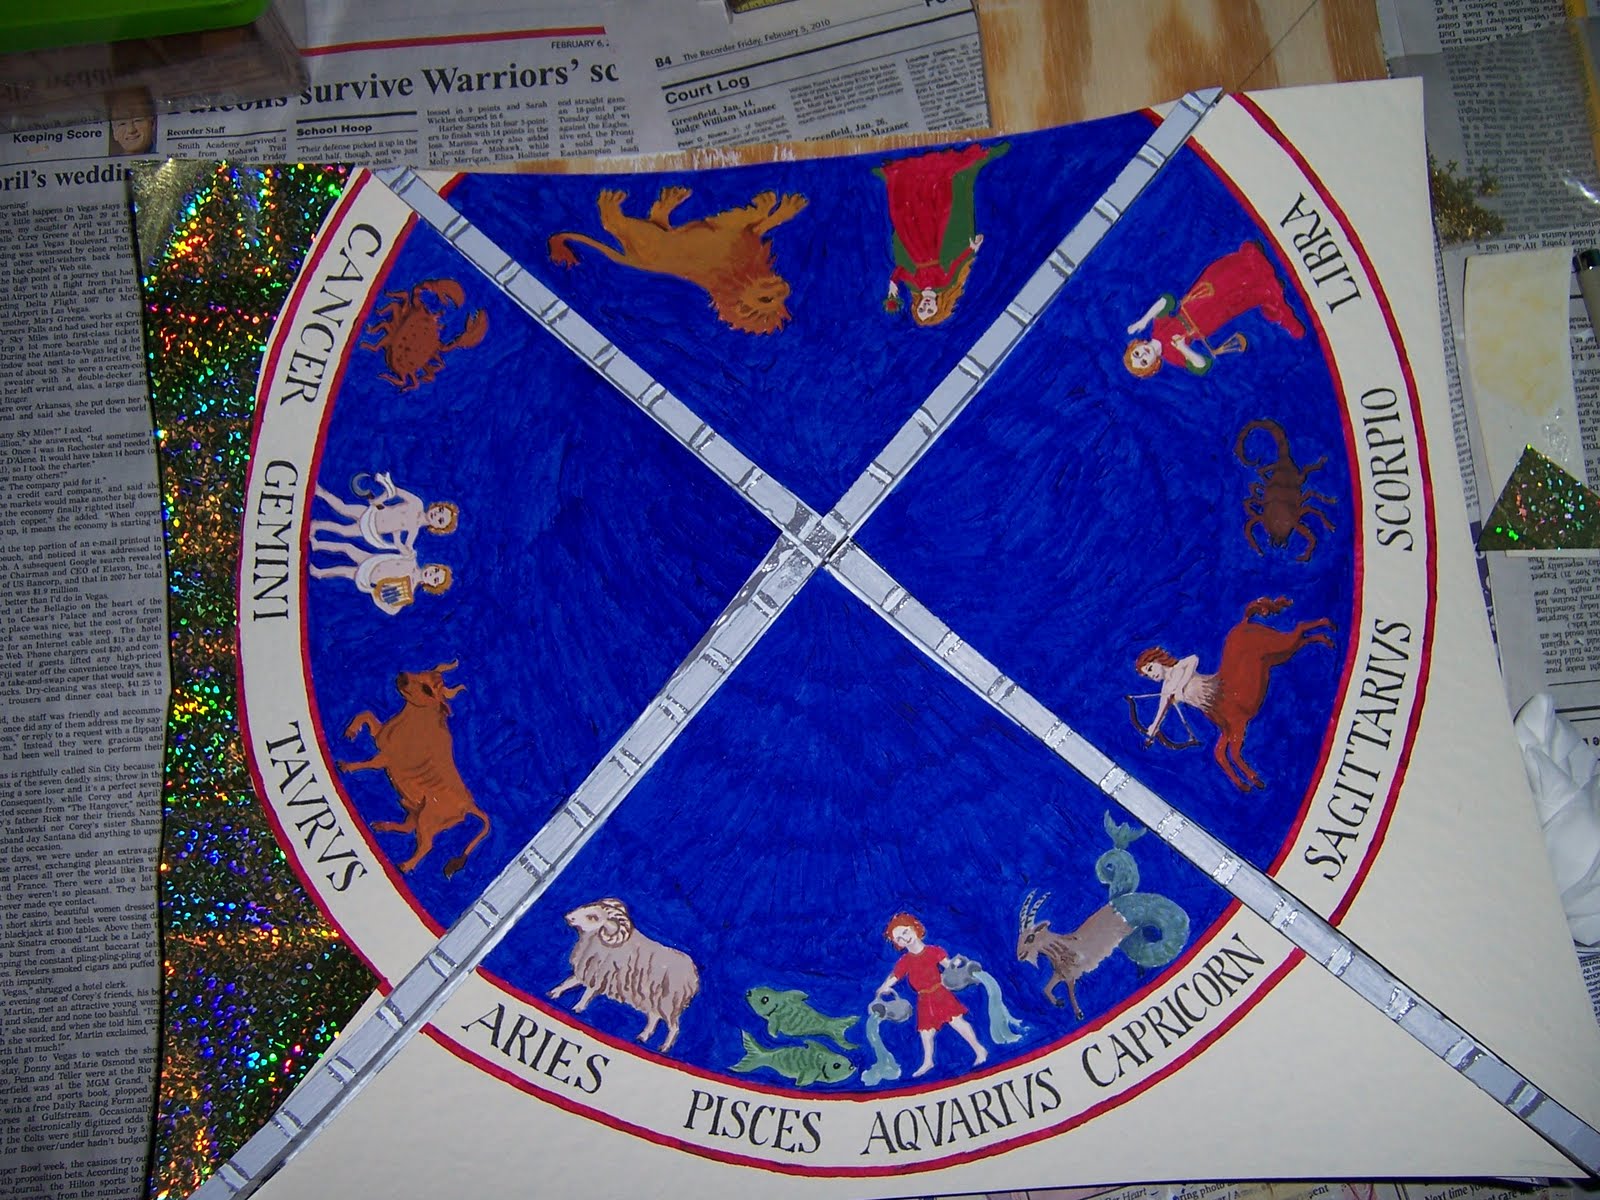
And had the vaulted ceiling painted with frescoes of the signs of the Zodiac, a wisdom he brought back from the East......


Here you can see the ceiling partly done and testing out the gilding around the edges......


And carved stone lions to guard the entrance to the hall........


Another view looking up at the partly completed ceiling.....


And some of the details of the trim around the door to the Great Hall.....


The lions look kind of friendly to me !


And here's the view of the completed ceiling.


So it turns out that there is a whole lot more decorating than I thought in a Castle Guard Room! I still have to figure out the windows....glass or none? Shutters for sure! And the details of door hinges and torches for lights, and a cache of weapons in the storage area beside the door! And the floor tiles need to be finished. But the project Supervisor is on the job making sure it is all done in the proper order and to the Lord's specifications!


So while I spent a couple of weeks working on this room last winter and early spring, I was actually moving VERY quickly for me! And while it may seem as though I am waiting for the "best" details to happen as part of the last rooms I get to work on.......I think I am finding that there are "best" parts of every room I work on! In fact, it seems as though each room feels like the "best" while I am working on it! So, I'm moving up AND I'm looking up!


Congratulations! And Looking Up!