Tuesday, May 29, 2018

Gypsy Wagon Sleeping Compartments...


Of What Do You Dream....?

It was That weekend, Dear Readers, which signals the beginning of Summer in so many ways, but in my house the most noteworthy way is the removal of my Houseplants to the porch for the Summer! This frees up the space in front of the windows for the Dollshouses which have spent the Winter perched on chairs and pushed into inconvenient corners. I got the plants all moved on Saturday, and even tackled a bit of window cleaning (I can't say how long it's been since I got that chore done!) and even moved the Conservatory onto the shelves in front of the sunny window. Then I moved the Gypsy Wagon from it's hibernation spot and set it on the shelf in front of the window.... and suddenly I needed to just take care of a few of those little steps that had been floating around in my mind for a while. You might remember that I had realized that none of the Wagon's walls could be completed on the outside, or attached to the base, before the interior was completed! And it was way last Summer that I had painted the walls of the sleeping compartment of the Tinker's Wagon.... with the horses in the meadow.... but the rest of the interior remained the very dark brown color I had stained all the walls. It needed color! And certainly before I could complete the sleeping area, I needed to complete the lower area, the space under the bed nook, the space where the Gypsy children sleep when they are little. And so I took the wagon apart and added paint to those interior walls. Fiery Cinnamon orange walls for the main compartment and brilliant yellow walls for the children's sleeping nook. Don't worry, once the other furnishings are all added, the color will be quite muted and hardly visible!

And then the yellow sleeping area
 needed sky blue for the ceiling
 and misty green added for the meadow....

Of course, it was a very rainy and gloomy day on Sunday....
 it was so dark inside.... 
you could barely see inside that nook 
even with the spotlight shining in...
but it made me dream of golden meadows and blue sky above....

And with the fourth wall in place you can see nothing inside....
But I am imagining the child.... 
and when asked what she sees in her meadow...

She says "chickens"! 
And "bunnies"!
So I have hastily painted a few chickens and bunnies
 on the walls of this lower compartment...
(reasoning that if her Father is the painter
 he will not spend too much time
 painting in there lying on his belly....!)

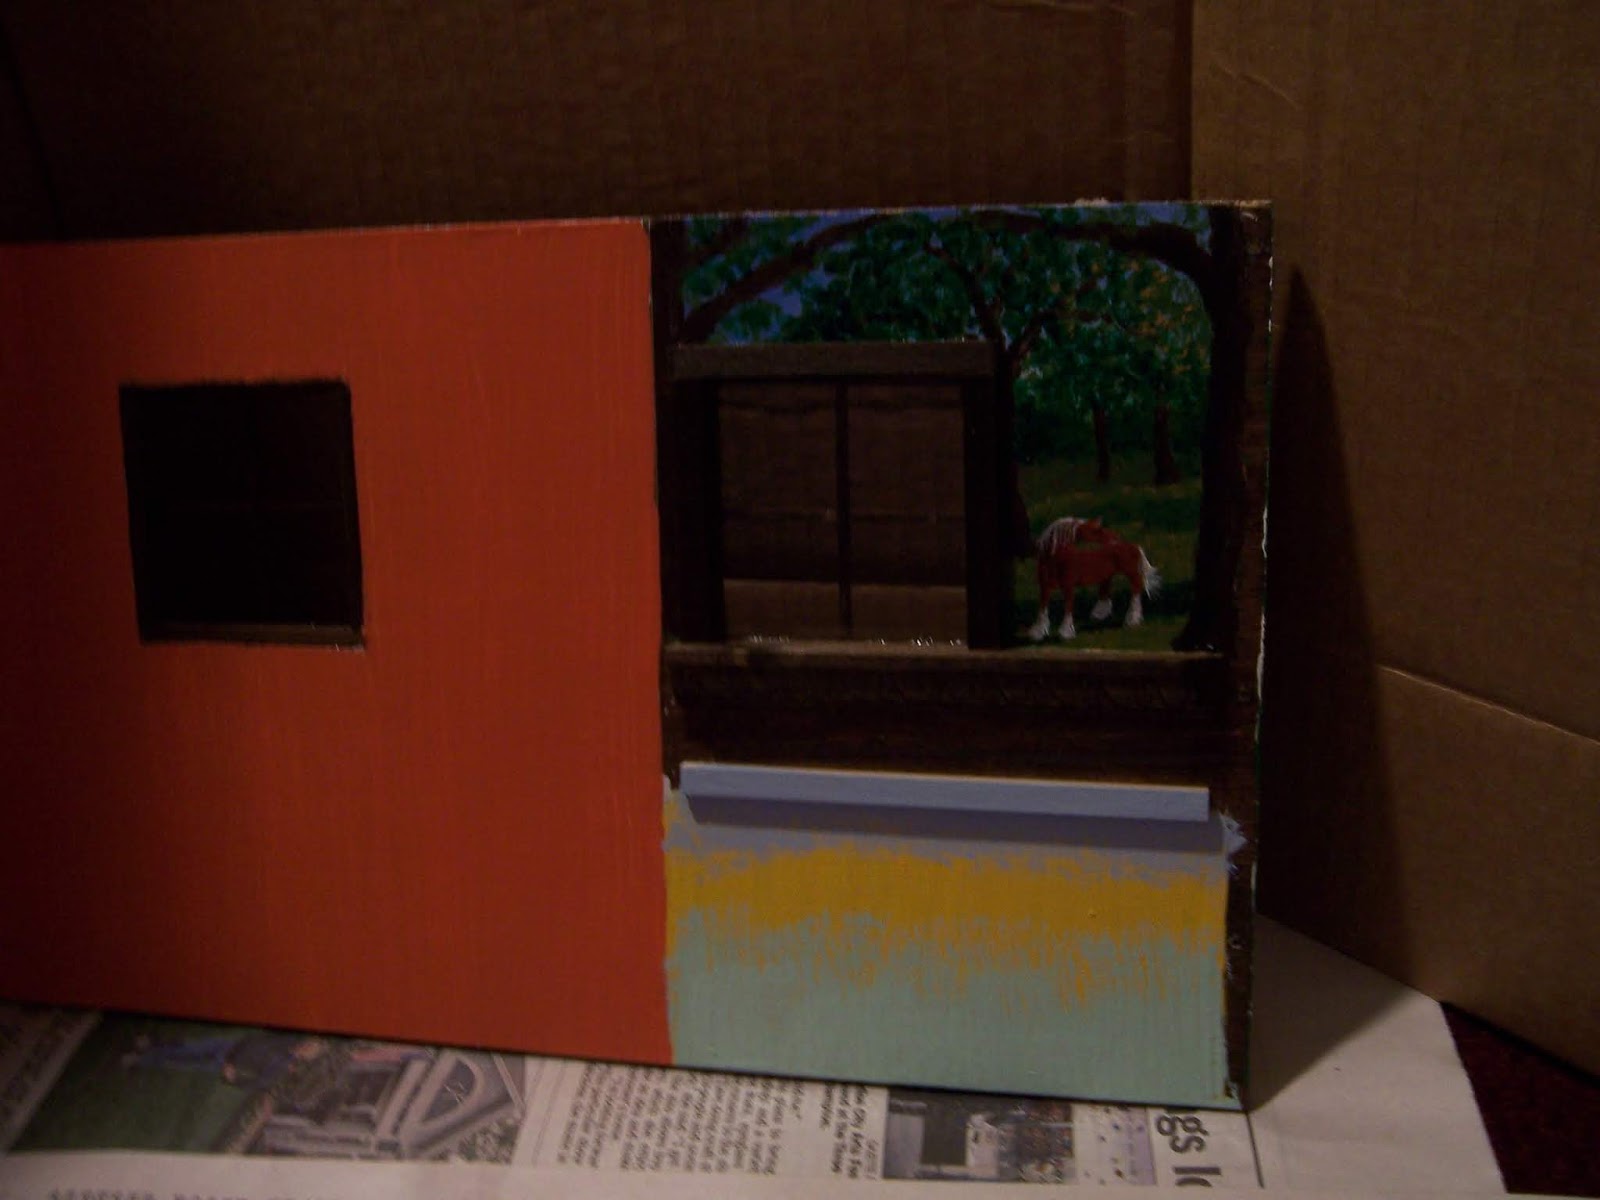
The wall on the right has a bunny....

The back wall has a bunny and a hen....

And the wall to the left has a hen with three chicks under her wings.
And of course, the meadow is filled with poppies too...

And then, because I thought something more was needed...
I added a couple of tiny clouds and a rainbow...
Because every child should have 
rainbows to chase in their Dreams!

Then I had to prop the walls together
 to see how the compartment would look from below, 
with the ceiling in place...

Can you imagine lying in the meadow
 and looking up to the summer sky....?

And seeing a rainbow sparkling in the dew....?

And with a mattress and pillow too.....

And with the "ceiling" in place..... how dark it becomes.....

What if there is a lantern......?
Is it still too dark....?

Will the rainbow be visible at all.....?

Alas, Dear Readers, I think we all know
 that this is one of those things that
 will not be visible at all when the Wagon is done..... 
not unless you can climb into that nook and Dream....!

Meanwhile, the fourth wall, 
the one with the doors to the sleeping nook,
 is still being painted....
(forgive the blue painter's tape...)

And when the doors to the sleeping nook are open....
there will be a tantalizing glimpse of the world beyond....
Inviting you to climb in for a spell....
and perhaps get lost in your Dreams!
(still not finished painting....)

And just in case you wondered, Dear Readers, 
whether I have fallen off the Wagon
 and forgotten to make another lilac blossom.....

I completed the tenth blossom!

Here they are all together in their box!
And I even started on number eleven....

So I am still on track with making one a week!
Because even while painting Rainbows in the
 Gypsy Wagon sleeping compartment, Dear Readers,
I have been Dreaming about those Lilacs....!
Of What do you Dream?

Monday, May 21, 2018

And A Little Bit More....


How Long......

I tell Myself All the time, Dear Readers, that I will finish this Lilac Shrub project Someday.... and I will! I Promise you! But the longer I work at it the Crazier I think this Idea is! I know, creativity and insanity are sometimes not very far apart! But I tell myself that I will persevere! I will just make the next blossom and then the next and then the next..... and eventually I will have enough to decorate the shrub. And then I will worry about the Leaves.... which are needed for two of the shrubs.... when I get there! Meanwhile, I fret about all my Other Projects.... which surely need some of my attention... and certainly I could maybe devote just a little bit of time to them each week... so as to accomplish something on anything that is not just another lilac blossom..... *Sigh* ...... And then I remind myself that there are Three other shrubs also needing my attention.... and I decide to devote my Wandering attention to them for now! Above you can see that I have placed the second "branched" shrub in place beside the porch so I can test the fit of all the branches. They have very little room to fit under the eaves of the porch and really must bend just so in order to be able to fit in and out of the garden spot!

And here you can see I have begun to add the branches to the third shrub!
And just so I can keep from getting them confused
they are numbered on the under-side of each pod!
And as I progress with this third shrub, 
I have decided that I simply Must get
 all four of the shrub "skeletons" finished
 before I lose track of the steps needed to finish each one!
That means I need to finish branching and
 painting and "texturing" each shrub....!
Yes, I have a Loooong way to go!

But look....! 


This week I have managed to complete Two more lilac blossoms!
The pieces for number eight are being assembled to the right.... 
and hot on their heels are the florets
 for number nine in the box at the left...!

Here are eight completed......

And number nine too....!

And here are all nine in the box!
(Only How many more to go....?)
I will not count because
 I do not know exactly how many I will need...!
But I am making progress!
 And I have only been making them for seven weeks!
(I think I can do this!)

And because You are so good and Patient 
with this project, Dear Readers,
 I have traveled back through my archives
and found another project that you have not been shown....
and I will share it with you now even though it is not yet done....
It has to do with the Second Gypsy Wagon,
 the one that belongs to The Fortune Teller.
 
 
And I must confess, that when
 I began to build the Gypsy Wagons
 a couple of Summers ago, 
I was embarrassed to show you both wagons...
 because it seemed like it was too much.... 
but I knew there had to be two wagons
 because the Gypsies would travel in a group...
so I only showed you the first wagon....
 but for every step on that wagon
 I was doing the same with the other wagon too! 
(I know, it sounds familiar, doesn't it?)
 
 
And the only differences were in small things,
 like the style of the carved trims around the doors...
 or the color of the wagons.

But then I decided that one of the wagons
 would have an extra window in the back wall
 of the sleeping compartment... high up.....
I could just see it with a deep window sill...
 with flowering plants on the sill...
So I cut the opening for the window!
And then, many months later, 
when I was thinking about how I was going to Build this window....
 because all the kit came with was 
the lovely frames for the windows... 
(I added all the glass panes...)

It occurred to me that in order to have 
a deep window sill to hold flower pots.... 
it needed to hang off the back of the wagon....
 and if it was hanging off the back of the wagon...
 then maybe there should be a "chest" or "box" as well... 
something to store things... 
that would explain the extra depth of the window sill.

So I started to build a framework 
that would attach to the back of the wagon.... 
with shelves maybe... 
or compartments......
 Or nesting boxes for chickens!....
 for surely the Gypsy Grandmother 
would want to have her chickens!
 
And it could attach like this...

And have nesting boxes like this.....
and doors, of course......


 with lots and lots of hinges!!!
 
Because all the compartments needed
 to be able to access separately....
 one chicken at a time.... 
and the bottom area for bigger creatures...
 maybe a goat or two?

And all those doors need extra interior trim
 to cover those sharp screws......
(And I have not yet decided how they latch!)

And since we have just added a Barn
 to the back of the wagon....
 perhaps there is still room for shelves in the corners... 
to hold a plant or two.... 
herbs, for example....
 and perhaps a cage or two...
(might as well maximize the real-estate while we are at it!)

Which could hold chickens or rabbits too!
(Just Think of the possibilities!)

One on either side..... 
with a hinging door.....
(Hinge still not added)
And the garden shelf above....
(still not added...)

So you can see, Dear Readers,
 what happens when you deviate
 even a little bit from the plan.....
But did I get my deep window sill?
 
Well, it's a start!
(It still needs all the trim....)
 

And with a temporary roof.....

And perhaps the suggestion of bedding.... 
oh, we have such a looooong way to go!

But I assure you, Dear Readers,
There will Always be A little bit more....
More to do and More that is done!
And I hope it will continue so for a Long Long time!


Tuesday, May 15, 2018

Lilacs Encore.....


Taking A Closer Look.....

The Lilacs are Finally blooming in my RL garden, Dear Readers, even though they are a looooong way from blooming in my Mini ones! And so while they are putting on their annual show (admittedly very very minor here in my yard) I am taking the opportunity to have a close examination of exactly how all the pieces come together! The blossom on this plant is the only one this year. It was a harsh winter here and many of the plants are showing a sparse bloom, especially when compared with last year which was so abundant! And besides that, this plant was only newly planted here, having endured for several years in a spot it did not like, (it was too wet). I moved it a couple of summers ago, and now it is finally showing some growth! It is a sprout of the plant that was next to my old Home which had been there for almost two hundred years! It has the very pale lilac blossoms. And the second lilac in my garden was here when I moved in, and it too has struggled, and also suffered much damage a couple of years ago in an ice storm. But it too, is surviving. It has a few small and scanty blossoms...

They are the deeper purple that I love so much.... 
and I am trying to copy in my minis.....
(I need to make the unopened buds a redder hue...)

And I am happy to report that I have managed to complete
 one more blossom for a total of seven!
  Plus I have assembled the florets for the eighth one,
 although they are still not painted.

And while I have standardized my method (for the moment)
 to grouping the florets into clusters of four before attaching them to the stem....

I have noticed upon closer inspection that the RL blossoms
 often have many more florets in their bunches.....

As you can see here on that same bush
 a few days before they opened....
And you can also see that there are two blossoms
 sprouted from the tip of the branch, 
while the leaves are sprouted from buds farther down the branch!
Believe me, I was glad to see any blossoms at all on this bush this year!
And while we are taking a closer look at the lilacs, 
I wanted to show you the ones where I work...

I couldn't get very good pictures 
because it was windy with a storm coming...
 poor light and plants in motion....
But it shows the scale of the much older shrubs
which I am modeling my mini versions on.
And these shrubs also have taken a beating over the past few winters.
There are many broken stems and more dead wood than usual.
 
And here you can see where the new branches
 have sprouted from the old broken stump...

Showing how over the years the shape of these "trunks"
 become quite irregular and have awkward "joints" 
between the stems and the trunks...


And bulky, knotty places along the stems
 that seem to be unexplainable....

Twisted and covered in lichens.....

Irregular, broken, bent....
 certainly not flowing in a smooth continuum from large to small....
And just as surely telling a tale of endurance...!

And so I flatter myself, Dear Readers, that Upon closer Inspection, 
My mini shrubs too can tell a tale of survival.... 
and that my Despairing comment of last week, 
that I would console myself that no-one would be looking
 too closely to see how inaccurate my "joins" were.....
can be revised!
Because the Truth of the matter is that
 I Would know that they were not good enough
 even if no-one ever saw them!

And truly, with only a little more glue and paint work.... 
(a task that was already on the list of things to do!) 
great improvements in the accuracy 
of my mini shrubs can easily be attained!
I am now consoled that they are not so far
 from the originals as I had thought!
(And I hope that now you, Dear Readers,
 can recover from any shock my comment caused!)

Even though they are far far far from done,
 and already hopelessly out of season,
 I am making progress...

The second one has all the branches added now, 
and I even added the glue to the tips of all the branches!

It is now ready for the first layer of painting the branches.....

Here you can sort of see the unpainted one
 with the painted one in the background...

And another shot with the two of them for comparison....
Yes, I have adjusted my expectations of making them identical,
 and am watching the process of growth and change
 that can happen in just one year!
And believe me, 
I am getting a little bit anxious about the Leaves!
I am going to have to start working out the method
 for making them sooner rather than later!

But for now, Dear Readers, 
I will Leave you with a picture of the seventh blossom....
because Upon Closer Inspection I think
In a small way,
 they are pretty close to being perfect!