 Roses, Wall Paper, Egg Cartons and Broom Sticks!
Dear Readers, I just can't tell you how MUCH I am enjoying my Mini Rose Garden by the Folly! This is how it looked this sunny Autumn Sunday morning. The Sun no longer strikes directly into the room... it has headed South for the Winter.... but even so, it lights up the tiny Roses and they keep on blooming! This white one has a delicious vanilla scent to it..... wish I could send it through the internet!
 And while we are looking closer..... there is a lovely little birdsnest hanging from the eaves of the Folly! It is a jewelry pendant I found at Michael's last week..... and couldn't resist!
 Here ..... you must have a closer look at this beautiful blossom...... they may be out of scale for minis... but they are tiny as far as Roses go! And they do make SUCH a lovely little garden hedge by the Folly! I am just in LOVE with them!
 And speaking of Roses.... I chose this wall paper for the Dining Room of the Cupboard House at least in part because the pattern is bouquets of Roses...... in a very dark Old Fashioned Rose Color! Here you can see I have started to attach it to the walls!
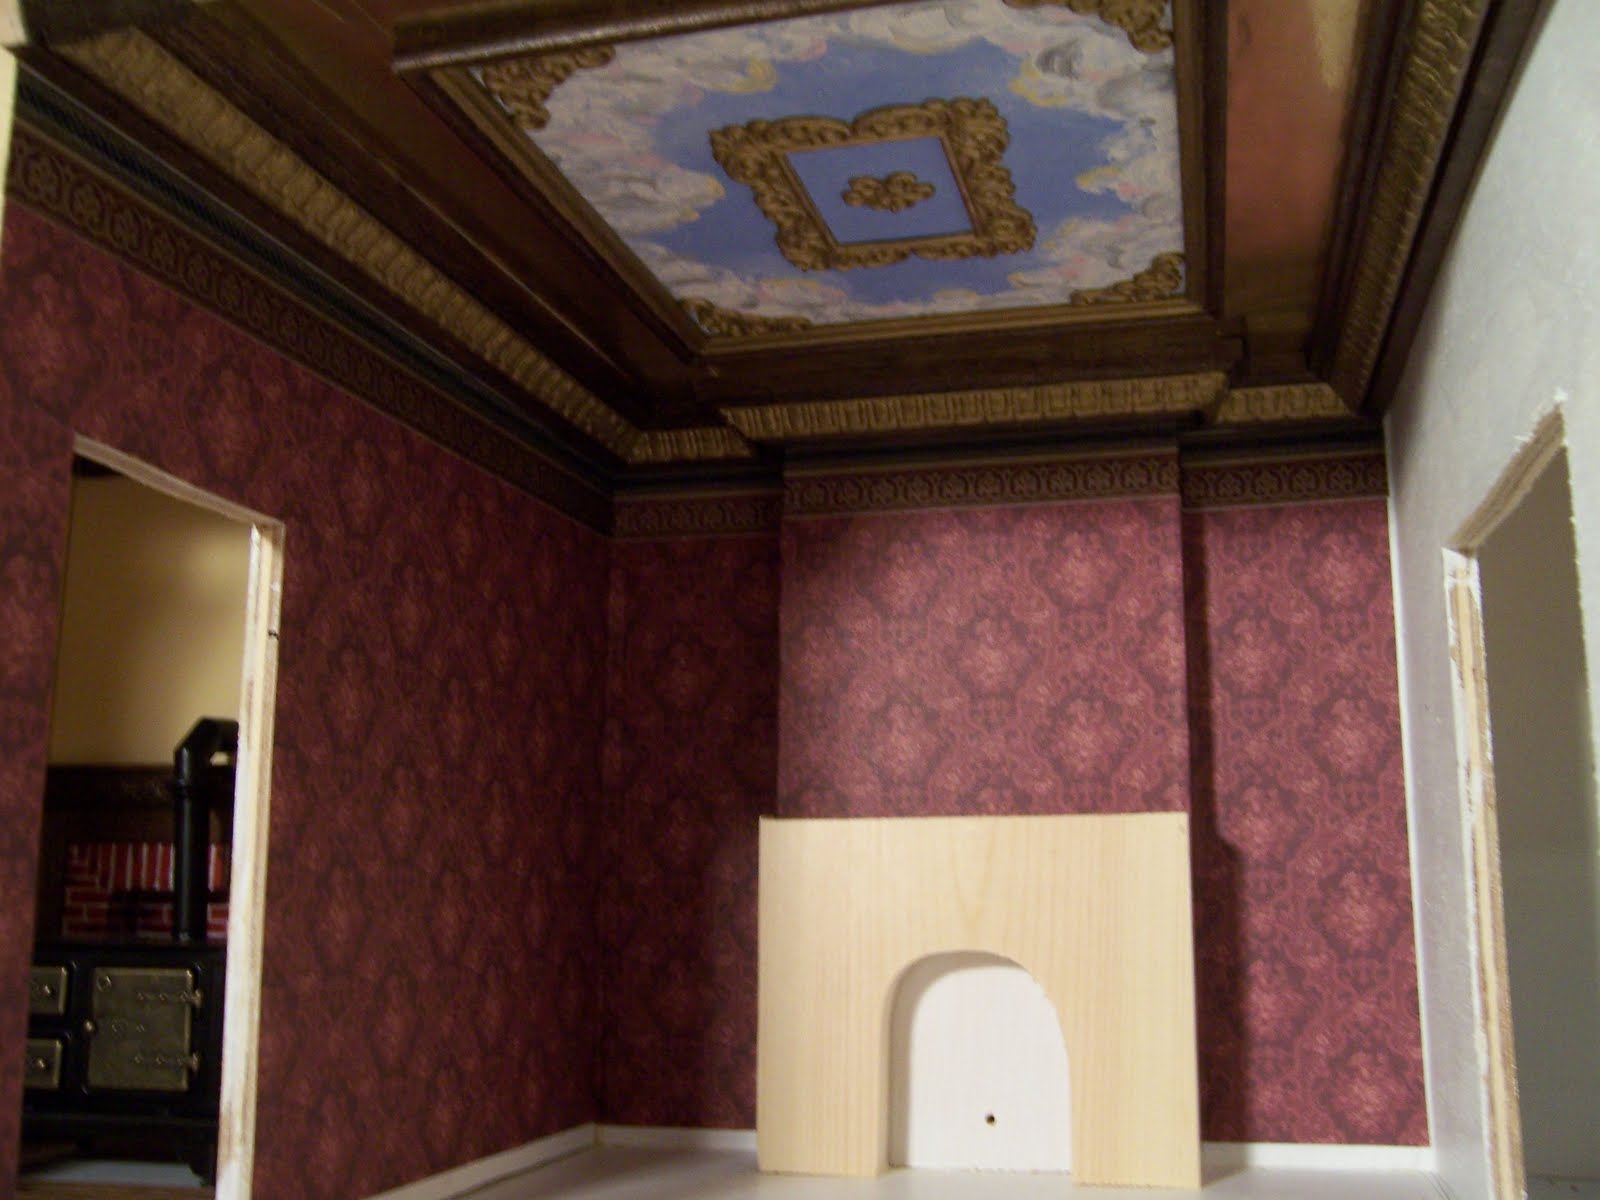 And this shows how it looks when the doors are in place..... so Dark and Rich and Victorian!
 And here it is with the third wall done.......
I love the way it reflects a Rosy hue in the gilded ceiling!
 And Paper in ANOTHER form.... Egg Carton paper .... has FINALLY been tested out for the brick floor of the kitchen underneath the cast iron stove. I have been intrigued by the idea of egg carton bricks ever since seeing other bloggers using them to such great effect.... but I had never tried them myself. It seemed like an awful lot of steps were needed ...... cutting the bricks, gluing them on, painting them, sealing them and finally grouting them...... and I had never used the grout so I was NOT sure it would be successful! But I finally convinced myself that this small corner of floor would be a good place to test them out.... and if they didn't work.... then I would try a different method. So I cut the bricks.... not very precisely, I might add, and attached them to a cardboard base that was cut to fit the space exactly. This served to give the right thickness of floor and also made it removable! Here you can see them all attached......
 Then I painted them and sealed them with polyurethane. They didn't look like much so I neglected to TAKE a photo of that step! Then I had to try the ALL IMPORTANT Grout! I carefully spread it on.... not too thickly.... making sure it went into all the cracks.... and wiped it off carefully so that only the grout in the cracks remained...... and left it to dry! At THIS point I began to see WHY people like it so much....... they REALLY started to look like BRICKS!!!! I am a complete convert! I LOVE them! I want to put them everywhere..... well, maybe NOT everywhere.... but I REALLY am impressed!
 Just LOOK at how Wonderfully REAL they look!!!!!
 And here's a view with the stove in place!
I Just Could NOT be Happier at the way these turned out!!!
 So by now you must be wondering what the Broomstick part of this Post is all about! Well, I had an idea for making a water heating tank for the Kitchen, but it required the SACRIFICE of the end of my Broom handle.....
 I thought about it for a Long time... but I am not very tall.... and heaven knows I don't Sweep very often.... so the end of the broom handle will probably NOT be missed....... and it IS for a Good cause.......
So I sawed the top four inches off......!
 And painted it a beautiful shiny Copper color......
(more coats of paint will make it even shinier...)
 And WHEN I attach all the copper pipes and faucets.....
it will make the PERFECT Hot Water Tank...
a VERY MODERN technology for the year 1852.....
Providing STEAMING Hot water for the Kitchen!
Providing STEAMING Hot water for the Kitchen!
 You will just have to IMAGINE the pipes for now.... as I didn't get that far this weekend......
But here is a peek through the almost finished window into the kitchen... oh dear.....
it is a bit dark and badly lit.......
I will have to do better next time.......
 That's it for now!
(Not Steam Heat) but Steaming Ahead!
Betsy, I love everything you have done so far!!
ReplyDeleteAlsa eggs come in plastic trays here, I wonder where I can find paper ones..., your bricks are simply fabulous!
Today I'll draw the windows in my walls and we'll start cutting. I feel thrilled as if it was first day at school.
Have a best day, Rosanna
Oh, Rosanna, I AM SO EXCITED for you!!! I Can't wait to see updates on your building progress! This is BETTER than the first day at school because we KNOW it will just go on getting better! Have FUN, I will be thinking of you! :)
ReplyDeleteI'm very impressed with your egg carton bricks and the broom handle end makes a far better hot water tank, I doubt it will be missed!
ReplyDeleteI'm loving your water heater! What a novel idea! :)
ReplyDeleteWOW! What a fantastic job. The brick looks perfect and the choice of wallpaper is wonderful. I absolutely love your progress.
ReplyDeleteGreat job!!!
Giac
LOVE the idea with the broom, Betsy!:D
ReplyDeleteThe bricks look so real - I have to admit I haven't tried egg carton yet...
The dining room has got a beautiful wallpaper, very Victorian.:)
And the birdsnest looks soooo pretty in your rose garden.:)
I can still find some eggs in the carton so ... I can try :-)
ReplyDeleteIt seems to me that the sacrifice of the broom was not consumed in vain :-)
Very nice hearth.
Mini hugs, dear Betsy
Flora
Thanks, Irene! I must admit, I was doubtful about the egg carton bricks until I added the grout! Now I think they are Fabulous and worth the effort!
ReplyDeleteHi Dale! The water heater is only partly my idea..... that dollhouse that had the dumb waiter also had a water heater! So I'm copying them.... but the sacrifice of the broom handle WAS my idea! Now I just have to figure out all the right tiny metal findings to make into faucets!
ReplyDeleteThanks, Giac! I'm SO glad I tried the egg carton bricks! I LOVE the dark ornate Victorian look..... this IS being FUN!
ReplyDeleteThanks, Ewa! I remembered you had made your marble tiles for Snape's floor out of painted paper and cardboard.... I am going to try them next in the hallway!
ReplyDeleteI'm glad you like the wallpaper.... not Everybody likes the really ornate Victorian era!
Hi Flora! You should definitely TRY the egg cartons if you can get them! I'm so amazed at how they turned out.... and I wasn't even trying very hard! And I'm glad I sacrificed the broom handle! :)
ReplyDeleteTried egg carton for my red sandstone temple and they look pretty good even though I was a complete amateur. And no wonder yours look fabulous, Bets, your painting is way way better than mine.
ReplyDeleteI am 100% behind sacrificing anything life size for our dolls' houses :). That copper tank is going to be just great.
Bravo Betsy! The bricks look wonderful and I can see sawing off the end of the broom. Loving the Victoria wallpaper.
ReplyDeleteYour roses are so beautiful next to the Folly :)
Hugs,
Victoria
felicitaciones!!! es una casa maravillosa y la cocina me encanta!!! quiero seguir viendo los avances!!
ReplyDeleteYou could sand off the end of what remains of your broom, so it isn't scratchy. You won't mind that it's a little shorter. The bricks are magnificent! And yes, I think the wallpaper in the dining room is exquisite. Perfect. How lucky the young couple will be to live in such a charming town house!
ReplyDeleteLots of love,
Mom
Amazing work. I am so glad you left a comment on my blog as it has enabled me to have a peek at your beautiful project. The gilded ceiling is simply wonderful.
ReplyDeleteI especially like seeing how other miniaturist's use every day materials. The broom handle idea really made me smile.
Betsy, egg carton paper? Amazing! I would never thunk. And even trying to grout. I can;t grout in real life-I've tried, I've watched plenty of HGTV and it looks easy, but I'm doing something weird. So to grout for a mini- wow. It looks fantastic, worth all the work. I cut out textured mat board and spritz it with a toothbrush, that's it. Bricks are not my favorite project. So I'm toasting to you right now, with my glass of juice!
ReplyDeleteSon muy interesantes sus trabajos, me gustan mucho, por eso me hice seguidor. Saludos de Pedro.
ReplyDeleteHi Sans! I didn't mean to forget to come back here to reply..... :(
ReplyDeleteThank you for your confidence in my painting abilities! But I know you can paint better than you THINK you can.... I have seen evidence in your creations! Just take the old brush and apply the paint.... you'll see.... we don't get the confidence until we try something.... sometimes again and again! :)
Thanks, Victoria! (I forgot to come back and reply!)
ReplyDeleteThank you Jorgelina! Welcome to my blog! I'm sorry I didn't reply sooner! I'm happy you like this house!
ReplyDeleteThanks, Mom! I will probably do that .... sand the broom handle! I'm glad you like the progress here!
ReplyDeleteHi Janice! Thanks for stopping by and commenting! I'm glad you like the ceiling!
ReplyDeleteThanks Amy! I will confess I approached the grout with quite a bit of trepidation! But I am really glad I overcame my anxiety! I will need to try it on my Castle Hall Floor soon..... a WHOLE other layer of trepidation there! I could always throw this out if it didn't work.... the Castle Hall floor is too big a project to back out on ..... I'm going to make some sample pieces to work out the kinks on before I tackle the whole floor.... It's HUGE!
ReplyDeleteThank you Pedro! Welcome to my blog! I have had a look at your ships.... simply AWESOME!
ReplyDeleteThanks for commenting!