Monday, June 27, 2022

Stitching....


 And Charting...

It may not Surprise you, Dear Readers, to find out that I had to make changes to the headdress of the Maiden I was stitching from the Janet Granger Kit. Above, you can see my progress, so far a faithful rendition of the kit design! But you may also remember that I had altered the headdresses of the first kit I had stitched a year or so ago. The kit designs just don't quite capture for me the extreme "Medieval" nature of women's head-wear in that era. 

Here you can see the first "Tapestry" I stitched,
 and the lady on the left has a much elaborated
 veil from the one in the original design.


In order to practice the art of charting a stitching design,
 I made a rendition of the changes I wanted to make
 on this lady's headdress.
 I started by drawing the parts of the kit I would use,
 so the scale would be correct, and then drew the changes.
This way I could see how my version would look
 before I began stitching!


Here the stitching is begun....


Here the veil has been begun....


And here it is completed.
I wanted to keep the colors mostly as the kit placed them,
 with the veil being blue rather than the whites
 I had added into the first tapestry.
And because I was planning to add another
 entire figure to the Tapestry, 
I needed to get a sense of the colors and balance of this addition.


My inspiration is the lady in this RL Tapestry, 
one of the Devonshire Hunting Tapestries.
The era and the colors were perfect.


The scale of my print-out is too small, 
but you can get an idea of what I am aiming for!


Here you can see I have begun the charting of the Lady,
 with a few adjustments to colors in her headdress.
I am trying to add a minimum of new thread colors to the kit design!
The subtleties of the Devonshire Tapestry just can't be rendered 
in this small scale without a higher count fabric.
 So I am working with what we have!


And at a certain point, I just had to start!
I carefully counted stitches to get the 
face and headdress placed correctly...
And because I am still sort of "designing as I go"
I was stitching with three or four threads.... 
leaving the ends dangling while I made sure
 the positioning worked well....


Working out the "blurry parts" in my chart 
as I got to each poorly defined "square" in my drawing!


And skipping past the parts I was unsure about....
(Which is most of the veil details....)


And adding the parts I am sure about first...
The sleeves....


And then just jumping in to the veil
 and trying to make it look a little bit "transparent"...
 but gold at the same time....
The effect will hopefully be more apparent
 when the background has been added.


And adding the little dog....!


And with the other Tapestry Ladies beside it....
to show the "Procession" they seem to make!
But I know you will not be surprised, Dear Readers,
 that I have yet to begin to chart the gown!
It is a complicated pattern
 and I might have to convert it to solid colors
 instead of the glorious brocade
 of the Devonshire Lady's gown.
I have a long way to go,
 but I am having a great deal of fun
Charting and Stitching this design!


Tuesday, June 21, 2022

Midsummer....


Magic....

Perhaps, Dear Readers, when you awoke early this Midsummer's Morning, you remembered at once that it was the beginning of that Longest Day of the year, and you leapt from your bed eager to see the dawn light come tip-toeing into every corner of the garden. Or perhaps, when you awoke, it was to discover a chilly fog laden mist shrouded the world in mystery.... quieting the birds and not a cricket awake to sing in the meadows. Or Perhaps you awoke to the loud crashing drama of a stormy morning, stealing your breath and shaking the earth, making you pull the covers back over your head! But however it was that you greeted the World this Morning, perhaps you had forgotten that last Night was one of those Magical Nights of the Year.... when the Fairies are abroad... and their Magic is often still spread across the fields and hiding under the hedgerows. And you just might catch a glimpse... if you are looking...!

And if you were rushing to get ready for work, 
you might not notice at first...


As you were rushing out the door...
The dew spangled spiders web hiding in the Summer Lilac!
But it might make you pause, 
and stop to take a closer look...


Perhaps you glanced down....
 and spotted something mysterious in the bushes...
What is that....?


Can we even see in there?
It looks like a ... chair...?.... a throne?


Half hidden in a Fairy Blanket spider web...
And a ring of fairy mushrooms....?


But try as I might, Dear Readers,
 I could not spot any Fairies!


And I did have to rush off to work!
But at the very last possible moment.... 
the sun broke through the morning mists...


Revealing the Summer Lilac in all it's glory!
Did I just Dream that the Fairies had come....?
Well, Dear Readers, I'll leave you to decide...
But I hope that you have all found
 Magic in your Midsummer Morn!


Wednesday, June 15, 2022

Stitching....


Carpet Update...

I Realize, Dear Readers, that I have been Remiss in keeping you updated about the stitching progress on the carpet I have been working on this spring. As you can see in the above picture, it is nearly finished. It is a very geometric pattern, and as such, is easy to stitch once you figure out the pattern of a given section. When I showed it to you last, I had just "enriched" it by adding a little touch of sky blue where none was called for in the kit instructions. And I had mentioned that I would be fighting the temptation to add just a little more in other parts of the design. In fact, it was no struggle at all! By the time I had finished writing that, I was pretty sure I would be sneaking a little bit of blue into the border that looks like a row of blossoms... a "necklace" of sorts for the carpet! If you look closely, you will see that I made the center of every fourth little "blossom" the sky blue, just being sure that the blue would not align too closely anywhere with the other "blue" centers, also every fourth oval, as it turns out! I love it when these pattern changes seem to make sense after all!

Here  the main stitches are finished. 
All I have to do is bind the edges and add the fringe.


Here you can see most of the edges are bound.
The two short ends don't get bound
 because I want there to be a fringe instead.


And I didn't waste any time starting the fringe stitching!
It is a bit time consuming, but is so worth it in the end!

And I would be surprised, Dear Readers,
 if some of you had not already guessed
 that I have started the next stitching project!
Yes, it is another of Janet Granger's kits!


It is a companion piece to the Medieval Tapestry one
 I stitched last year which now lives in Rose Thorne Cottage.
In fact, these "Tapestries" look to me as if they were
 originally all one large tapestry that was chopped into
 smaller sections at some point in its history!
At least that is the story I am going with!


And if you notice that I have begun stitching the Lady
 way over to one side of the piece of canvas,
 this is because I am planning to make it larger
 than the kit instructions call for.
 I plan to add another "Lady" beside the first one!
But I need to design this "Lady" myself!
I have got out my graph paper...
 and counted the stitches needed
 to match the size of the current "Ladies".....
And started sketching...


I know, you can barely see my scribbles!
Now I need to carefully color every single square
 in the color it will need to be stitched....
I think I am up for the challenge!

I think...!

I am really so eager to get this design
 worked out so I can stitch it!
The group of Tapestries together
 I am thinking of as "Ladies in Waiting"...
 

Yes, I have been "Turbo-Stitching!"
But this coloring might take a while....!
 
And that, Dear Readers, 
is the Stitching Update!
One Carpet almost done, 
and One new Project begun!
I just Love to stitch!


Tuesday, June 7, 2022

Details, Details, Details......


The Things We Almost Forget.....

As I Was Eagerly rushing to begin gluing most of the loose Castle parts, Dear Readers, I had one of those "But Wait..." moments that stopped me from getting too far ahead of myself and taking steps I would regret later. I was looking up at the bare ceiling, starting to think about what would be the best way to attach the many beams I was planning to have spanning the gap between the arches, and I realized that trying to cut and fit all those beams to the exactly correct length to keep them from falling off the ceiling while in construction would be a challenge I did not want to attempt! (I have had this problem when making the first room of the Dollmaker's Studio!) My cutting skills are not that good! The beams would instead, need to be notched into the arched ceiling supports, and those notches needed to be cut before I glued the arches in place!

I was relieved to discover that it was easier
 than I had thought to cut all the notches. 
The grain on this wood is lovely and even!


Here you can see the notches have been cut and I am testing it in place.
The stair wall and ceiling have been removed.


Here I am aligning the beams between the arches
 to make sure the spacing is right.


Here you can see all the beams are cut
 and the notches in the arches too.
The beams will each need to be "notched" on the ends 
to fit into the corresponding notch in the arches.
But this will be done after the arches are glued in place.
In the meantime, they sit too "high"
 to have the ceiling board in place.
Now, at last, I could glue some of those "rock" pieces in place!


Starting with the final section of "rock" ceiling above the hearth.
This makes all the area behind the arch part of the stone vaulting.
The wooden section of the ceiling will be over the middle of the Tower.


And the Arched section is glued!
And as I was about to rush ahead and glue the Stair Wall in place,
I remembered that the back corner 
had a small Niche built into the wall....


Back in the far corner where it is impossible to see!
There is an ornate Cross,
 for the Lord to make his private Devotions...


It is a bare corner except for this Treasured symbol.
And as I was pondering the Darkness of this corner,
 and wondering where the Lord would set his candle....
(indeed, I have been pondering that question
 for this Chamber for some time...!)
I thought I had better test some lighting
 before I got too far ahead of myself!


There really are only a few options for this Chamber!
One of them is near where the bed will sit...
(Here you can see me trying to hold a light
 and take a picture at the same time!)
 But I am concerned about the (future) bed hangings 
and candle flames being too near each other!
The other option is on the opposite wall... 
but I hope to hang a Tapestry there!
So how will I light this chamber?
In the Middle Ages, people were
 accustomed to the darkness of night.
The Lord most likely came to his chamber at bed-time
 with a single candle in hand and set it on one of the rock "corbels"
 which were placed to be useful that way.
He would have had enough light to see himself to bed!
No chandeliers! No great branched candelabras! No reading in bed!
Candles were expensive and not wasted.
But if he were going to say his prayers before sleeping... 
would he not set the candle near the niche? 


How far around the corner and how high should it sit....?


This would be unnaturally high... 
it is about 7 inches from the floor...
He would be annoyed to have to reach so high for his candle!


Here we can see what it illuminates... 
(getting my camera way back in the corner!)
but it is too high.


And if we lower it a little bit... 
build in a corbel  for it to sit on....
(figure out how to run the wires out the back...!)


Well, Dear Readers, I don't know about you, 
but I am liking the way this looks!
And I did get the Stair Wall glued in place!
But it is Remembering those last minute little details
 that make all the difference!


Wednesday, June 1, 2022

Glue... Getting Where We're Going....


One Rock At a Time...

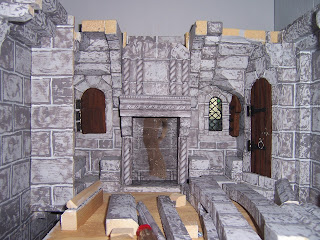
I Always feel Very ambitious, Dear Readers, when starting a three day weekend, and assume I will make tons of progress on my current projects. I was actually hoping to get a lot of the parts of the Lord's Bedchamber finally glued in place! Alas, the time was consumed with lots of fiddling and fidgeting and fitting unexpected "little" pieces that needed to be done before the permanent step of gluing could happen. Above you can see the Chamber as it looked on Saturday morning, but it is deceptive because so many of those pieces are not yet attached. And sometimes figuring out which ones have to be glued Before others can be glued is time consuming itself! But it was early in the weekend and I had determined to get as much "finished" as I could, starting with the stair wall on the left. What you can't see in the above picture is that the wall is a bit warped. and because it no longer spans the whole room front to back like the lower levels, it needs to be attached very firmly. So I got out my drill and screws and drilled the wall where it would attach by the nook in the rear. I couldn't wait to get it glued in place so I could figure out the corner trim... but then I realized I couldn't glue it until the ceiling arches, at least the one at the back of the room, were attached... and I shouldn't attach the arch until I had completed the upper section of the Hearth... and so it went. I got the hearth out and went to work on it first!

You will have to excuse the dark photos... 
it had become a very stormy and gloomy day
 and I don't always remember to take pictures with the flash.... 
because I usually think they look awful!
I had fiddled with the trim for the upper part of the chimney breast. 
Originally I wanted to make something more "ornate", 
but then I reasoned that this was just a "private" room
 and not made for display of wealth or power.
This room is not meant to be as Grand as the Council Chamber
 and the hearth would not be as big.


Here you can see the screw holes in the end of the stair wall...
(ah... that blinding flash...!)


And with the stairwall and ceiling removed....
But still, I realized I had better get the Hearth completed
 before I tried to attach the ceiling arch or the wall.


With the flash, you can see where the rear arch spans
 behind where the side wall will attach.
 Here I have propped the corner trim in place
 to see how it will look... 
but nothing is glued because the Hearth still needs work.


Here you can see it in the Morning light... 
I know, it is still pretty dark... 
but it is supposed to be a Dark Old Castle!


The hearth is removed for detailing.... 
it needed better paint application and grout lines at least!


And in case you wanted to know how much was Not Yet Attached....
all the loose pieces have been taken down.


And while we're at it, I decided to finish "strengthening" 
the central arch where it crosses the stairs behind that wall....
 not that it will be very visible,
 but I will feel better knowing it is there!


And since we are finishing the Hearth,
 it will need to have the "smoke" effect I like to use
 with the glitter strewn gauze...
It would be a mistake to skip this step!


And the interior of the hearth needed 
to be blackened from all the smoke...


And we need to see how it will look 
with the partly finished chimney breast in place...


Without the flash.....


And the wall and ceiling added....


And because I can't stand the suspense of not having the "fire" ready... 
I have borrowed the fire from the Hardwick Hall Attic.....
And run the wires out the back to the plug strip...
But the flash just Kills the effect....


Without the flash it is awesomely moody...
(I know, you can barely see it...!)


From a little farther back... 


Can I get more ambient light in there....?
 

And a little farther back...?
Can you see where we're going...?
 
I don't know about you, Dear Readers,
 but I don't mind that I only glued
 two pieces in place all Weekend.
I can see it is coming together... 
One Rock at a Time!