One Rock At a Time...
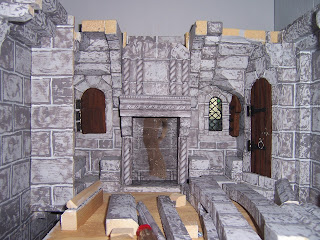
I Always feel Very ambitious, Dear Readers, when starting a three day weekend, and assume I will make tons of progress on my current projects. I was actually hoping to get a lot of the parts of the Lord's Bedchamber finally glued in place! Alas, the time was consumed with lots of fiddling and fidgeting and fitting unexpected "little" pieces that needed to be done before the permanent step of gluing could happen. Above you can see the Chamber as it looked on Saturday morning, but it is deceptive because so many of those pieces are not yet attached. And sometimes figuring out which ones have to be glued Before others can be glued is time consuming itself! But it was early in the weekend and I had determined to get as much "finished" as I could, starting with the stair wall on the left. What you can't see in the above picture is that the wall is a bit warped. and because it no longer spans the whole room front to back like the lower levels, it needs to be attached very firmly. So I got out my drill and screws and drilled the wall where it would attach by the nook in the rear. I couldn't wait to get it glued in place so I could figure out the corner trim... but then I realized I couldn't glue it until the ceiling arches, at least the one at the back of the room, were attached... and I shouldn't attach the arch until I had completed the upper section of the Hearth... and so it went. I got the hearth out and went to work on it first!

You will have to excuse the dark photos...
it had become a very stormy and gloomy day
and I don't always remember to take pictures with the flash....
because I usually think they look awful!
I had fiddled with the trim for the upper part of the chimney breast.
Originally I wanted to make something more "ornate",
but then I reasoned that this was just a "private" room
and not made for display of wealth or power.
This room is not meant to be as Grand as the Council Chamber
and the hearth would not be as big.
Here you can see the screw holes in the end of the stair wall...
(ah... that blinding flash...!)
And with the stairwall and ceiling removed....
But still, I realized I had better get the Hearth completed
before I tried to attach the ceiling arch or the wall.
With the flash, you can see where the rear arch spans
behind where the side wall will attach.
Here I have propped the corner trim in place
to see how it will look...
but nothing is glued because the Hearth still needs work.
Here you can see it in the Morning light...
I know, it is still pretty dark...
but it is supposed to be a Dark Old Castle!
The hearth is removed for detailing....
it needed better paint application and grout lines at least!
And in case you wanted to know how much was Not Yet Attached....
all the loose pieces have been taken down.
And while we're at it, I decided to finish "strengthening"
the central arch where it crosses the stairs behind that wall....
not that it will be very visible,
but I will feel better knowing it is there!
And since we are finishing the Hearth,
it will need to have the "smoke" effect I like to use
with the glitter strewn gauze...
It would be a mistake to skip this step!
And the interior of the hearth needed
to be blackened from all the smoke...
And we need to see how it will look
with the partly finished chimney breast in place...
Without the flash.....
And the wall and ceiling added....
And because I can't stand the suspense of not having the "fire" ready...
I have borrowed the fire from the Hardwick Hall Attic.....
And run the wires out the back to the plug strip...
But the flash just Kills the effect....
Without the flash it is awesomely moody...
(I know, you can barely see it...!)
From a little farther back...
Can I get more ambient light in there....?
And a little farther back...?
Can you see where we're going...?
I don't know about you, Dear Readers,
but I don't mind that I only glued
two pieces in place all Weekend.
I can see it is coming together...
One Rock at a Time!


Betsy I don't know what the deal is, but for some reason, for the second week in a row, my comments appeared to have published and then the next day disappeared. I will try to capture my first impressions of your lovely post again...
ReplyDeleteBoy can I relate to the "This Before That" conundrum and being coerced into something totally different than you thought you were going to! But you are a masterful pivot-er and the Lord will be enjoying his custom chamber in no time!
My heart leapt for joy at seeing the lighted fire and at that incredible roped molding. What a beautiful fireplace!
You’re getting close Betsy! You might not’ve gotten it all glued but at least you won’t have to unglue anything!! That’s usually hard to fix. I too always think I’ll get more done on my time off but it never happens.
ReplyDeleteDear Betsy, I'm sure the lord understands that to get a beautiful chamber takes time. He's lucky to have a wonderfully talented architect and worker to fulfill this project. I love the hearth with lit logs. I also love the lit window, makes up for the gloomy day.
ReplyDeleteHugs, Drora
And so Dear Betsy....What it all comes down to is this- this bedroom is currently between a rock and a hearth place! 😁
ReplyDelete