Monday, July 7, 2014

Tieing Up Loose Ends


Kitchen Lights and Other Little Things....

I can hardly believe it, Dear Readers, but I have Finally completed the Electrical wiring for the Lights in the Folly! The kitchen was the last unlit room, and I had been unable to decide on the lighting that would be needed without a sink in place. But once I had found the right sink, there was no excuse for leaving the lights incomplete! I decided to go with a simple and traditional sconce with a fluted glass, and I attached it with the globe facing downward as it gave much better "task" lighting at the sink.

Here I am testing the new light.....
I was able to mostly hide the wire behind the edge of the "tile" backsplash...
(here I have slid it aside while working on the wiring)
and the part below the chair rail is mostly hidden by the sink....
once I drilled the hole and ran the wire to the underside of the house.


 The other light in the kitchen is the one I acquired over a year ago, 
but did not complete the wiring.... 


It came without a plug... 
and to get the wiring attached properly would mean 
moving The Folly off its foundations.... 
so I could reach the underside to thread wires through the tiny hole.....
and run them up a channel to splice onto the lamp wires.
So I left it undone for over a year!
You can see below the partly moved Folly
and the wires in the "cave" underneath....

And here you can see the kitchen with both the lights on.....

And a view of All the lights on......

And now that the lights are all wired... 
I was able to add the trim to the outer corner on the kitchen side...
which covers the channel where the wires are run from the upstairs...
and that in turn allowed me to Finally glue the chimney in place!

I had finished the bricks Ages ago..... 
but could not attach it until the trim was in place......
which couldn't be attached until the Wiring was done!
Here you can see the whole chimney....

I couldn't attach the upper portion until the lower part was done
so as to be sure they were aligned correctly!

And to think that All this progress 
hinged on getting the right sink!

And speaking of "hinges", Dear Readers......
I have been having more fun with Tiny hinges for the Tree House!
To begin with I cut the doors in the walls 
for the Nursery and the Nanny's Room...

And added the hinges......
(I LOVE hinges!)

And here you can see the doors in place in the Tree House....

This is the Nanny's Room.....
with a door to the Nursery on the left 
and the door to the Hallway on the right.

And here you can see where the hallway runs along the back to the stairs...
(which will be inside the cardboard tube...)

And here you can see the Nursery.
The door on the back wall leads to the hallway and the stairs....
and the door on the right to the Nanny's room.
But the best part is the Bed Alcove that is built onto the "door " to this level....

This is just the rough framework viewed from the outside.....

And the inside.......
Visible when the main door is opened!
And I had to add the window frames.....
For the Bed Alcove.....

And I wanted the windows to be able to open.....
so I added Hinges.....

Teeny Tiny Hinges!
They went on a little bit crooked.....
But this is just a Tree House after all....

So it can be a bit rustic and worn!
I will need to fill the chipped spots.....
And I need to make the "window glass"....
This is really just the beginning!

So while it seemed as though 
Very little got done this week, Dear Readers,
Between the Tiny Hinges, The Lights and the Chimneys...
At least I managed to tie up a bunch of loose ends!

Monday, June 30, 2014

Walls


Big and Small.....

I Truly cannot say how long it has been, Dear Readers, since I did any Serious work on the Folly! It figures so often in my pictures of sunlight playing in my Doll Worlds, and I have come to accept it's incompleteness while I work on my other more Exciting projects. But I have for a long time been aware that the Kitchen needed attention! The only furnishing in there have been the almost finished stove and the not at all finished, but cute, hutch! It is such a small space that I have never been sure I would be able to fit in a refrigerator.... but I have always known it would need a sink! And not just any sink! It would need to be small and old fashioned... (this house was built in the Nineteenth Century after all), with a slightly elegant feel to it, not really rustic at all. I have watched others make their own sinks with great success... and was beginning to think I needed to make this myself. Then I came across the perfect little sink at the Sturbridge Fair! 
(Yes, I did not show you ALL the Treasures I bought at the Fair!) 
When I got it home, It Fit Perfectly! 
And then I began to think of the Tile backsplash it would require.... 
as it had no backsplash attached..... 
And that was when I noticed the Coaster under my Tea.... 
one given to me Ages ago by my Dear Friend Ewa.... 

She sent me a gift package with these coasters and many other little things... 
and I have always thought these coasters should 
find their way into one of my projects...!
So I propped it in place behind the sink......
and it Fit Perfectly!
(Thank you, Ewa!!!)

Then I thought there should be wainscoting 
below the tile backsplash.....
Beadboard wainscoting...
Because All the old Victorian houses I ever saw 
had beadboard wainscoting in the kitchen!
I would need to start with the mopboard at the bottom....
Then I found a piece of trim in my piles of stuff 
that was already painted the right color....
 
And was the right length for both the mopboard and the chair rail at the top...!

Once they were glued in place 
I began to cut woodsies to the right length......

And glued them in place between the rails!
The woodsies have enough of a bevel on their edges 
that they mimic the beadboard paneling, 
but they don't actually have a "bead" along the edge. 
These will be barely visible in the end, 
so I am not bothered by that small imperfection.

As for the "Tile" backsplash.....
I took the coaster and trimmed the sides back 
to eliminate the curve at the corners,
And marked the grid of the tiles with a pen.

I then used a ball stylus to press an indentation along the lines....
this is to mimic the grout lines.
Because the coaster is just varnished paper 
I did not want to cut into its surface.
Here you can see the grout lines painted white....

I did spray the surface with varnish between the black marking and the white....
And then again to seal the white too....

I think it looks like perfectly dirty old grout!

Of course, by now it is so late at night 
and the picture is too dark to see well.
But in the morning.....
With the Sun shining in....

I think it looks Perfectly Lovely...
And almost as if it has always been there!

You can even see the "texture" of the individual tiles!
 I am sometimes amazed at how things will 
suddenly come together to make the perfect result...
when I had no idea how it was going to work when I started!

But that was not the only wall I was working on, Dear Readers!
I also decided to wallpaper the inside of the Stairwell 
on the spiral stairs in the Tree House....

And it is a good thing I did! 
Because in the process of making the pattern for the wallpaper....
I discovered I had not yet glued the cardboard wall in place!
It is now glued....

I used the same glittery paper that I used in the Library and the lower stairwell.
I still need to make the window for this door... 
and add the latch and magnet.....
But I think it is just about time to attach the next floor above! 
So I can get going on Those Next Walls, Dear Readers!
Big And Small!


Monday, June 23, 2014

Baby Steps....


Learning As We Go.....

Where To Begin this week is the problem, Dear Readers, because I have so many tiny little things I could show you.... and I am only afraid Some of them might seem a little Boring to look at! To begin with, I have Finally made a little more progress on the Tree House! Do you even Remember where we left that project? Well, I had mostly completed the bathroom (that does seem to be a theme lately!) and had partly finished the Dressing Room ..... but it was not done enough to attach the floor for the next level up! What you see in the above picture is the Beginnings of the Door for the next Room level.... and the floor temporarily in place. And if you look Closely at the door to the bathroom below, you will spot a wire loop on the side of the door... and a magnet on the door frame! It took me Months to decide how to attach the magnets and the door "latches" for the upper doors to the Tree House. Left to their own devices they tended to swing open and I had used masking tape for ages.... but that didn't work very well and could not be the permanent solution. The wire loops are very attracted to the magnets, and they are bendable, so they can be formed to the correct shape when I put the "outer skin" on the whole tree.... a Long time from now!

I have added one of these wire loops (made from a bent paperclip) to each of the upper doors along with a magnet... which I sometimes had to carefully cut away the walls in order to make it fit! (This was because I had not decided on the latching mechanism at the beginning of the project!) So we are learning as we go!
And another little detail that has been waiting for me to accomplish 
is the inner layer to the door on the Spiral staircase.......

This will not seem like much, 
and you might not even be able to see what I am talking about in the picture, 
but it was really very necessary! 
The door fits more closely to the stairs now when it is closed.....
And we wouldn't want any little Baby Ratlings 
to fall through cracks in the walls!
And Another small thing that has been holding up progress on the Tree House 
has been the Lighting for the Dressing Room beside the Bath.
I was originally hoping to make one LED light work for 
Both the toilet room and the Dressing Room...
(This was because the batteries support 10 lights each 
and I had reached that number for this battery 
and I wanted the next battery to light the rooms above, not this level!)
But I finally decided that I had to make a separate light for the Dressing Room....

I used a gelatin capsule for the "glass dome" and a sequin for the base....
And glued the LED inside....
And then I had to paint a piece of ceiling to match the room.....

It is not very big......
And attached the lantern to the ceiling.....

With the wires run through to the upper side.....
And then we see how it looks.....

Do you even remember this room???
With the wild Sea Horses in the waves.....

Well now you can actually see them!

And you can see the ceiling.... 
if you get down on your knees and look up..!

Here you can see it with the other light lit as well.....
I think the battery is running low on that one....
But now we are one tiny baby step closer to starting the next level up, 
because once the wiring is in place I can attach the floor above!
And what is that level going to be, I hear you ask?
Well, it is going to be the Nursery and the Nanny's Room.....

Here you can see the view looking down from above......
I had to extend the floor in several places.....
The Nursery is on the left and 
the Nanny's Room will be on the right of the dividing wall.
When we get there....
One Little Step at a time!

But That is not All, Dear Readers! 
I find that I Must tell you the next installment of Daphne's Story....
And this time we Begin with Guillaume...

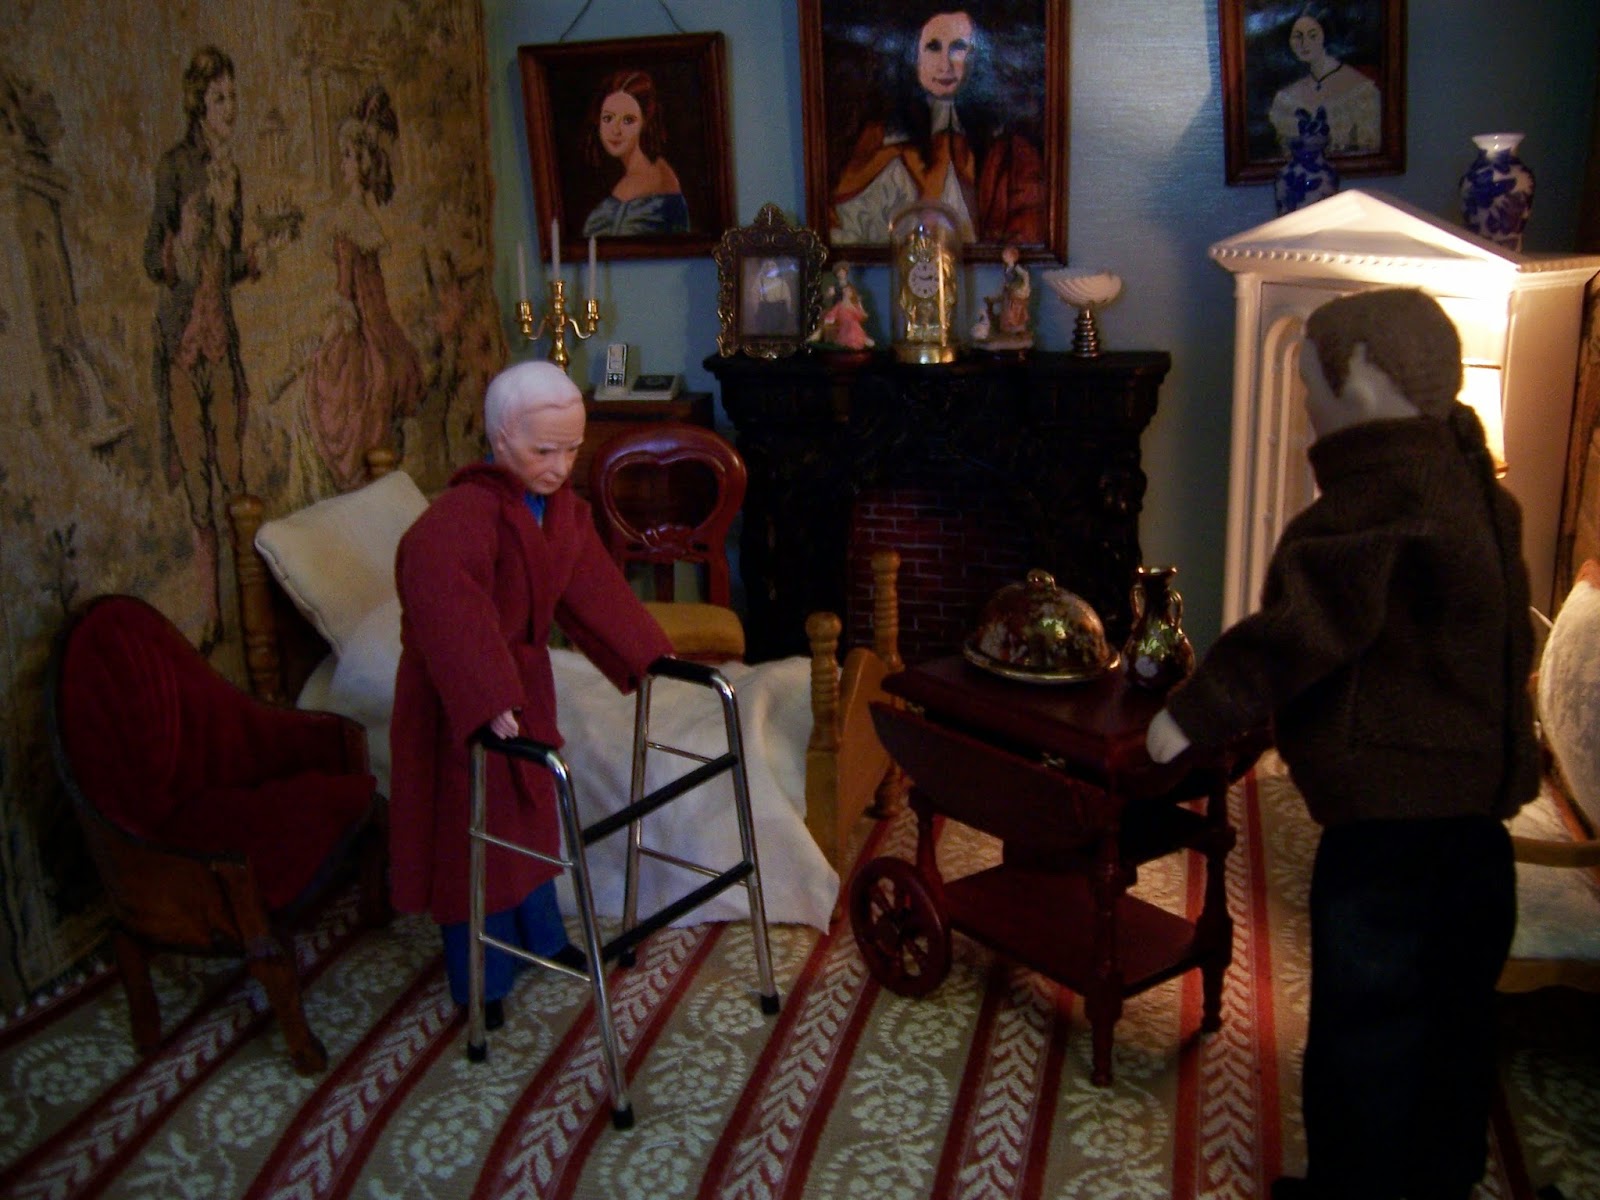
Some of you Might recall that he had suffered a terrible Stroke shortly after the Baby was delivered into their care....


And Yvonne found it necessary that she learn to take over the 
management of the Family business and all their Estates.
As Guillaume slowly gained strength she would sit by his bed and tell him all she was doing and learning....

But in spite of the best medical care, his healing was slow.
And Yvonne needed to be away from his side to see to the Business.
They hired a Nurse to tend to him.
 Jean Paul was large and strong and kind.
But Guillaume did not always think so, 
especially when he was being told to try to walk...

They did not seem to understand that his body did not listen to his mind any more....

He was not at all sure that "practice" was going to make it better.
As the weeks turned into months and he could not manage to do the stairs in the Townhouse, 
they made the first Floor parlor into his own room, adding a bed....
And his meals were wheeled in on the tea trolly....

Guillaume was happier to eat alone, 
he felt so ashamed that he needed help even to eat!

And even worse, his words did not return at all!
When he thought "dog" it  came out "pig" or sometimes even "cabbage"....
There did not seem to be a connection any more in his brain and his voice....
so he said nothing at all.

He could not understand why his life had dwindled to this one room....
He thought it would have been better if he had died.
But sometimes in the distance he would hear the baby crying...
and then he would remember that there was one thing to look forward to.

Sometimes Raymond would come to see him and would bring the child.

At first he had no interest. 
He really felt that it did not matter what became of him.
But while the baby slept in his arms, Raymond would talk to him.... 
about the household, about his work, 
and about the baby and the progress she was making.
As the weeks went on, Raymond and the Baby's visits 
became treasured moments in his empty life.

The time passed very slowly for Guillaume.....
They moved in a large TV to give him some entertainment...

But he could never remember how to run the controls....
and he didn't understand what was on the screen anymore.
Travel was impossible for him, so they never went to the Country House.
Yvonne spent every evening with him, reviewing the work of the day....
But he had lost interest and had nothing to say. He was afraid to try to speak to her...
He was sure his words would make no sense.
It was the Baby, little Renee, who gave meaning to his days.
She was growing so quickly!

One day she was just an infant, and the next it seemed she would talk any day!

Or Walk!

Can it be she will take her first steps....?

Just for Grandpa?

He had not realized it before...
His heart had been stolen....
But suddenly he knew This child meant Everything to him!
He wanted to live many more years... to watch her grow!
Yes, Dear Readers,
It all might be just Baby Steps...
But we're all learning as we go!