Blossoms, Branches and Biography.....
I Left you last week, Dear Readers, with the fourth blossom completed and the fifth one painted and ready to assemble. I had once again hoped I would manage to make two blossoms in a weekend, but once again I only completed one more. Above you can see the unpainted florets lined up in the box I am using to keep them safe during the many steps required for this process. The florets are tiny and could easily be scattered by passing pets or brisk breezes! I was planning to make the next batch of florets, but decided I needed to make the remaining three shrubs look a little more like the first one before I forgot the steps needed to do so!

Here you can see two of them with only the main stems,
and even a few of the secondary stems still not attached.
I attached the last few missing stems
and then wrapped all the joins
in extra layers of brown paper and glue.
This was to strengthen them and also to smooth
the transition from one size branch to the next.
It is only marginally successful at that,
but I console myself with the assumption
that no-one is ever going to look that closely
between the branches!
And because I have already made one of these shrubs,
I have a good idea of how many smaller branches are needed!

I need to make forty-eight twigged branches for each shrub!
Above you can see twenty four with the twigs added and the glue drying.

This is the number two shrub with the
stems ready to have the branches added.
I tried to give them the same shape and twists
as the first shrub, but some adjusting will
probably be needed as we go on.
It is remarkably difficult to make the two shrubs
closely resemble each other!

Here I am starting to add the twigged branches to the stems.....

And more added...
I think this is fifteen or so of the branches added.....
But it was getting late,
and I was also assembling that sixth flower blossom.....

Oh, and I forgot to show you the completed fifth blossom!

Just for the record .... here it is!

And here you can see the six completed blossoms together!
(Along with the failed previous method at the right for comparison!)
And the other little bit of background I worked on Dear Readers,
was the cream colored stitches in the petit-point embroidery.

See? And I have no idea how many stitches
I added, because I wasn't counting!
It is very therapeutic to sit and stitch on a Sunday morning!
And since I have so little that is new to show you Dear Readers,
I thought I would continue with the retrospective of this blog,
this time sparked by a comment left by one of you Readers!
In the picture of Rose Thorne Cottage that I posted last week,
visible in the background is the doll whose picture
is the icon for my blog.
But I have never introduced you to her!
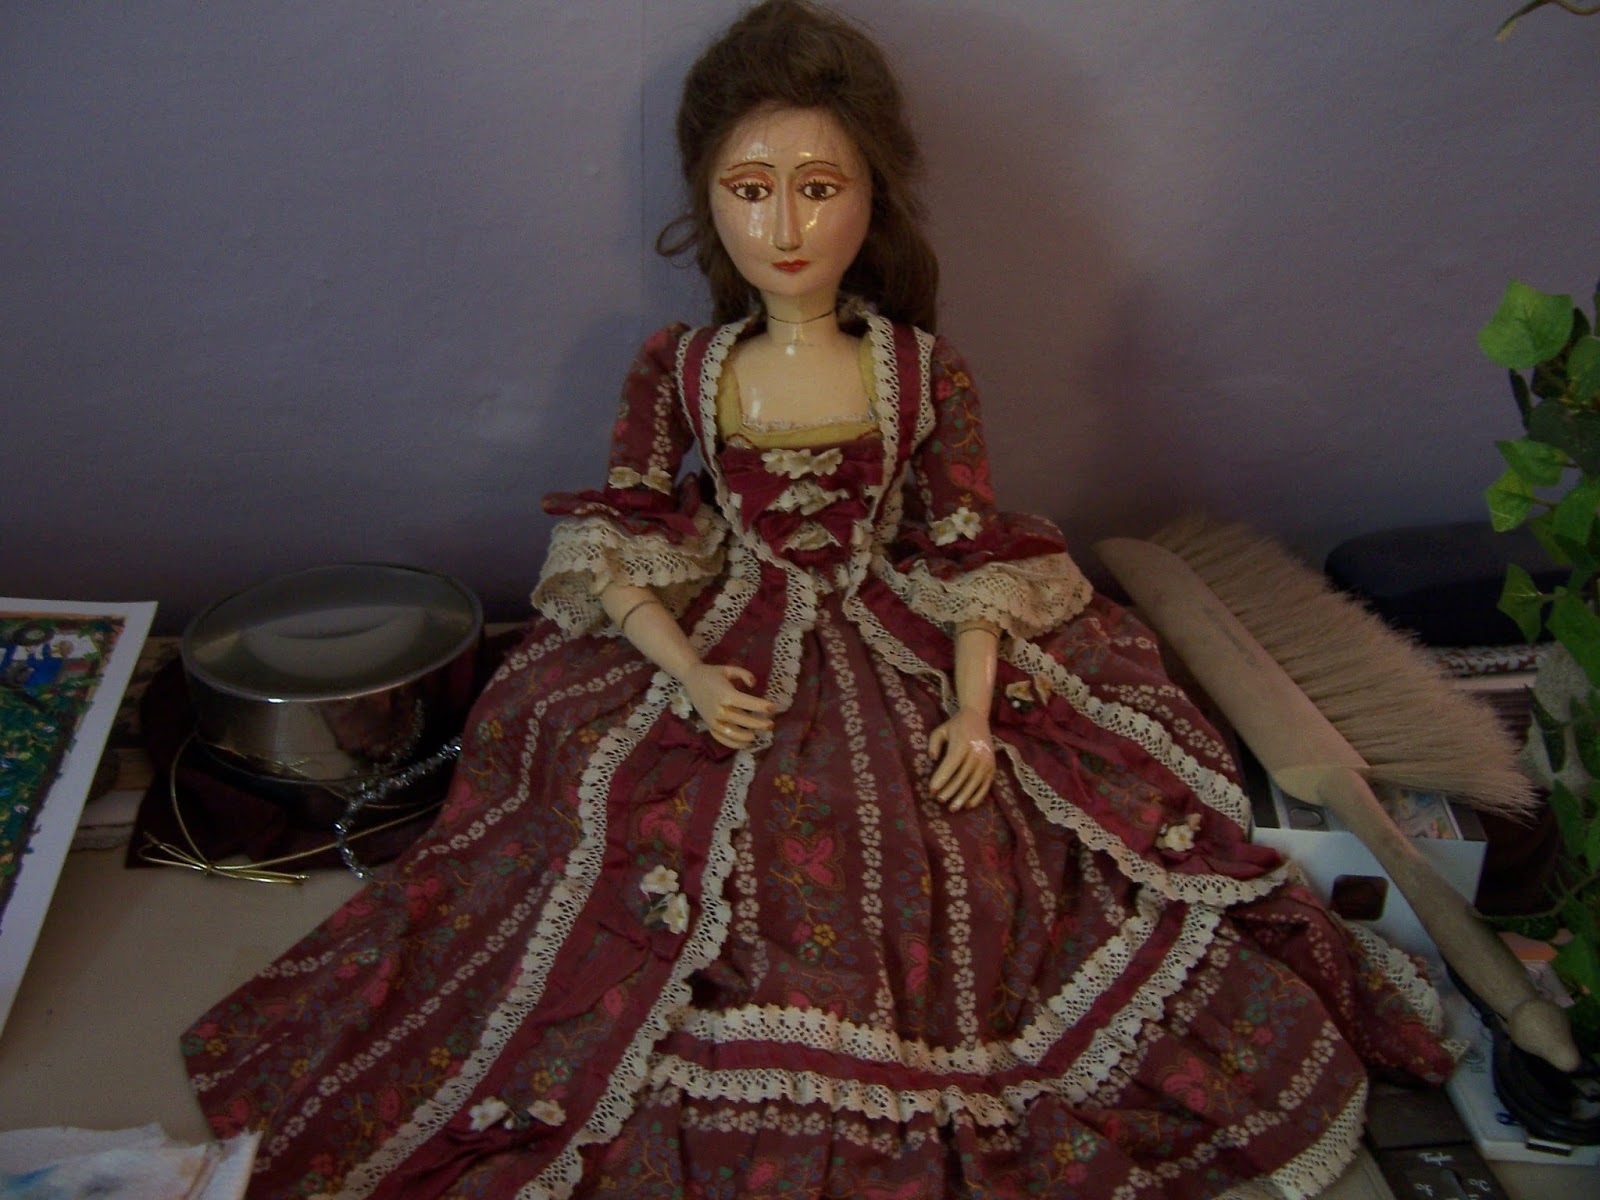
You must meet Penny Wooden!
She is entirely hand made by me,
carved from wood a long time ago when I was nineteen.

She is a mortise and tenon jointed wooden peg doll....

She is much larger than dollhouse scale,
standing about sixteen inches tall....
(Which she doesn't do very well as her knees buckle easily...!)

I had never carved wood before....
and didn't know how to carve the features.....
I remember going to the mirror to try to see
how a face rounded from the front profile to the side....
And then I had no idea how to paint the features.....
I do not even remember where I got the paints!
The hair is my brother's hair.... collected after
he got his long hippie locks cut short....
beautiful curly hair!

The hands are also carved wood....
I think the entire doll is made from scraps of pine wood
that we had kicking around at the Farm.....!
I added the swivel joints in her forearms
so her hands can change their angle of repose!

She is really rather fragile at this point,
her wood having aged and dried and shrunk....
I let her sit quietly on a cushion beside me on my drawing table.
But her story is a.... well,
Let me tell you her story!
I made her at a point in my life when I had not yet left home.
We lived in a very rural area and
creative materials were hard to come by.
Trips to the city, which were few and far between,
always involved looking for
fancy cloth and books and other artistic supplies.
Shortly after I completed her, I did leave home,
and decided to give her to my sister
who was living half way across the country at the time.
I made a fancy traveling box to keep
her secure and shipped her off.
And I truly forgot all about her!
I was young and doing other things...
including making cloth fashion dolls for a few years.
My sister is the one who named her "Penny Wooden"
(Because she was carved in the style of the
antique "penny woodens" of the eighteenth century.)
She sewed her some alternate costumes,
but decided to keep her in her original gown which you see here...
(sewn by me with all the underclothes in accurate detail)

You can see here her "bodice" is not
completely covered by her "stomacher"....
If you care to know such details!
My sister kept her carefully in her box most of the time....
but did let her out once or twice to play with her daughters.
Her leather shoes and neck ribbon and hair lappets got lost along the way.
But my sister moved a lot,
and boxes get stored from time to time,
and so she was forgotten.
Truly forgotten. By all of us!
Then a few years ago we were all
preparing for my Mother to move out West,
so there was a big clear out of her attics and closets,
and Lo and Behold,
There was Penny Wooden in her tattered box!
Wrapped in the old blanket I had first shipped her in.....
only a little the worse for wear...
(A mouse had made a nest next to her at one point,
and chewed a hole in her gown...)
And so she came back to me!

I keep her there on my drawing table....
yes, even when I am painting the Christmas cards
and doing other calligraphy work...
I think she helps me with the creative Dreaming....
So there you have her story Dear Readers,
along with the blossoms and branches
And a little background!