Tuesday, May 26, 2020

Hinges.... Again....


Take Two....

It was a Gloriously Beautiful Day on Saturday, Dear Readers, with the promise of a three day weekend stretching before me and seemingly endless time to accomplish things Great and Small. And high on my list was finishing the window for the opening wall of The Lord's Council Chamber in the Castle. I had pretty much finished the frames and needed only to fit the glass panes (with the lead lines trimmed to a decent shape) and attach them. The upper fixed panes worked like a charm and were done in short order. So I started fitting the lower hinged window, confident that I knew what I was doing because it had worked on the previous window. Alas, there were a few small things that didn't go as planned.

Above, you can see the interior side of the window,
 hinges notched into the frame, pane fitted correctly.... 
but the window is not seating properly at all,
 and won't close fully.
Hmmm.... what is the problem here?

Upon closer inspection, from the outside of the opening panel,
 the entire frame is not screwed into the opening in the right position.
 The pivot of the hinges should be flush with the wall,
 not pushed out by a sliver.
How did that happen?

I did everything the same way I had on the other window!
Here you can see it from above.... 
it is never going to close correctly.
It was late, I was tired and annoyed. 
I went to bed and Dreamed of hinges.
 
The next morning I took the window apart again. 
And examined things a bit closer....
I found a couple of problems.
Firstly, I was wrong... 
the hinges do not form a Ninety Degree angle when fully opened...
They probably forma a Ninety-three degree angle
 (I don't have good enough measuring tools!)

So in order to have the face of the frame close flush with the wall, 
the hinge plate will have to have a slant inward
 to accommodate the extra degrees.
The simplest way to accomplish this was
 to add a "frame post" to the side of the window.

And to make sure the notches for the hinge plates had a good tilt to them.

The other small problem I found was that
 when I was drilling the holes for the screws
 (remember that I am drilling into the side of a small opening
 and could not get a perpendicular angle to the drill no matter what I tried)
 the screws happened to align with the glue layer of the plywood
 (which is much harder than the wood itself)
 and so the drill slid to the side just enough
 that the whole hinge was out of place.
Alas, I did not take a photo of this detail,
 so you will have to imagine it for yourself.
The good news is that this problem was
 also corrected by the addition of a "hinge post"
 because I could do all the drilling
 prior to inserting it into the wall!

Here you can see I am fitting the "hinge post" to the side of the window,
 ensuring that the resulting angle will equal the desired Ninety degrees.

This is the front facing view... 
yes, the hinges are large and sturdy!

Here you can see the hinges are attached to the new post
 (which will be trimmed along its side)
It is now ready to be fitted to the window opening.... 
or rather, the window opening needs to be fitted to it!
Which was another whole adventure... 
but was not the fault of the hinges 
that it did not go smoothly!
Some shims had to be employed 
when My carving techniques went awry.

This is the outer view... sorry for the blurry shot
(by now I was getting cranky!)

And the view of the interior side... with the window "ajar"...
But does it close properly...?


Yes! 
It closes perfectly!

And the open view.... 
showing the hinges correctly placed!

And getting the paint added to disguise the addition...

And the outside view..... this is the outer wall of the Castle... 
which is a long way from being "finished"....
 so we will excuse the rough finish!
Whew! (That was Rough!)
And pretty much used up those three days!

But before I leave you, Dear Readers,
 let me show you a little more of that 
Lovely Lilac in bloom...

It was such a Beautiful Day!

And maybe we can forget all about the frustrating hinges....

I can almost smell the blossoms...!

And I can Hope, Dear Readers,
 that my next attempt with the Hinges.....
 will not require so many "Takes"!


Tuesday, May 19, 2020

Lilacs And Love....


Late Bloomers....

You might be surprised to learn, Dear Readers, that our local lilacs are just Now coming into bloom! It is a very very late Spring in this part of the World, but not All of us mind! It is still just as Beautiful as can be with the sun shining and the birds singing. Will and Gabrielle are enjoying the early morning in the sunshine beneath the Blossoming Lilac. Yes, it was time at last to bring it out of the storage box for its brief reign of beauty! This also required a certain amount of shuffling the Houses around, even though it is still too early to move the house plants outdoors which signals the true start of Summer at my house and the rest of the dollhouse seasonal shuffle takes place.

I hope you don't mind if we revel in the lilacs for a minute or two!
 In case you did not remember that it took well over a year
 to construct the lilac shrub, I think it deserves
 a minute or two at least of admiration!
Will and Gabrielle are smitten...
and not just with the lilac!

It is difficult to get good pictures.... 
the sun is either too little or too much...
But, Oh we love it so!

It was one of those weekends when
 there was not much time for minis.
But I did make a Start on the next window
 for the Lord's Council Chamber.

The opening front has one window.
I started by making the paper pattern for the opening.

And cutting the outer framework from 1/8th inch thick plywood.
I must be getting practiced at this.... 
it fits better than the last one!

Yes, I am going to make the bottom section open with hinges again! 
This requires building two separate frames for each half of the window.

Here I am making sure the bottom half
 will fit right with the upper half. 
And you can see the inner side of the opening door
 has been painted to resemble the stone walls.

Both the frames have been fitted,
 now they will be painted while I make the glass panes....

Once again, I have stained the bottom opening section
 as it would not have been made of stone like the upper frame.

You might recall that I had found two panes of glass in my scrap pile
 that were Exactly the right size for the windows.... 
I decided to only use one on the first window
 since I needed to shape the top pane anyway.... 
which means I still had a ready made pane for this window!
What you see here is the top pane which I did have to cut to fit....
 prepped for the lead lines painting.
There are guide lines on the paper
 for the exact size of the window opening 
and the placing of the lead lines.  

Here you see both panes "leaded".
As usual, the lead paint is hard to control 
and my lines are too blobby and badly spaced.
I will be able to do some cleaning it up once it is dry.

And in case you were wondering if I had made up my mind
 about the grouted floor in the Lord's Council Chamber...

Even though it is impossible to get the perfect
 bright sunny morning pictures...

I Absolutely Love it!
 
 
And though the Lilacs are blooming so late, Dear Readers, 
They take my breath away with their beauty!
I Love them still!


Monday, May 11, 2020

About Grout......


About Time....!

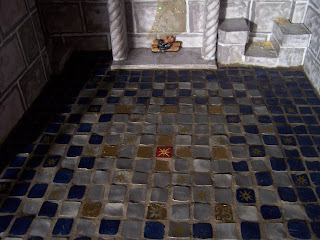
I am Sure you will be glad to hear, Dear Readers, that the grout I had ordered weeks ago arrived at last! It came last Tuesday, but grouting is not the sort of task you want to tackle without ample time, so I had to wait for the weekend before getting started. Above you can see the floor with the tiles all neatly glued and waiting. I am always surprised at how nervous it makes me to add the grout. Did I space the tiles right...? Will the grout ruin the finish...? Should I seal them again before the grout...? Will it make the plywood under the floor too wet and warp the structure...? You can see I lose my confidence with too many questions. At a certain point you just have to dive in! In this case I decided to remove the front door panels and the framework to allow better access to the back of the room. The doors were going to need to be painted anyway, so it was practical to do that now.


Without the front panel or the doors you can see 
the structure of the upper room as well.
And then it was time for the grout.
And I will tell you that grout is one of those messy tasks
 that don't encourage picture-taking at the same time! 
So there are no in-progress grout smearing shots!


Just the floor with the grout applied and partly wiped away.
And I was glad I waited for the supplies to arrive, 
because I did need part of the extra bag of mix!
Whew!
At this point you simply have to wipe enough grout away
 that the tiles are essentially clean, if not perfectly clean.

It leaves a silty residue.... 
which will eventually wipe away when it is dry. 
But you want to be sure the tiles are not 
covered where they shouldn't be.... 
dips and cracks wiped as clean as possible.

And then you have to let it dry completely.
Which takes a while. 
I leave it overnight. 
And I refuse to look at it... 
because I am already convinced it won't be right.
The spacing wasn't right... the grout is too thick....
 the color won't be right.....
Just walk away!

Because when you look in the next morning
 you will know you were right....
Aiyi yii.... what were you thinking....? 
It doesn't look anywhere near the way you hoped it would.
(Even the camera shots are bad.... you just don't want to look!)

And with the spotlight shining in.....
It needs a lot of work.
But I was sure that would be the case...

The grout color is much too pale to begin with.... 
and the floor is supposed to look old...
I knew I would have to "age" it anyway.
The first task was to "polish" the tiles 
to remove as much of the filmy grout layer as possible.
I used an old dishtowel, dry not wet.  
(The grout is quite abrasive and tears paper to bits)
And in one or two places I scraped back the grout
 where it encroached too much on the tile....
 (my hand-made tiles are very irregular in size)
But the chief task was going to be applying a
 "muddy wash" to the floor. 
This is another one of those steps
 that is very anxiety producing....!
It is just impossible to tell as you are applying the wash
 how dark it will end up once it is dry.

I used a watered down mixture of black and burnt umber acrylic paint....
 more black than umber... and very watered down.
I started in the back corner by the stairs... 
and it instantly looks much too dark!
You have to apply it in small areas and wipe it off the tiles before they dry.
 I basically want the grout darker, but the tiles not too dulled down.

It is hard to see back there.... but knowing that
 I am probably not making it dark enough....
 I went back over it a couple of times....

I decided to mostly work in from the edges.... 
doing the outer darker tiles first... 
and deciding about the middle later....
The grout drinks the water right up..... 
(And the acrylic paint actually seals the grout nicely)
but you have to clean the tiles off....
 mix, slather, wipe....
(It is rather messy!)

At this point you are sure that it won't be right....
The middle won't look right with the darker grout....
But you just have to carry on!

Because you won't be able to tell for sure until it is dry!

And if you made it too dark..... 
it will just have to stay too dark!
(Like a dirty old floor!)

It does help to walk away.
 
And maybe look in later with a little atmospheric lighting....
 just to check on it.... 
because who can resist....?
I know... you can't really see it without the spotlights!

Which do shed rather a lot of light.....

And maybe make me think it doesn't look too bad...?

But it is night.... will I still like it in the morning....?

On a Dark and Gloomy morning...... 
in a hurry because I must go to work....
I can't tell.... 
but I run my hand over the floor and it feels beautiful!

And much later.... can we add the lights....?
It is growing on me....!

And with the spotlights....?
Is it the right amount of dirty.... or not enough....?


Ah.... perhaps it is too soon to tell!
I will have to wait for a beautiful brilliant morning....
I will have to add the door and the ceiling....
I might have to live with it for a while...
But really, Dear Readers, perfect or not...
I am loving this floor with the grout!
It feels so real!
It's about time!