A Twisting Tale...
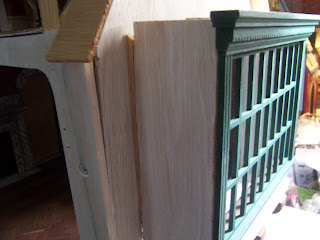
Unlike the Dollmaker's Studio Vignette, Dear Readers, which went together flawlessly from laser cut pieces of the well made kit, the Window Seat alcove is cobbled together from scrap wood pieces found in my "bits and pieces" boxes. What seemed like an ideal piece of plywood, exactly the needed dimensions for the base, had a subtle flaw that only became apparent after the structure was glued together. It had a slight warp to the plywood! The result is that the base of the window seat doesn't sit square to the walls on both sides. On one end it leans away from the wall, leaving a sliver of a wedge shaped gap at the top. You can see in the above picture that I have added a sliver of plywood to fill the gap. And on the other side of the window, it is the window frame which doesn't meet the side of the wall!

This is because the opposite wall leans out a little bit because the base is a little bit twisted. The piece of plywood is too sturdy to "untwist" by applying pressure and a lot of glue; it is 3/8 th inch thick and only 2 inches wide by 7 inches long. It is sturdy so the window seat will not be vulnerable to accidental breakage over the years, sticking out the way it does!
It is screwed to the supports that it sits on
(I will glue it permanently when it is all finished)
and the supports themselves might not be entirely level or even.
I am allowing that over the many hundred years of its life,
it has probably sagged somewhat!
The structure from the interior will not show
the patched pieces once the trim is all in place.
And all the trim needs to be added to
the window seat before I attach it...
starting with the narrow scrap of ceiling
which is another serendipitous scrap!
It is meant to be the roof (with overhanging eaves)
of the window alcove for the Sugar-plum Cottage kit,
and fits just perfectly into the
expanded size of the Window Seat alcove!
Not a sliver of altering needed!
But it also must first be painted...
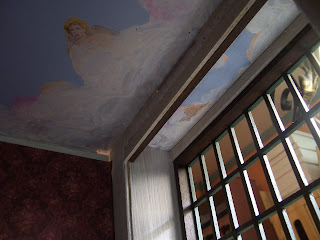
With a sleeping cherub among the billowing clouds.
As always, it takes many layers to make it look right.
This one will be difficult to see...
This is as close as we will ever get!
Because the ceiling of the window seat is
tucked behind the supporting wall beam...
And there will be the gilded ceiling trim blocking the view...
And we will have to crane our necks to even get a glimpse...
But we will know he is there...
asleep on his cloud pillow!
The gilded trim needs to be fit...
but not attached until the wallpaper is attached.
Which requires that we get the whole end wall glued in place
so the wallpaper pattern can match as well as is possible!
No, the pattern does not match perfectly!
I am using up scraps in this build...
and argue that the discrepancies will be attributed
to renovations made later.... or something like that!
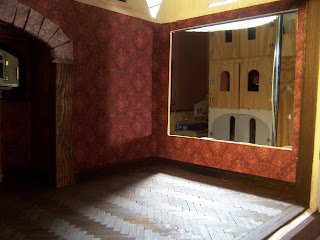
And... Oh look! The baseboards have even been added!
And wallpaper on the sides of the window seat...
so we can glue the gilded ceiling trim in place!
The window seat will have trim around
all the edges once it is glued in place.
And I am using a very fine scrap of wood veneer
(that came with the Willowcrest kit
for making the mansard roof curved sides...)
to cover the back and surface of the window seat itself,
because I don't want to add any thickness to the seat.
It is already high enough!
Here you can see my trusty high tech clamps in action
holding the side panel in place while the glue dries.
The seat surface cannot be added until the window seat
alcove is firmly attached to the supports and those screws filled in!
Here I am testing it in place... not firmly attached yet!
First I must figure out how the ceiling of the room will "tab" into place
if all four walls are glued and have no "flex"
because of all the firmly glued alcoves....!
For the moment I have left one side of the end wall
not yet glued to the support post...
so it can be flexed as needed for the ceiling tab.
So you can see, Dear Readers,
it is a bit of a Twisty Tale...
Figuring out how all the parts fit together...
but I am making good progress!


Dear Betsy, I was sure you would fix this problem of gaps between the bay window and the dollhouse. Just, and not only, because you're one of the best at solving of this sort of things, but what it pity it did happen. And probably it is as you said: the house and alcove has sagged away somewhat over the hundred years of its excistance, after all almost everything is possible in mini ;).
ReplyDeleteI love that you "extended" the ceiling a bit more to the alcove, by painting another stunning, naughty cherub, who is looking over the edge. Oh Betsy, you are such a talented painter for painting these fantastic cherubs on your (both) ceilings. And even one we can't see anymore afterwards, which is such a pity ;).
By adding the alcove this room is even more prettier than it already was without it. You made good progress indeed in figuring out how all of the parts will fit in, much better than I do in my farmhouse ;). Although I also made some progress......okay, only a little bit progress *LOL*.
Take care, and keep making minis, dear Betsy!
Hugs, Ilona
Dear Betsy,
ReplyDeleteYou have masterfully resolved all of the issues that rear their ugly heads when bashing structures together and using up spare parts! That must feel like a major victory, especially when it comes out looking as lovely and charming as it has! I love the idea of lying down on the window seat to catch forty winks in the sunlight, looking up and realizing that you will be watched over by an adorable cherub! I can't imagine anything better! This build just keeps getting better and better with every detail! Good luck with the tabs and flex! I hope you only have to wrestle with it one time, and I can't wait to see the results!
You have mastered the art of Kitbashing 10X's over Betsy!
ReplyDeleteThe window seat looks Smashing and I LOVE the sky painted ceiling and the look of all the trims- SO GOOD!
elizabeth
Dear Betsy,
ReplyDeleteYou certainly justify the saying "where there is a will there is a way".
The paintings on both ceilings are very beautiful and the window seat is stunning.
fantastic work!
Hugs, Drora
Wow! You're taking waste not want not to a whole new level. It looks wonderful. Poor Cherub, the trim almost hides him away. Maybe he's shy.
ReplyDeleteUn gran trabajo.
ReplyDeleteWe have a saying in the language of Northern Germany which is Low German (a language of its own and not a dialect): "Beten scheef het gott leef". It means God appreciates it when it's not plain and even. ;O) Being the master builder that you are you managed in an impressive way to fill and cover those gaps that came along form using the materials you had at hand for your kit-bashing. And in the end - it's an old house with an own history - a little rescue touch here and a band aid there just adds to the character. And the good thing is that in your projects all of this comes along looking so good that there can't be any doubt that it was always meant to be this way right from the beginning.
ReplyDeleteIt's always amazing what difference a bit of trim makes, the room looks stunning now. And the little sleeping cherub is just the cherry on the cream. At first I was wondering why he is sleeping - but now that I know he's living a more private life than his buddies I can understand why he prefers to sleep on a cloud. I even kind of envy him... and let's not forget we all will always know he's there... right there over the golden trim. You've made wonderful progress - and as always I can't wait to see more!
Hugs
Birgit
Oh well - "real" houses are never quite square. Pat had to shim up the head of Nancy's bed because her house sinks gently down toward the east, down the long hallway to her bedroom.
ReplyDeleteLove, Mom