Monday, January 31, 2022

Going For The Gold...


 Step By Step...

It's Been a while, Dear Readers, but Some of you might remember way last spring when I was starting to work on the ceiling trim of the second floor room in the Dollmaker's Studio project. I wanted to create an ornate, gilded floral swagged Rococo border to accompany the cherub painted ceiling. I began to construct the corner sections first and had assembled and painted many of the pieces when summer arrived and the Castle painting became my central focus. You would be forgiven if you thought I had abandoned this project! (It became buried under the pieces of "rock" I was needing for the Castle...)! But as often happens with my projects, this was really because I had become unsure of how to make a part I needed for this ceiling trim. I wanted to add some leafy sprays of foliage that would counterbalance the downward sweep of the swags... but I could not find leaves that would suit my purposes. At any rate, I had temporarily taped a few of the "swags" into position and there they stayed until I unearthed the pieces a week ago. I decided that at least I could attach the pieces I had already finished and then it might be easier to see what was still needed! So I began gluing the swags to the gold painted cornice trim... one piece at a time, being careful to not get glue onto the wallpaper.

The ceiling cornice is not yet glued in place 
which means it easily falls out of position...
but it is necessary to attach the swags while it is in place
 so they hang correctly against the wall.
The ends of the gold ribbon are glued down afterwards, 
leaving one of the corner sides unattached 
until the final gluing will be done.
I know, it is complicated!


And, of course, the wall is irregular because of the stone archway,
 so the different pieces need to be carefully fitted around the arch.


Each swag is slightly different anyway, 
because I wanted it to feel loose and carefree
 rather than too structured. 
Rococo design is dependent on
 asymmetrical flowing forms.
It was night time and dark, so the flash is necessary.
 
 
Here you can see it in the clear morning light!
But I wanted to see how it would look with the painted ceiling in place.
 

Without the flash, it is impossible to see it well enough.
 

And with the flash...!
It is starting to feel like I hoped it would... 
except for the missing leafy parts... 
Which I have been experimenting on
 making from plastic pieces and paper pieces.


Here I am testing some foliage....
 without the flash...


And with the flash.
I have added a few of the heavier plastic pieces
 in between the swags,
 but this is just testing, not glued in place.
And a few of the paper pieces
 peeking over the top against the ceiling. 
They need to support the illusion
 that there is sky above the gilded trim!
 
As you can see, Dear Readers,
I still have a ways to go before 
I can really glue it all in place!
But I am making some progress!
Step by step... Going for the Gold!


Wednesday, January 19, 2022

Another Little Thing...


 Not Quite Done...

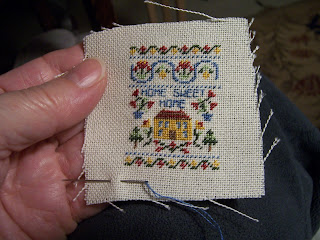
As you Might know, Dear Readers, I have spent a Lot of time during these Covid years soothing myself by stitching tiny things. I usually take pictures of my progress so I can show the steady development of each project. But I am shocked to discover I can't find any pictures of the making of this little Sampler! Why would I neglect to take pictures? Or remember when it was that I was working on this? I can only plead the usual Covid problems of stress and anxiety and disruption of normal habits. So, I am sorry to say I can't show you the development of this lovely little project. It is another one of Janet Granger's kits, and it was quick to stitch. Perhaps that is why I didn't take pictures! Above you can see the nearly completed piece of stitching. It sat in my sewing box for a long time and since I am trying to finish these little things, I pulled it out, ready to put it in the frame that is part of the kit. But then I realized that I had always felt that the windows of the house were a bit too "empty" feeling as the kit left them bare with no curtains showing. In the above picture you see only one of them still empty... I remembered to take a picture at the last possible minute! Just imagine all the windows empty... and perhaps you can see why I wanted to add that detail.

I did manage to find the kit package
 to show the house with blank windows!
 
And here it is with the final window curtains stitched.
I think it looks so much more... inhabited!
 
And I didn't take the step of putting it in the frame yet
 because I decided I wanted to paint the frame
 and not leave it the stained wood color.
 
And that's all I have to show, Dear Readers, 
Just another Little Thing not Quite done!
 

Monday, January 10, 2022

Finishing Things....


The Christmas Card and More...

Well, Here it is, Dear Readers, the Christmas Card at last! You might not be too surprised at the subject matter.... but the perspective, or point of view, might not look familiar! It is one that I noticed while I had the Castle pulled all apart to paint the back side last summer. The only way to see this view when the Castle sections are standing together, is to stick your head all the way inside the Guard Room and crane your neck to the left and look into the Great Hall through the "entrance" doors.... as if you were a tiny person walking into the room. Even a camera put in through the doorway has a hard time getting a good picture of this perspective! But being a Dreamer who is clearly obsessed with this Medieval experience.... I want to feel like I am walking into this Grand Medieval Hall with the soaring ceiling painted with portraits of Saints! And thus we have this rendition. I did finish the drawing on January 2nd, but could not get it printed for several more days because the Covid surge has caused many local businesses to be drastically under-staffed. I am sure you have all experienced this, and certainly, a late Card needing printing is not an emergency! As for the other "finished" items I referred to in my header.... there are not many! I have stitched many tiny items in the past two years, and the minute the stitching was done on each, I started another one, leaving the "finishing" for later!

Remember this cushion?
I finally decided I needed to actually finish it!


Here it is with the carpet for size reference.
The carpet is on 18 count canvas cloth,
 the cushion is on 40 count silk!


The backing is a faux suede in dark blue.
The stitching together is simply overcast stitches all around
 with a single strand of the floss. No turning required.
I stuffed it with small beads.


Here it is in The Lovely Old Dollhouse living room.
And that is all I have "finished" so far, Dear Readers,
but there is a long list of tiny things waiting their turn.
Perhaps I will get many things finished this year!
 
I hope you are all staying well, Dear Readers,
 and maybe even getting a few mini things finished too!


Saturday, January 1, 2022

New Year....


Same Old Story....

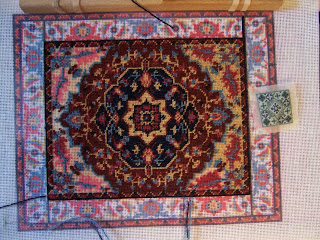
I must confess, Dear Readers, it is a New Year, but there is not much that is New to show in my Mini Worlds! Above you can see where I left off stitching the carpet at Thanksgiving time. I am eagerly looking forward to getting back to the stitching, and all the other mini projects.... but I must first finish The Christmas Card drawing! I am nearly done. I have been working on it diligently for hours and hours every day (this is not a bad thing as I Love to paint!) but the drawing is complex and cannot be rushed. And I am scheduled to go back to work on Monday morning... so my window of creative opportunity is coming to an end. Nevertheless, I wanted to take a minute to wish you all A Happy and Creative New Year! And now I will rush back to my painting.... still not finished but getting close! I Hope you are all enjoying the Holiday and Dreaming of a Wonderful Creative Year ahead!

Happy New Year!

(Even if it is the Same old story!)