Monday, August 26, 2019

Endless Summer.....


The Beginning Of The End.....

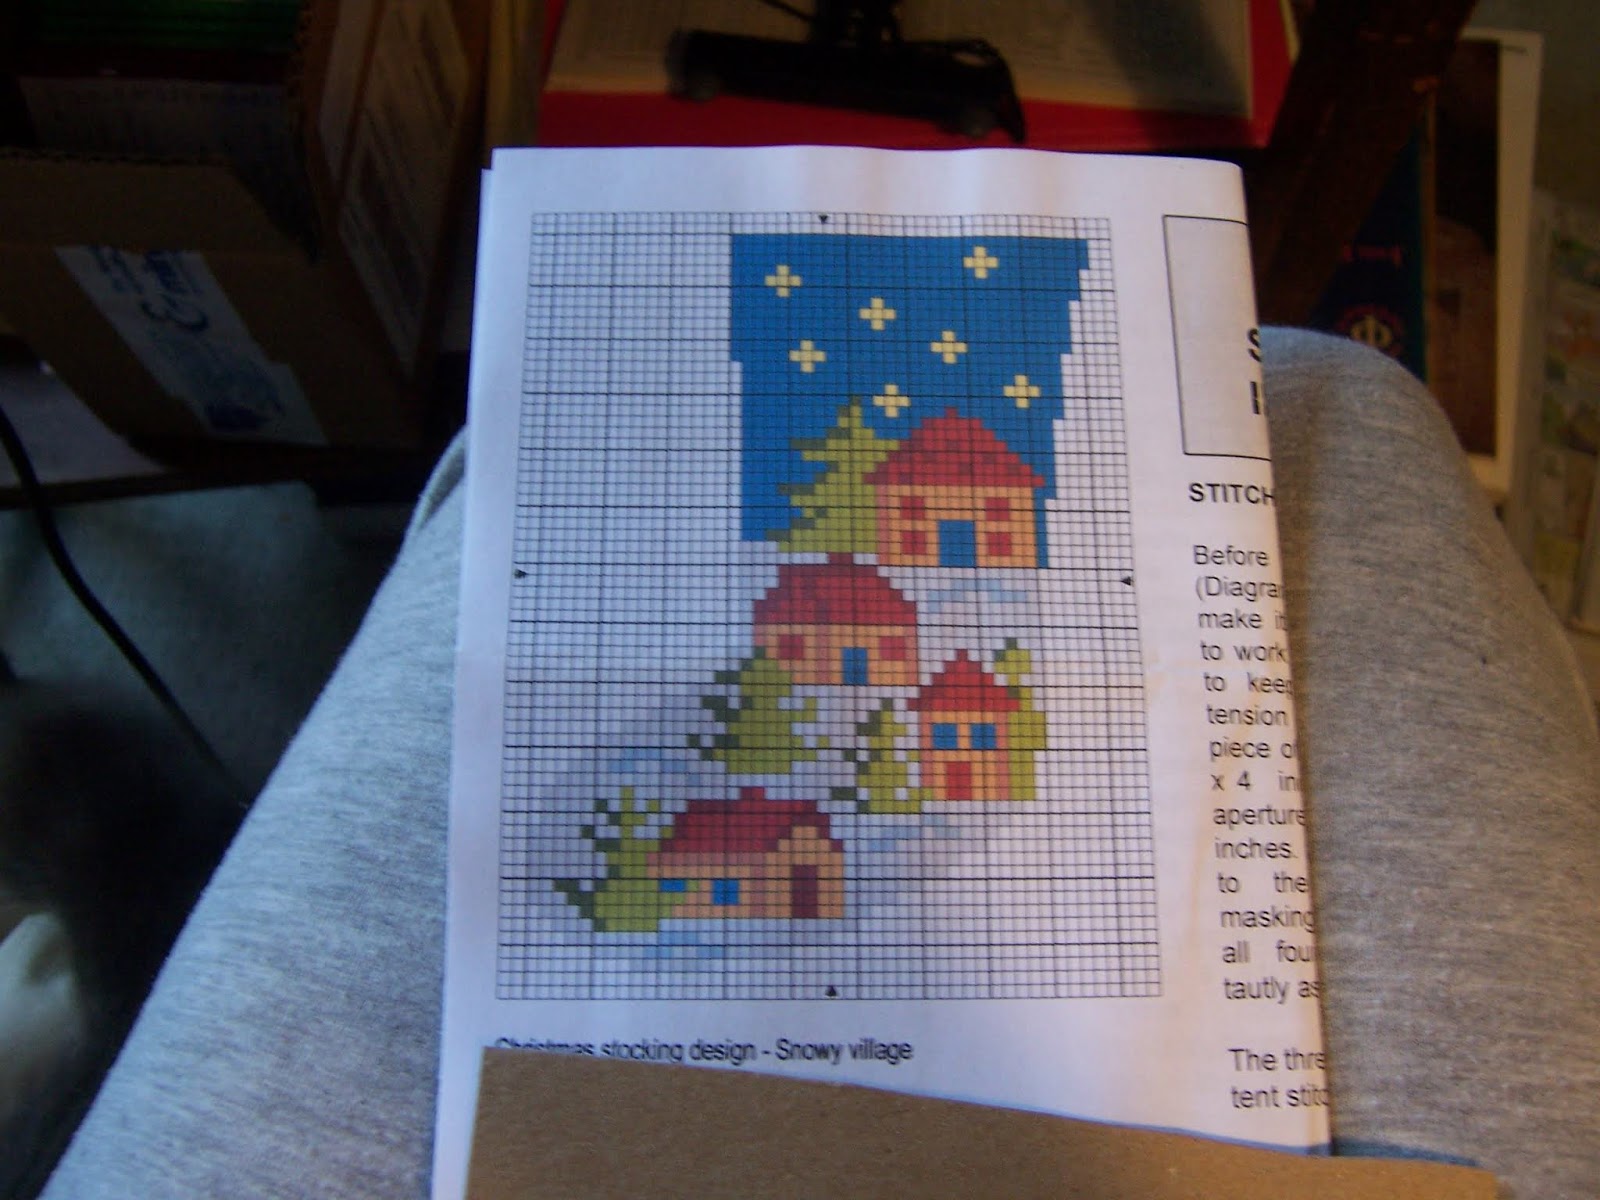
I am Keenly aware, Dear Readers, that the Summer is drawing to a close. The School year is starting, the nights are getting longer and alarmingly chilly, and the deadline for my personal goal of completing the Summer Lilac Shrub is nearly upon us! And what better way to understand this Seasonal Shift, than to be stitching on a Tiny Christmas Stocking? The very essence of cold Winter to come is embodied in the Starry Winter Night! As you can see in the above picture, I have finished stitching the blue sky. I have made one artistic alteration to the original design, in that I have left a little bit of snowy "ground" behind the topmost house and tree, rather than have it terminate at the foundation as in the instructions.

I think my adjustment makes it feel
 a little more three-dimensional,
 and  tiny bit cozier too!
Now all I have left to stitch is the
 endless expanse of cold white snow! 

And as for the Summer Lilac Shrub and the
 Endless application of leaves and leafy stems... 
I did complete another batch of ten leafy stems.... but only barely!
I ran into a problem with the paint.
I have been using one tube of the chosen Chromium Oxide Green
 for all the lilac leaves and have been running low on the paint.
I have been trying not to switch to a new tube
 because I was concerned that the pigment would not match exactly
 and would be noticeable on the shrub.
But the tube is really nearly empty,
 so I finally pulled out the new tube.
 It is not the same brand but is the same "pigment". 
Yes, I can see a difference in the new paint....

The new paint is the green blob at the lower right,
 it overlaps the small patch of the original green paint... 
and I can clearly see a difference.
But I thought I had better give it a try....
 
I could tell it was not going to work at all!
 It has a much less opaque quality... 
leaving streaks of the paper showing through on the leaves.

Here is a comparison of the regular paint on the leaves.... 
no streaks and a lovely dense coverage.
(Yes, the paint I have been using is of a higher quality....
 I will need to get more!)
But could I squeeze any more out of the tube.... 
just to complete this batch of leaves?

Oh, the Drama....!

I dug into the cap with my brush, 
and into the pinched tube as well....
 gathering enough paint to finish this batch..... 
and maybe even next week's too.......?

Here are this week's at any rate... waiting to be shaped and glued....

And I did manage to attach about fifteen more leafy stems... 
or was it twenty......
You can see the improvement to the shrub.
 But the left hand side still needs a lot more added!
(Hence the Endless part of this summer....!)

And lest we be the only ones who are feeling the Chilly air and the change of the Seasons, you might be happy to see that Daphne and Renee had decided to show Grandpere the quilt they were making, even though it was still so incomplete.

"Grandpere..." said Renee earnestly
 "It is to keep you warm when we go to the Park!"

"Ah...!" replied Grandpere.
He really thought he had never seen anything so Beautiful...
 but could not find the words.
 
 
"Madamoiselle O'Malley says we can use it today
 when we go..." added Renee excitedly.
"Can we go now..." she added?

He could deny her nothing.... so off they went.
It was a chilly and overcast morning....

I should have worn a jacket... thought Daphne....
 and found a sweater for Renee!
(She was still getting used to this thinking of the child's needs...!)

But Renee did not notice, she only wanted to play with her friends the birds!

Daphne wheeled Grandpere closer so he could watch...

What was it about those birds that fascinated her so?

Perhaps it was the same fascination as he felt watching her....
She was so young and quick and Alive!

She grabbed the bread and threw it again and again....
The birds did not mind!

She is so young.... thought Grandpere.
And growing so fast...
 soon it would be time for her to go to school....

She is so Beautiful... thought Daphne....
 I could watch her Forever and never get tired!

"School..." said Grandpere suddenly.
No! thought Daphne..... 
She is not ready... 
I am not ready....! 
Although she did not speak aloud...
 it was not hers to decide.
But perhaps there would still be some Time,
 Dear Readers, before that came to pass.
We are, after all, talking about Endless Summer.... 
even though we know that such can never be,
 and is perhaps already Truly
 The beginning of the End!


Monday, August 19, 2019

Paint While The Glue Dries.....


And Glue While The Paint Dries....

You Will think it silly Dear Readers, that I had forgotten how Slow going it was to attach the leafy stems to the Lilac shrub! You might remember that I had to attach so many leaves to the twigs that were already part of the shrub and then paint them and then shape them before I could even begin to attach the "regular" leafy stems to the shrub, and I simply assumed it would be easier and faster with the already constructed "leafy stems"! I was forgetting about waiting for the glue to dry. In the above picture you can see the shrub with all the attached leaves "shaped" correctly. It lets you see how bare the branches really are.... how much room there is that needs to be filled with the leafy stems. I have already attached about fifteen more stems to this shrub... all on the right side... I am not sure it is enough. I have made about sixty leafy stems so far in my ten stems per week regimen..... (on top of the fifty stems already on the shrub)... I don't think it will be enough!

At least I can "shape" the leafy stems much faster this way....
The above stem has been "shaped" on the left half
but not on the right.

Here you can see some of the "leafy stems" being glued on.....
 Just look for the large blobs of white glue... 
that is what has to dry completely before it can be painted over.
And because the stems have to be inserted around all the other leafy stems... 
I can only attach so many at once or they get
 knocked around too much while they are drying...
And the glue dries slowly in humid weather!
 

So while the glue dries... I paint the next batch of ten leafy stems!

Which takes a couple of hours altogether...

By which time the glued spots will have dried.
Above you can see a branch with a newly dry glue join
 (the stem on the right side)
Which looks too glossy and too much like a glued wire... 
so it needs to be painted over...
And I need to be able to keep track of all the newly dried stems
 so I don't forget to paint over the join!
It's complicated!

Here is a closer shot of the joined stem after it has been painted over...
it looks less glossy and a little more like the branch (I hope!).

So you can see Dear Readers, it is Slow Going...
Painting while the glue is drying and gluing while the paint is drying!

But I did manage to add a few stitches
 to the Starry Night Stocking!
And It Too is slow going! 
(Even though it has Nothing to do with Glue or Paint!) 


Monday, August 12, 2019

Progress....!


It's the Little Things.....

After enjoying the visit with my son So much, Dear Readers, it was Difficult to see him go home! But my consolation is having my small studio back... it serves as the guest room from time to time... and so I was able to sit by the window and add a few stitches to the little petit-point stocking as you can see in the above picture. The pale blue snow drifts are almost invisible, but the stars and the beginning of the night sky are easily seen. I think I am going to adore this tiny stocking! And while I was trying to put my house back to "normal" (which really means dollhouse projects Everywhere!) I decided to paint the primer coats on the ground floor of the Dollmaker's Studio.

I have realized that I really need to get the ground floor structure
 completely set up before I can make the first floor section, 
the Sugarplum kit section fit securely to the lower part.
I am planning for the lower section to be mostly "stone"....
 meaning egg-carton stones most likely... 
and the upper section will probably have a half-timbered exterior.
Here you can see I am adding the primer coats to the lower section interior.

And the exterior too.


Then I painted the exterior a dark gray base coat. 
This is so that when I add the egg carton stones, 
the spaces that show between them will be a dark color. 
I know from experience how important this step is!
It is impossible to get the dark paint into all those cracks afterwards!

I am planning to make the floor stone as well, 
hence the gray paint there and around the doors and
 windows where the stone framing would show.


I am planning to have paneling on the walls
 and wooden beams overhead supporting the floor above.

And lest you think I was ignoring my
 Leaf-making responsibilities, Dear Readers,
 here you can see the Ten leafy stems for this week!

 
And I was all set to begin attaching some of these stems to the shrub
 when I remembered that all the ones that have already been attached
 need to have their leaves "shaped" before I can add any more stems!

This is what the shrub looks like 
before the leaves are "shaped" properly.
It is a complete mess!
 In a real shrub the leaves are all
 pointing their flat tops to the sun
 (little solar panels that they are!)
and are spaced evenly to fill all the gaps 
where the sun comes in.... 
and are all growing "upward" on the stems!
And they have a crease down the middle too....

If you look carefully at the leaves on the lower left
 you can see they are creased and are growing "upward" on their stems.... 
not just sticking out straight to the side of the stem!

This is a slow process....
 I manage to arrange about half of them....

You might not be able to see the difference, 
but the stems on the upper right side have been "shaped".
It makes for a much more orderly arrangement of the leaves.
It makes it easier to see where the new stems are needed... 
and will make it easier to add those stems.... 
once I have shaped all the leaves that are already attached!

And I even managed to do a little more stitching on the stocking!

Although I think I counted wrong somewhere
 between the stars and the roofs...
But I think it won't matter in the end.

So you can see I made Progress, Dear Readers, 
Even if it was all just Little Things!


Thursday, August 8, 2019

Too Little Time....


Two Little Things...

I have had next to No Time for Minis lately, Dear Readers, which only causes me to Dream about them even more than usual, and then the Dreams lead me to grasp at any Tiny little project which might be able to fit into the spare minutes and empty corners of my busy life, and so you can see I have Finally cut out a few more Quilt squares for Daphne and Renee's Quilt! Did you think I had Forgotten that they are making a quilt for Grandpere? I dug through my boxes of fabric and found the finest cottons with the smallest patterns and spent a pleasant hour cutting tiny one inch squares. These are mostly scraps of Liberty cottons from which my former Mother-in-law had all her dresses sewn many many years ago.

Because I was working with pieces that did not
 necessarily "go together" well, 
I laid them out in what I thought was
 the best possible arrangement
 and began to stitch the squares together.
This was going to be a very "make-shift" quilt after all!

You can see the first twelve squares are sewn on the right....
and you can see how much the size is reduced by the seams. 

It was so enjoyable to sit and stitch tiny pieces of fabric
 while visiting with my Younger son
 who has not been home in quite a few years!

Here is a view of the reverse side with the seams pressed open.

When I had assembled two sets of twelve,
 I decided to reverse the pattern when stitching them together. 
I think it looks more interesting to not repeat exactly.

Here you can see them close-up.
I am really liking how these fabrics are working together after all!
 
 
And the other little thing I got done was
 the Ten Leafy Stems for the Summer Lilac shrub.
Because I would not Dream of skipping them!
But I did not have time to begin to attach them all to the shrub.
And that was all I managed to make
 last week, Dear Readers,
Two Little things and 
Way too little Time!


Wednesday, July 31, 2019

Three Little Things.....


Depending On How You Count....

As With most kits, Dear Readers, this alcove is made up of many layered pieces that must be punched out and glued together to achieve the desired results. Above you can see the front wall of the Alcove being glued to the main section. I am trying to not get too far ahead of myself with attaching all the pieces only to discover that I should have attached the wall paper or at least added primer to all the wood before I glued it together. And I also need to make a decision about how much of the floor I will be able to incorporate into the Sugarplum design... and then make the appropriate cuts. Along with that decision is the need to re-design the little shelf brackets that are supposed to flank the opening of the Alcove, but might not work where I am putting it in the Sugarplum kit. But at least the front opening arch, which is supposed to resemble a Stone archway, will be used as designed for the kit. I did manage to punch out the little support pieces and the stone arch itself and glued them together.


Here you can see the pieces for the arch attached.
The alcove is supposed to have little angled "wings" 
off the sides where the little shelves attach. 
I am not using the "wings" so I may have to redesign
 the little shelves to fit against a straight wall.
And because my weekend was busy with Family visits
 I did not get anything else accomplished on the Dollmaker's Studio!

But the second little thing I wanted to show you, Dear Readers,
 is another Tiny project I am trying to complete, 
which I started way last Fall!

This is going to be a Christmas Stocking done in Petit-point stitching.
 It is a kit by Janet Granger and will be a little village
 of houses under a starry night when it is done!

Here is what the pattern looks like.
I have only made one serious mistake so far...
 and it was not one I could undo, 
but it was not desperately bad either.
 I will leave you to see if you can spot it!

Here you can see I have added more of the trees....

And then the darker green shadow color.
And that is as far as I got
 before the Family visit demanded my attention.

And the Third little thing is
 the weekly Ten Leafy Stems that I completed!
I have decided that I need to attach them as I go from now on,
 so I can better estimate how many I will actually need to make.

So there you have it, Dear Readers, 
Three Little Things I managed to do on a busy Weekend! 
(Depending on how you are counting, that is!)


Monday, July 22, 2019

A Little More Progress....


Sugarplum Structure Changes.....

You Might recall, Dear Readers, that I am raising the height of the ceiling in the second floor of The Sugarplum Dollmaker's Studio by lowering the floor level, causing the bottom one and one half inches of the walls to be formed by the plywood structure I built from scratch. In order for the door openings and the alcove openings to begin at the new floor level, I had to cut away the openings in the plywood to correspond with the openings formed by the kit. Above you can see that I have done that, making the openings for (from the left hand wall) the fireplace, the Tower stairs door, the Alcove, and the door to the Balcony at the right side. We won't consider that this would have been easier to cut if I had made the cuts before I glued the base together...! At least this way I could perch the Sugarplum kit on top of the new base and make sure the openings were in the right place!


You can see here that I still have to cut away the bottom sections 
of the Sugarplum kit where the openings are....
 as well as add the door to the stair Tower 
at the second and third floor level.

 
Here I have cut away the lower portions of the kit....
 and added the floor so you can see how they go together.
The Balcony porch will be one small step up from the floor level.
And I have placed the Alcove in its opening
 as well as cut the Tower stairs door.
(The more I cut away the Sugarplum kit pieces,
 the harder it is to keep it standing up!)

Here I have added the second floor ceiling
 to get a better sense of the dimensions of the room.

 
Here you can sort of see both floors....
I know my photos are too dark.... 
It was a blisteringly Hot weekend here, Dear Readers,
 with temps in the high 90's both days, 
so I was staying indoors with my shades closed
 trying to keep cool!

 
This is a view of the structural support I am adding 
where the Stair Tower will connect to the main part of the house.....

Glued and screwed to the base wall...
It will make the connection much more durable
 and will stabilize the second floor kit where it sits on the base.

Oh, and you can see where I decided
 there just Had to be a small window in the back wall.
(Again, this would have been So much easier to cut
 before the walls were assembled!)

Here you can see I have patched the top of the door
 to the Balcony where it was too tall once the floor was lowered.

 
And I started to build the Fireplace for the Ground floor room.

As usual, it doesn't seem like much was accomplished,
 but quite a few little steps got done.

 
And yes, I Did complete my Weekly ten leafy stems
 for the Summer Lilac shrub!

Between those stems and
 the Sugarplum Structure changes, Dear Readers,
I think I made a Good bit of Progress!