Wednesday, March 30, 2022

Stitches And Stones...


Slow Going...

I Managed to find the time, Dear Readers, to take the carpet off the frame so I could finish stitching the edges. The long sides are finished by folding under a half inch of the fabric and stitching a binding stitch with a double thickness of the thread. You can see the beginning above. I am happy to be able to report that I had enough of the dark blue thread for both the long sides! I probably could have also done the short ends this way, but I wanted them to have a fringed edge instead. The fringe thread did not come as part of this antique kit... so I scrounged from the remains of a couple of other kits I have made.

Here you can see I have just begun the fringe along one end. 
It is a very slow stitch to make!
And it uses an enormous quantity of thread. 
A three foot length makes about an inch of fringe!
But I know where to get more if I need it, so I am not worried!
So I will slowly, slowly be adding the fringes!

And as for the Stones I mentioned, you know how that goes!


This is the view of the Lord's Bedchamber
 as it was on Saturday morning with the sun shining in.
You can see the unpainted "rocks"
 that I am trying to fit to various places:
The seat below the window, 
the bottom steps by the stairs,
 and most particularly, the "rocks" in the gap
 between the upper stairs and the chimney frame.
I am using small blocks of wood and cutting them to fit...
 then painting them and then gluing them in place.
 Yes, it is slow going.


The first step was to remove all the parts that were not yet glued in place!
Then glue the ones I was sure were correctly fitted... 
and then paint them with primer....


And then the first coat of gray paint...


And then add back in (temporarily for fitting purposes)
 the Hearth and the Door to the stairs...
So I could begin to glue the parts on the other side of the hearth.
The hearth is still removable as it is not finished yet.


The corner on the left needed to have it's post "strengthened"
(you might recall this being done on lower levels last year....)
And because it was an "afterthought",
 I had to carve away some of the window trim to fit the new post!


Yes, I have had to use the flash...
 it has become a dark and stormy Sunday
 and impossible to see in here!
The new post is snug against the original post...
 and now two more sections will be added to make it "square"...
 

I only painted the sides that would show...

Here all the new sections have been added. 

The grout lines will need to be painted.

That whole corner will have a seat across the side wall.
And I have to figure out how to make the ceiling arch inward... 
at the right angles to look like a vaulted ceiling...
 

No, not all of it is glued in place! 
But there are a few more pieces painted than there were last week!
So you can see, Dear Readers, 
Whether it is stitches or stones....
It is slow going!


Tuesday, March 22, 2022

Threads of a Different Color...


Stitching....

It has been a while, Dear Readers, since I showed you any progress on the beautiful antique carpet project. Above you can see the borders nearly completed. I was only about half way through stitching this project when I began to be worried that I would not have enough thread, especially of the dark maroon and the brighter red. So I began to be very careful how I stitched the patterns, wasting as little thread as possible, stitching down to the very tiniest ends possible of my threads, even not using knots but just pulling the thread carefully to the end before stitching back over a few stitches... all in the hopes that I would not run out of thread with only ten stitches left in the end! With the dark maroon there were a couple of places where the pattern needed three stitches of maroon way across the border, which would waste an inch and a half of thread each time... so I left those for last, thinking that if I had enough thread in the end, I could add them later. I did not have enough of the maroon for those little bits, but I did, just barely get those narrow borders completed! There was about 1" of threat left over. I used the blue and yellow and changed the pattern in tiny ways to make up for the missing maroon stitches. But when it came to the brighter red, I was even more afraid of running out. And the border had those large areas (I think they are turtles) which needed to be all done with the same color... no substituting possible! Once again, I stitched so So carefully... even working the pattern symmetrically in from the outer edges...

I would see just how far the remaining red thread would go...


I would just be happy if there was enough to finish both the turtles!


Which, Thankfully, there was!
There was even enough to just finish the center turtle too.
But that was it.
I ran out of red and the pattern still had unstitched stitches
 that really Really needed to be red.
And it needed to be a wool thread. 
And close enough in color to maybe pass as "the" red...
Did I have anything like it left from any of my other stitching....?


Well, gosh... it looks awfully close! 
I maybe couldn't find a better one if I searched for ages...!


So I bravely stitched the rest of the pattern in this leftover thread!
I know it is not quite a perfect match...
But it works for me!


Then it was just a matter of finishing the background
 in that glorious midnight blue...
Which I am pretty sure I have enough of...


And yes, the border is done!
 And I hope (believe) I still have enough left
 to do the binding on the two long sides.
I plan to add the fringe to the short edges.
I am just so happy to be able to see this carpet nearly done... 
and at the same time, I really wish I had another like it to stitch...
 what a beautiful pattern!

And I also finished stitching the Elephant Tea Cozy, Dear Readers,
Another really fun kit from Janet Granger.


The elephant is the same on both sides except for his tail!


I just love his cheerful blanket.. or saddle...
and as I was finishing this, 
my eye caught on some threads I had bought a while ago,
 just on impulse... metallic embroidery threads in all colors of the rainbow!


And I wondered how it would look if I added
 a few glittering stitches on top of the stitched pattern...


Just in certain parts, over red stitches....
Can you even see the glittery effect in the upper elephant?


The upper one has the glitter thread added... the lower one doesn't...
But I like the effect, so I added it to the other one too!


Of course, glitter is hard to photograph.
You will have to take my word for it Dear Readers,
 it added a really fun sparkle to this Tea Cozy!
I have been having fun with these 
Threads of a Different Color!


Tuesday, March 15, 2022

Spring Snow....


Comes And Goes....

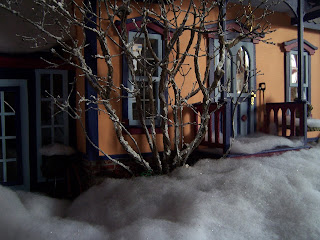
I suppose, Dear Readers, some of you might have Wondered whether there would be any snow falling on The Folly this year! After all, what was the point of spending all that time making Seasonal Lilac shrubs if one never puts them to use in Seasonal display? This winter has been rather inconsistent in this neck of the woods, with extremely warm weather in December, quite cold in January with almost no snow, some of Everything in February, and now a rapid series of storms that have both very warm rainy parts and very cold very windy snowy parts! Last week we got six inches of a heavy wet snow which was all melted two days later in time for rain and freezing rain.... suffice it to say we are ready for Spring! But all that snow reminded me that the Folly Lilac shrub had been neglected...

And Finally, it has snowed in mini blogland!
At this time of year it is challenging to get a well lit picture of the Folly.
It is still too dark in the morning as I head to work.
I had to wait for the weekend and hope for a sunny morning.
(And then remember to grab the camera at the right moments!)


Early morning.... before there are any footprints in the snow...
Before the shoveling commences...


As the light grows steadily stronger...


We can take a moment to admire that magnificent Lilac bush....


With every branch outlined in a Fresh Spring Snowfall!
Isn't that why I made the Seasonal Lilacs in the first place?


And here's the fresh snowfall on my RL garden....
 that reminded me I had neglected The Folly!
Spring snow, Dear Readers,
Comes and goes quickly!


Wednesday, March 9, 2022

Even Less....


 Tiny Progress...

Because Nothing is glued in place yet, Dear Readers, there is a constant need to fiddle and adjust each piece as I try to get the Tower Stairs constructed. Above you can see I tackled cutting the door frame and door and attaching the hinges. Yes, I hope you understand by now, how happy hinges make me! The door opens and closes! You can get a glimpse of those mysterious stairs when the door is even slightly open! But the upper section of the door wall needs to fit carefully under the top stairs, so I am fitting it separately after I get the door itself correctly positioned.

And because the whole back section of this room needs to be
 constructed along with the stairs so they all fit together properly,
 I have also been adding to the upper frame of the fireplace.
Of course, it is now a gloomy day and my pictures are dark.
 
And because you know by now that I am not just working on one project at a time...
 I have also been making some progress on the gilded trim
 for the cherub ceiling in the Dollmaker's Studio.


I realized a while ago that I was never going to make progress
 with the trim in place in the room,
 because I couldn't turn myself upside down to see it well enough. 
So I removed the ceiling and am testing the assembly
 with the ceiling upside down and the trim lying along the edges.
You can see the arrangement above, 
before I have made any changes to the trim.
(And showing only the two sides I have so far constructed.)


Seeing it that way made me realize
 I needed to glue down all the tail ends of the ribbons
 before I added anything else.
Which I am doing ribbon by ribbon in this picture.
You can also see the beginnings of a third section of trim,
 before it has been glued together and painted.


Here you can see I have attached some of the "leaves"
 between the ribbon swags...
These were the parts I could not wrestle with properly
 when it was in place... 
they just kept falling down!
They are now glued to the trim!


Here you can see I am testing some of the "flat leaves" 
that will peek over the top of the trim... 
hopefully adding to the illusion that there is sky above...
They have to be "flat"...
 because there is no sky above...
 there is a very flat ceiling with almost no room for them to fit at all!
I plan to enhance the illusion of "sky above"
 by adding a few painted leaves as well...
We shall see if that works when I get to it!

And speaking of painting...


I painted the "rocks" on the tower stairs wall,
 and also added the hardware to the door.
I did not get to the grout... 
and the flash shows all the unfinished parts.


And just a glimpse of the stairs when the door is left ajar!
(I just Love hinges! )

And that is all I have to show, Dear Readers,
Hardly anything at all... 
But it is Tiny progress!


Wednesday, March 2, 2022

Not A Lot...


 Little Progress...

I am Sure you will understand, Dear Readers, that after a long week of Vacation during which I could immerse myself in my many mini projects, an ordinary weekend feels like no time at all! Even when it was unexpectedly extended by a snow storm which kept me home from work, I seem to have almost nothing new to show you. And I am sure you know by now that I don't necessarily finish one project before I start another one.... yes, I am still stitching the beautiful carpet, but I also needed to start another of the kits I bought from Janet Granger way back when the covid shut-downs began. It is the Elephant tea cosy you see above. This is being a simple and fun stitching project! Yes, yes, I know I still have to sew together the last tea cosy kit I stitched.... the thatched cottage... (and a few other little stitching projects as well...) but I have it all ready to finish one day soon! And I just love to stitch these kit so much... it is an obsession.

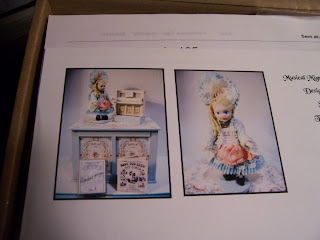
The only other new thing I have to show you is the kit I "gave" myself for a Birthday present...

It is another kit by Sandra Morris of Tower House Dolls...
The last kit I purchased from her,
The "Atelier de la Poupee"
 caused me to launch the Dollmaker's Studio project...!
As of now I don't have any grand plans for this one...
 but I cannot promise that it will end up
 looking exactly like the cover picture!
It is a porcelain doll with a tiny piano.... 
atop a box that conceals a music box that plays piano music!
She is supposed to be a mini "automaton" pretending to play music.
The very idea enchants me... 
so we will see what happens 
when I begin to assemble the parts!
So that's I all I have to show, Dear Readers,
Not a Lot of progress... 
But Tiny fun Projects!